The release process is defined in the release definition, which consists of
-
The underlying pipeline.
-
The applications to deploy (the payload).
-
The environments to which the applications are deployed.
-
Any runtime configuration the application requires, such as input parameters.
-
Notes entered team members, task assignees, and approvers.
-
Planned start and end dates for releases.
This section has examples of release definitions and shows how to define a release.
Example: Release Definition
Here is a typical release definition.
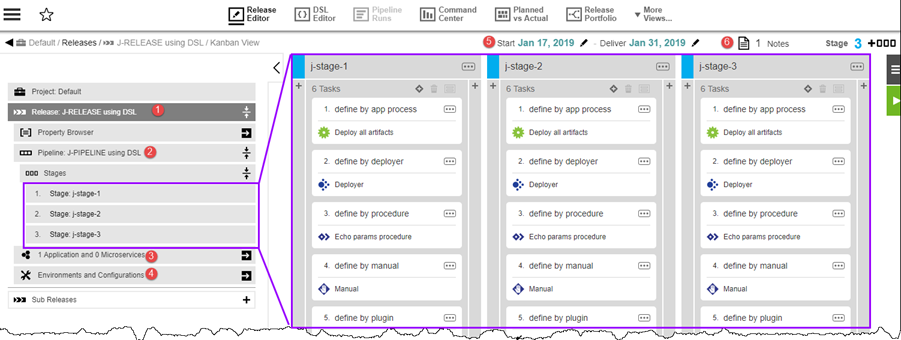
Of note:
1 |
It is called |
2 |
It is based on the pipeline named |
3 |
It defines one application and no microservices |
4 |
It defines environments into which the application is deployed and configures inputs to the application to be entered at runtime. |
5 |
Start and end dates of the release. |
6 |
One note is attached to this release. Notes can contain plain text and URLs. |
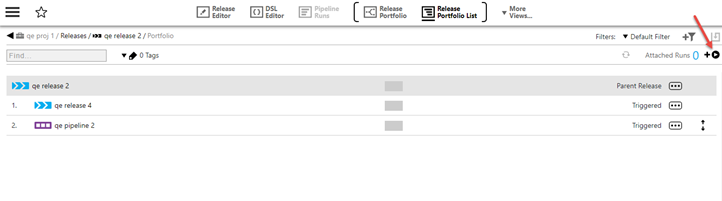
Example: Attaching a Pipeline Run to a Traditional Release Train
This example shows how to attach a pipeline run to an parent release. This is useful in environments with a release train model: one or more subordinate pipeline runs would like to independently join a parent release. Attach a pipeline run to a release via the release portfolio list.
-
Navigate to the releases list via Main Menu > Releases. Note that pipeline runs cannot be attached to completed releases.
-
For the release of interest, select Release Portfolio List from the Views pull down on the right. The releases’s portfolio list displays.
-
Click the Attach Pipeline icon near the upper right corner. The Attach Pipeline Run dialog displays with a list of pipeline runs eligible to be attached. Note that only top-level pipeline runs are eligible for attaching. Triggered pipeline runs or release runs are not eligible and won’t appear in the list.
-
Use the project and run status filters to narrow down the list of pipeline runs, select the one you wish to attach, and click OK.
-
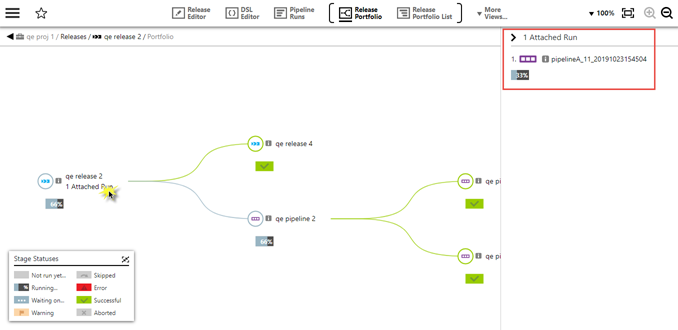
In the example below,
pipelineA_11_20191023154504is selected.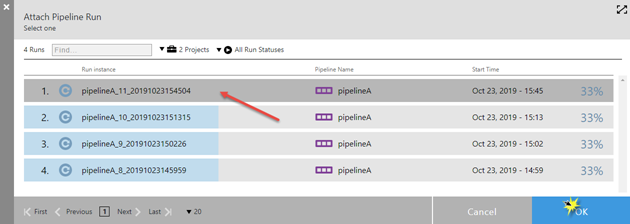
-
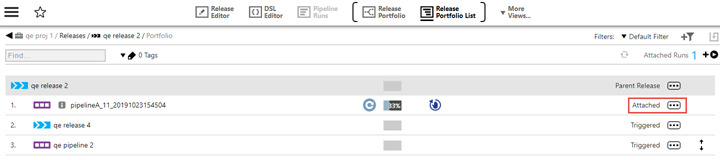
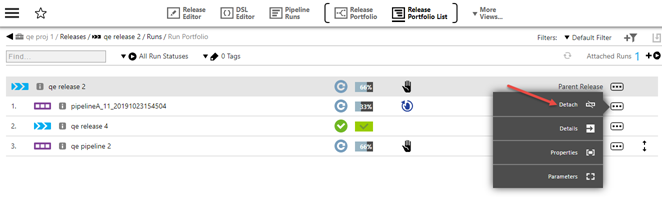
The Release Portfolio List displays again, this time showing the newly attached pipeline.
-
Open the Release Portfolio view. Click on 1 Attached Run to view information about it.
Detaching Pipeline Runs
Navigate to the release portfolio list view for the release of interest and select Detach from the pipeline run actions menu on the right. Note that pipeline runs cannot be detached after the release completes.
Example: Traditional Multiple Application Release
This example shows how to define a multiple application release. You can create a new release or copy an existing release.
A copy of a release is the same as the existing release with the following exceptions:
-
The status in the copy is set to
Release in planning. -
For start and end dates in the past, the start date and end date in the copy are set to the current date and two weeks later, respectively.
-
The actual start date and actual end date fields in the copy are cleared. This is because the release is in planning and has not started, and hence there is no end date.
The example in this section shows how to create a new release. To do so:
-
Navigate to the release dashboard.
-
In the Release dashboard, click New+ in the upper right corner to add a release. The New dialog box displays; click Create New.
-
In the New Release dialog box, enter the following:
-
Release name.
-
From the Select Project dropdown, pick the project.
-
Select Start with an Existing Pipeline.
-
Optionally, select start and end dates.
You can include hyperlinks as part of an object description for any CloudBees Flow object.
-
-
Click Next. The Select one dialog box with a list of pipelines appears.
-
Select Quarterly Online Banking Release Pipeline. The Next button is enabled because the applications in this pipeline have required inputs, as indicated by
 . This means that there are two required inputs to deploy the applications through this pipeline. If any input is a credential parameter, you can enter the path to the credential, browse to it, select the Parameter Credential or Credential binding, or select a user-defined credential that is attached to the project associated with the pipeline.
Enter the required inputs, and click OK.
If the applications did not have any required inputs, the OK button would be enabled instead.
-
The new release definition appears. Note that the hierarchy menu on the left side shows the pipeline that you selected. If the applications in the selected pipeline have inputs, a dialog box showing the inputs to the pipeline will be displayed.
-
If any input is a credential parameter, you can enter the path to the credential, browse to it, select the Parameter Credential or Credential binding, or select a user-defined credential that is attached to the project associated with the pipeline.
-
If any of required parameters do not have values, enter the appropriate values and click OK.
The Application field is now enabled in the Release Definition page.
-
-
Click Applications. The dialog box where you specify the applications to be deployed through the pipeline opens.
-
Select the applications that you want to deploy in the release, and then click the
 button to move them to the right side of the dialog box, which is the list of applications to be deployed through the pipeline.
Clicking
button moves the selected applications to the right side and displays the number of required parameters at run time and the application process to be deployed.It shows the list of available applications. The default is to show the applications for all projects.
If you want to see only the applications for a specific project, click the down arrow in the All projects field to select one or more projects one of these ways:
-
Click on the name of one or more projects.
-
Enter the search criteria in the Search field. The projects that match the criteria appear in the list.
You can also search for one or more applications by entering the search criteria in the Search field next to the All projects field. If there are no matches, a message appears stating that there are no applications in the selected projects.
-
Click < to set how you want the applications to be deployed during the release run.
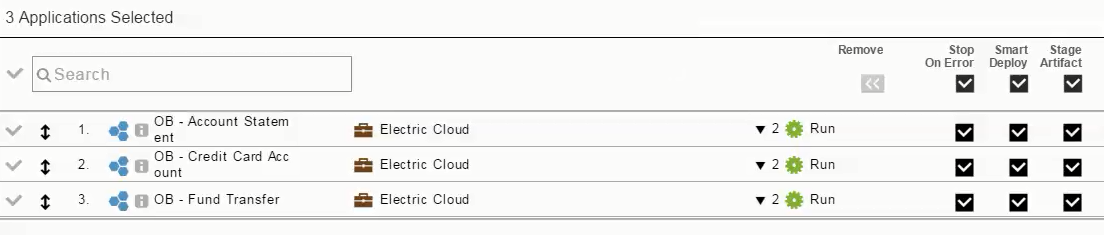
For each application, you can select these settings:
-
Stop on Error : Select this error handling setting to abort the release run when the deployer task fails. The default is Stop on Error. If the application fails, the release pipeline aborts.
When this setting is not selected (continue on error, which is similar to the Continue running option in a pipeline stage or gate), the deployer continues to the next application with a known error if the current application fails. This allows the release to continue running when an application run has errors and fails. For example, in a release with multiple applications, some applications can fail and not be deployed with other that were successfully deployed as delivered in the release.
-
Smart Deploy : Select this setting if you want the release to deploy the application only with artifacts that have not been deployed to a resource or with selected versions of the artifact have not been deployed to new resources since a previous run.
-
Stage Artifacts : Select this setting if you want the release to retrieve artifacts that will be deployed in an application run before the deployment starts.
In this example, all the settings are selected for the selected applications. The release will stop if any of the applications fails.
The default is that CloudBees Flow uses smart deploy to deploy the applications in the pipeline. If you want to use smart deploy for all the applications, you do not need to change the settings.
-
-
If the applications have snapshots, click the down arrow next to
 , and select a specific snapshot for each application, and click OK.
Using a snapshot as part of the release definition is a best practice. Using snapshots, you can lock the exact versions of the artifacts to be deployed, which provides consistency and predictability. But you do not have to select a specific snapshot for an application.
If a snapshot is not selected for an application here, the exact artifact versions to use would be based on how that application is modeled. That is, if the application model uses the latest artifact version for a component, the latest version would be used every time the release runs when a snapshot is not selected.
When the release runs, this list of applications (the payload) is passed to the deployer task in the pipeline, and the applications are deployed through the pipeline sequentially. You can change the order in which the applications will be deployed by reordering the application input in the payload.
-
Click Environments to select the where the applications in each stage will be deployed. The Environment selection dialog box opens.
Each cell in the table represents an environment where application in a stage is deployed.

When you mouse over the filter icons, the tool tip text appears, from left to right:
-
View only cells with missing environments.
-
View only cells with missing tier maps.
-
View only cells marked "N/A".
-
View only empty cells.
-
-
Select one or more cells in the table one of these ways:
-
For one cell (one application-stage combination)–You can select one cell by clicking in it. This allows you to select the environment for a specific application-stage combination.
-
For multiple cells (all the applications in a stage)–If the environment in a stage is the same for all the applications, you can select all the cells in a column (stage) by clicking in the header cell with the stage name.
After one or more cells is selected, the Fill button in the upper right corner is enabled.
-
-
Click the > button in the upper left corner of the dialog box. The Fill Environment Names section opens on the left side of the dialog box.
-
Select an environment using one of these options:
-
Select Environment –Click the down arrow to select an environment or environment template.
-
Clicking Select Environment opens the list of available environments in the Environments tab. These are static environments that are authored before deploying the application in the stage.
-
Clicking on the Templates tab opens a list of environment templates. These are dynamic environments with provisioned cloud resources that can be spun up during the application deployment. For more information about dynamic environments, see Modeling Dynamic Environments.
-
-
Name Pattern –Click ? for tips on how to specify environment names. The tips describe how to specify environment names using static text or a fill pattern.
-
N/A –Select this to not run the application in the stage. You should set environment mapping to N/A for stages where you do not want an active deployment even though the deployer is attached to a stage.
In this example, the
hc-store devenvironment is selected from the Environments list.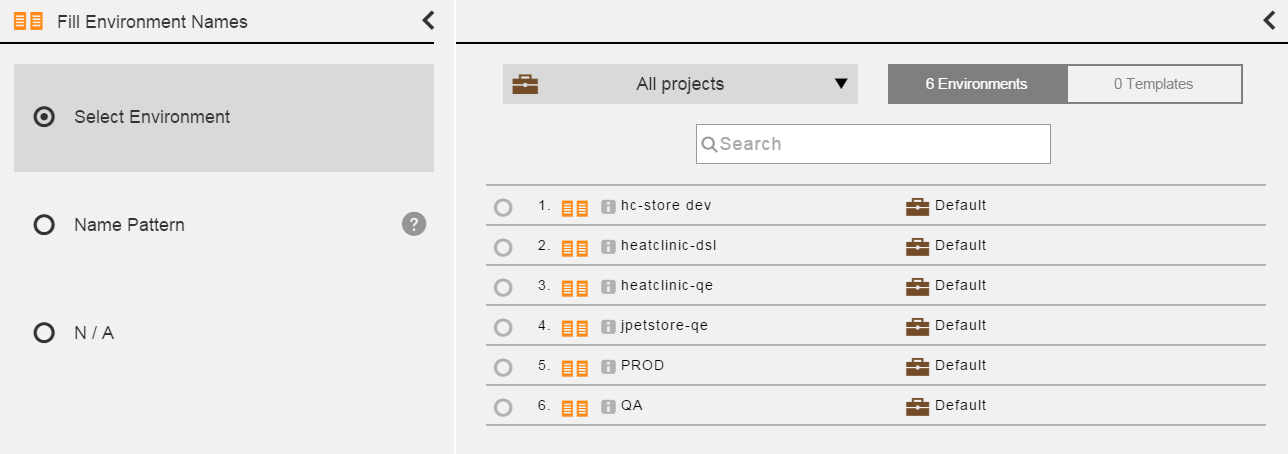
It shows the list of available environments. The default is to show the environments for all projects.
-
If you want to see only the environments for a specific project, click the down arrow in the All projects field to select one or more projects one of these ways:
-
Click on the name of one or more projects.
-
Enter the search criteria in the Search field. The projects that match the criteria appear in the list.
You can also search for one or more environments by entering the search criteria in the Search field next to the All projects field. If there are no matches, a message appears stating that there are no environments in the selected projects.
-
Click OK to close the Fill Environment Names section.
-
Click OK to save the settings.
-
Click Configurations to enter the inputs (parameters) for the applications in a stage.
If any of the required parameters have not been entered on one of the cells for an application in a stage, you see this:
 . You can enter the value for it now or at runtime.
 -
Click OK.
The next step is to run the release. See Running and Completing Releases to learn more about running and completing the release.
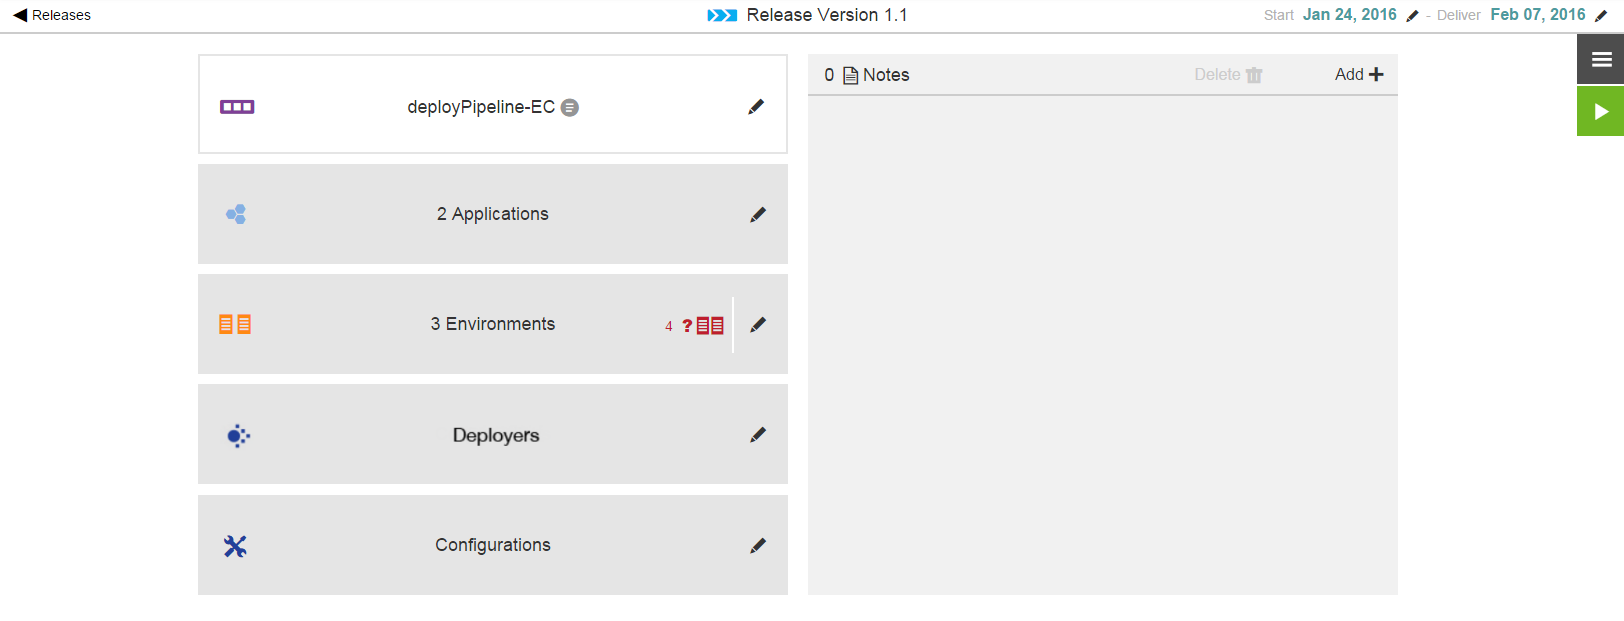
Example: Continuous Delivery Style Releases for One Application
This example shows that when you define a release, you do not have to enter all the details. However, any configuration issues have to be resolved before the release run. After a release is added, the release definition opens.
-
Click in the Pipeline field. A dialog box opens where you can select a pipeline:
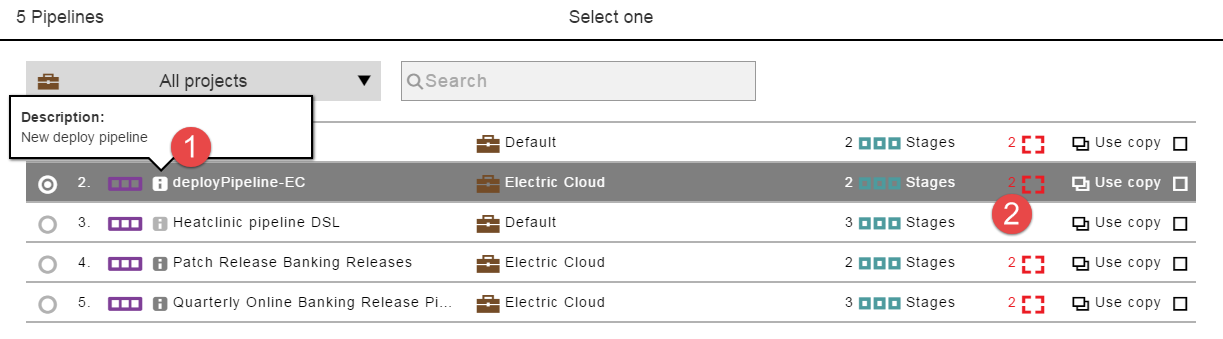
When you click the button (number 1 above), a description of the deployPipeline appears. The icon on the right (number 2 above) means that two required parameters are attached to the pipeline.
It shows the list of available pipelines. The default is to show the pipelines for all projects. To see only the pipelines for a specific project, click the down arrow in the All projects field to select one or more projects in one of these ways:
-
Click on the name of one or more projects.
-
Enter the search criteria in the Search field. The projects that match the criteria appear in the list.
-
You can also search for one or more pipelines by entering the search criteria in the Search field next to the All projects field. If there are no matches, a message appears stating that there are no pipelines in the selected projects.
-
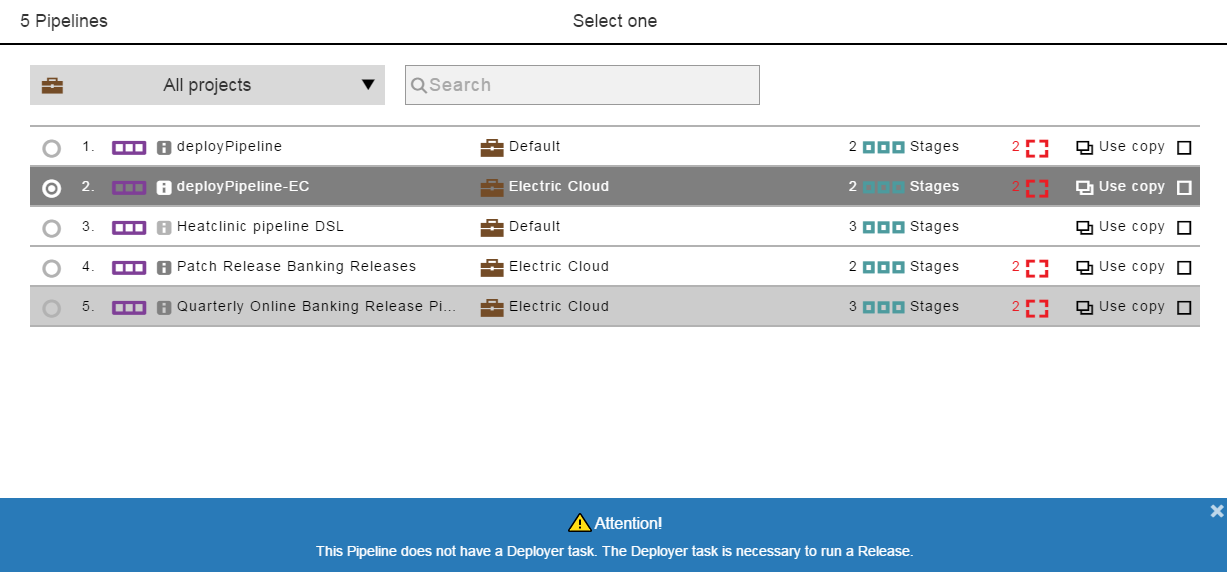
Select the deployPipeline application, and click Next.
-
If the pipeline does not have a deployer task, a message appears reminding you that you need to define a deployer task to run the release. Close the message to continue, and click Next.
-
If the pipeline has a deployer task, the message does not appear so you need to only click Next.
In the example, the pipeline has four required parameters. Some of them have default values that you can keep or change. Others do not, and you have to enter a value for them.
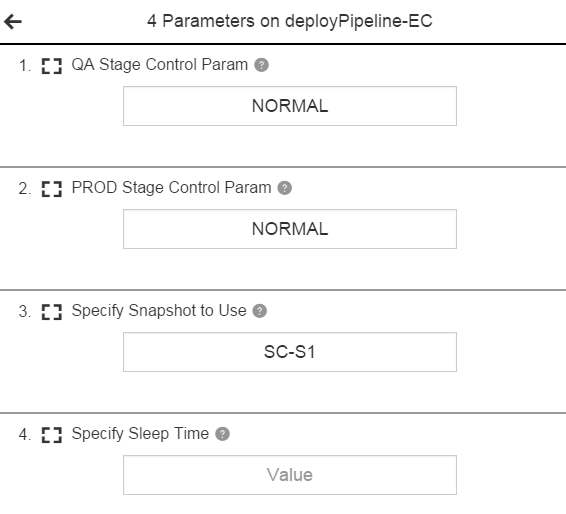
-
-
After you enter the values, click OK.
-
Click in the Applications field. The dialog box to select one or more applications opens.
It shows the list of available applications. The default is to show the applications for all projects.
If you want to see only the applications for a specific project, click the down arrow in the All projects field to select one or more projects one of these ways:
-
Click on the name of one or more projects.
-
Enter the search criteria in the Search field. The projects that match the criteria appear in the list.
You can also search for one or more applications by entering the search criteria in the Search field next to the All projects field. If there are no matches, a message appears stating that there are no applications in the selected projects.
-
Select one or more applications, click the
button to add them to the pipeline, click OK, and click < :
-
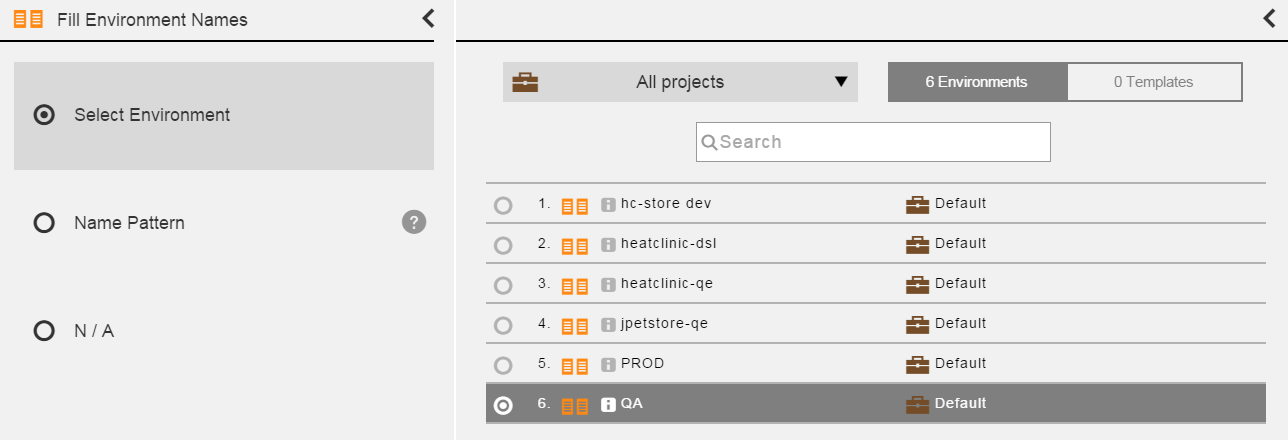
Click in the Environments field. The dialog box to select an environment where the applications in each stage will be deployed opens.
It shows the list of available environments. The default is to show the environments for all projects.
If you want to see only the environments for a specific project, click the down arrow in the All projects field to select one or more projects one of these ways:
-
Click on the name of one or more projects.
-
Enter the search criteria in the Search field. The projects that match the criteria appear in the list.
You can also search for one or more environments by entering the search criteria in the Search field next to the All projects field. If there are no matches, a message appears stating that there are no environments in the selected projects.
When you mouse over the filter icons, the tool tip text appears, from left to right:
-
View only cells with missing environments.
-
View only cells with missing tier maps.
-
View only cells marked "N/A".
-
View only empty cells.
For detailed instructions about how to select the environments in which the applications in each stage will be deployed, go here.
In this example, the environments are selected as follows:
-
ShoppingCart application in the QA stage:
In the ShoppingCart row, select the cell in the QA column and double-click in it. Notice that the Fill button is now enabled.
A panel opens to the left where you can select the environment where the ShoppingCart application will be deployed.
Select the environment to which the ShoppingCart application is deployed: QA.
Click OK to save your selection.
-
jpetstore2 application in the QA stage:
In the jpetstore2 row, select the cell in the QA column and click in it. Notice that the Fill button is now enabled.
A panel opens to the left where you can select the environment where the jpetstore2 application will be deployed.
Select the environment to which the jpetstore2 application is deployed: jpetstore-qe.

Click OK.
-
All the applications in the PROD stage. Click in the header cell for the PROD stage.
A panel opens to the left where you can select the environment where the applications will be deployed.
Select the environment to which the applications will be deployed: PROD.
Click OK.
Now click in the Configurations field. The dialog box to enter the required parameters for the pipeline to run opens:

If any of the required parameters have not been entered in a cell (an application to be deployed in a stage) with in it, you can click in the cell to enter the inputs (parameters) for the application in a specific stage. You can enter the value for it now or at runtime. Then click OK to save your entries.
The release definition now looks like this:
The next step is to run the release. See Running and Completing Releases to learn more about running and completing the release.