This Help topic provides a detailed overview for all views and functionality on this web page. You may want to read this topic in its entirety if this is your first experience with the CloudBees Flow Workflow feature.
This page displays workflow definition components, including state and transition definition names, types, actions, descriptions, and various links to create additional transitions and state definitions, define access control, run the workflow, and so on. You can view any previously defined workflow objects and create new properties too.
When you open the Graph view, your first glance at this page will look similar to the following:
Links and actions on the graph view:
-
Above the Workflow Definition Details page title you see (in this example) "Project: Upgrade-End to End". This breadcrumb information tells you which project you are viewing or working with and provides a link back to the project, itself.
-
Immediately after the page title, you see "workflow_9", which (for our example) is the name of this workflow.
-
Track Changes (
 )–Click this to open the Change History page.
 -
Run (
 )- Use this link to run the workflow definition. Hover your mouse over the drop-down arrow to see these choices:
 -
Selecting Run —allows you to pick the "starting state" to run the workflow. After clicking OK from the Run Workflow pop-up dialog box, the Run Workflow page is displayed. If you previously created parameters for this workflow, they are displayed. You can accept the parameter values or change them before running the workflow.
-
Selecting Run Immediately —this option uses the first (default) "starting state" to run the workflow. Note: Clicking Run, without using the down-arrow to make a selection, is the same as selecting Run Immediately.
-
Edit —Use this link to go to the Edit Workflow Definition page to make any necessary changes.
-
Access Control —Use this link to set privileges for this workflow definition. For details, see the Access Control Help topic.
-
The "star" icon allows you to save this workflow definition to your Home page.
Navigation and view summary
Each button has its own expanded description section following this summary.
-
Graph—the page opens in this view. The main portion of this view contains the work area for visually creating your workflow.
-
List—this view provides a table displaying states, transitions, and so on in list form.
-
Properties—this view provides a table displaying previously created properties and provides links to create additional properties.
-
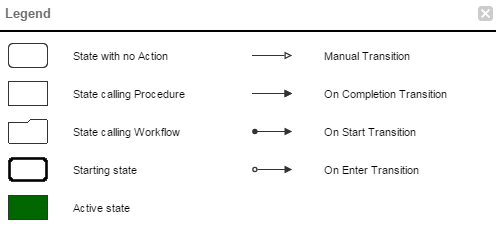
Show Legend—displays a legend for workflow objects.
-
Create State—this button produces the State Definition panel where you can create new states as you build or modify your workflow.
-
The multi-square directional icons allow you to change your workflow graph from vertical to horizontal, depending on how you choose to see the graph.
-
The drop-down menu for percentages allows you to diminish or expand the workflow graph size.
Graph view
To create a workflow, minimally you need to create state definitions and transition definitions. Optimally, those objects have parameters and properties, and you will want to create or enforce access control and perhaps create one or more email notifiers too. To begin, the following sections describing functionality in this view will familiarize you with how to create workflow objects and end with exploring the graph’s quick-access features.
Click the Create State button to create a new state using the State Definition panel.
You can use the DSL Export (![]() ) button to download the objects as a DSL file.
) button to download the objects as a DSL file.
To create a new state
After clicking the Create State button, enter information in the State Definition panel as follows:
| Field Name | Description |
|---|---|
Name |
(Required) Provide any name of your choice. The name must be unique to this workflow definition. If you do not provide a name, a system-generated name is created: New State, New State 2, and so on. |
Description |
(Optional) Plain text or HTML description for this object. If using HTML, you must surround your text with For example, the following HTML:
renders as follows:
|
Startable |
Select this checkbox if you want this state to be your workflow "starting" state. The first state in any workflow definition is saved as Startable , but you can change this later. |
Click OK and the State Definition panel provides options to configure your new state definition.
To configure the new state definition
In the State Definition Panel, the state name appears at the top. Configure the following settings.
Links at the top of the panel
-
Access Control —use this link to add or modify access control privileges for this state (link not illustrated in the State Definition panel example above).
-
Edit —use this link to modify this state’s name, description, or whether or not the state is Startable .
-
View in list —displays the List view to see the state definition in the Workflow Definition Details table. This state will be highlighted in the List view.
-
Create Transition —displays the Transition Definition panel to create a transition for this state.
Action
As each state in a workflow becomes active, it performs an action . The state’s action can be to create a job from a procedure or to start a workflow from a workflow definition. When the job or called workflow completes, On Completion transitions are evaluated to see if the workflow should change to a different state, possibly based on the outcome of the action.
Selecting No action , Procedure , or Workflow changes the fields that appear under these choices.
-
No action—if selected, no other information is required. Click OK.
-
Procedure—this selection displays the following fields:
-
Current—this selection refers to the project that contains the workflow definition.
-
Project—if selected to call a different project, start typing in the text box to display a list of (non-plugin) projects from which to select. Only the first 10 matches are displayed. Type more characters to refine the list.
-
Plugin—if selected, start typing in the text box to display a list of plugin projects from which to choose. Only the first 10 matches are displayed. Type more characters to refine the list.
-
Procedure—start typing in this field to see a list of available procedures from which to select, depending on your previous choice of Current, Project, or Plugin. Only the first 10 matches are displayed. Type more characters to refine the list.
-
Workflow—this selection displays the following fields:
-
Similar to selecting Procedure (above), select Current, Project, or Plugin.
-
Workflow—if selected to call another workflow definition, start typing in this text box to display a list of workflow definitions from which to choose. Only the first 10 matches are displayed. Type more characters to refine the list.
-
Starting State—start typing in this field to see a list of available starting states definitions in the workflow definition you selected. Only the first 10 matches are displayed. Type more characters to refine the list.
After selecting the procedure or starting state, press the <Tab> key to leave the field and see a list of parameters for the selected action. After entering any procedure values, click OK to save the changes.
Notifiers
Select this tab to see a list of email notifiers previously created for this state definition or to create an email notifier. Notifiers are commonly used to inform interested parties about transitions to the state being defined.
| Note: Before you can set up an email notifier, you need an email configuration. If you have not already defined an email configuration, you can do it now. Go to Administration > Email Configurations and select the Add Configuration link. |
The Notifiers table contains a list of all previous created notifiers for this state definition.
Column descriptions
| Column Name | Description / Actions |
|---|---|
Name |
The name of the email notifier. Select a name to go to the "edit" page for that notifier if you need to make changes. |
Type |
The type of email notifier specified during creation. |
Description |
(Optional) Plain text or HTML description for this object. If using HTML, you must surround your text with For example, the following HTML:
renders as follows:
|
Actions |
Delete —Use this link to delete the notifier on that row. |
To create an email notifier, click the Create Notifier link to access the Email Notifier panel.
Enter information into the fields as follows:
| Field Name | Description |
|---|---|
Name |
(Required) This name can be any text string you choose. The name must be unique among other notifier names in this project, on procedures or workflow definitions called from other projects. |
Description |
(Optional) Plain text or HTML description for this object. If using HTML, you must surround your text with For example, the following HTML:
renders as follows:
|
Type |
Use the pull-down menu to choose a type:
|
Condition |
Use the pull-down menu to select the type of condition you need for this email notifier. Edit the auto-supplied condition in the text box or add a completely new script for your purpose. The condition specifies whether the notifier should send a message depending on the result of a property expansion. If the result is empty or non-zero, the message is sent. If the result is "0", the message is not sent. |
Template |
Use the pull-down menu to select from a list of global, ready-to-use formatting templates. Depending on the type of email notifier you are creating, the available template choices in the drop-down menu will be different. (Required) To customize your template, edit the auto-supplied text in the text box or you can add a completely new script for your purpose. Any edits made in this text box will not be saved to the global template. To create a custom template, the basic structure is:
|
Email Configuration |
Click inside this field or start typing to bring up a list of possible email configuration names. An email notifier that does not specify an email configuration will use the configuration named 'default' if it exists. |
Destinations |
(Required) This is a space-separated list of valid email addresses, email aliases, or CloudBees Flow user or group names, or a property reference that expands into such a list, or you can enter an LDAP DL name (group name). |
Click OK to save your email notifier configuration. The next time you view the Notifier table, you will see this notifier in the list.
Parameters
Similar to Notifiers, a parameter table is displayed containing all formal parameters defined for this state definition. Parameters are presented when launching the workflow definition (if it is startable), or when taking a manual transition to the state. A transition may enter values for some or all of the formal parameters defined by the state definition, in which case only the unmapped parameters are presented to the user.
-
Create Parameter —Use this link to go to the New Parameter page to create a parameter for this state definition.
If you need assistance with creating a parameter, click the Help link in the upper-right corner of the New Parameter page.
Properties
Similar to the Notifiers and Parameters table, a properties table is displayed containing available properties for this state definition. If no properties were defined for this state definition, the table does not exist.
Click one of the available links to create one or more properties that will be displayed in the table when created:
-
Create Property —Click this link to go to the New Property pop-up box to create a new property for this state definition.
-
Create Nested Sheet —Click this link to go the New Nested Property Sheet pop-up box to create a nested property.
-
Access Control —Click this link to go to the Access Control page for the property sheet.
The property pop-up boxes contain a Help link if you need assistance creating a property.
To create a transition definition
On the State Definitions panel, click the Create Transition link to see the Transition Definition panel.
Enter information into the fields as follows:
| Field Name | Description | ||
|---|---|---|---|
Name |
(Required) Enter a unique name for the transition definition. It can be any name you choose, but the name must be unique within the state definition. If you do not provide a name, a system-generated name is created: New Transition , New Transition 2 , and so on. |
||
Description |
(Optional) Plain text or HTML description for this object. If using HTML, you must surround your text with For example, the following HTML:
renders as follows:
|
||
Target State |
This field displays the "best guess" for the target state. If not correct, or you intended to create a transition for a different state, use the down-arrow to choose an available target state from the list. |
||
Trigger |
Use the drop-down menu to choose the transition type. The four types of transitions are:
|
||
Condition |
Use the drop-down menu to choose a condition. After selection, the text box is populated with a sample JavaScript string to edit for your purposes.
|
Click OK to save your transition definition.
Notice the new links and options available now:
-
Access Control –Use this link to add or modify access control privileges to this transition definition.
-
Edit –Use this link to modify the transition definition.
-
View in list –Use this link to see the new transition definition in the List view (table) on the Workflow Definition Details page. You can use the List view to move the transition to a different position within the state definition.
-
Parameters–If parameters were defined on the State Definition Details page, you will not see them here. If parameters are defined on this page, you need to enter values. Manual transitions allow you to defer parameter assignment until transition time.
-
Properties–Displays properties available for this object or you can create one or more properties at this time.
Using quick-access features
The following screen example is a portion of a workflow graph. In the graph, states and transitions are links:
-
Click on a state to open the State Definition panel to modify that state.
-
Click on a transition to open the Transition Definition panel to modify that transition. (Hover your mouse over a transition or transition name and click when it changes color.)
However, if you right-click on a state or transition, a context-sensitive menu with other options is available. In the following example, right-clicking on the "group_1" state provided the quick-link pop-up menu.
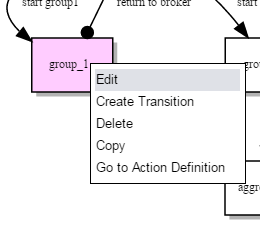
Available pop-up links include:
-
For states calling a procedure or another workflow, menu choices can be:
-
Edit—opens the State Definition panel to make modifications. This is the same as selecting the Edit link on the State Definition panel.
-
Create Transition—opens the Transition Definition panel.
-
Delete—deletes the state.
-
Copy—makes a copy of the state with all associated transitions preserved.
-
Go to Action Definition—for states calling a procedure, the Procedure Details page is opened. For states calling a workflow, the Workflow Definition Details page for the "subworkflow" is opened.
-
For states with "No action", the choices are the same, except the "Go to Action Definition" option is not available.
-
For transitions, menu options include: Rename, Delete, and Copy.
-
Right-clicking anywhere on the graph canvas provides two more choices:
-
Create State—allows you to quickly create a new state. This is the same as clicking the Create State button at the top of the graph.
-
Rotate Graph—acts as a "toggle", rotating the graph from a vertical to horizontal view and back again.
Show Legend
The following screen is another example of a workflow graph. Depending on your workflow, your graph could be very simple or much more complex than the example below.
Notice the transition line-endings and different shapes used for states.
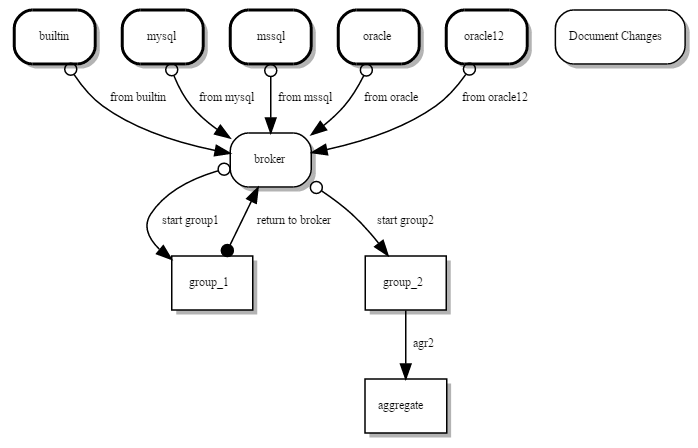
The legend is available for reference anytime to help you become familiar with state shapes and line-ending definitions.
List view
This view will be empty until you build a workflow in the Graph view. You can view this page at any time to see a list of states and transitions in your workflow definition.
| Column Name | Description / Actions |
|---|---|
Name |
This column displays state definition and transition definition names currently defined for this workflow definition.
|
Type |
This is the type of action or trigger currently assigned to the state definition or transition definition.
|
Action |
This is the action previously defined for the state or transition.
|
Startable |
A check mark in this column shows this state was defined as startable, which means this state is the beginning point for your workflow. |
Description |
(Optional) Plain text or HTML description for this object. If using HTML, you must surround your text with For example, the following HTML:
renders as follows:
|
Actions |
You can perform some or all of these actions:
|
Properties view
Select the Properties view button to see the Properties table. If no properties were defined for this workflow definition, no table appears. The following links and actions are available in the Properties table:
-
Links and actions at the top of the table
-
Create Property —Click this link to go to the New Property pop-up box to create a new property for this workflow definition.
-
Create Nested Sheet —Click this link to go the New Nested Property Sheet popup to create a nested property.
-
Access Control —Click this link to change access control privileges on the property sheet.
-
-
Column descriptions
Column name Description / actions Property Name
Select a property name to edit that property. You can change its name, value, or add/change its description. If the property name is preceded by a folder icon, this is a property sheet. Click on the property name to open the "folder".
Value
The value currently assigned to the property.
Description
(Optional) Plain text or HTML description for this object. If using HTML, you must surround your text with
<html> … </html>tags. Allowable HTML tags are<a>,<b>,<br>,<div>,<dl>,<font>,<i>,<li>,<ol>,<p>,<pre>,<span>,<style>,<table>,<tc>,<td>,<th>,<tr>, and<ul>.For example, the following HTML:
<p> <span style="font-family: Arial;"> <i>Note:</i> For more information about the <b>abc</b> object, see <a href="https://www.google.com/">\https://www.google.com</a>. </span> </p>renders as follows:
_Note:_ For more information about the *abc* object, see \https://www.google.com.Actions
Delete —Click this link to delete the property on that row.