A plugin is a collection of one or more features that can be added to CloudBees Flow. A plugin:
-
Can provide one or more new pages for the UI and can also provide a configuration page so you can provide additional information needed to implement the plugin.
-
Has an associated project that can contain procedures and properties required by the implementation.
-
Is delivered as a JAR file containing the features implementation. When a plugin is installed, the CloudBees Flow server extracts the JAR contents to disk into a configurable plugins directory.
The CloudBees Flow installation includes numerous bundled plugins. These plugins are created and supported by CloudBees. You can also create your own plugins as described below.
Navigating the Plugin Manager User Interface
You can use the Plugin Manager to:
-
See a list of installed plugins and whether an installed plugin is promoted.
-
Perform a variety of operations on plugins in the list, such as demoting, configuring, and uninstalling them.
-
Install plugins from the Plugin Catalog.
-
Create plugins, modify those plugins, and export those plugins.
Tabs and Filtering Options
The Plugin Manager main page displays the following tabs and the following options for filtering the list of plugins.
| Installation or upgrade task | Description | ||
|---|---|---|---|
Currently Installed |
Displays the installed plugins. Plugins that you create or install from other sources also appear on this page. |
||
Install from File/URL |
Displays the screen for plugin installation options:
You can also use
|
||
View Catalog |
Displays all plugins available for installation. The View Catalog tab is not present if the CloudBees Flow server lacks internet access (such as if it is locked down or has a connectivity issue.) If so, an error message appears in the Plugin Manager (such as on the main page or the New Plugin page): Catalog Install —Click the Install action (next to a plugin listed in the catalog) to download and install the plugin. |
||
Category |
A drop-down menu to filter the plugin list by a specific category. |
Plugins list columns
Columns in the list of installed plugins provide a variety of details about each plugin.
| Column name | Description |
|---|---|
Plugin Label |
Name of the plugin. Click the label of an installed plugin to see the Project Details page for that plugin. |
Author |
Person or organization who created the plugin. |
Version |
Plugin version. Promoted plugin versions also appear in this column. The promoted version number is labeled |
Category |
Plugin type. Plugins that provide similar types of functionality are grouped into categories. |
Description |
Short text string that describes the plugin purpose or function. |
Actions |
List of plugin tasks. Not all plugins have the same list of tasks. For example, some plugins might perform their own setup during installation and thus do not need more configuration information entered here.
If the action that you need is not in the Actions column, you might not have sufficient modify permission in the plugins ACL for that action. |
Creating a plugin
To create a plugin, you set up the plugin configuration and then add procedures and properties.
Setting Up the plugin configuration
-
In the Automation Platform, choose Administration>Plugins.
The Plugin Manager page appears.
-
Click Create Plugin. The New Plugin page appears.
-
Complete the page as follows:
Field name Description Name
Plugin name. Enter a unique name.
Version
Plugin version. The default is
1.0.0.0.Description
(Optional) Plain text description of the plugin. CloudBees Flow does not interpret this text.
Category
(Optional) Category for the plugin. Categories let you group plugins by functionality or purpose and provide a convenient way to look up a specific plugin if you know its functionality or purpose. For example, when you are configuring a process step and want to deploy an application on WebSphere, you first choose the Application Server category and then the WebSphere plugin.
You can select an existing plugin category by using the autofill functionality or enter a new category. The default category is
Utility.Author
(Optional) Plugin author’s name. For example, a user or organization name. The default is the current user name (such as
System Administrator).Author Url
(Optional) Plugin author’s URL. For example,
https://example.com/integrations/docker.Enable plugin configuration support
(Optional) Determines whether to allow the addition of plugin procedures to support the creation of plugin configurations. Disabling this option displays a confirmation dialog box if the plugin already exists:
Any existing plugin configurations for this plugin will be deleted if the 'Enable plugin configuration support' is unchecked.If you enable this feature, the Configuration Setup tab is added to the Project Details page for the plugin, and the CreateConfiguration and DeleteConfiguration procedures are added to the plugin (you can click the Procedures tab to see these procedures). This tab lets you modify information required to support plugin configurations such as the parameters required by the CreateConfiguration procedure.
This option is enabled by default (meaning that the check box is checked).
-
Click OK.
If you selected Enable plugin configuration support in the New Plugin page above, the Configuration Setup tab in the Project Details page appears. (A plugin is a type of project.)
In the Configuration Setup tab, the plugin configuration parameters appear under the Configuration Parameters section. The CreateConfiguration procedure uses these parameters when creating the plugin configuration. By default, the following configurations parameters are added to a new plugin:
-
config—Used to provide a unique name for the configuration
-
desc—Description of the plugin configuration
-
credential—User name and password used to communicate with the third-party system with which the plugin is integrated
-
-
In the Configuration Setup tab, click Create Parameter to add configuration parameters that your plugin requires. The New Parameter page appears.
-
Complete the page as follows:
Field name Description Name
Name of the parameter for which values are requested when the CreateConfiguration procedure is invoked. Enter a unique name.
Description
(Optional) Plain text description of the parameter. CloudBees Flow does not interpret this text.
Default Value
Default value of the parameter if no value is provided when the procedure is invoked.
Required?
Determines whether a value for the parameter is required. If this is enabled, the CreateConfiguration procedure ignores the default value and does not run unless a value is provided. After the procedure begins execution, the parameter value is available in the job property sheet with the same name as the parameter.
The check box is unchecked by default (meaning that the parameter is optional).
Defer Expansion?
When the step executes (the check box is checked). The check box is unchecked by default (meaning that expansion is not deferred).
The configuration parameters that you specified are added as parameters to the Create Configuration procedure in the Procedures tab for the plugin.
-
From the Type pull-down menu, choose a form element type and complete the page for that type as follows:
Type Description Text entry
Creates a field for users to enter a small amount of text.
Text area
Creates a field that expands for users to enter a large amount of text (such as a script).
Dropdown menu
Creates a drop-down menu for users to select a value when the parameter is presented. Choose one of the following:
-
Enter options —Click + Add Option to add one or more new rows. Then enter the text and value for each option. The text is what will appear in the menu, and the value is the parameter value if that option is selected.
-
Load options from list —Enter a pipe-separated list of options (for example,
foo|bar|baz). The text and value for the options will be the same. -
Load options from property sheet —Enter the path to the property sheet that contains options for the parameter. The property sheet must be created in a specific format:
-
An
optionCountproperty must exist whose value is the number of options. -
For each option, create a nested property sheet named
optionN , where N is the option number, starting with1. For example, ifoptionCountis set to3, you must create three nested sheets:option1,option2, andoption3. -
In each nested sheet, create two properties:
textandvalue. The value of thetextproperty will appear in the menu. The value of thevalueproperty is the parameter value if that option is selected.
Radio selector
Creates radio buttons for users to select a value when the parameter is presented.
-
Enter options —Click + Add Option to add one or more new rows. Then enter the text and value for each option. The text is what will appear in the menu, and the value is the parameter value if that option is selected.
-
Load options from list —Enter a pipe-separated list of options (for example,
foo|bar|baz). The text and value for the options will be the same. -
Load options from property sheet —Enter the path to the property sheet that contains options for the parameter. The property sheet must be created in a specific format:
-
An
optionCountproperty must exist whose value is the number of options. -
For each option, create a nested property sheet named
optionN , where N is the option number, starting with1. For example, ifoptionCountis set to3, you must create three nested sheets:option1,option2, andoption3. -
In each nested sheet, create two properties:
textandvalue. The value of thetextproperty will appear in the menu. The value of thevalueproperty is the parameter value if that option is selected.
Checkbox
Creates a check box for users to select or deselect a value when the parameter is presented.
-
Value when unchecked —Value of the parameter when the check box is unchecked (
falseby default) -
Value when checked —Value of the check box when the check box is checked (
trueby default) -
Initially checked? - Whether the check box should be checked initially. If
true, set Default value to match Value when checked. Iffalse(the default) set Default value to match Value when unchecked.
Credential
Creates a text box and an input field for users to provide a user name and password respectively to use this parameter at runtime.
-
-
Click OK.
The new parameter appears in the Project Details page under the Configuration Parameters list.
-
Repeat the previous three steps to create more parameters as needed.
The new plugin appears on the Plugin Manager page under the Currently Installed tab along with the other installed plugins.
Adding Procedures
A procedure defines a process to automate one or more steps. A procedure is run to carry out a process.
-
In the Plugin Manager page, click the plugin name. The Project Details page for the plugin appears.
-
Click the Procedures tab and then click Create Procedure. The New Procedure page appears.
-
Complete the page as follows:
| Field name | Description | ||
|---|---|---|---|
Name |
Procedure name. This name must be unique within the project. |
||
Description |
(Optional) Plain text description of the procedure. CloudBees Flow does not interpret this text. |
||
Job Name Template |
Template used to determine the default name of a job launched from the procedure. For example:
produces a name such as:
Enter any combination of elements to create meaningful procedure names. For example, you could include the build number.
|
||
Default Resource |
Resource name. Enter a name or click Browse and choose a resource. This name must be unique among resource names. |
||
Default Workspace |
Name of the default workspace. Enter a name or click Browse and choose a workspace. |
||
Time Limit |
Maximum amount of time during which the step can execute. The step is aborted if it exceeds this time. If no time limit was specified on the calling step, time limits are copied to the calling step from the procedure. If the procedure is called from The timer for the procedure starts when the calling step or job becomes runnable (when all preconditions are satisfied). Specify a number and then use the pull-down menu to select the units (seconds, minutes, or hours). |
||
Impersonation Credential |
|||
Credential Project |
Name of the project that contains this credential. Use the current project or click the other radio button and enter a project name (or click Browse and choose another project). The current project is used by default. |
||
Credential Name |
Name of the credential for the project. Enter a name or click Browse and choose another credential. |
||
-
Click OK.
-
Repeat the above steps to add more procedures if needed.
Adding Properties
-
In the Project Details page for the plugin, click the Properties tab. The list of properties for the plugin appears.
-
Click Create Property. The New Property popup appears.
-
Complete the popup as follows:
| Column Name | Description / Actions |
|---|---|
Name |
Property name. |
Value |
Value to assign to the property. |
Description |
(Optional) Plain text description of this object. CloudBees Flow does not interpret this text. |
Expandable |
Determines whether the property is marked for expansion. Enabled (checked) means that a property value such as |
-
Click OK.
-
Repeat the above steps to add more properties if needed.
Editing a Plugin
You can use the Plugin Manager to edit plugins that you have created in the Plugin Manager. (You cannot use it to edit plugins that are bundled with CloudBees Flow or downloaded from the Plugins Catalog.)
-
In the Automation Platform, choose Administration>Plugins. The Plugin Manager page appears.
-
Click the name of the plugin that you want to edit. The Project Details page for the plugin appears.
-
Create or update the procedures, properties, and so on as needed for the plugin project.
-
Click the
 (edit plugin details) button. The Edit Plugin Details page for the plugin appears.
 -
Complete the page as follows:
Name Description Extension Version
(Optional) Number that CloudBees Flow uses to differentiate between the CloudBees created plugins that you downloaded but did not modify or extend and CloudBees created plugins that you have modified or extended. This prevents a CloudBees Flow upgrade that also upgrades the corresponding bundled plugin from overwriting the plugin that you have modified or extended.
Use only positive integers with no other characters. For example,
12. The default is1.For details about version extensions, see How Plugin and Extension Versions Determine Plugin Installation or Autopromotion .
Description
(Optional) Plain text description of the plugin. CloudBees Flow does not interpret this text.
Category
(Optional) Category for the plugin. Categories let you group plugins by functionality or purpose and provide a convenient way to look up a specific plugin if you know its functionality or purpose. For example, when you are configuring a process step and want to deploy an application on WebSphere, you first choose the Application Server category and then the WebSphere plugin.
You can select an existing plugin category by using the autofill functionality, or you can enter a new category. The default category is
Utility.Author
(Optional) Plugin author’s name. For example, a user or organization name.
Author Url
(Optional) Plugin author’s URL. For example,
https://example.com/integrations/docker.Enable plugin configuration support
(Optional) Determines whether to allow the addition of plugin procedures to support the creation of plugin configurations. Disabling this option displays a confirmation dialog box:
Any existing plugin configurations for this plugin will be deleted if the 'Enable plugin configuration support' is unchecked.If you enable this feature, the Configuration Setup tab is added to the Project Details page for the plugin, and the CreateConfiguration and DeleteConfiguration procedures are added to the plugin (you can click the Procedures tab to see these procedures). This tab lets you modify information required to support plugin configurations such as the parameters required by the CreateConfiguration procedure.
-
Click OK.
Exporting a Plugin
You can export a plugin in order to import it to another CloudBees Flow server. Only procedures and properties are exported. Workflows, schedules, credentials and so on are not exported.
-
In the Automation Platform, choose Administration>Plugins. The Plugin Manager page appears.
-
Click the Export link for the plugin that you want to export. The plugin .zip file is downloaded to your system as
<plugin-name>-<version>.zip.
About plugin versions
The Plugin Manager uses a combination of the plugin version and plugin extension version to determine whether to install or autopromote a new plugin version. The following table uses examples to demonstrate the rules for installation and autopromotion of a new plugin version:
| Existing version | New version | Result | Rule used |
|---|---|---|---|
1.2.3.300 (promoted) |
1.2.8.1234 |
1.2.8.1234 (promoted) |
For two plugins without extension versions, the newer plugin is installed and promoted regardless of the promotion status of the existing plugin. |
1.2.3.300 (promoted) |
1.3.4.1235 |
1.3.4.1235 installed. 1.2.3.300 remains promoted. |
For two plugins without extension versions, the newer plugin is installed (but not promoted, because it is a minor-version upgrade and not just a patch). |
1.2.3.300 (promoted) |
1.2.2.124 |
1.2.2.124 not installed unless forced (via the |
For two plugins without extension versions, the newer plugin is not installed if the existing plugin is a newer version than the plugin being installed. |
1.2.3.300 (promoted) |
1.2.3.300 Extension 1 |
1.2.3.300 extension 1 (promoted) |
With two plugins of the same version, a plugin with an extension version takes precedence over a plugin that is promoted and has no extension version (the plugin with the extension version is installed and autopromoted) |
1.2.3.300 Extension 1 (promoted) |
1.2.3.300 Extension 2 |
1.2.3.300 extension 2 (promoted) |
With two plugins of the same version, a plugin with a higher extension version takes precedence over a plugin that is promoted and has a lower extension version (the plugin with the newer extension version is installed and autopromoted). |
1.2.3.300 extension 2 (promoted) |
1.2.3.300 |
1.2.3.300 is not installed unless forced (by using the |
A promoted plugin version with an extension version takes precedence over a plugin of the same version but without an extension version. |
1.2.3.300 extension 2 (promoted) |
1.2.8.1234 |
1.2.8.1234 is installed . 1.2.3.300 extension 2 remains promoted . |
A newer plugin version is not autopromoted if the existing plugin has an extension version and is currently promoted. |
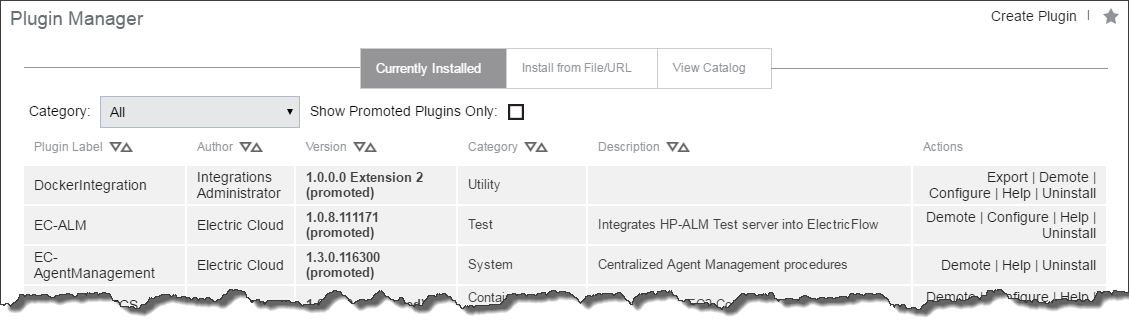
An extension version for a plugin appears as Extension <version> on the Plugin Manager page in the Version column of the Currently Installed tab. For example, Extension 2:
Using a Plugin
Configuring CloudBees Flow to Recognize Your SCM Plugin
For help using your SCM plugin with CloudBees Flow Preflight, Default Tracking, and ElectricSentry, see Preflight Builds , and Defect Tracking .
Adding a subprocedure step
-
Click the Projects tab and choose an existing project or click the Create Project link to create a new project.
-
On the Project Details page, select an existing procedure or click the Create Procedure link to create additional procedures.
-
On the Procedure Details page, select the Plugins link to go to the Choose Step pane to create a New Step using a plugin.
-
In the left pane, select a plugin category and then choose a plugin.
-
In the right pane, select a step type. This opens the New Step page so you can add a new subprocedure step (using your selected plugin).
On the New Step page, note that the plugin that you selected already appears in the Subprocedure section.
-
-
Enter information into the Parameters section fields.
These fields are plugin-specific and are frequently different for each plugin.