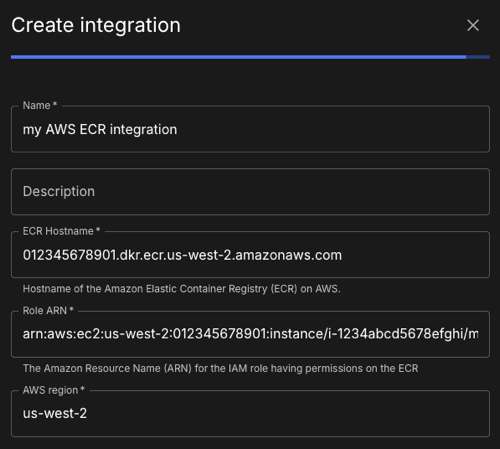
Create an Amazon Web Services (AWS) Elastic Container Registry (ECR) integration to connect the CloudBees platform to AWS cloud repositories. If you manage code repositories that are behind a firewall, you can also integrate AWS repositories with the platform. Connect to AWS with access tokens configured according to OpenID Connect (OIDC).
Once you connect your source code to the platform, you can create a new component and set up a workflow. For more information, refer to:
Prerequisites
To integrate with AWS ECR, you must first establish an identity trust relationship between AWS and CloudBees platform using OIDC, and then create an AWS IAM role with assigned permissions. Refer to OIDC setup and usage for more information.
Create an integration
Create an integration between the CloudBees platform and AWS ECR using OIDC.
To integrate with AWS ECR:
-
Select an organization, and then select .
-
Select Create integration.
-
Select Container registries.
-
Select Amazon ECR.
-
Enter an integration Name (no spaces are allowed).
-
(optional) Enter a Description.
-
Enter the ECR Hostname in the format:
<AWS_ACCOUNT_ID>.dkr.ecr.<REGION>.amazonaws.com-
<AWS_ACCOUNT_ID>is your AWS account ID. -
<REGION>is the AWS region you are using.
-
-
Enter the Role ARN that uniquely identifies your AWS IAM role, in the format:
arn:aws:ec2:<REGION>:<AWS_ACCOUNT_ID>:<NAMESPACE>/<REPO_NAME>/<ROLE_NAME>-
<REGION>is the AWS region you are using. -
<AWS_ACCOUNT_ID>is your AWS account ID. -
<NAMESPACE>is the repository namespace. -
<REPO_NAME>is the repository name. -
<ROLE_NAME>is the role name you are assuming.
-
-
Enter the AWS region you are using.
-
Select Submit.

Your AWS ECR account is connected to the platform, and the integration is listed under Integrations.