Configuration-as-Code (CasC) in CloudBees Unify Feature management is a GitOps strategy that bridges feature management entities in the UI with YAML files stored in SCM. This connection allows you to modify and store flag configurations using your preferred interface, ensuring changes are synchronized and seamlessly delivered to end users via the flag service layer.
| CloudBees recommends installing the CloudBees Feature management SDK before proceeding to configure CasC. |
CasC enables you to:
-
Simplify deployment using pull requests for testing and release.
-
Use version control to track and roll back changes.
-
Integrate feature delivery into deployment and release pipelines by adding tools like automated testing to update flags based on production data.
-
Move or copy definitions between environments by transferring files between directories.
Integrate Feature management with your source code repository to activate CasC. This integration is bidirectional within the same organization: changes made in either your source code or CloudBees Unify UI will automatically sync with the other. CasC configurations are scoped to the application in which they are defined. Configurations are not shared across applications.
For example, if you update a target group in a new environment and merge your changes to the default environment, CloudBees Unify UI reflects the updates. Similarly, if you delete a flag in the UI, CloudBees Unify pushes a commit with the corresponding code change to your repository.
Access CasC integration with feature flags
To access the CasC integration with feature flags:
-
Select .
-
Select Application and choose an application.
-
Select
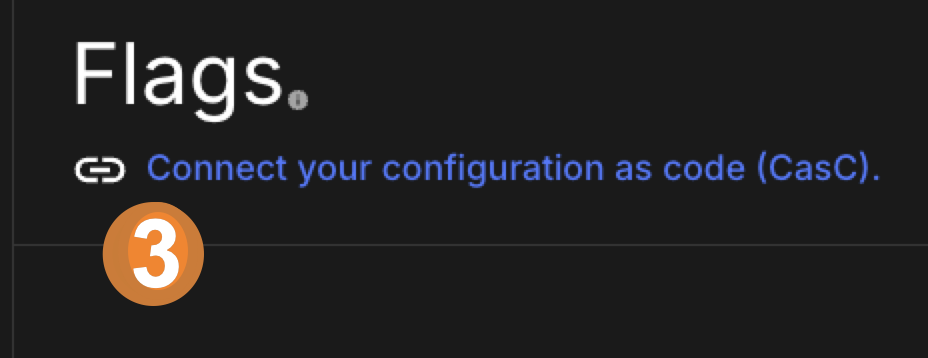
 Connect your configuration as code (CasC).
The Connect your configuration as code (CasC) link is visible only if CasC has not been set up previously for the selected application.

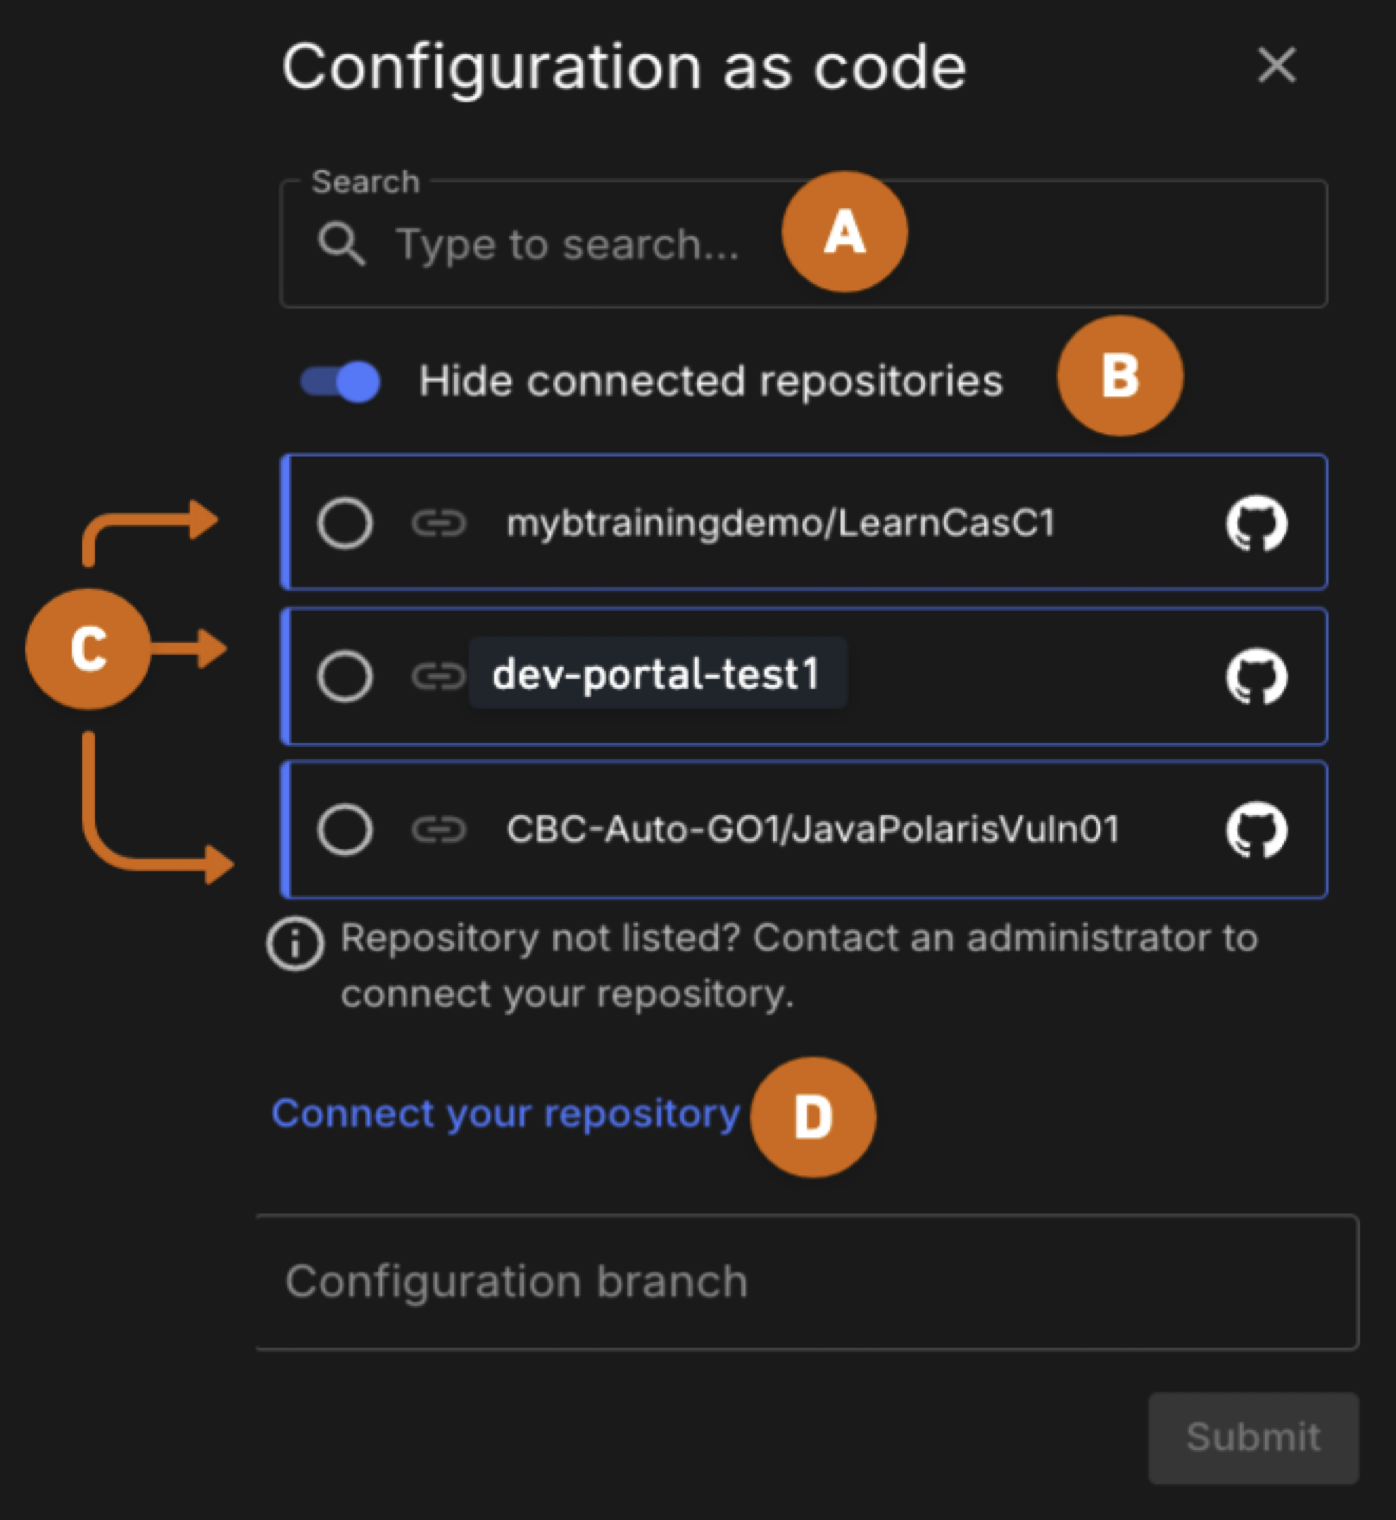
The Configuration as code panel displays existing connected repositories, and it allows you to identify the GitHub repository the connection uses.

-
Search: Use the Search field to locate previously installed GitHub repositories from the list.
-
Toggle: Limit the display of GitHub repositories that are installed but not connected to an integration by toggling on or off.
-
Repositories: Select one of the available GitHub repositories in the list to connect it to the CasC integration.
-
Connect your repository: Select this link if your GitHub repository is not displayed in the list, use this link to install and activate your GitHub repository.
Activate CasC with GitHub
| The CloudBees Unify only accesses files in your repository that contain Feature management code. |
The CloudBees Unify leverages GitHub Apps to enable secure integration with a GitHub organization and selected repository(s).
To activate CasC with GitHub, proceed with one of these methods, depending on your configuration:
Connect to a new repository
If your GitHub repository is not displayed in the list of available repositories, follow the steps below to connect your GitHub repository.
| If you are connecting to a new GitHub repository, it must be initialized in GitHub before it can be used. Initialization involves adding at least one file, such as a README, license, or an initial commit. For more information, refer to Quickstart for repositories. |
-
Refer to access CasC integration to begin.
-
From the Configuration as code panel, select Connect your repository.
-
Select GitHub App.
-
Type a name for the integration.
-
Type a description for the integration.
-
Select Install GitHub app.
-
In the GitHub window, select the organization that contains the repository for this connection.
-
Select the appropriate repository access.
-
Select Save.
-
In CloudBees Unify select .
-
Select
 Connect your configuration as code (CasC).
 -
Select your newly added GitHub repository from the list.
-
Select Submit.
-
Refresh your browser.
The link at the top of the Flags window, Connect your configuration as code (CasC) should now display as a link to your GitHub repository.
Use an already integrated repository
To activate CasC with a GitHub repository that you have already integrated with CloudBees Unify:
-
Select the organization.
-
Select .
-
Select the link at the top of the window:
 Connect your configuration as code (CasC).
 -
Locate a GitHub app using one of the following methods:
-
Select Search to locate a previously installed GitHub repository.
-
Select Toggle to limit the display of repositories that are installed but not connected to an integration.
-
-
Select an available repository from the list.
If your GitHub repository is not displayed in the list, select Connect your repository to install and activate your GitHub repository on CloudBees Unify. Refer to Connect to a new repository for more information. -
Select Submit at the bottom of the window.
-
Refresh your browser to ensure the latest changes are displayed.
The Connect your configuration as code (CasC) link is replaced with a link to your GitHub repository.
CasC folder structure
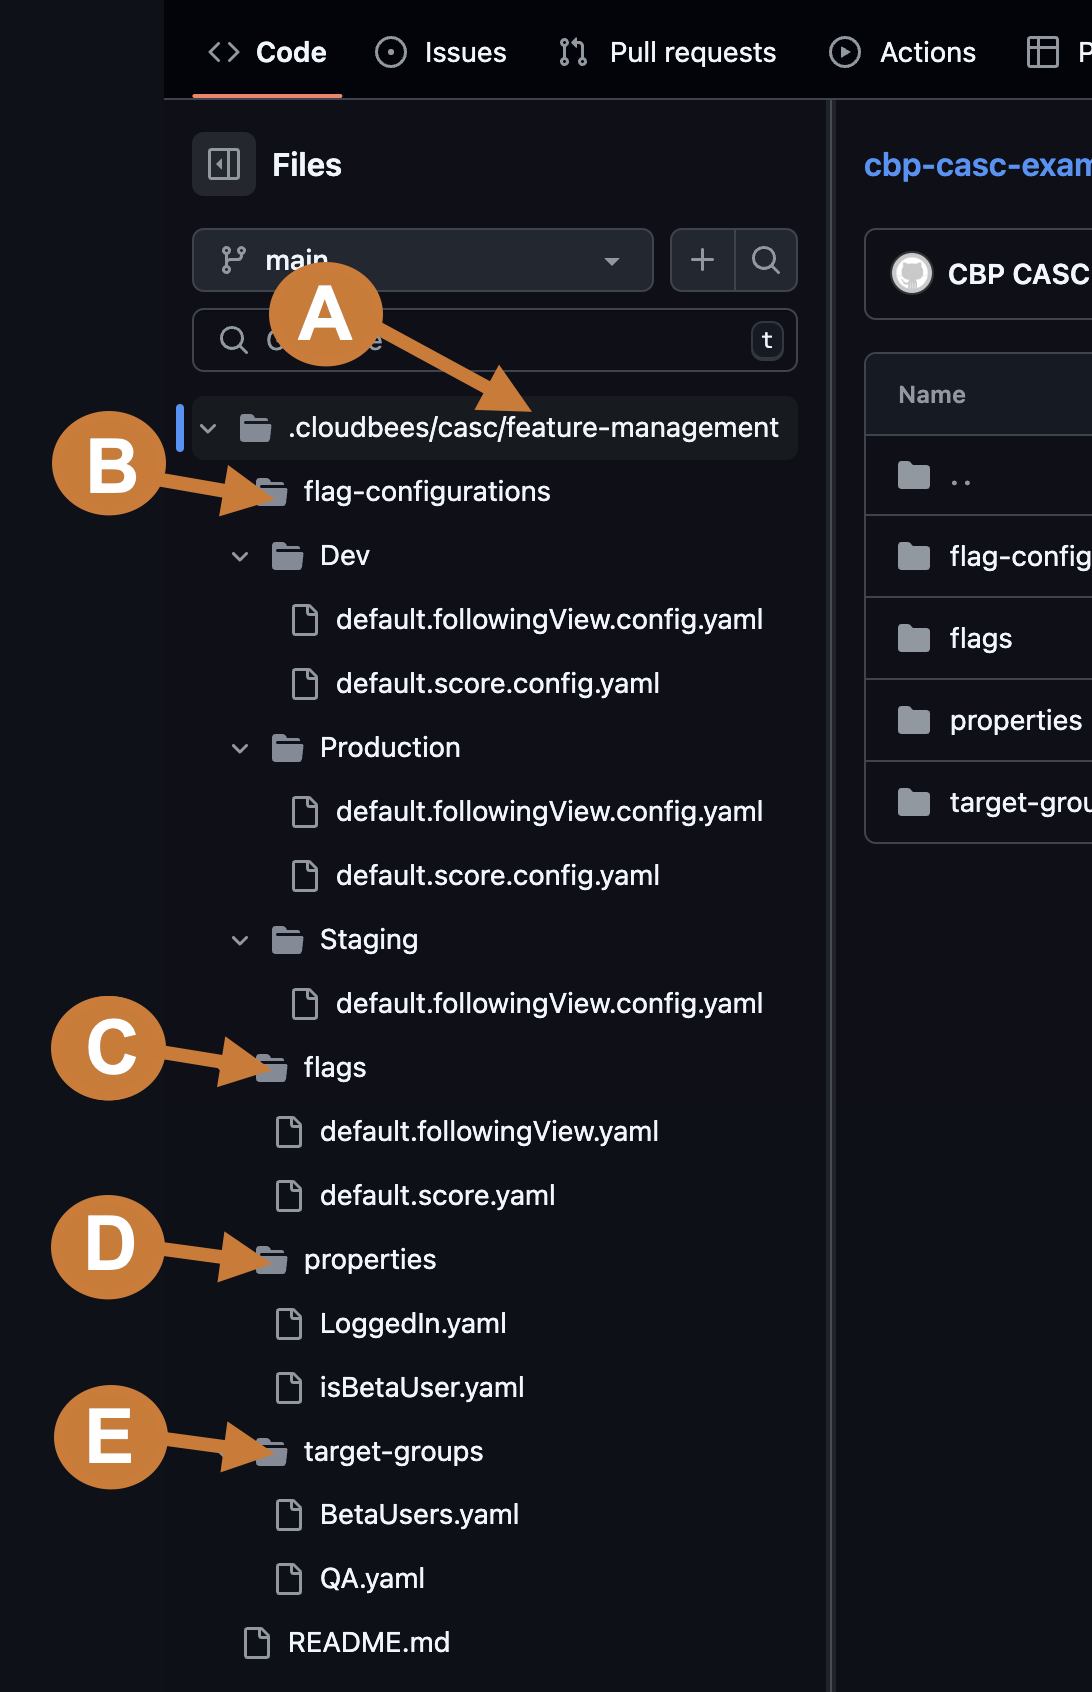
The folder structure is organized to support consistent management across environments. At the top level, the main folder acts as the root directory. Inside this root, the .cloudbees/casc folder contains subfolders dedicated to various aspects of feature flag configuration. The system processes files according to this structure, validating YAML files located in the .cloudbees/casc/feature-management/flags subdirectory and creating them as flags in the system. These flags then appear in the UI for easy management.

| While the YAML files include a type field, this field has no functional impact and is intended for informational purposes only. |
View more about each of the main folders:
A. feature-management
| Folder name and description |
|---|
feature-management: Contains all flags and configuration-related details. |
B. flag-configurations
| Folder name and description | Example content |
|---|---|
feature-management/flag-configurations: Contains a subfolder for each environment, containing the details of the defined flag configurations. |
Produces environment sub-folders. For example: Example file name: default.score.yaml
|
Deleting an environment in the UI will delete the corresponding environment folder under feature-management and all files within it. However, deleting an environment folder directly in SCM only deletes the flag configurations associated with that environment and does not delete the environment itself.
|
C. flags
| Folder name and description | Example content |
|---|---|
feature-management/flags: Contains details that are consistent across environments, such as names, descriptions, labels, variations. |
Example file name: default.score.yaml
|
D. properties
| Folder name and description | Example content |
|---|---|
feature-management/properties: Contains a list of the available properties that can be used in flag configurations or target group definitions. |
Example file name: properties.yaml
|
E. target-groups
| Folder name and description | Example content |
|---|---|
feature-management/target-groups: Contains definitions for target groups, which are consistent across environments. |
Example file name: BetaUsers.yaml
|
inheritance.yaml [Deprecated]
| Folder name and description |
|---|
inheritance.yaml: [Deprecated] This file was previously used to reference inherited entities from parent organizations. Inheritance is no longer needed - feature management entities are now independently scoped to the organization in which they are created. |
Create the CasC YAML files
To configure CasC in the Cloud-Native CloudBees Unify, you can create YAML files and folders using one of the following methods:
-
Generate files automatically via the UI
-
Use CloudBees Unify UI to create the entities, such as target groups, or custom properties.
-
The system generates the corresponding YAML files and organizes them under the appropriate folders in the SCM repository.
-
This method provides a structured starting point, making it easy to edit and refine.
-
-
Manually create files
-
Write YAML files yourself using a text editor or IDE, following the expected folder structure:
-
feature-management/flags: For defining feature flags. -
feature-management/target-groups: For defining target groups. -
feature-management/flag-configurations: For flag configurations organized by environment.
-
-
Save and commit the files to your SCM repository.
-
-
Copy and edit existing files
-
Use an existing YAML file as a template.
-
Copy the file, adjust parameters such as flag names, conditions, or target groups, and save it in the appropriate folder.
-
|
Begin by creating entities in the UI to generate skeleton YAML files. These files can be downloaded or edited directly in your SCM to refine the configuration. Ensure that all YAML files adhere to the CloudBees Unify CasC folder structure, as only valid files within the specified directories are interpreted by the system. |
Root CasC configuration
The flag value is controlled at runtime for all CasC flags.
Select the link below to show the inputs for the base, or root, schema for CasC in CloudBees Unify Feature management.
View details about the root input schema:
| Input name | Data type | Required? | Description |
|---|---|---|---|
|
Semver |
No |
The CloudBees Unify API version.
The default value is |
|
String |
Yes |
For a flag, must specify |
|
String |
Yes |
The name of the flag controlled by this flags definition. |
|
String |
No |
The flag name. |
|
String |
No |
The flag description. |
|
String, Boolean |
No |
The available values for the flag. |
|
Boolean |
No |
Whether the flags status is enabled. |
|
String |
No |
The flag labels. |
|
String |
No |
The stickiness property that controls percentage-based flag evaluation.
The default value is |
|
String |
No |
The code language or framework name. For example, |
|
Array |
No |
An array of conditions having a logical |
|
String |
No |
The value when no condition is met.
The default value is |
Conditional CasC configuration
A condition is an if/else statement.
An array of conditions is processed in order, with a logic gate between each condition statement. There are four types of condition statements: dependency, group, property, version.
View details about the four types of condition statements:
-
dependency: Expresses flag dependencies by indicating a flag name and expected value.Table 2. Dependency nested inputs Input
nameData type Required for a dependency? Description flagString
Yes
The flag name.
valueString Boolean
Yes
The expected flag value.
-
group: Lists target groups and the operator that indicates the relationship between them.Table 3. Target group nested inputs Input
nameData
typeRequired for a target group? Description nameArray / String
Yes
The list of target group names.
operatorLogical operator
Yes
The type of relationship between groups:
and|or|not. -
property: A single property that includes an operator and an operand; multiple conditions are possible.Table 4. Single property nested inputs Input name Data
typeRequired for a property? Description nameString
Yes
The custom property name.
operatorLogical
comparison operatorNo
The first operand of the condition; accepts
is-undefined|is-true|is-false|in-array|eq|ne|gte|gt|lt|lte|regex|semver-ne|semver-eq|semver-gte|semver-gt|semver-lt|semver-lteoperators.operandString
NumberRequired only if
operatorspecifiesis-undefined|is-true|is-false.The second operand of the condition.
-
version: Compares the version value of one to another.Table 5. Version nested inputs Input
nameData
typeRequired for a property? Description semverSemver
Yes
The version to compare to.
operatorLogical
comparison operatorNo
The operator to compare to the
semverversion; acceptssemver-eq|semver-ne|semver-gte|semver-gt|semver-lt|semver-lteoperators.
Specify the value when the condition is met with the value input.
Multiple conditions
Create multiple conditions using and|or logical operators between any of the above types of condition statements.
Specify the operator in acrossTypesLogicGate.
For example, if a dependency is met and a user matches a target group, then a Boolean flag serves true. Otherwise, the flag is false (default).
Multiple conditions usage examples
In the following example, a flag is true only for users in the QA or Beta Users target groups that are using version 3.0.1 (or later) of an application.
Otherwise, the flag value is false and the feature is hidden.
flag: default.followingView type: flags name: following view conditions: - group: name: - QA - Beta Users version: operator: semver-gte semver: 3.0.1 value: true value: false
Target group CasC example
Use the following YAML example to help you configure target groups.
A target group is a set of rules on top of custom properties that are defined in runtime and used in flags conditions.
# Yaml api version # Optional: defaults to "1.0.0" version: Semver # Yaml Type (required) type: "target-group" #Target Group Name name: String # Target Group description # Optional = "" description: String # The logical relationship between conditions # Optional = and operator: or|and # Array of Conditions that have a logical AND relationship between them conditions: # The Custom property to be conditioned (first operand) - property: String # The Operator of the confition operator: is-undefined|is-true|is-false|in-array|eq|ne|gte|gt|lt|lte|regex|semver-ne|semver-eq|semver-gte|semver-gt|semver-lt|semver-lte # The Second operand of the condition # Optional - Based on operator (is-undefined, is-true, is-false) operand: String|Number|[String]
Target using User IDs
Configure a target group matching specific user IDs.
type: target-group name: QA conditions: - operator: in-array property: soundcloud_id operand: - 5c0588007cd291cca474454f - 5c0588027cd291cca4744550 - 5c0588037cd291cca4744551 - 5c0588047cd291cca4744552 - 5c0588047cd291cca4744553
Split release configuration
The available split release configurations include split value schema and 50% split.
Split value schema
Specify a percentage of web traffic to split across different flag values.
| Input name | Data type | Required? | Description |
|---|---|---|---|
|
Number |
Yes |
The percentage for which the flag value is true. |
|
Boolean|String|Number |
Yes |
The flag value delivered to the |
50% split
In the following split release example, a flag value is true for 50% of app users. For the other 50% of users, the flag value is false, and the feature is hidden.
flag: default.followingView enabled: false defaultValue: - percentage: 60 option: true - percentage: 40 option: false conditions: []
Scheduled value configuration (Boolean flags only)
Configure the percentage of app users who are exposed to a feature at a specified date and time.
Scheduled value schema
Enable/disable a feature for a percentage of app users at a specified date and time.
The flag value is either true or false.
| Input name | Data type | Required? | Description |
|---|---|---|---|
|
Date |
Yes |
The date and time when the flag value is switched to the specified |
|
Number |
Yes |
The percentage of users served the flag |
|
Boolean |
Yes |
The flag value delivered to the |
The example below illustrates a rollout transitioning from 0% to 100% over the course of a week, from November 21 to November 28. For example, at 2024-11-21T13:26:00Z, 0% of users will receive 'true,' and by 2024-11-28T13:31:00Z, 100% of users will receive 'true.' Refer to Configure a scheduled release (Boolean only) for more information about configuring a scheduled release.
enabled: false defaultValue: - percentage: 0 from: 2024-11-21T13:26:00Z - percentage: 100 from: 2024-11-28T13:31:00Z conditions: []