Configure a feature flag using product and user data to control how and when a feature is released. Flags are created within an application, which must be linked to one or more environments. Once a flag is created, it becomes available in all environments linked to that application.
Configure the flag’s rules separately for each environment. For example, a QA environment might always have the flag enabled, while the production environment might use a gradual rollout.
| For applications linked to multiple environments, you can clone a flag’s configuration from one environment and apply it to any other environment linked to that application. |
Rules can be based on user properties such as location, device type, language, or dynamic target groups using custom attributes evaluated at runtime. You can also nest rules to create more advanced logic using flag, property, and target group conditions.
For more information, refer to how flags relate to applications and environments.
| A flag configuration must be enabled to be functional. |
Rule values
To add complexity, add property, target group, and flag conditional statements using IF/THEN, ELSEIF/THEN, and ELSE logical operators.
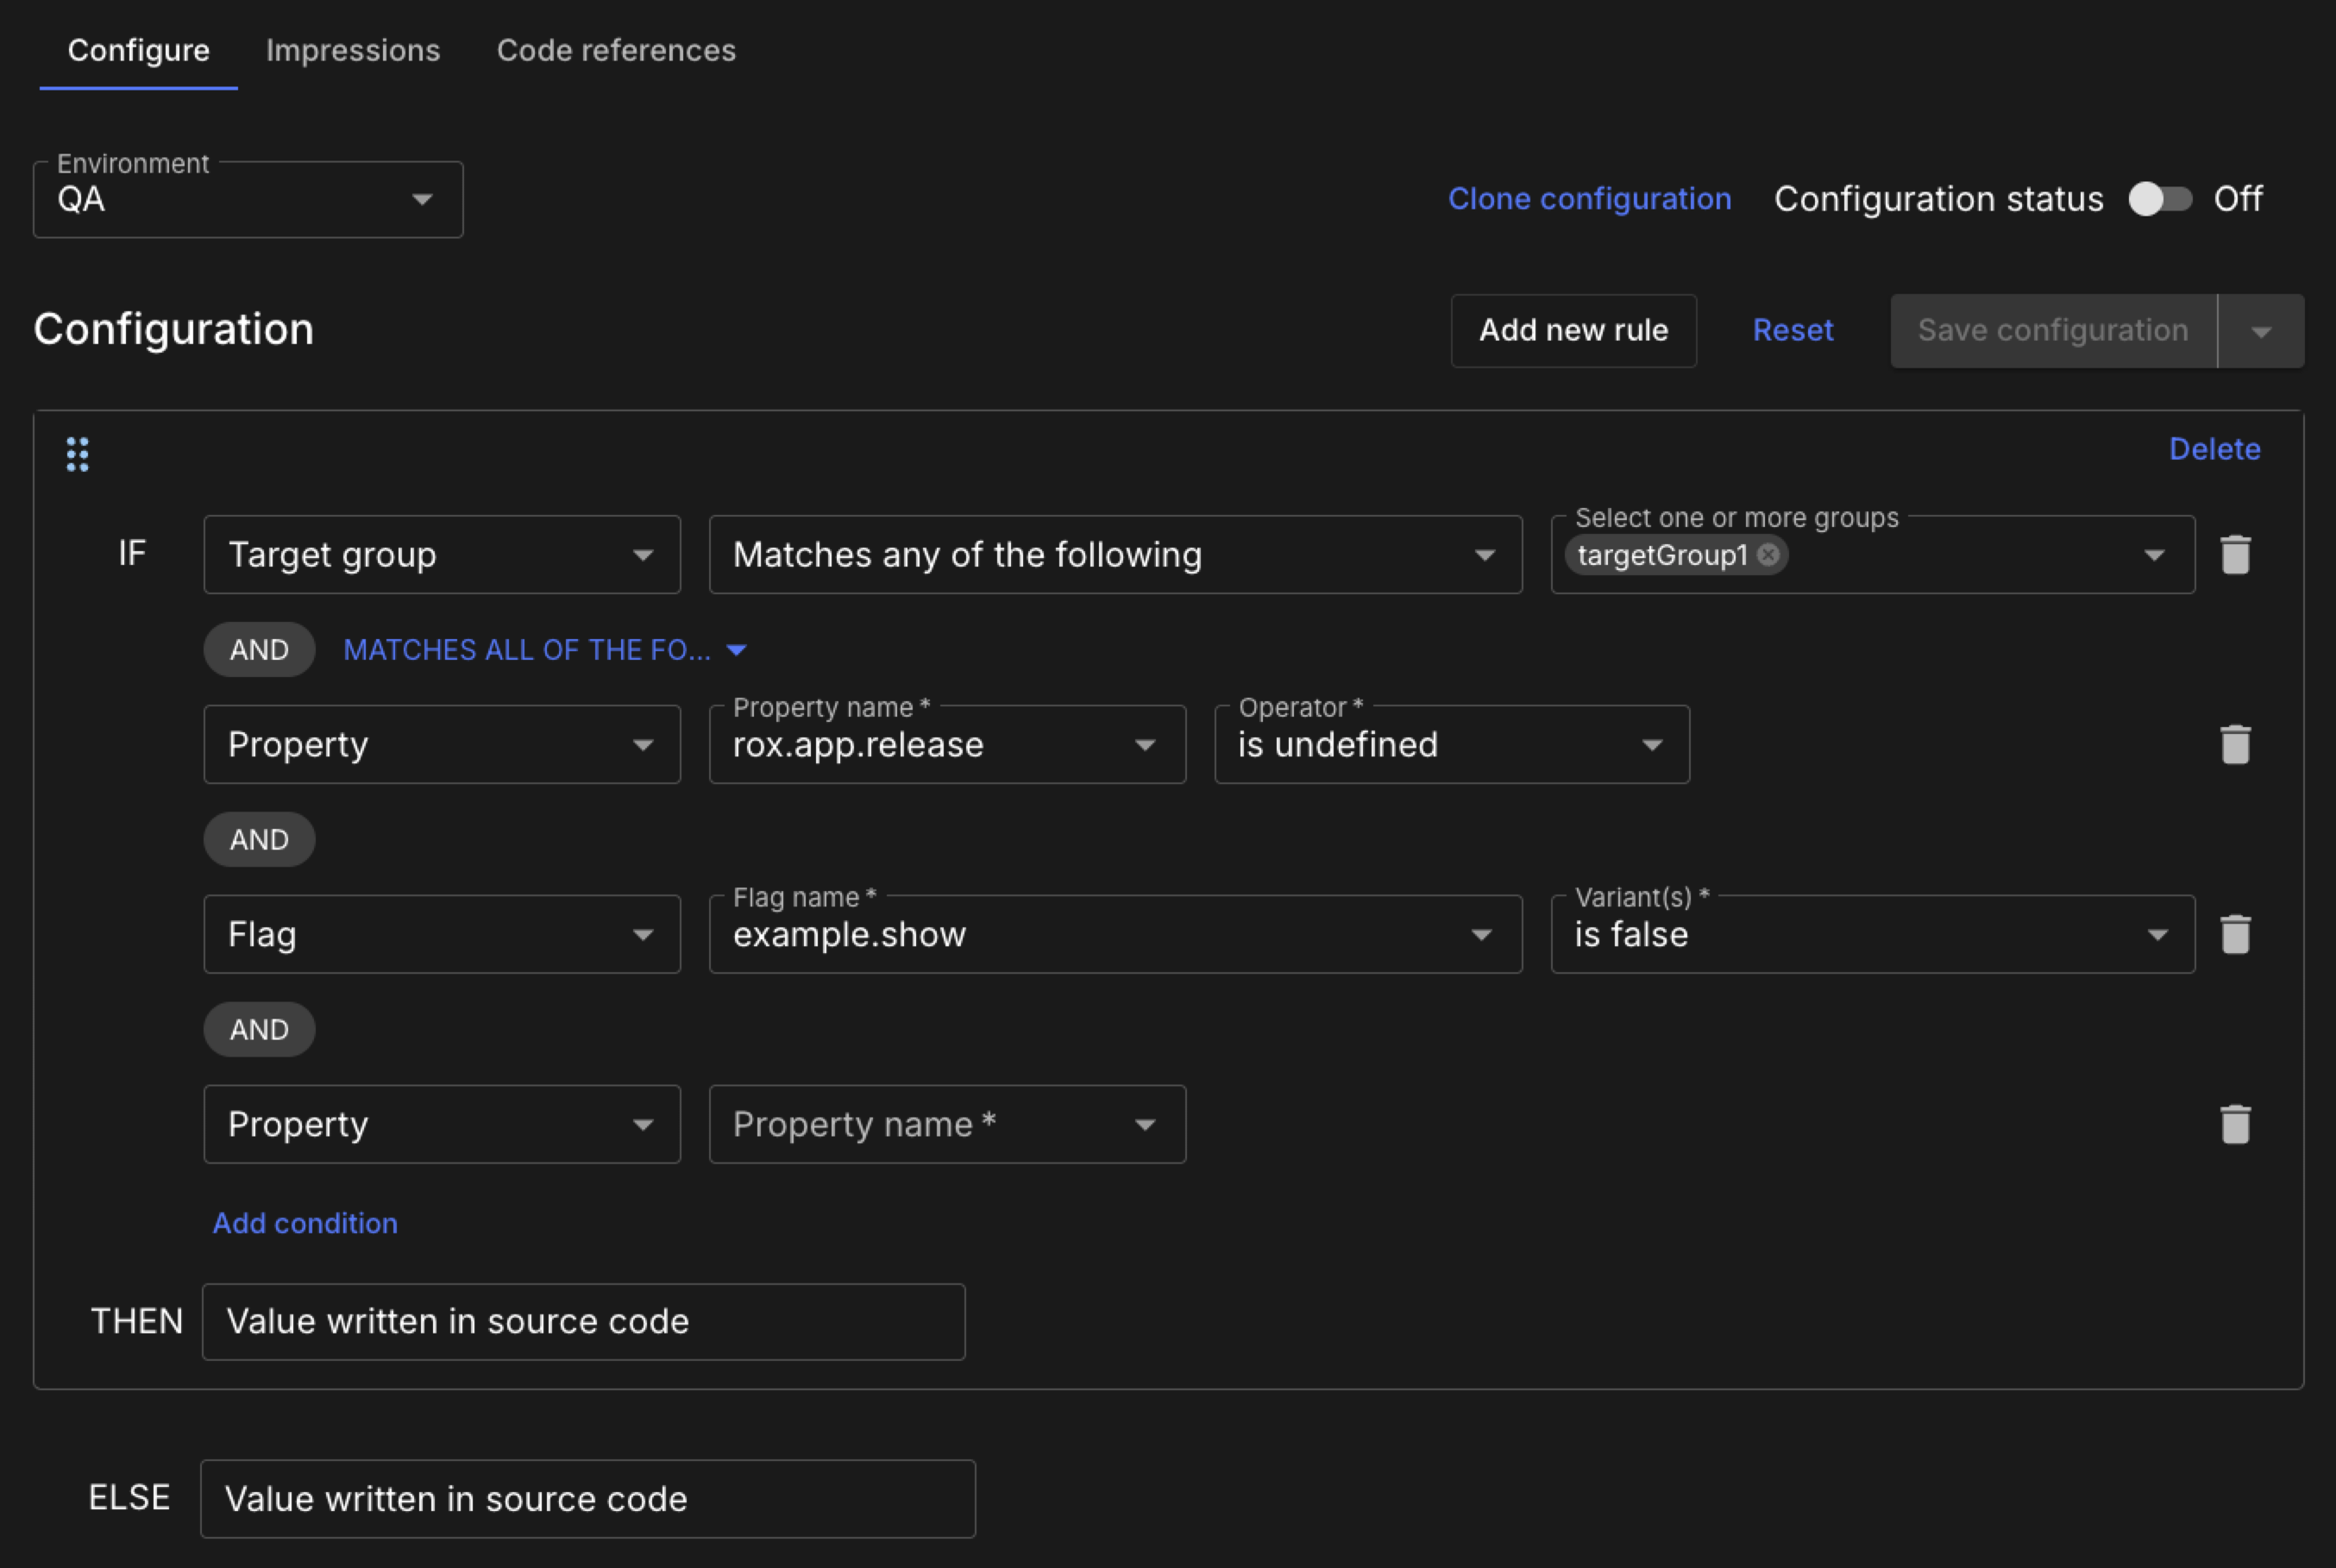
Adding a new rule creates a new configuration block. Each configuration block may contain one condition or multiple (nested) conditions. Refer to the following table for options when adding nested conditions.
| Rule type | Maximum number of instances |
|---|---|
Property |
Unlimited |
Target group |
1 |
Flag |
1 |
The following flag configuration example has nested conditions.
Default value
The default condition for a flag is to serve the value written in the source code.

Free text value
When you set the configuration for a number or string flag, you can select from predefined variations or enter a free text value directly. Free text values are useful when the value cannot be predetermined, such as a timeout duration, URL, or custom string.
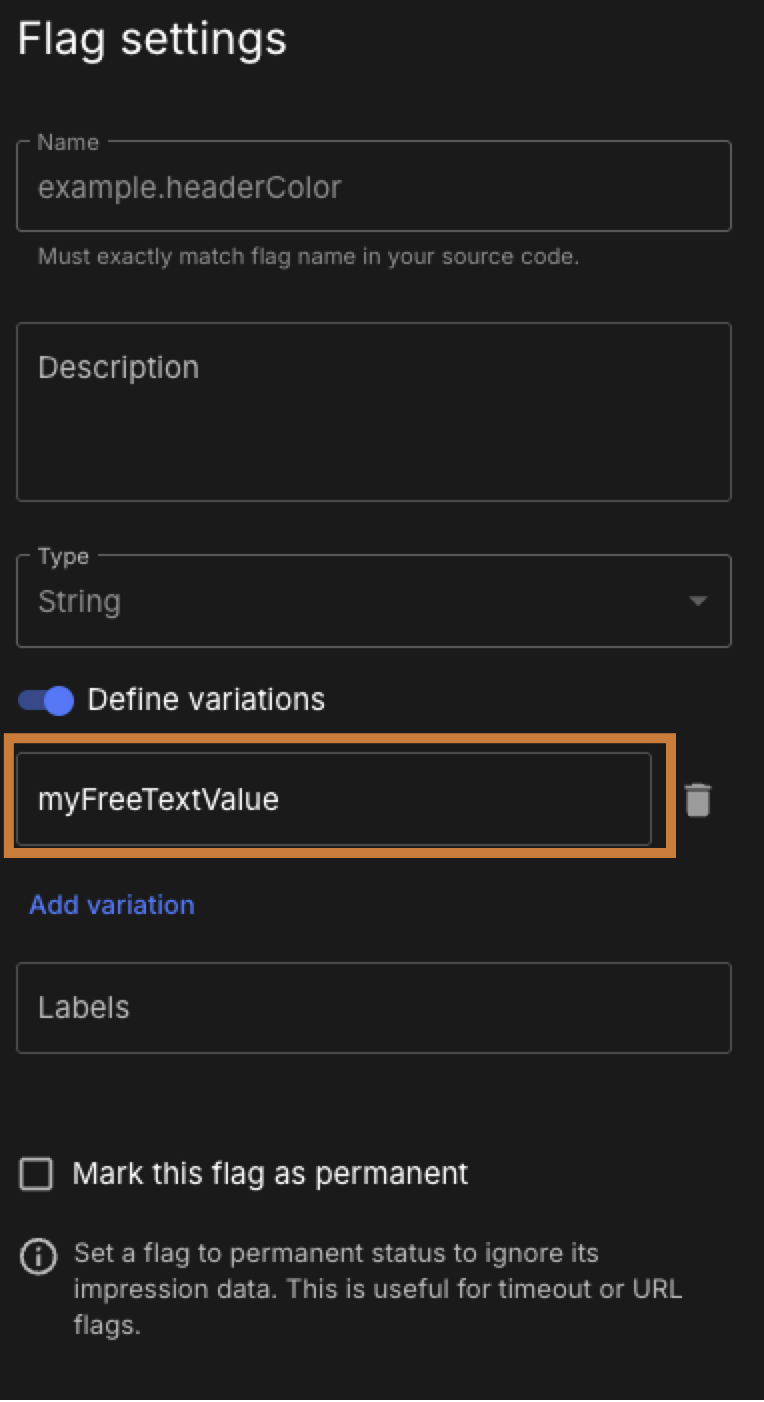
| At any time during configuration, select Reset to restore the flag configuration to its saved state. |
Add a new rule configuration
Add conditional logic to your feature flag, choosing among property, target group, and flag options.
To add a rule:
-
Select Feature management.
-
Select
 next to the flag you want to configure.
 -
Select Configure.
-
Select an Environment from the options.
-
Select Add new rule, and select from the options.
-
Property:
-
Select a Property name.
-
Select an Operator from the options.
-
Select a Value from the options.
-
-
Target group:
-
Choose from the Matches… options.
-
Choose from the Select one or more groups options.
-
-
Flag:
-
Select a Flag name.
-
Select Variant(s) from the options, if available.
To reorder your ruleset, select  next to the rule you wish to move, and drag it to the desired location within the configuration.
-
-
-
Select Add new rule to create a new ruleset, or select Add condition to add another nested condition.
-
Select one of the following for each ELSE and/or THEN value.
-
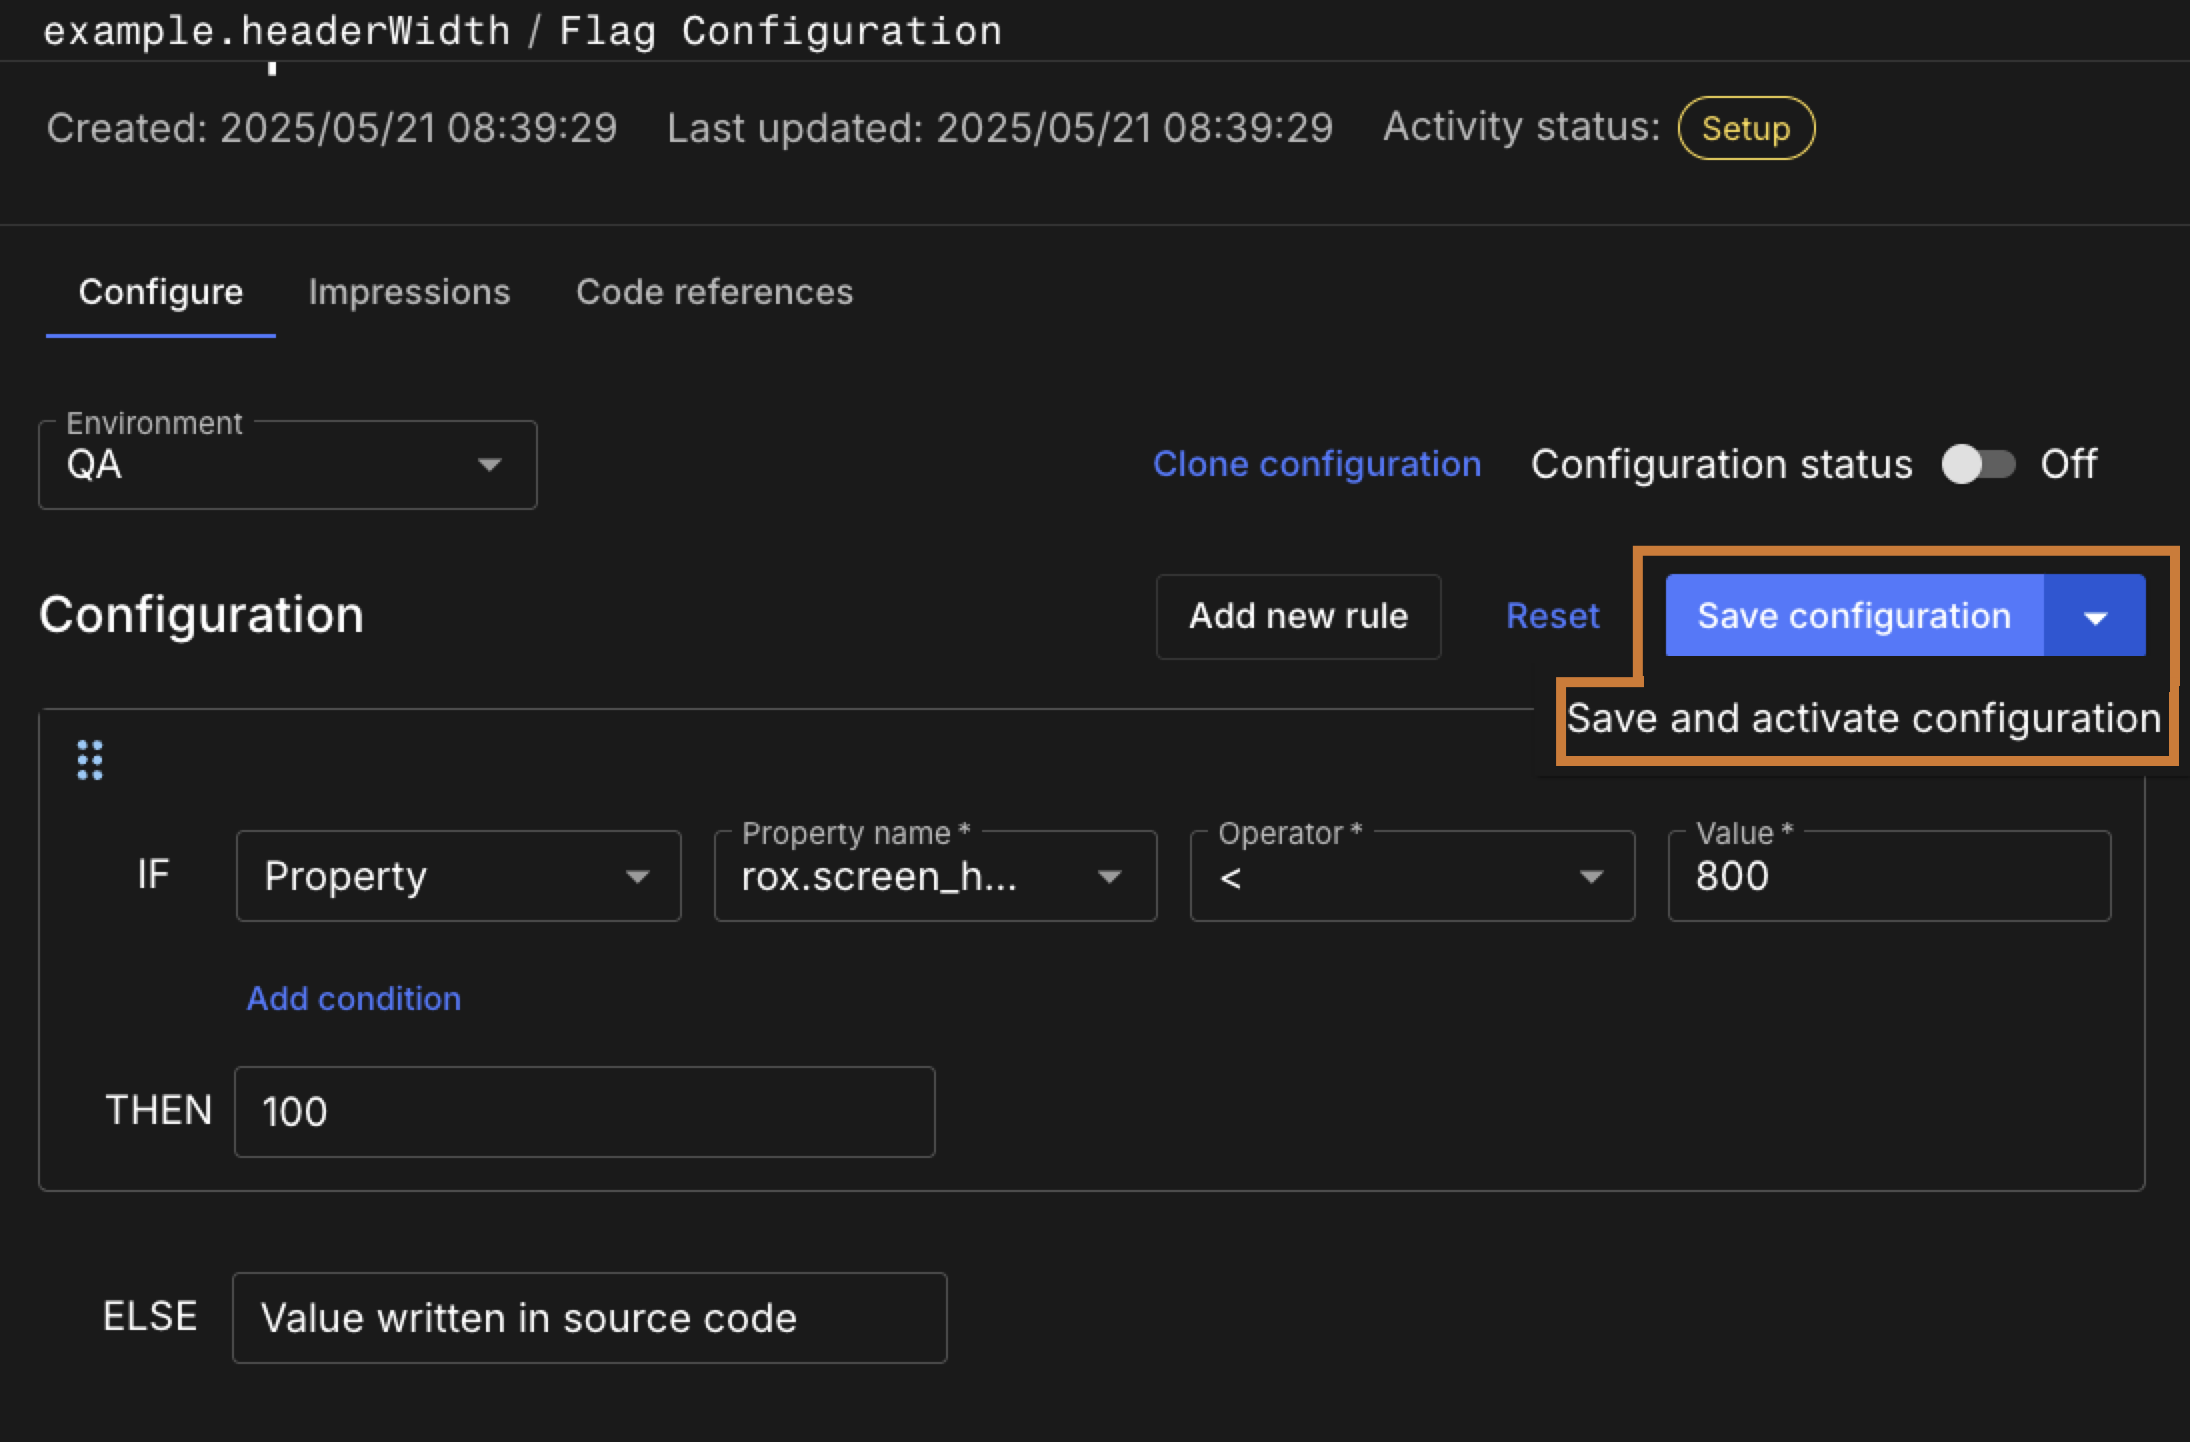
Select Save configuration, or select
 and Save and activate configuration.
| Refer to Rule values for more information. |
A conditional statement for a flag configuration is set accordingly. Enable the flag configuration by toggling the Configuration status to On.
Add a nested condition
Add complex logic to your flag configuration statements with nested conditions separated by an AND or an OR.
To add a nested condition:
-
Select Feature management.
-
Select
 next to the flag you want to configure.
 -
Select Configure.
-
Select an Environment from the options.
-
Select Add new rule if you have not already added at least one configuration to create a conditional statement.
-
Select Add condition inside the configuration block to add a nested condition. Refer to: Number of properties, target group, and flag conditions permitted for nested conditions..
-
Select MATCHES ALL OF THE FOLLOWING (an AND logical operator) or MATCHES ANY OF THE FOLLOWING (an OR logical operator).
-
Select from the options.
-
Select Save configuration, or select
 and Save and activate configuration.
|
Select Delete on the right of a configuration to remove the configuration block. Or select |
Enable the flag configuration by toggling the Configuration status to On.
Configuration status
The configuration status is the key flag controller within an environment.
By enabling a flag configuration, release features based on user properties such as location, device type, language, or dynamic target groups, using custom attributes that are evaluated at runtime.
Turning a flag configuration on or off only affects the flag configuration in a given environment.
To change the configuration status:
-
Select Feature management.
-
Select the Environment from the options.
-
Select
 next to the flag configuration you want to enable.
 -
Select Configure.
-
Select the configuration On or Off toggle to turn the configuration status off or on, respectively.
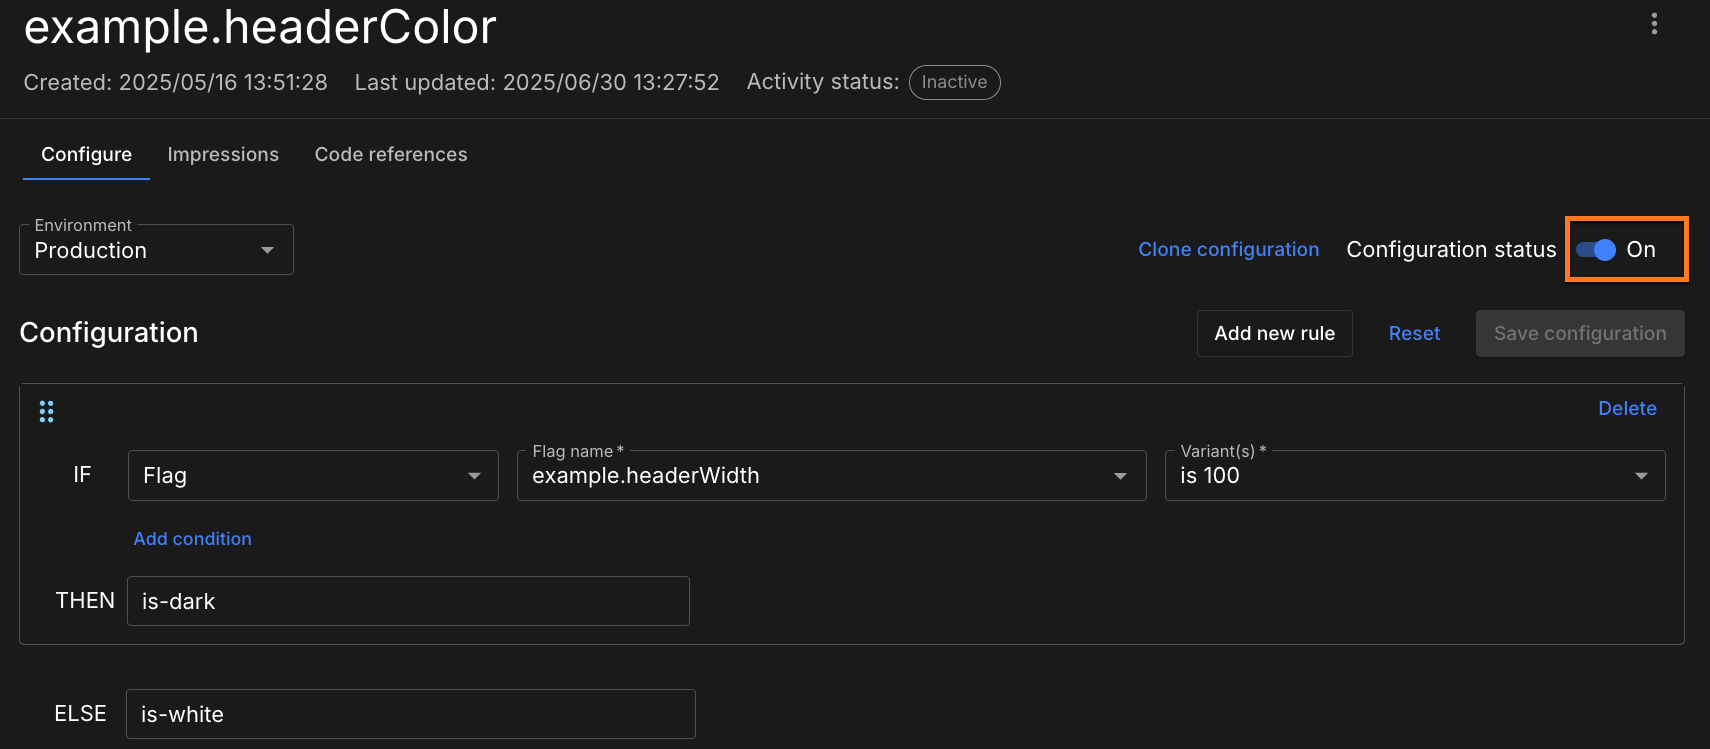
Toggling a configuration to On sets the flag value to the Configure rules. Turning a configuration Off disables the configuration rules and serves the default configuration value as written in the code. The selected flag configuration status is updated accordingly for the specified environment only.
Configure a scheduled release (Boolean flags only)
Schedule a Boolean flag configuration to be enabled for a fraction of users at a given date and time. For example, you may want to deploy a feature to 25% of users on a particular day, to 50% of users a month later, and to 100% of users two months later, to allow for user feedback and testing.
By designating the percentage of users the feature is enabled for and the timing of the release, you gain more granular control over your feature release schedule.
To create a feature release schedule:
-
Select Feature management.
-
Select
 next to the flag you want to configure.
 -
Select Configure.
-
Select an Environment from the options.
-
Do one of the following:
-
If your flag has no configuration with conditional statements, select Scheduled from the Set to options.
-
If you have added configurations and/or nested conditions to a feature flag, select Scheduled from the THEN and/or the ELSE options.
The scheduled percentage is displayed, and defaults to True 0% at the current time, and True 100% five minutes later in 24-hour clock format.
-
-
(Optional) Select a time zone from the options.
-
(Optional) Enter a positive number to adjust either of the schedule percentages.
-
(Optional) Set the schedule percentage date by either of the following:
-
Select the date and enter your desired date.
-
Select
 .
.-
Select
 to adjust the year.
 -
(Optional) Select
 to adjust the month.
-
-
| You must set any new scheduled percentage date and time to occur after any existing scheduled percentage date and time. |
-
Set the schedule percentage time by either of the following:
-
Select the time and enter your desired time, in one-minute increments.
-
Select
 and scroll to adjust the hour and minutes, in five-minute increments.
-
-
Select Add row to add unlimited scheduled percentages and dates/times, each of which default to True 0% at five minutes after the last scheduled time, and adjust accordingly.
-
Select Save configuration, or select
 and Save and activate configuration.
Enable the flag configuration by toggling the configuration status to On. Once enabled, the Boolean flag serves the value True to the designated percentage of users at the designated dates and times.
|
You can add more than one schedule, as in the example below: 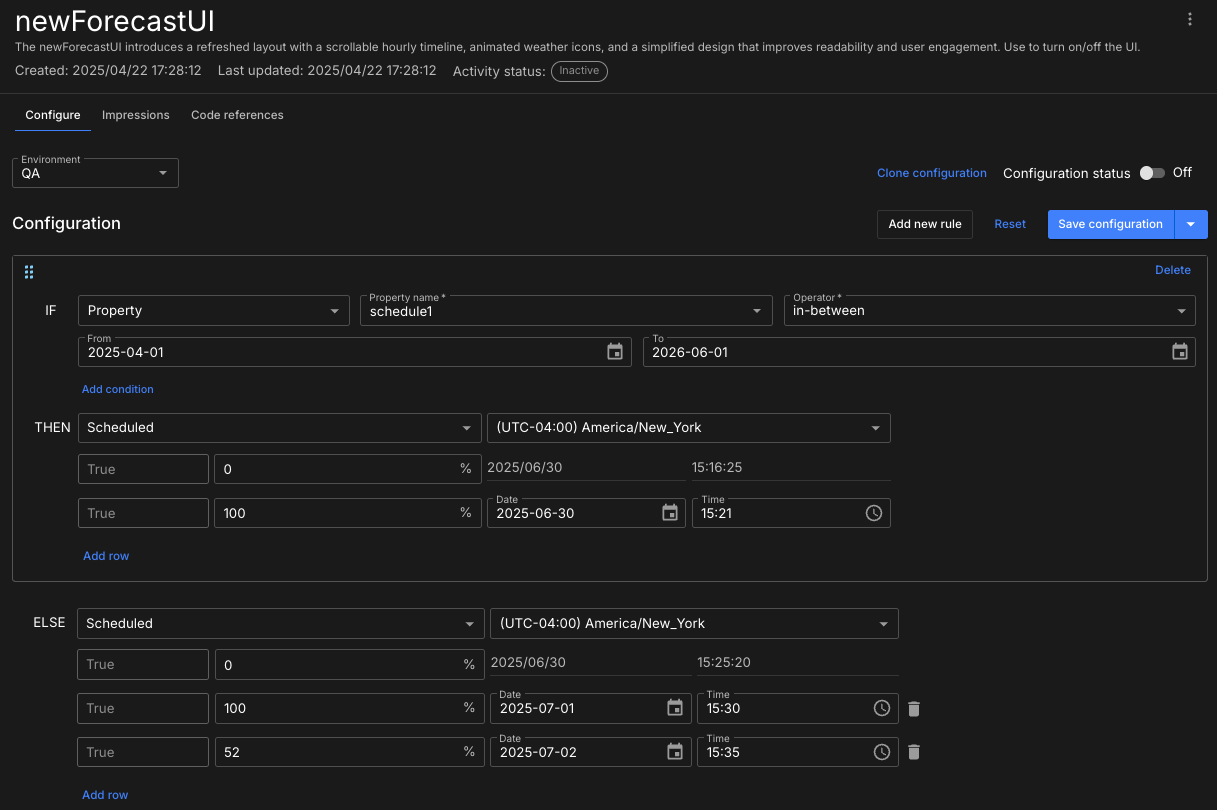
Figure 7. Example flag with two schedules configured.
|
Configure a split release
Split releases are designed to provide consistency for the user. A distributed algorithm, which is similar to tossing a coin, determines the split. When the user revisits the page, the flag configuration persists and provides a consistent user experience. Configure any flag to release its associated features to a specified percentage of users.
For example, you might want to release an experimental feature to a third of your beta user group, chosen randomly. To be sure the same third of testers experience the experimental feature each time they access your application, configure a split release.
To configure a split percentage flag:
-
Select Feature management.
-
Select
 next to the flag you want to configure.
 -
Select Configure.
-
Select an Environment from the options.
-
Do one of the following:
-
If your flag does not include a configuration, select Split from the Set to options.
-
If you have added one or more configurations, and/or nested conditions to a feature flag, select Split from the THEN and/or the ELSE options.
-
-
The split percentage is displayed, and defaults to the following (according to flag type):
-
Boolean flag: A split between True and False.
-
Number flag: A split among all variations.
-
String flag: A split among all variations.
-
-
Adjust the split percentages by either of the following:
-
Select
 .
. -
Enter an exact number.
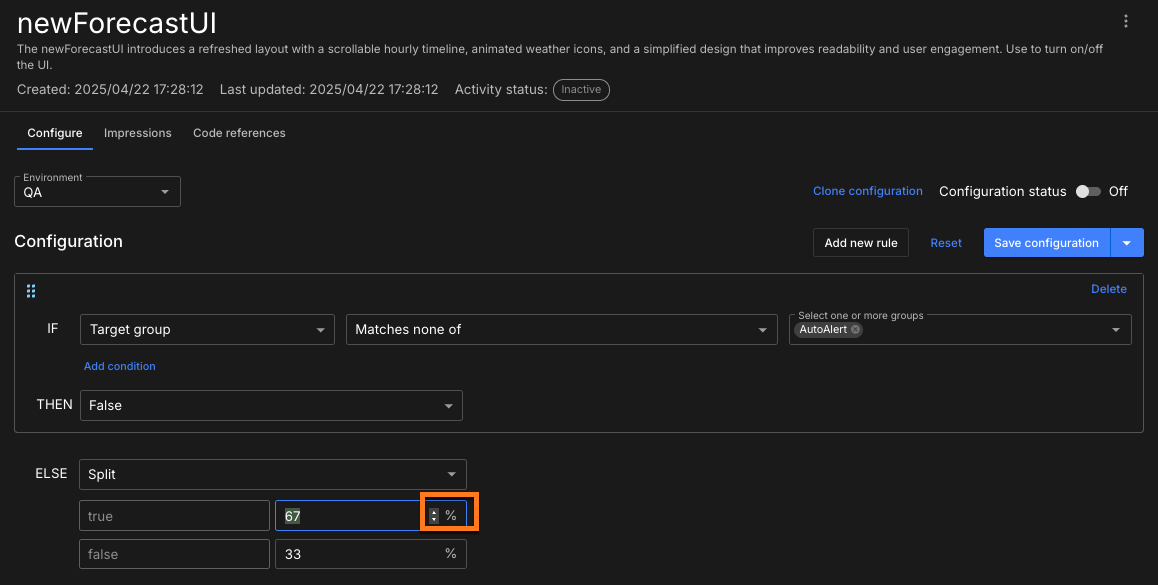 Figure 8. Split percentage example with arrow controls highlighted.
The total percentage must equal 100%. To remove a string or number variation, set the percentage to 0%.
To add a new variation to the split:
-
Define a new variation in the flag settings.
-
In the flag configuration, delete the current split and set up a new one. The new split has the new variation.
-
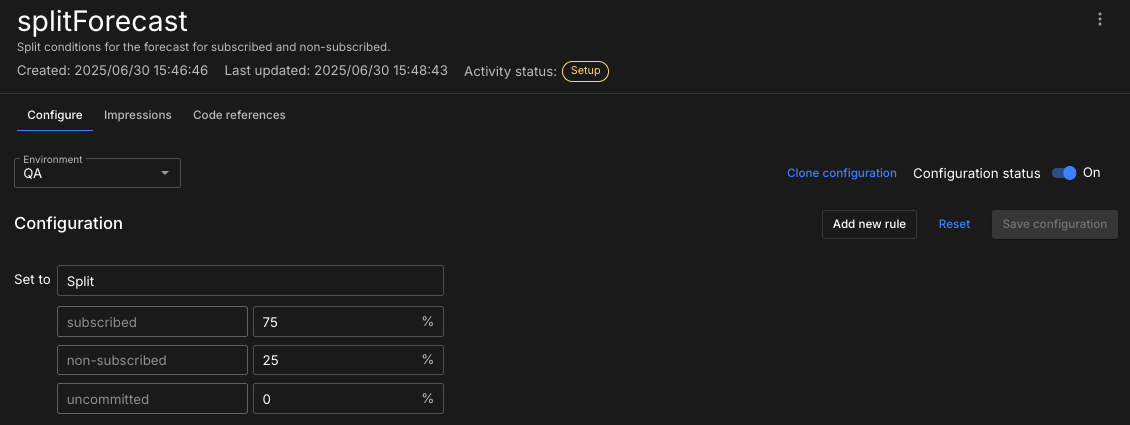 Figure 9. String split percentage example with one variation unused.
 -
-
Select Save configuration, or select
 and Save and activate configuration.
The new split conditions for the flag configuration are set accordingly. Enable the flag configuration by turning the configuration status to On.
Once enabled, each split percentage serves its specific value to that same set of users each time they open the application. For a Boolean flag, the values are True or False, and for a number or string flag, the values are the indicated variations.
|
CloudBees strongly recommends that you preserve the consistency of the user experience by never decreasing a live Boolean flag’s True percentage. Decreasing the True percentage of a flag that is enabled in production may lead to inconsistencies, in which some users who previously had received a True value may instead receive a False value. While CloudBees recommends that you avoid updating any flags live in production, sometimes changes must be made. If so, you can safely increase a flag’s True percentage. When a flag’s True percentage is increased, all users that previously received a True value continue to have that same experience. |
The split release algorithm
The split release flag algorithm works as follows:
-
The built-in property
rox.distinct_idis a universally unique identifier (UUID). It is generated and serialized in the app. -
Every feature flag has its own seed to remove any potential statistical bias between two feature flags.
-
The SDK uses the seed and
rox.distinct_id(known as the "stickiness property") to run a hash function that is mapped to a double number from0to1.
If you select a 50% split, for example, CloudBees Unify checks if the hash
result is smaller than 0.5.
Modify the stickiness property
The stickiness behavior for a particular feature flag determines what value a user should get when splitting values.
For example, if you select userId as the stickiness property, the userId has a consistent behavior on all devices.
Alternatively, if you select account_id as the stickiness property, all users in the same account experience consistent behavior.
The default value for the stickiness property is the UUID distinct_id, but this can be modified.
The distinct_id is stored on the local storage of the end user device.
You can choose to override the rox.distinct_id to support the following:
-
A consistent cross-platform behavior for split releases.
-
A consistent experience for back-end SDK users.
The stickiness property of a flag can be any property you choose, and is specific for each environment.
To update the default (distinct_id) stickiness property:
-
Select Feature management.
-
Select
 next to the flag you want to configure.
 -
Select Configure.
-
Select an Environment from the options.
-
Select
 in the upper right.
 -
Select Flag settings.

The stickiness property is updated accordingly.
Clone a flag configuration
Cloning a flag configuration overrides the destination flag configuration. The flag rules are copied during cloning to override the flag configuration in the destination environment. Cloning is an efficient way to set up complex flag configurations in different environment(s).
To clone a flag configuration:
-
Select Feature management.
-
Select
 next to the flag you want to clone.
 -
Select Configure.
-
Select Environment from the options to clone the configuration for that environment to another environment or environments.
-
Select Clone configuration.
-
Select the environment(s) you want to clone to, or Select all.
Saving on the cloning step will override any existing configuration for the selected environment(s). -
Select SAVE.
The selected flag configuration and its configuration status are cloned to the chosen environment(s).