Artifacts are the output of a software development process, such as binary build and configuration files, and are often stored in a cloud storage service. Artifacts can be downloaded from storage and used in subsequent testing or deploy steps in a development pipeline.
Versioning of an artifact enables the management of artifacts effectively, providing the following:
-
Traceability: Connect an artifact to the specific workflow run where it was created.
-
Reusability: Reuse artifacts with consistency across environments and deployments.
-
Reliability and compliance: Link artifacts to evidence such as image digests or chart names.
Artifact traceability prerequisites
To enable artifact traceability, the artifact information must be registered to the CloudBees platform.
|
If using a CloudBees platform workflow, do one of the following to save artifact information:
-
Use the Register a build artifact action in the appropriate workflow step.
-
Add an action to the workflow that will automatically register artifact data, such as one of the following:
-
Manually create an artifact version in the UI.
Access an artifact
Use Artifacts to access information generated by workflow runs.
Access artifacts using one of the following options:
Option 1: Component associated with a workflow run producing artifacts.
-
Select Components.
-
Find and select a Component that has a workflow run producing a build artifact.
-
Select Runs.
-
Then select Run details > Build artifacts. The following information displays:
-
Artifact name
-
Artifact version
-
A link to the artifact digest
-
A link to the artifact location
-
Option 2: Artifacts associated with a component or application.
-
Select Components.
-
Find and select a Component that has a workflow run producing an artifact.
-
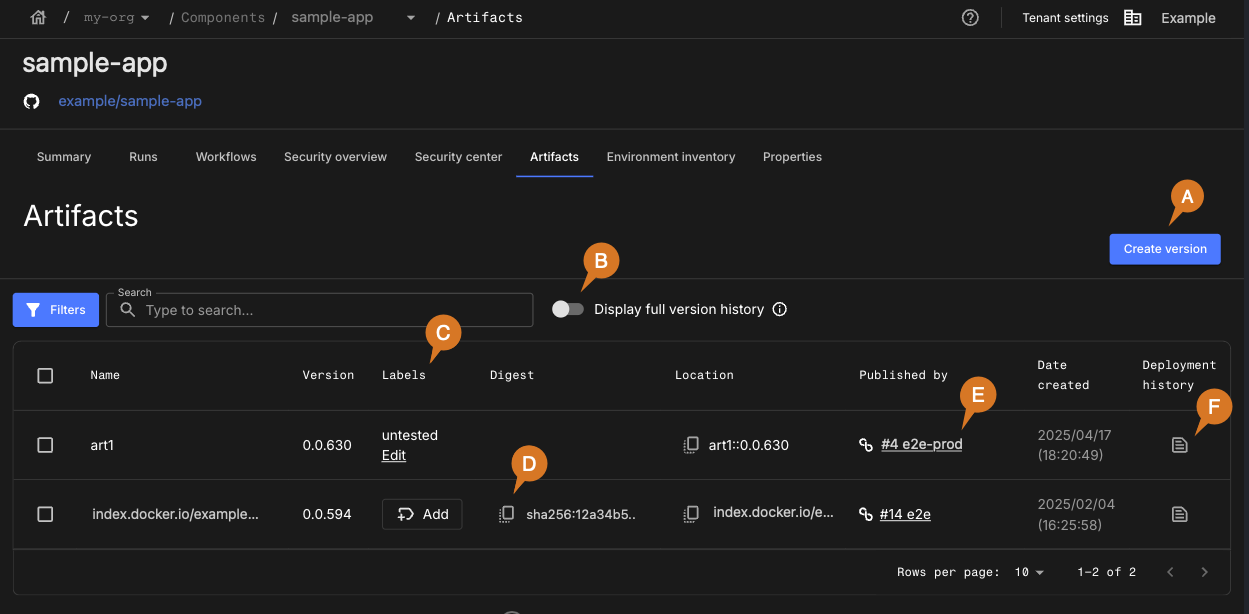
Select to view associated artifacts.
-
In addition to the information available in Build artifacts, the following displays:
-
Published by: The link to the run that has published this artifact.
-
Date created
-
Option 3: Artifacts associated with an application release.
-
Select Applications.
-
Find and select an Application that has a release that includes an artifact.
-
Select , and then select a release Name.
-
Select an Artifact to display the view described above.
(Optional) Filter and search for artifact versions:
| The filter and search features are only available after accessing the selected artifact from or . |
-
Search for a specific artifact by entering all or part of its name into the Search field.
-
Select Filter to narrow the search for only those artifacts with specific names and/or labels.
-
Use the toggle
 to display the full version history.
The default display
  shows only the latest artifact versions.
Artifact version information may not appear while generation is in progress.
The artifacts built or deployed by a workflow run in that component or application are displayed.

Explore the artifact list using the following options:
-
Select Create version to create an artifact version.
-
Toggle between the latest artifact version and full version history:
-
 displays only the latest artifact versions (default view).
 -
 to display the full version history.
-
-
Add, edit, or remove artifact labels.
-
Filtering the list by labels is also an option.
-
-
Select
 to copy a Digest or Location path.
 -
Select a run link to display the Run details of the run that published the artifact.
-
Select
 to display an artifact’s history.
Create an artifact version
Creating an artifact version enables effective management of software artifacts by:
-
Keeping track of specific artifact versions linked to a workflow run.
-
Maintaining observability for compliance reasons.
-
Managing dependencies effectively.
-
Automatically deploying newer versions of artifacts to different environments as part of automated workflows.
To create an artifact version:
-
Select Components, and then select a Component.
-
Select .
-
Select Create version.
-
Enter a Name for the artifact.
You can include the path for the artifact in the name. -
Enter the version.
-
Enter the URL location of the artifact version.
-
(Optional) Enter the Job URL; the URL of the workflow run that has built the artifact version.
-
(Optional) Enter the Digest; the signature of the artifact version binary (usually provided by the host repository).
-
Select Save. The artifact version is created.
Delete artifact versions
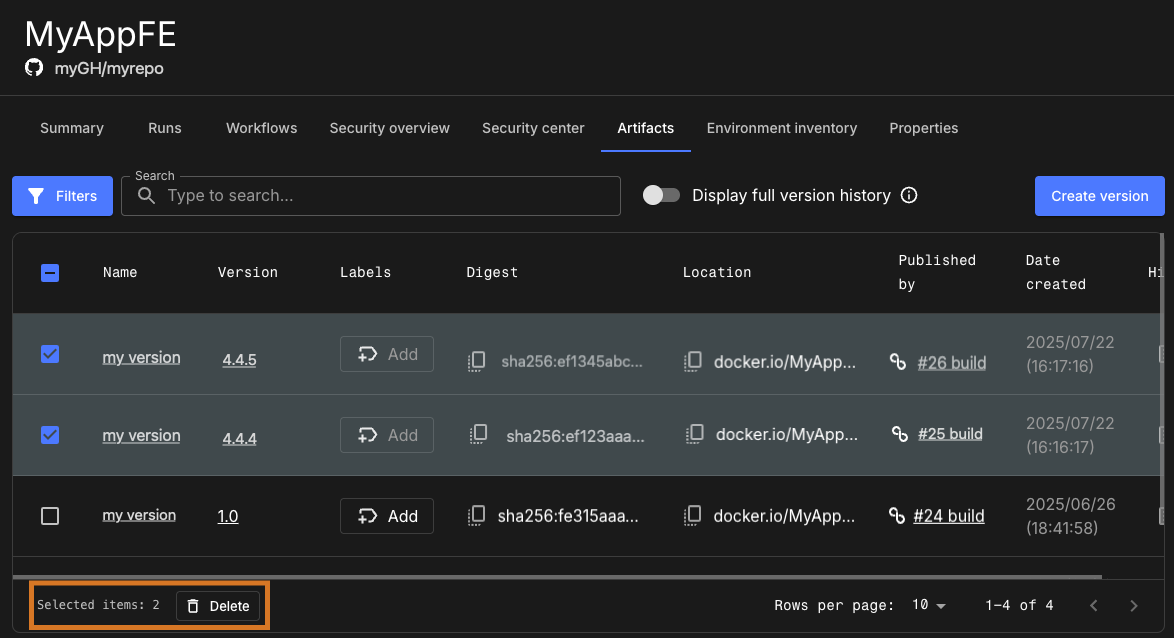
To reduce clutter in your organization, delete artifact versions. Delete multiple versions at once using the bulk delete feature.
To delete artifact versions:
-
Select Components, and then select a Component.
-
Select .
-
(Optional) Select
 to Display full version history.
 -
(Optional) Use Search or Filters to refine the artifact version list.
-
Do one of the following:
-
Select the
 of each artifact version to delete.
 -
Select the
 in the heading row to select all versions (bulk delete).
-
-
Select Delete. A delete confirmation message displays.
-
Select Delete artifact versions to confirm. The selected artifact version(s) are deleted.

Deployment and publish history
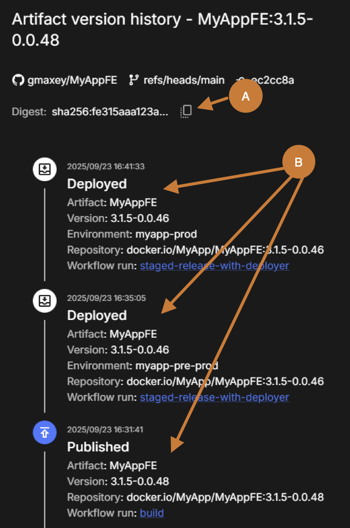
The deployment and publish history provides an information timeline for each artifact digest. The history can track an artifact across repositories using the digest, which serves as a unique digital signature for the artifact binary. In that case, the artifact name and version can be different.
| To collect artifact deployment data, a workflow must contain an operation to publish an artifact. |
To access the history:
-
Select Components, and then select a Component.
-
Select to display the artifact list.
-
Select
 for an artifact version. The artifact history is displayed.

The artifact version history displays the following information:
-
Select
 to copy the digest.
 -
Each deployment or publishing event is specified and includes the:
-
Event timestamp
-
Event type: Deployed or Published
-
Artifact name
-
Artifact version number
-
Environment name, if applicable
-
Repository URL
-
Workflow run: Includes a link to the run details of the workflow that deployed the artifact.
-
| A message displays if no digest or history is available for the artifact. |
Artifact labels
Create custom labels for artifact versions, and use them to organize and filter the artifacts listed in a component. Text strings are an acceptable label, and labels are reusable. Multiple labels can be added to an artifact version.
Artifact labels are useful for organizing artifact versions into groupings such as:
-
User or team
-
Release or testing status
-
Environment
-
Version
For example, use "Testing" and "Dev team" labels on an artifact in the development stage, and a "For release" label on all artifacts ready for production release. In the UI, filter the artifact list by the "For release" label, to get a convenient view of all artifacts ready for release.
|
If multiple labels for an artifact version have been created, only one is displayed by default in the artifact list.
|
Create or add artifact labels in the UI
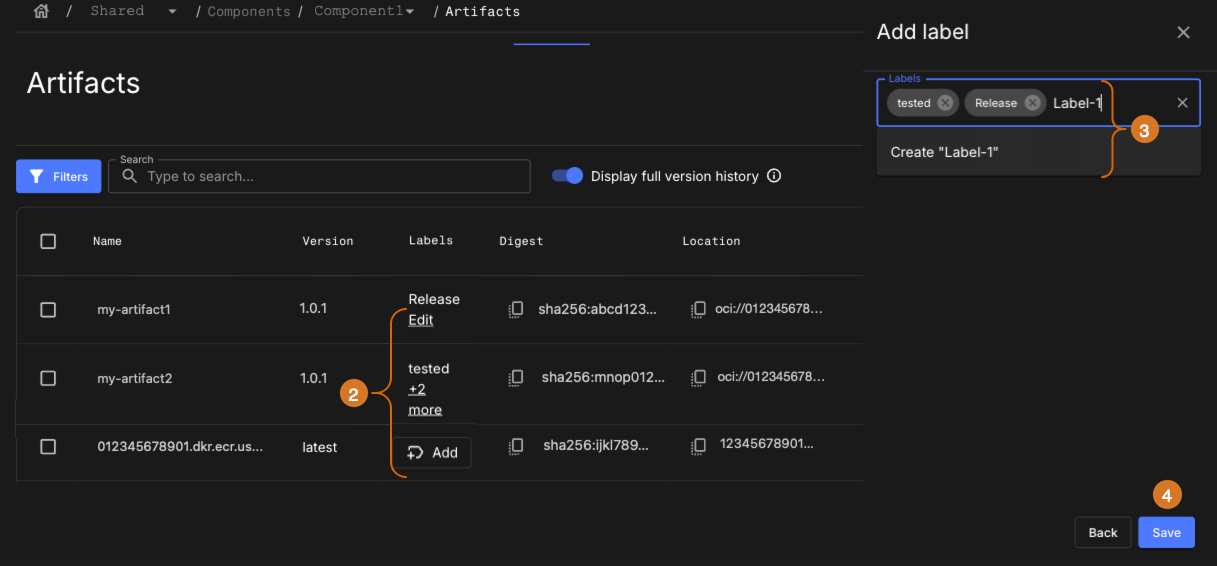
Create custom labels for an artifact version, and/or add existing labels. An artifact version may have multiple labels.
| A maximum of 20 labels are allowed per artifact version, with a maximum of 20 characters per label. |
To create or add an artifact version label:
-
Go to .
-
Select the link next to the artifact version to label. The link varies according to the label status:
-
 Add (an unlabeled artifact)
 -
Edit (an artifact with a single label)
-
+n more (an artifact with two or more labels)
-
-
Select Labels, and then use either of the following methods:
-
Enter a custom label, and then select Create "<custom label name>", where
<custom label name>is the label name. -
Select an existing label from the options to highlight it (not shown).
Scroll down to display all the options in the label list. -
(Optional) Add or create more labels using the above methods.
-
-
Select Save. The artifact version is labeled.

Remove an artifact label in the UI
Remove label(s) from an artifact version. Do the following:
-
Navigate to .
-
Select either:
-
Edit, if the artifact has one label.
-
+n more, if the artifact has two or more labels.
-
-
Select Labels to display the labels list, and remove a label by doing one of the following:
-
Deselect the highlighted label in the label options.
-
Select next to the label.
-
-
Select Save when all desired labels have been removed. The label(s) are removed from the artifact version.
Once a label has been removed from all artifact versions, it is deleted from CloudBees platform.
Managing artifact version labels using actions
The artifact ID is a unique identifier of an artifact version; this ID is used in actions to manage labels in workflow runs.
Apply the appropriate action based on the type of workflow being run:
| If your workflow is: | Manage labels with: |
|---|---|
CloudBees platform workflow |
|
GitHub Actions (GHA) workflow |