Create a source code management (SCM) integration to connect CloudBees platform Components and Applications to repositories hosted in GitHub, Bitbucket, GitLab, or Gerrit.
Once an SCM integration is configured, CloudBees platform can query repositories and branches, configure webhooks to trigger workflows, and authenticate repository access during workflow execution. This integration also enables security scans on connected source code repositories.
You can integrate with:
-
Cloud-hosted SCMs such as GitHub, Bitbucket Cloud, or GitLab Cloud.
-
Self-managed or on-premises SCMs such as Bitbucket Data Center, GitLab self-managed, or Gerrit.
Each integration type uses its own authentication method:
-
GitHub: GitHub App (managed automatically by CloudBees platform)
-
GitLab and Bitbucket: Personal access token
-
Gerrit: Basic authentication
The following table summarizes the supported SCM providers, their hosting types, and the integration methods used by CloudBees platform.
| SCM provider | Hosting | Integration type |
|---|---|---|
Cloud |
Access token |
|
Self-hosted |
Access token |
|
Cloud |
GitHub App |
|
Cloud or self-managed |
Access token |
|
Self-hosted |
Basic authentication |
| Each SCM integration type requires specific repository or application permissions to enable workflow commits and webhook creation. For detailed requirements, refer to SCM permissions for editing workflows and creating webhooks. |
Once your source code is connected to CloudBees platform, you can create new components or applications and set up workflows.
For more information, refer to the following documentation:
GitHub
If you have a GitHub repository in the cloud, you can connect it to the platform.
GitHub App installation
The CloudBees platform connects to GitHub through a GitHub App that is registered and managed by CloudBees.
To integrate your GitHub repository:
-
Select an organization, and then select .
-
Select Create integration.
-
Select Source code management.
-
Select GitHub App.
-
Enter an integration Name (no spaces are allowed).
-
(Optional) Enter a Description.
-
Select Install GitHub App. This action redirects you to GitHub.
-
Select a GitHub account or GitHub organization to connect.
You can only set up a single CloudBees platform integration with a given GitHub account or organization. GitHub accounts and organizations are displayed in GitHub as follows:
-
Configure present: At least one repository is already connected to the platform.
-
Configure is not present: Available to connect to the platform.
The integration name is automatically generated based on the GitHub organization name.
New features in the CloudBees platform may sometimes require updates to permissions in the GitHub App registered by CloudBees.
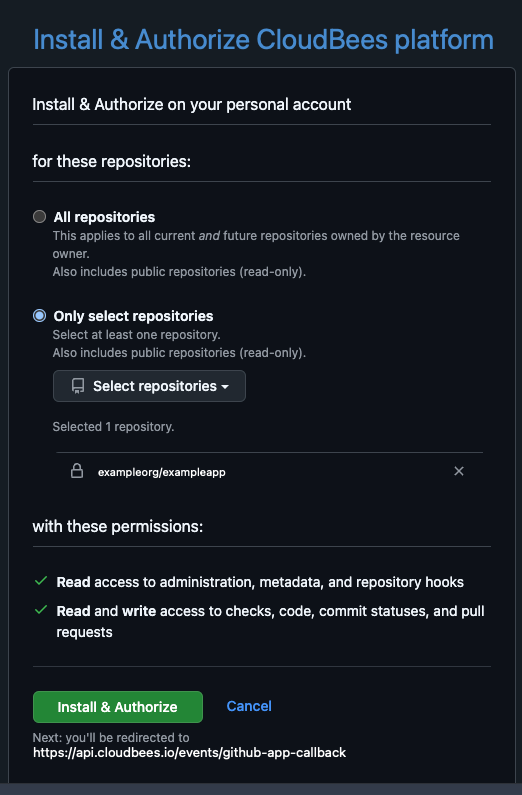 Figure 1. Example GitHub App installation.
 -
-
Install and authorize All repositories, or Only select repositories, and select from the options.
-
Select Install & Authorize.
Your GitHub account is now connected to CloudBees platform and appear in .
Core GitHub App permissions
For basic functionality of the CloudBees platform, the following permissions are required in your installed GitHub App.
| Read access | Write access | Key |
|---|---|---|
|
|
Actions |
|
|
Commit statuses |
|
|
Contents |
|
|
Metadata |
|
|
Events |
|
|
Pull requests |
|
|
Webhooks |
| Additional permissions may be required for specific features. Refer to specific feature documentation to check for any additional required permissions for that feature. |
GitHub App permission change requests
On occasion, new features in the CloudBees platform may require updates to core permissions in the GitHub App for full functionality. If the CloudBees platform requires a permissions update, all users of the GitHub App:
-
Receive an email notification from GitHub alerting them of the permissions change request.
-
Can access the permissions change request in the Installed GitHub applications listing for the connected GitHub organization.
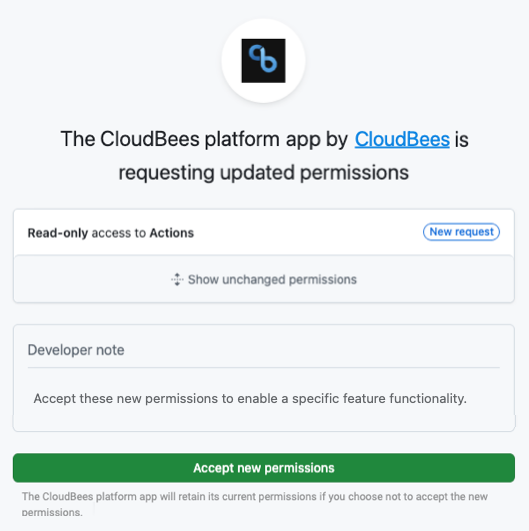
To update GitHub App permissions:
-
Go to your list of installed GitHub Apps, and select Review request next to CloudBees platform.
-
Review the Developer note describing why this change is necessary.
-
Select Accept new permissions.
The CloudBees platform GitHub App permissions have been updated to enable full functionality for the new platform feature described in the Developer note.
| If you choose not to accept the new permissions, your existing permissions are retained, and you will not be able to use the new platform feature. |
For more information, refer to the GitHub documentation for approving updated permissions for a GitHub App.
Bitbucket
If you have an Atlassian Bitbucket repository in the cloud, you can use an access token to connect it to the platform.
To integrate with Bitbucket:
-
Select an organization, and then select .
-
Select Create integration.
-
Select Source code management.
-
Select Bitbucket access token.
-
Enter an integration Name (no spaces are allowed).
-
(Optional) Enter a Description.
-
Enter your Token.
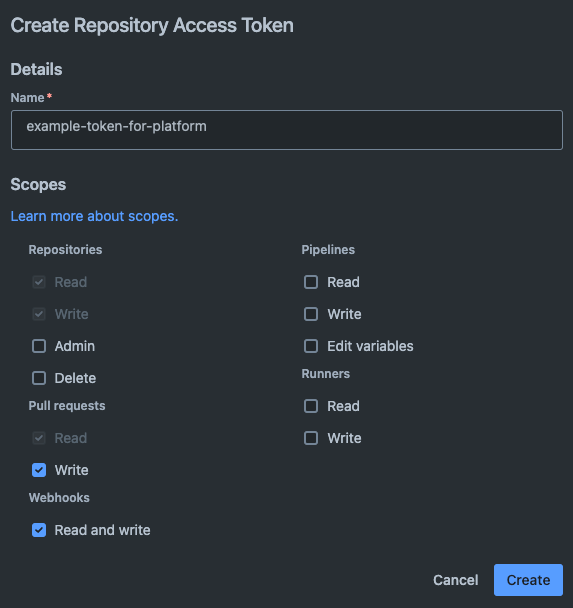 Figure 3. An example Bitbucket access token with the appropriate permissions.
The CloudBees platform requires only the following scopes from Bitbucket:
-
Repositories: Read and write
-
Pull requests: Read and write
-
Webhooks: Read and write
-
-
(Optional) Select Test integration to check the connection.
-
Select Submit.
Your Bitbucket account is now connected to CloudBees platform and appears in .
Bitbucket Data Center
Enterprise teams who require an on-premises repository can use the Atlassian Bitbucket Data Center. You can connect Bitbucket Data Center to the platform using an access token.
To integrate with Bitbucket Data Center:
-
Select an organization, and then select .
-
Select Create integration.
-
Select Source code management.
-
Select Bitbucket Data Center access token.
-
Enter an integration Name (no spaces are allowed).
-
(Optional) Enter a Description.
-
Enter your Bitbucket Data Center URL.
-
Enter your Token.
The CloudBees platform requires the following scopes from Bitbucket:
-
Repository admin permissions
Refer to the Bitbucket Data Center HTTP access token documentation for more information.
-
-
(Optional) Select Test integration to check the connection.
-
Select Submit.
Your Bitbucket Data Center account is now connected to CloudBees platform and appears in .
Gerrit
Gerrit is an enterprise-level code review and collaboration tool based on Git that allows development teams to approve or reject source code changes in a self-hosted environment.
To integrate with Gerrit:
-
Select an organization, and then select .
-
Select Create integration.
-
Select Source code management.
-
Select Gerrit Code Review Credentials.
-
Enter an integration Name (no spaces are allowed).
-
(Optional) Enter a Description.
-
Enter your organization Gerrit instance URL in Gerrit Code Review URL.
-
Enter the Username.
-
Enter the Password.
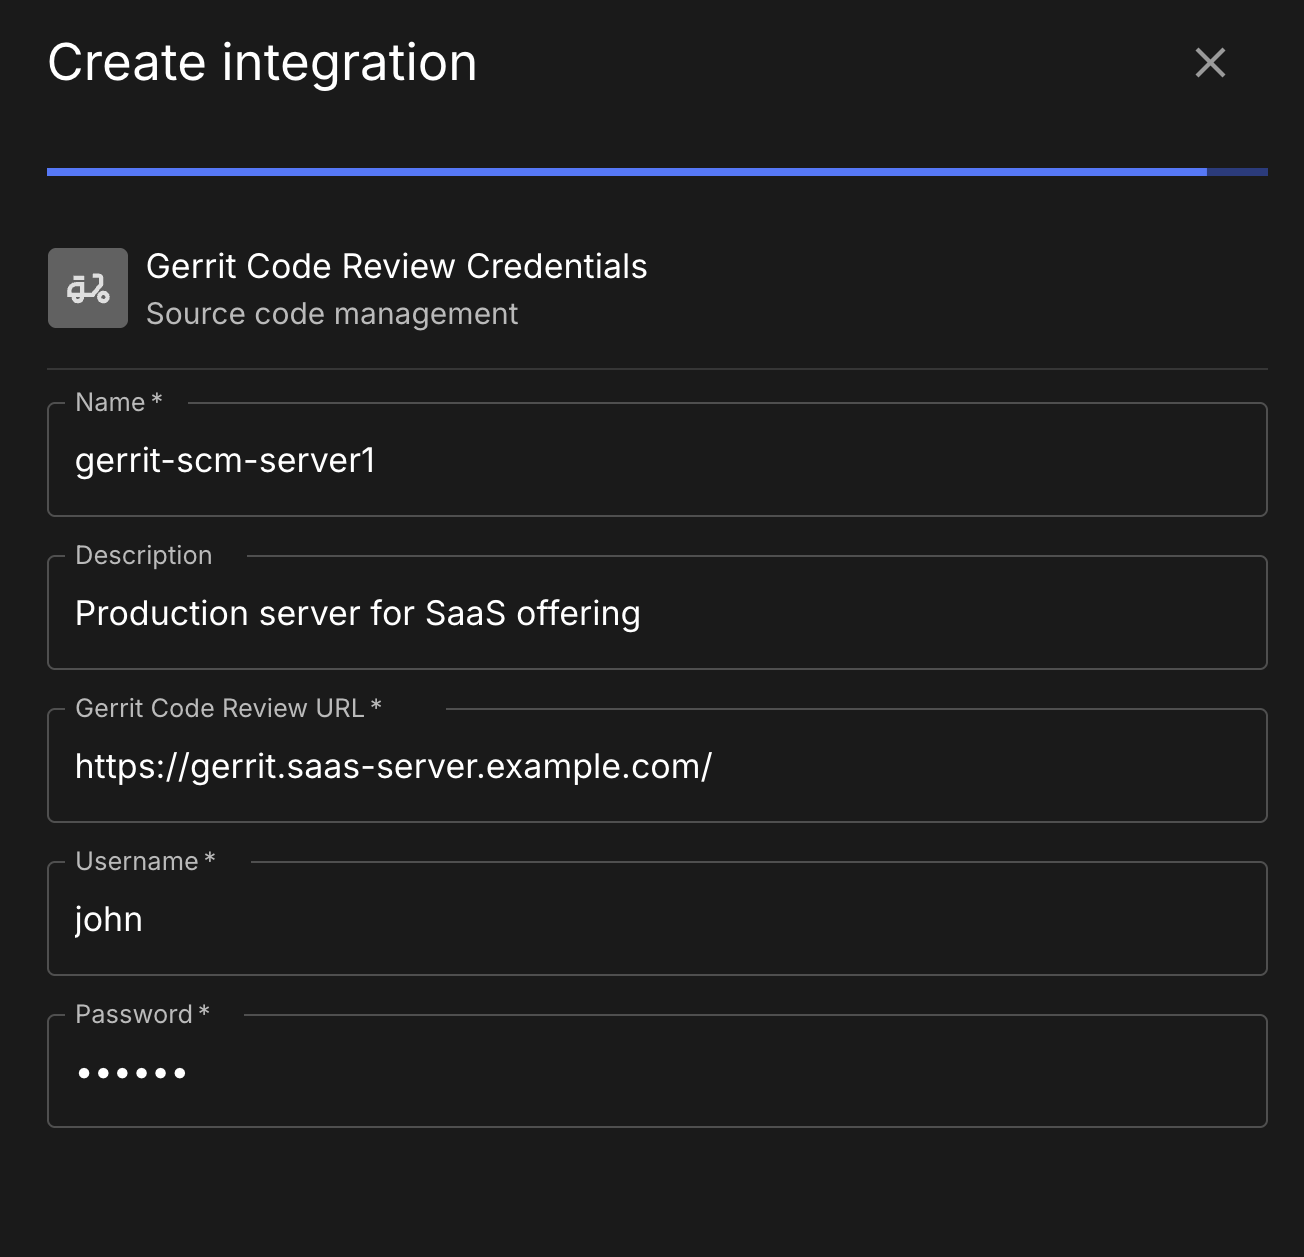
Your Gerrit SCM account is now connected to CloudBees platform and appears in .
GitLab
If you use GitLab to host your repositories, you can connect it to the CloudBees platform using a personal access token. The integration supports both GitLab Cloud (gitlab.com) and self-managed GitLab instances.
After integration, the CloudBees platform can discover your repositories and branches, configure webhooks to trigger workflows, and use the token to access your source code when workflows run.
To integrate with GitLab:
-
Select an organization, and then select .
-
Select Create integration.
-
Select Source code management.
-
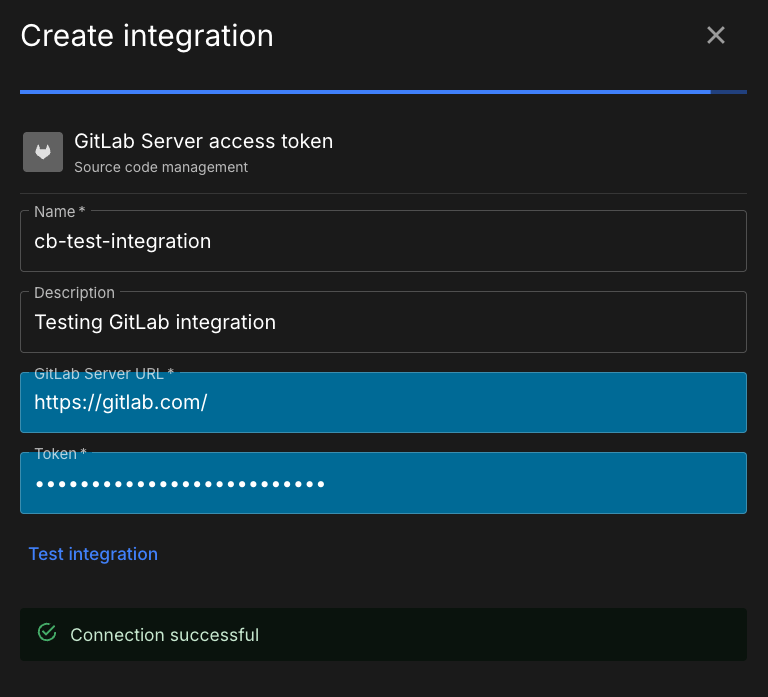
Select GitLab access token.
-
Enter an integration Name (no spaces are allowed).
-
(Optional) Enter a Description.
-
If you use a self-managed GitLab instance, enter the full GitLab URL.
-
Enter your GitLab personal access token.
-
(Optional) Select Test integration to verify the connection.
-
Select Submit.
|
The CloudBees platform requires a personal access token with the following minimum scope:
|
To create a personal access token in GitLab:
-
In GitLab, navigate to .
-
Enter a Token name and (optional) Description.
-
Set an Expiration date.
-
Select the
apiscope. -
Select Create personal access token.
Your GitLab account is now connected to CloudBees platform and appears in .
You can now create components or applications and link them to your GitLab repositories.
For more information about creating components or applications, refer to Create components and Create application.