Feature flags enable development teams to progressively toggle features on and off for specific user segments. Flags are defined as Boolean, number, or string types. You can create flags in either the UI or in your application code.
This page describes how to create, edit, and delete feature flags using the CloudBees platform UI. To view and assess the health or activity of existing flags, refer to Flag health.
Flag settings
Flag names are case-sensitive and must exactly match in both your source code and the platform UI. Each flag requires a type and a unique name. These values cannot be changed after creation. Flags are scoped to the application in which they are created and are not shared across applications.
| Flag setting | Definition | Required? | Editable? |
|---|---|---|---|
Name |
The flag name. Refer to Namespaces and labels. |
|
|
Description |
Any descriptive information about the flag. |
|
|
Type |
The flag type: Boolean, string, or number. |
|
|
Variation (string or number flags only) |
One or more possible predefined flag values. Each value must be the appropriate type. For example, the string value |
|
|
Label |
A way of organizing flags. For example, tag all flags administered by a specific developer team with the same label. Refer to Namespaces and labels. |
|
|
Mark as permanent |
Set a flag, for example, a timeout or URL flag, to permanent status to ignore its impression data. |
|
|
Refer to update flag settings for details on editing flag settings.
Access the Flags overview page
Flags are managed at the application level. Each application is linked to one or more environments.
To view a list of flags for an application:
-
Select Feature management.
-
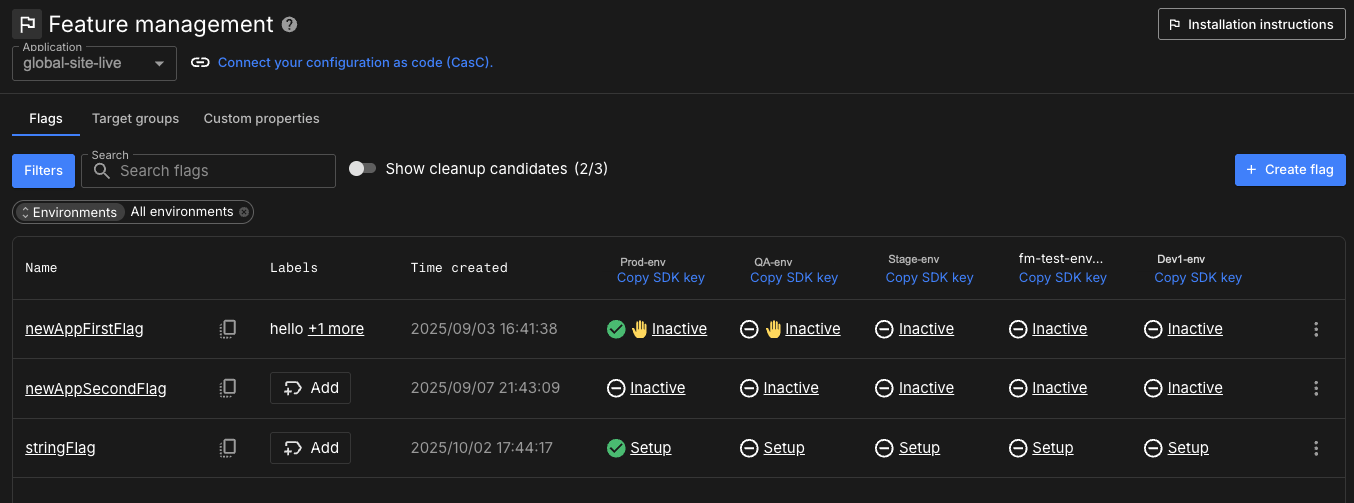
View the default landing page, Flags listing all flags in the linked environments, for the selected application.

If the list appears empty, it may mean:
-
No flags have been created for the selected application.
-
A different application or environment is selected.
Display options
The Flags overview page includes filters, column options, and status indicators that help you analyze flag activity across environments.
Refer to flag-health.adoc#_access_the_flag_overview_page for details on available filters, environment columns, and icon meanings.
Locate and copy your SDK key
Use the Connect your configuration as code (CasC) link to integrate with GitHub and manage flags declaratively.

Once connected, select ![]() to copy the environment-specific SDK key for use in your application code.
to copy the environment-specific SDK key for use in your application code.
| Your SDK key identifies a specific environment within an application and is required to evaluate flags at runtime. Refer to get-started-with-feature-flags.adoc#_how_flags_relate_to_environments for more information. |
Filter flag lists
Filter flags in an environment according to the following criteria:
| Filter | Possible options | Reference |
|---|---|---|
Configuration status |
|
|
Flag type |
|
|
Label |
Any existing label |
|
Namespace |
Any existing namespace |
|
Activity status |
|
To filter flags:
-
Select Filter.
-
Apply one or more filters by selecting an option.
-
Filter by environment when the application is linked to multiple environments. Or, select
All environmentsto filter across all linked environments. -
Search by flag name.
| For details on how flag statuses are determined and what each status means, see flag-health.adoc#statuses. |
Create a flag in the UI
You can create feature flags directly in the UI to control how features are released across environments. After a flag is created, it’s automatically available in all environments linked to the application. The flag’s name and data type cannot be changed later.
To create a flag:
-
Select Feature management.
-
Select Create flag.
-
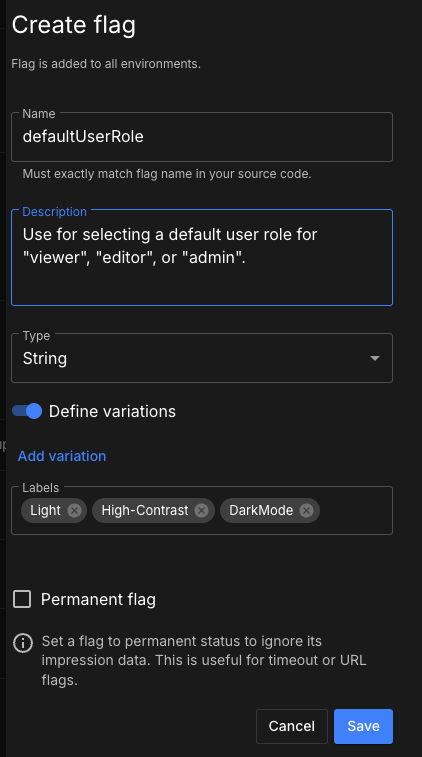
Enter a flag Name.
-
Enter a Description.
-
Select a Type from the options.
-
Enter a value of the appropriate data type for your flag.
-
For string and number type flags, define variations:
-
Select Define variations.
-
When Define variations is selected, Add variation becomes available.
-
The Add variation option allows the flag to toggle between multiple values, not just true or false.
-
-
Select Add variation to enter another value.
You may enter unlimited variations.
 Figure 3. Creating a flag, with variations highlighted
-
-
(Optional) Enter Labels. Refer to namespace and labels for more information.
-
Select Permanent flag if appropriate.
-
The Permanent flags option ignores impression data and is excluded from cleanup filters. This is useful for flags that serve a static purpose, such as enabling logs or setting timeouts.
-
Examples include timeout flags, URLs, or logging levels. Permanent flags are always intended to remain enabled or disabled, not used for A/B tests or gradual rollouts.
-
-
Select Save.
Once created, the flag appears in the Flags overview page.
-
Enable the flag configuration by turning the configure-feature-flags.adoc#status to On.
Create a flag in code
Create a flag in your source code and run your application. Your newly created flag appears in the CloudBees platform feature management flag list.
Refer to Create flags in code to learn more.
Update flag settings
Add to, remove, or edit any flag setting.
To update flag settings:
-
Select Feature management.
-
Select
 next to the flag you want to edit.
 -
Select Edit flag settings.
-
Update the Description, Type, Labels, or mark or unmark a flag as permanent.
-
Select
 next to a variation to remove it, or delete all variations at once by toggling Define variations to off.
 -
Remove a label from a flag by selecting the "X" next to the label name.
-
-
Select Update.
The flag settings are updated accordingly.
Delete a flag
To delete a feature flag, you must first turn off its configuration in all environments. A deleted flag is completely removed from the CloudBees platform, including all environments, and deletion is irreversible.
Flags marked as stale or inactive are often good candidates for deletion. Refer to flag-health.adoc#stale and cleanup recommendations for guidance.
To delete a flag:
-
Select Feature management.
-
Select
 next to the flag you want to delete.
 -
Select Delete.
-
Select the toggle next to the flag to disable the flag configuration for all environments.
-
Select Delete.
The selected flag is deleted and removed from the flag list.