In the CloudBees Unify, users and teams are assigned permissions using role-based access control (RBAC). RBAC defines what a person or team can do using predefined or custom roles, which are assigned to different scopes (such as applications, environments, or a combination of both).
A user may hold multiple role assignments across these scopes. Their effective access includes all roles assigned at any level.
To understand who has what access, use the access control list (ACL) to view user and team role assignments across your tenant.
| You must have the Admin role to manage RBAC, including roles and permissions. |
View the access control list
Use the ACL to view which users and teams have been assigned roles, and which roles apply to which applications or environments. Search in and filter the list of access roles for all users and teams in the tenant.
-
To open the ACL, select .
The access control list displays the following:
-
Type: Either a user (
 ) or a team (
 ).
). -
Principal: The user email address or the team name.
-
Name: The account name or the team name.
-
Role: The associated roles for each principal.
To view user and team role assignments:
-
Select .
-
Select , and enter all or part of a name into Search. Follow the same process to search for a team.
-
Select
 to further limit the list results.
View and search roles
Use the Roles screen to view all available roles you can assign. Roles may be predefined or custom. Each role includes:
-
The Name of the role (for example, Admin, Approver, or User).
-
The Type of role, indicating if the role is Predefined or Custom.
You can use the search bar to filter the list by role name. Begin typing into the search field to show matching roles dynamically.
Grant a role
Assign one or more roles to a user or team for a specific resource such as an application or environment. You can grant both predefined and custom roles to any user or team. Role assignments define what users or teams are allowed to do in a specific context.
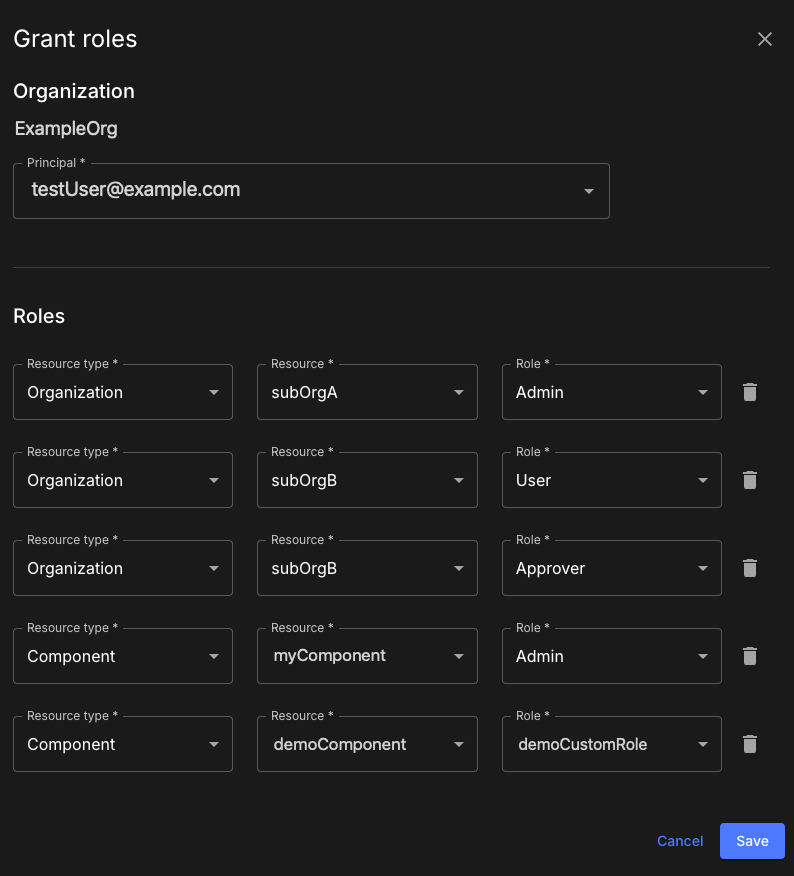
For example, User‑A has the Admin role for Application A. In Application B, User‑A has the Approver role for Environments Dev and Staging, and a custom role for feature management in Production.
-
User-A has the Approver role for two of the components in Org-B.
-
User-A has a custom role that allows them to use feature management in all components of Org-B, but provides no other permissions.
To grant one or more roles:
-
Select .
-
Select Grant role.
-
Select a Principal (a specific user or team) from the options.
-
Select a Resource type from the options.
-
Select a Resource from the options.
The available resources depend upon the selected Resource type.
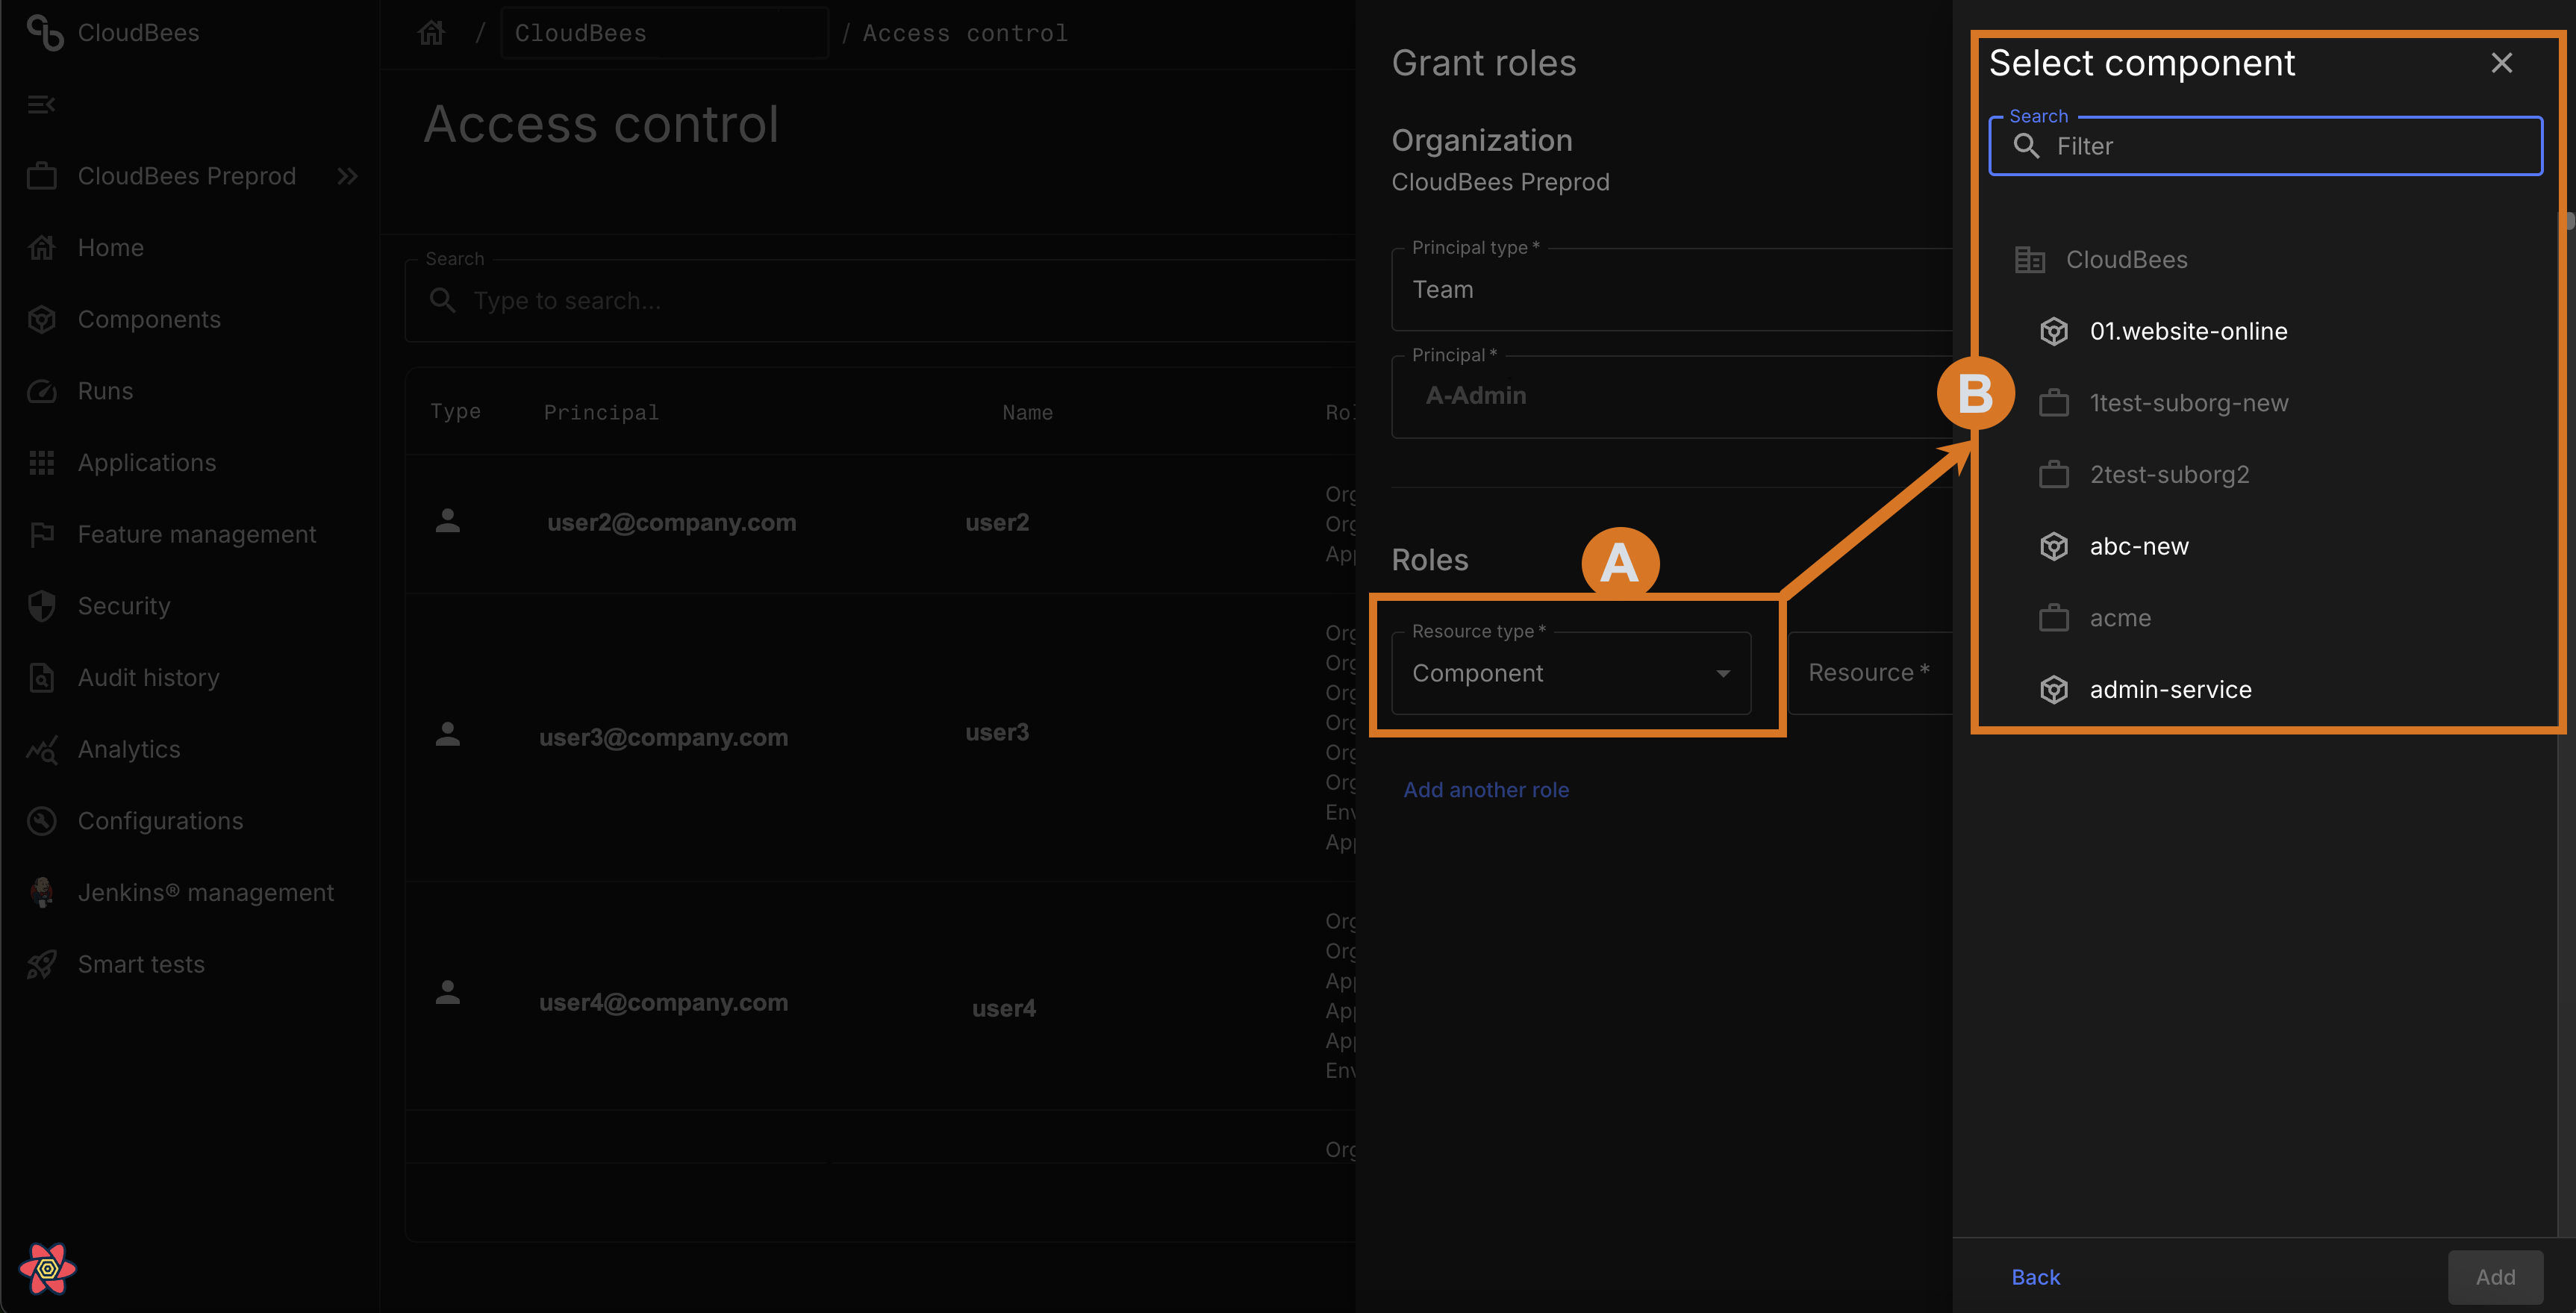
 Figure 1. Example of Component type resource, and available components.
-
In the image, the Resource type is set to Component.
-
The Resource is selected from the list of components.
-
If the selected Resource type is an organization, the Resource options consist of all sub-organizations in the selected organization and the selected organization itself. This structure provides important context in environments with nested organizations, helping users understand where the resource resides within the broader resource tree.
-
If the selected Resource type is a component, the Resource options consist of all components within the current organization. This helps users identify the component’s location relative to the organizational structure, which is especially helpful in systems with nested components.
-
-
-
Select a Role from the options.
-
(Optional) Select Add another role to grant the same Principal another role. You may add unlimited roles.
-
Select Save.
A role or roles for the defined resources are granted to the specified user or team.

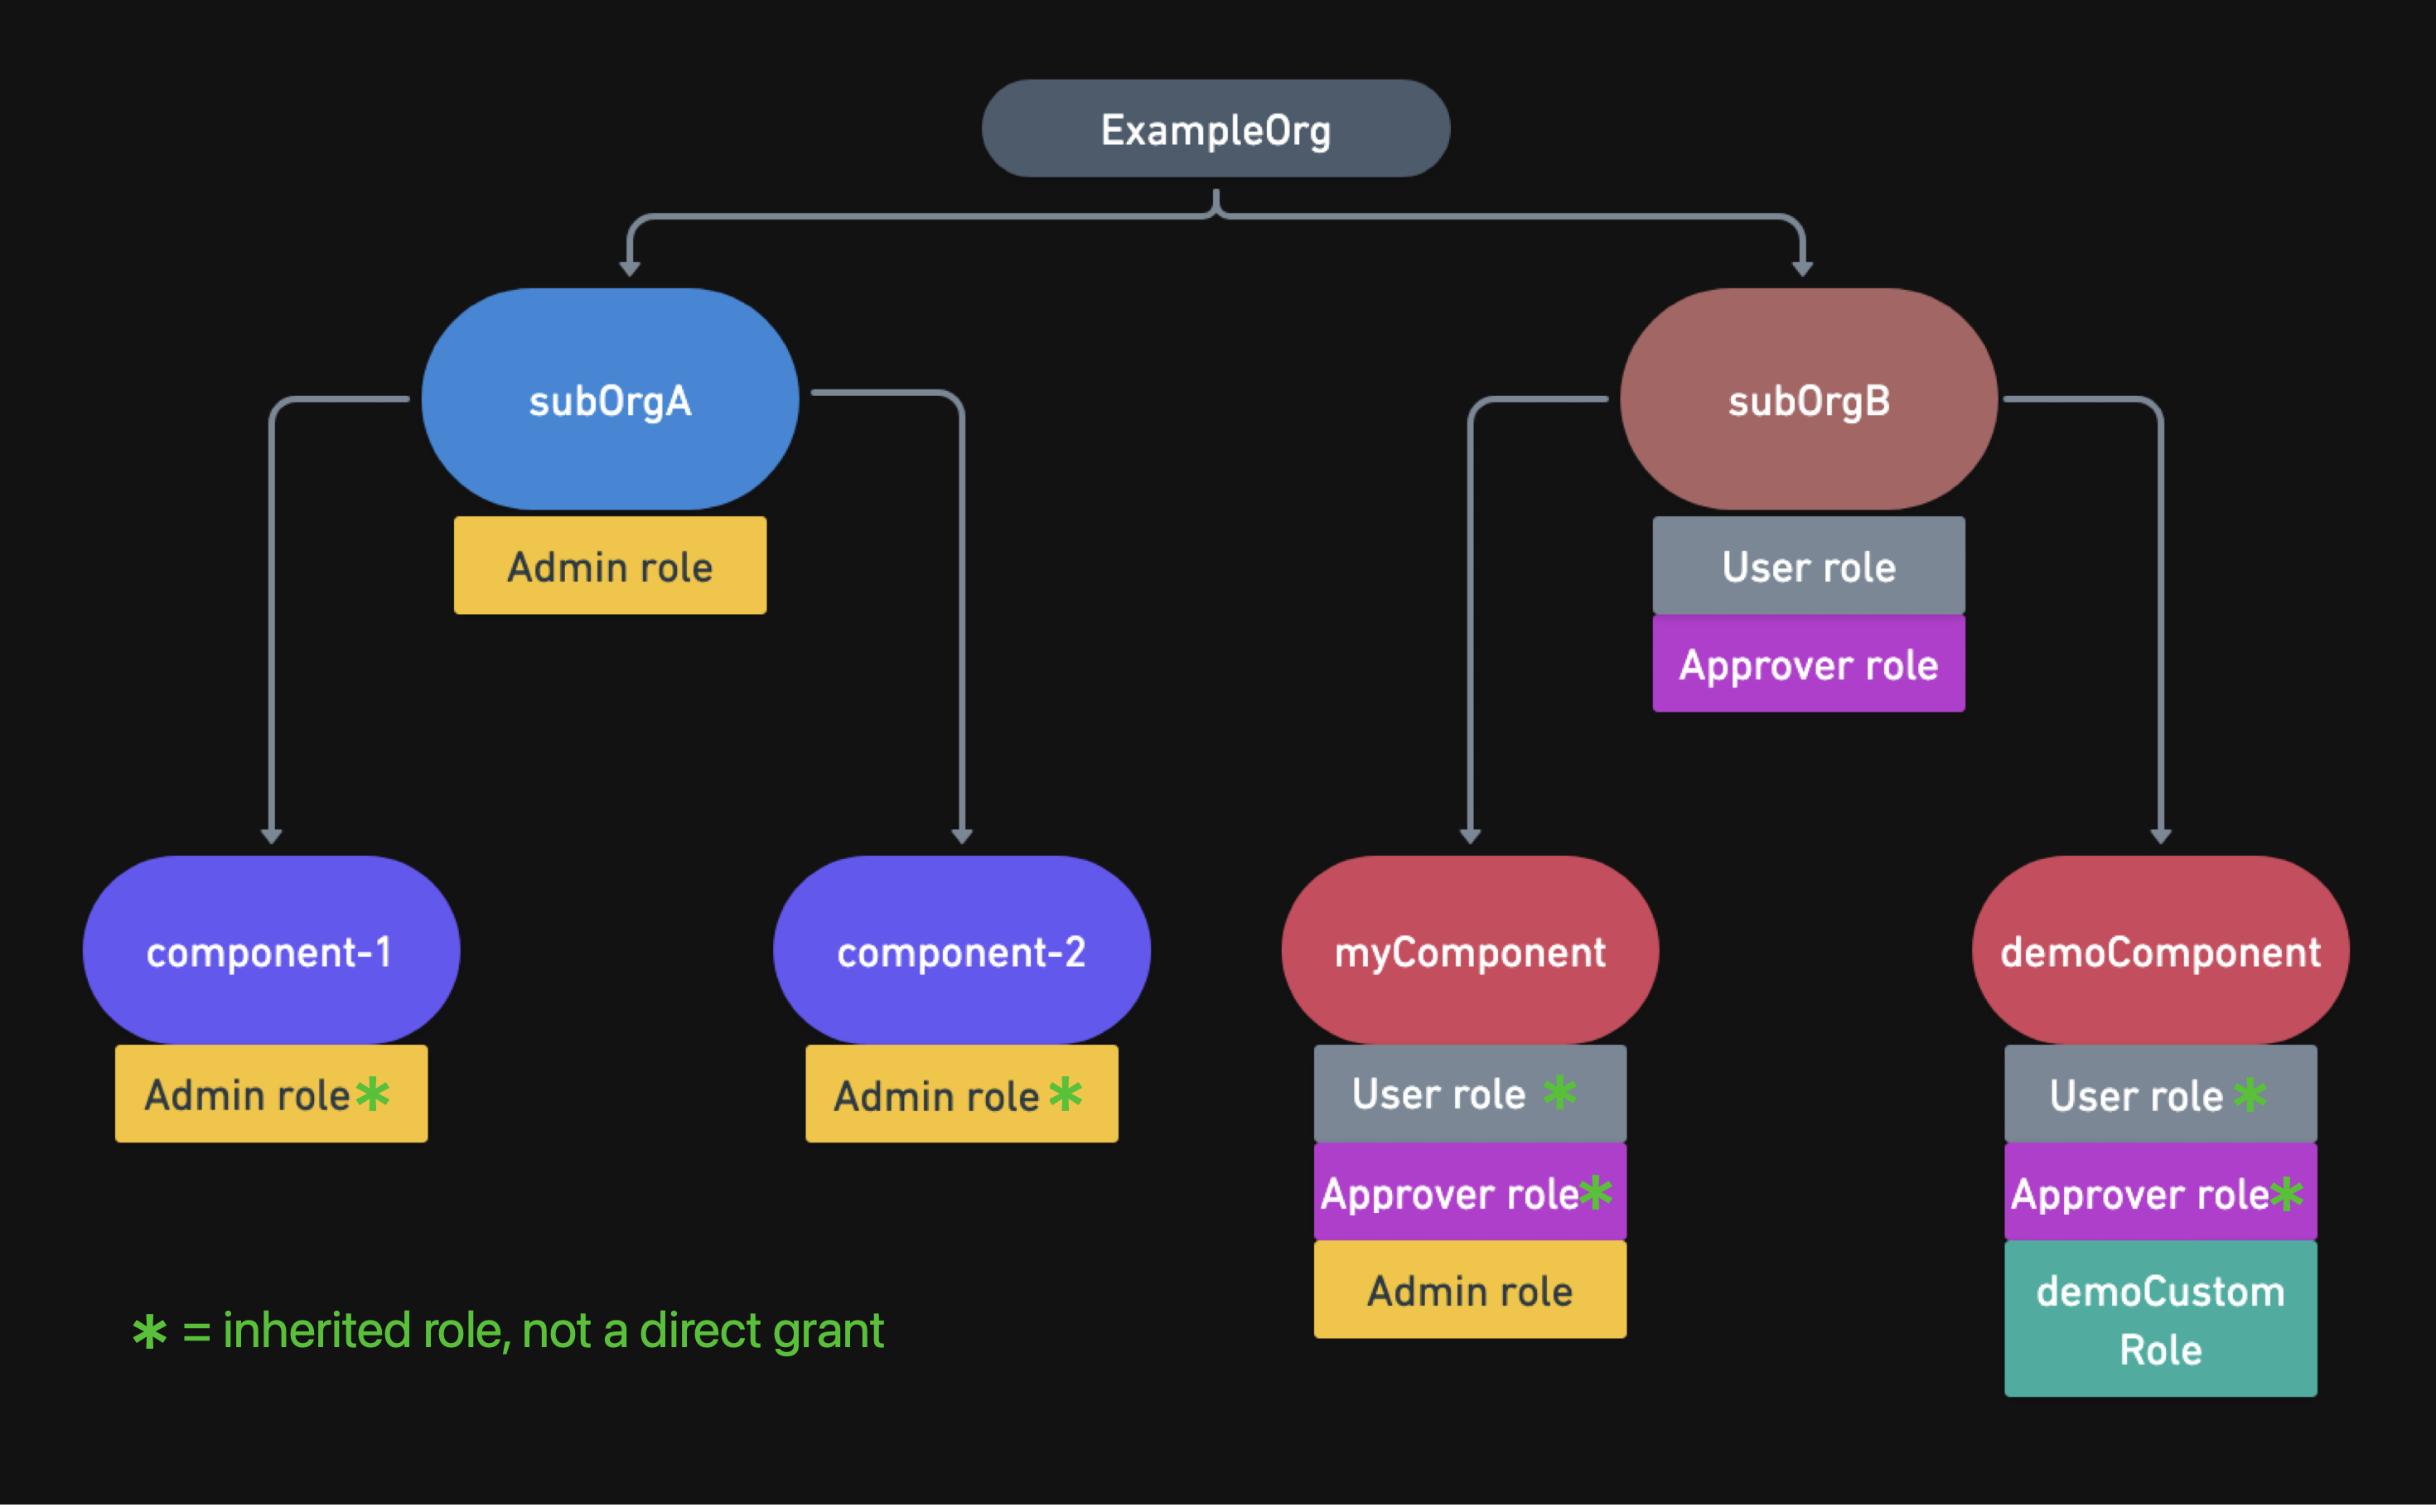
A diagram of the resources and roles set in the above example follows.

Manage permissions
The CloudBees Unify enables you to develop fine-grained permissions for custom roles.
Permission categories
Permissions in the CloudBees Unify are grouped into the following categories, to assist in assigning specific permissions to a custom role.
-
Tenants
-
Components
-
Applications
-
Configurations
-
Analytics
-
Feature management
-
Continuous security
-
Other
Privilege levels
For each permission within the above categories, there are five levels of privilege.
| Level | Description |
|---|---|
|
Grants a user the ability to read an entity. |
|
Grants a user the ability to create an entity. |
|
Grants a user the ability to update an entity. |
|
Grants a user the ability to delete an entity. |
|
Grants a user the ability to execute an action. |
| In feature management the Execute permission is selectable but not currently evaluated; it has no effect. This does not affect Execute in other parts of the product. |
Permission details
The following table details each permission, organized by category.
| Category | Permission | Description |
|---|---|---|
Tenants |
Teams |
Team management and permissions. |
User invite |
Invite new users to CloudBees Unify. |
|
Users |
User management and permissions. |
|
Components |
Artifact |
Workflow and ASPM artifact management. |
Log |
Workflow log management. |
|
Resource |
Inheritance resource management. |
|
Workflow automation |
Workflow automation management. |
|
Workflow event |
Management of external workflow events reported by actions. |
|
Configurations |
Endpoint |
Endpoint and integration management. |
Environment |
Environment management. |
|
Extension |
Actions catalog management. |
|
Property |
Workflow property management. |
|
Analytics |
CI insights |
CI insights for Jenkins® management. |
VSM |
Value stream management and reporting. |
|
Feature management |
Flag |
Feature flags management. |
Approval |
Manage creation and approval of feature flag change requests. |
|
Custom property |
Manage user-defined attributes for feature flag logic. |
|
Target group |
Manage groups of users for flag evaluation. |
|
Continuous Security |
Review risk accepted request |
Review a transition request for a risk accepted finding. |
Review false positive request |
Review a transition request for a false positive finding. |
|
SLA Configuration |
Define the service-level agreement (SLA) for an organization. |
|
Triage findings |
Triage security findings. |
|
View findings by triage status |
View findings by their triage status. |
|
Other |
API tokens |
API token management. |
Account |
Account management. |
|
Audit log |
Audit log management. |
|
Authorization |
User authorization. |
|
Entitlement |
Entitlement management for features. |
|
Manual approvals |
Manual approval management. |
|
Role |
Role management, including custom roles. |
|
Secret and credential |
Secrets and credentials management. |
|
Security |
Security management. |
Predefined roles
The predefined role permissions are summarized in the table below.
| Role | Permissions |
|---|---|
Admin |
Has full administrative control over all functionality on the selected application or environment. |
Approver |
Able to execute manual approval of a workflow in response to an approval request. |
User |
Has read-only access to all functionality on the selected resource and its sub-resources. |
Manage custom roles
Create custom roles for specific users or teams to provide them with the least privileges necessary to perform their work. Delete any custom roles as necessary.
Create a custom role
A role in CloudBees Unify grants a set of permissions to a specific user or team.
| CloudBees recommends that you follow the principle of least privilege, and provide only the minimum level of access needed for a user to perform their job function. |
To create a custom role:
-
Select from the upper right.
-
Select Create Role
-
Select
 next to Custom Role, and then enter a name for the role.
 -
(Optional) Select
 next to Description to enter a description, such as a summary of permissions granted.
 -
(Optional) Select a category on the left pane to scroll to that category.
-
Select permissions to be granted to your custom role by choosing one or more privilege levels next to the permission you want to grant.
-
Select Save.
The custom role is created with the selected permissions and is displayed in Roles.

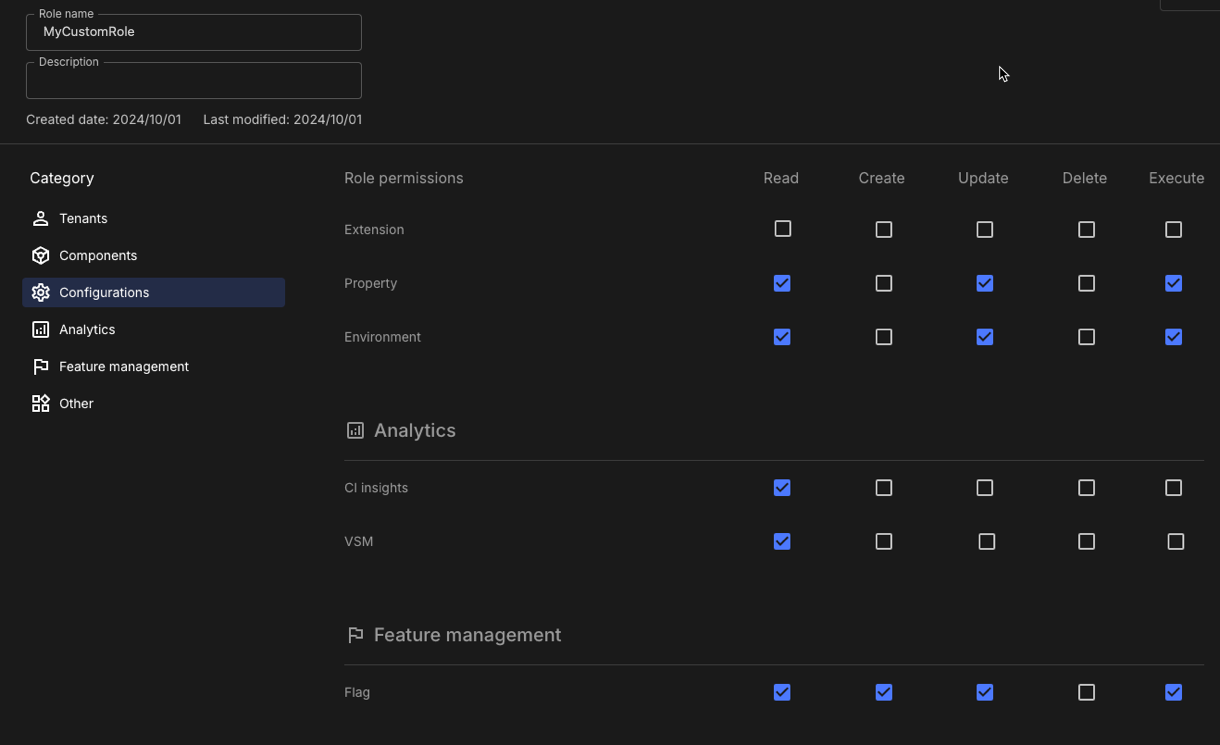
In the above permissions example, a user with this role has the ability to:
-
View and edit properties and environments, but not create or delete them.
-
View CI insights for Jenkins and VSM dashboards, but not connect a controller or configure analytics.
-
View, create, and update feature flags, but not delete them.
Update a custom role
Update the name, description, and permissions of a custom role. You must have the administrator role to make updates.
| You cannot edit the predefined roles. |
To update a custom role:
-
Select from the upper right.
-
Select
 next to the role you want to update.
 -
Select Edit.
-
Make any desired changes.
-
Select Save.
The selected custom role is updated accordingly.
Delete a custom role
Delete any custom role as long as you have the administrator role. A deleted custom role is completely removed from the CloudBees Unify, and deletion is irreversible.
| You cannot delete predefined roles. |
To delete a custom role:
-
Select from the upper right.
-
Select
 next to the custom role you want to delete.
 -
Select
Delete. -
Select Delete.
The selected custom role is deleted and removed from the roles list.
Create a feature management role
Use roles to grant Feature management permissions. For step-by-step instructions, examples, and scope nuances (flags, target groups, approval requests), refer to Custom roles for feature management.