A component is the key link between your source code and downstream features of the CloudBees Unify, enabling secure, robust, and efficient software delivery. As a foundational element of CloudBees Unify, a component may be as simple as a piece of software built and deployed from source code, or it can be part of a complex application composed of many connected components. Use the flexibility of a component to create and manage complex CI/CD workflows.
Components are defined by the following attributes:
-
Every component is created within an organization.
-
Every component is connected to a single code repository via an SCM integration.
-
A component may not connect to a code repository that is already integrated with another component or application.
Component details
View the components in your organization by selecting Components. Refer to Manage components to learn more about how to access and manage components in your organization. Select the Component name link next to the status icon to review detailed information for that component.
In the component details screen, use the tabbed navigation to access all the activities linked to a component.
-
Summary: Review a snapshot of component activity, including builds and deployments.
-
Runs: Review workflow executions and implicit scans.
-
Workflows: Review and edit workflow YAML files.
-
Security overview: Review vulnerabilities remediation trends and severity of findings.
-
Security center: Review issues identified by security tools.
-
Artifacts: Review details of generated artifacts and deployment history.
-
Environment inventory: Review artifact versions organized by their environment.
-
Properties: Review and update key/value pairs created in or inherited by the component.
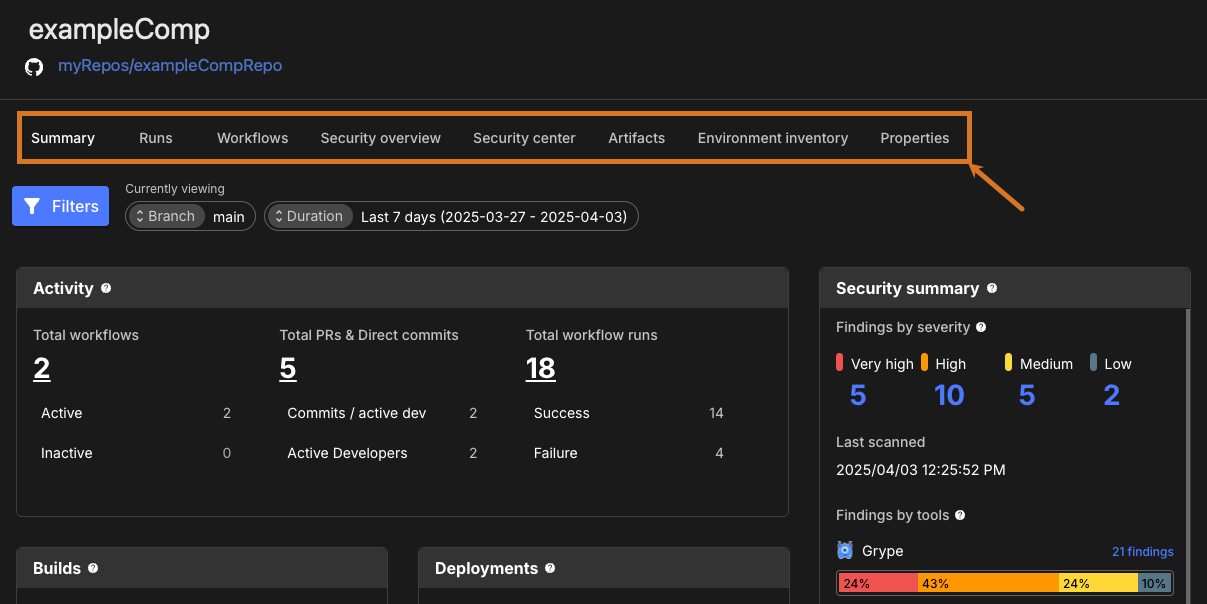
Component summary
Get a comprehensive view of activity for a component in the Summary. This dashboard includes commit, build, and deployment information, and provides detailed security scan results. Refer to Component summary to learn more.
Runs
Review details of every workflow execution in a component on Runs. This view includes trigger information, links to the workflow composer, the run completion date, and the run duration.
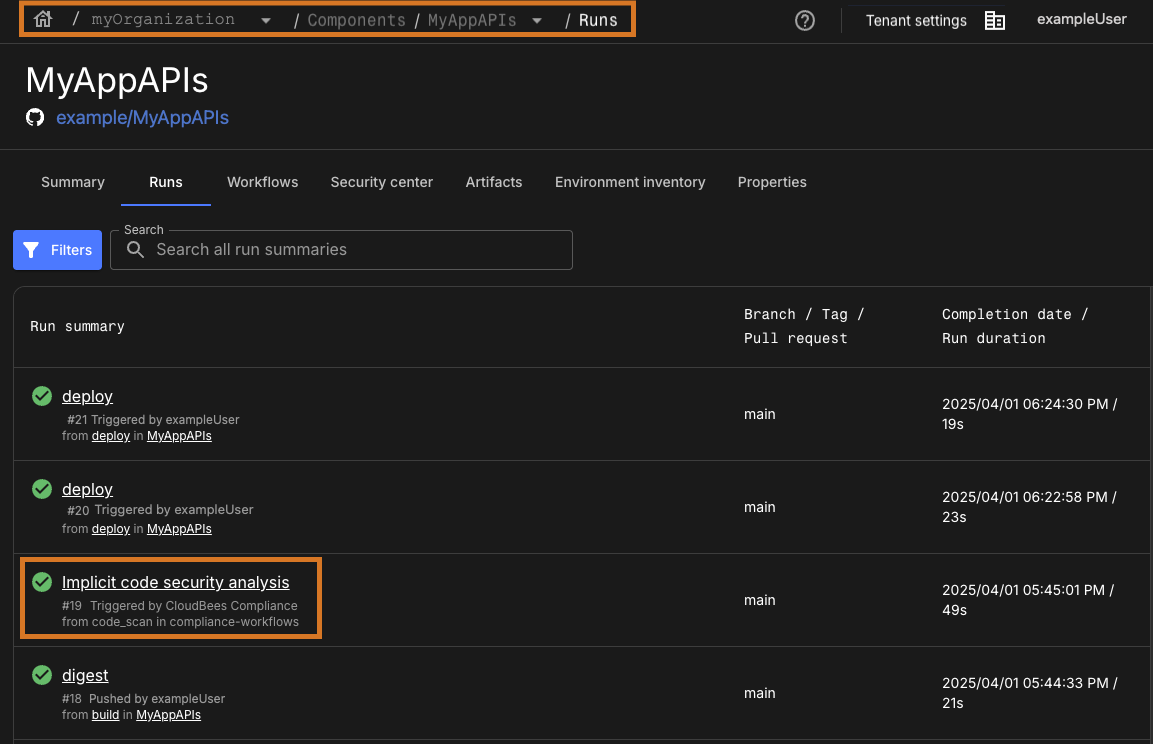
If you have implemented implicit security scanning, the analysis runs are available in this list, as shown in the example above. To learn more about configuring implicit security scans, refer to Manage security tools.
Select the link next to a run status to view detailed information for that run. To learn more, refer to Runs.
| Implicit security analyses are not included in the list displayed by selecting Runs on the left pane, and then filtering by your component. |
Workflows
View and manage workflows within a component.
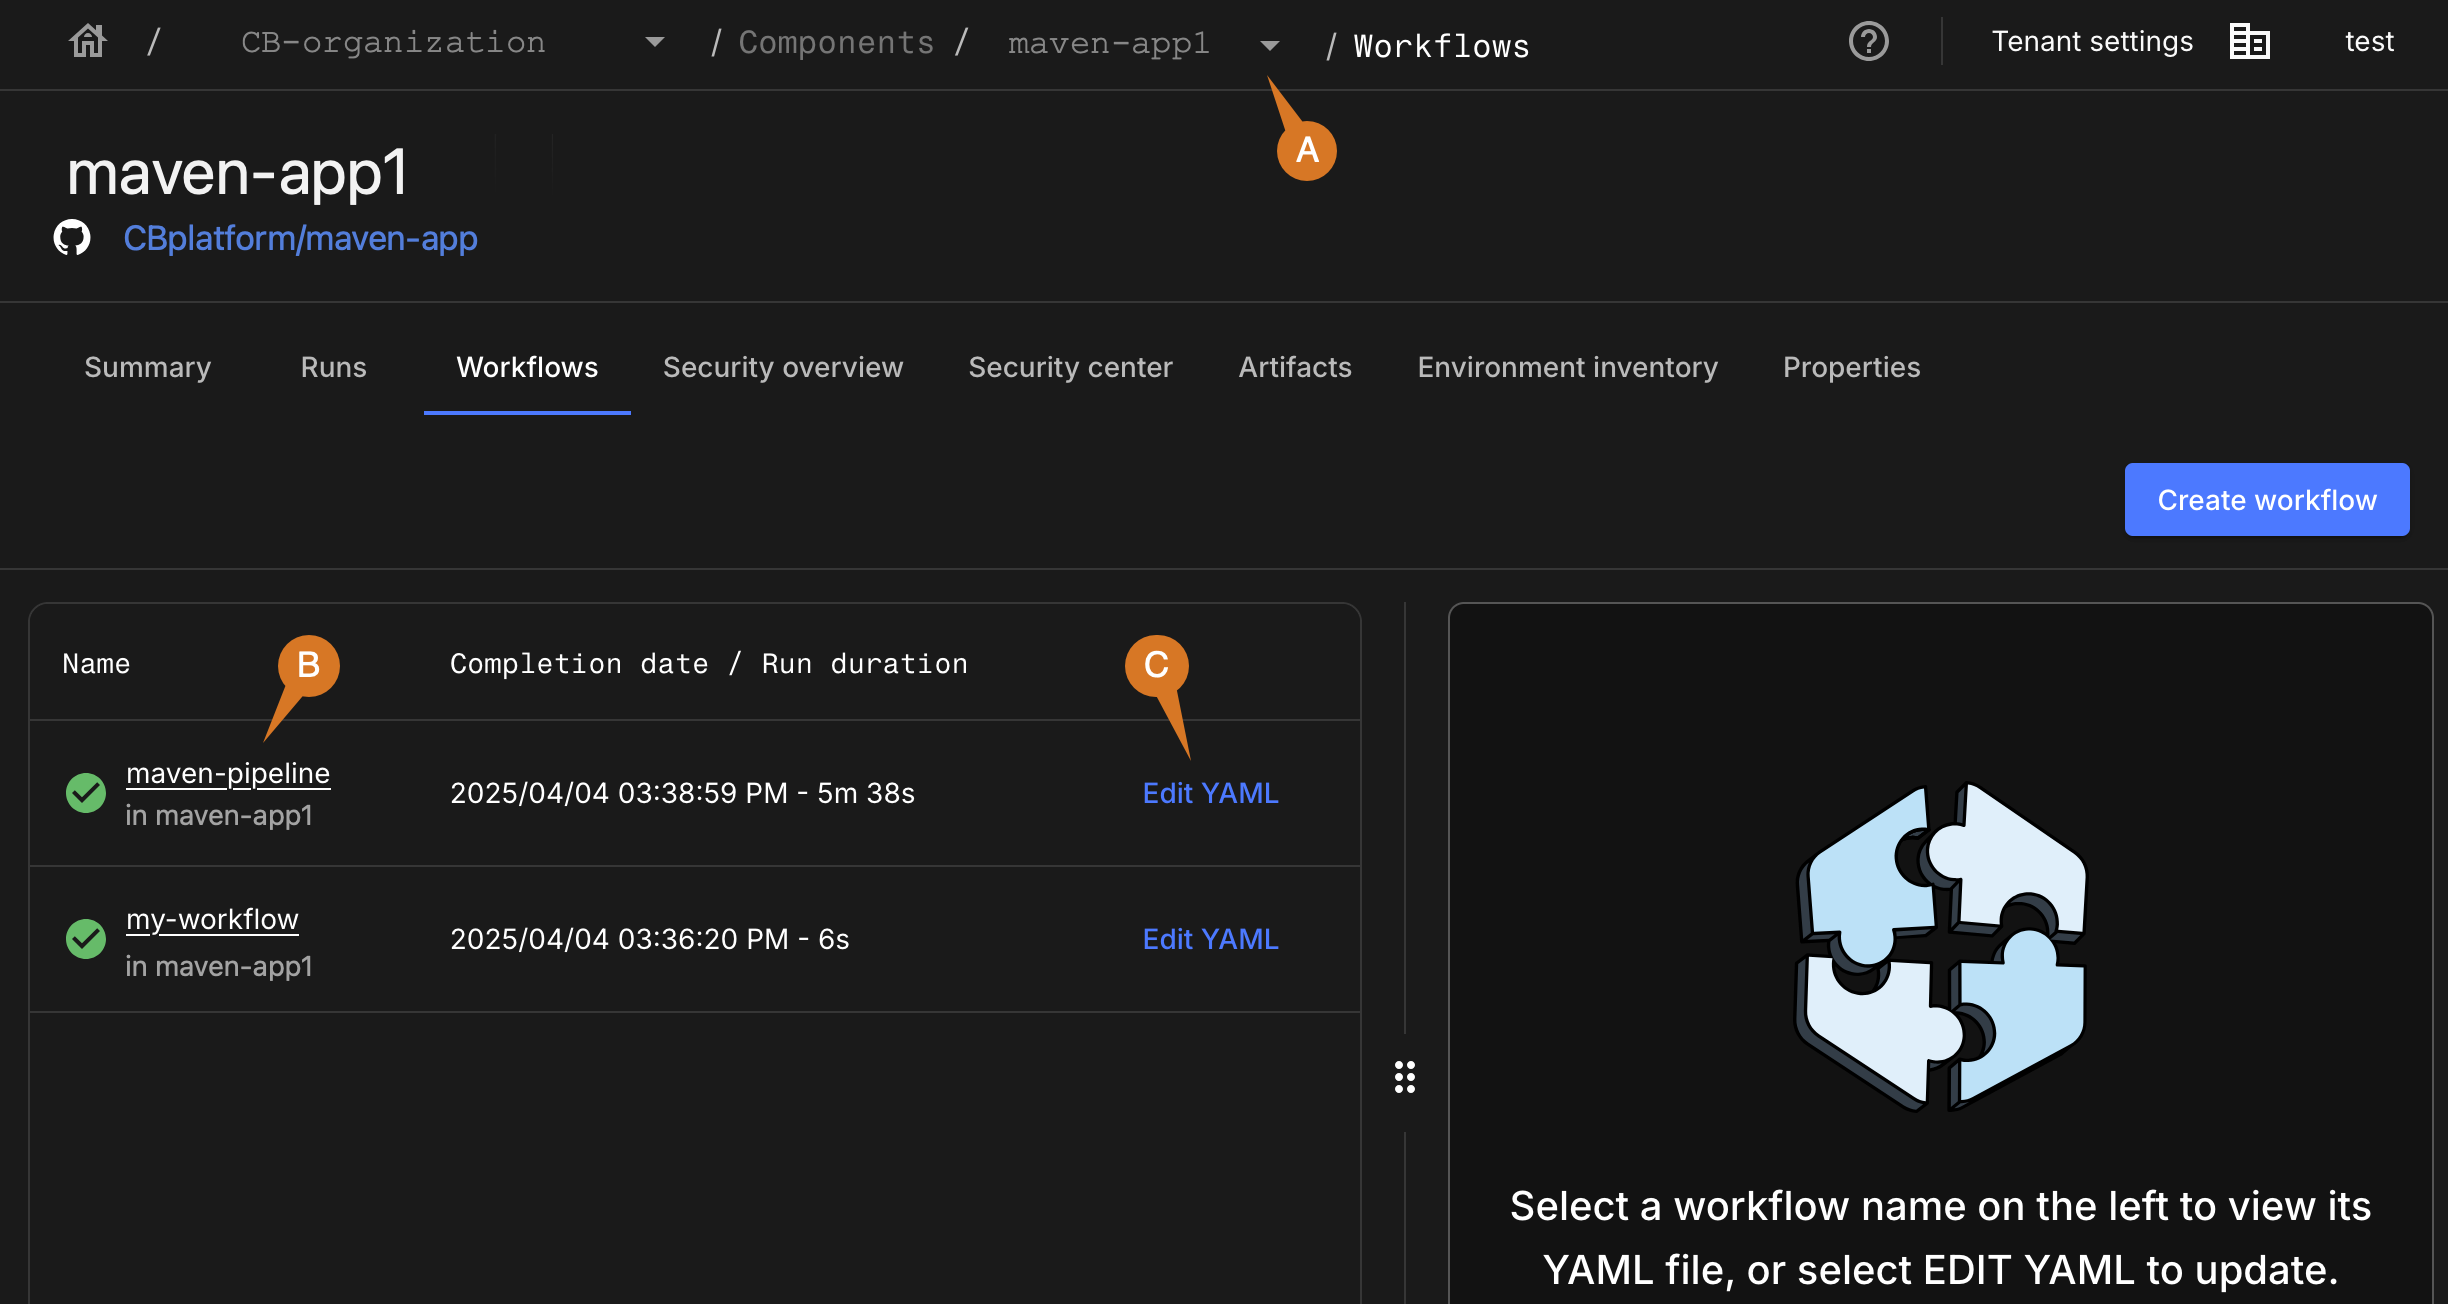
As in the above example, perform any of the following:
-
Select a different component using the breadcrumbs.
-
Select the workflow name to view the workflow YAML file.
-
Select Edit YAML to update the workflow YAML file.
For more information, refer to:
-
CloudBees DSL syntax for workflow YAML files.
Staged workflows
Staged workflows are usually run in the context of application releases, but you can also use staged workflows for a single-component continuous delivery flow. In this case, the following are not required:
-
An associated environment.
-
An associated deployer workflow YAML file.
To learn more, refer to Configure a staged workflow
Security overview
View security metrics for a component in Security overview, to assist with continuous security-posture management.
To learn more, refer to Security overview.
Security center
Review security issues and findings for a component in Security center.
An implicit security analysis is triggered when:
-
The component is created.
-
A commit is made to the repository linked with the component.
Refer to Component security center for more information.
Artifacts
View a list of all artifacts generated by executed workflows in a component. To collect artifact data, a workflow must contain an action to register an artifact. In Artifacts, choose to list either the full version history or only the latest versions.
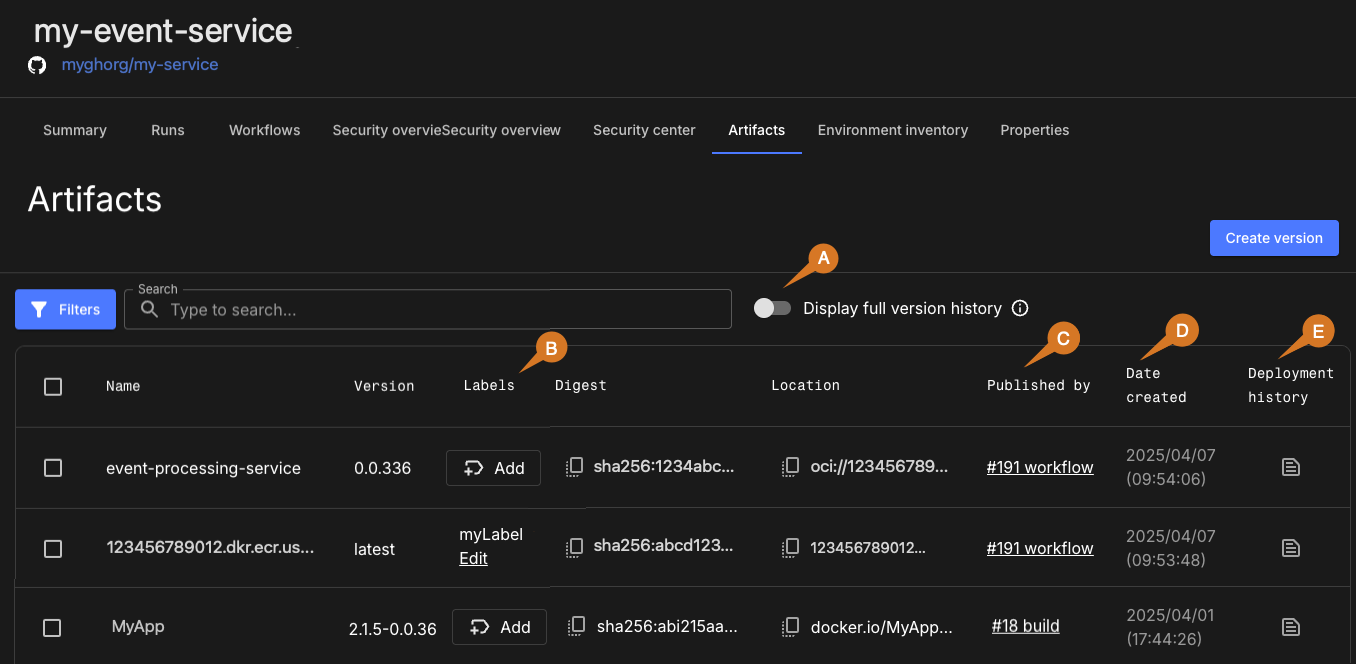
The above component artifact list example displays items not available in the list:
-
The option to display the full version history. The default display (toggled off) shows only the latest versions.
-
Labels, with the option to add or edit labels. You can also filter the artifact list by label.
-
A link to the associated run.
-
The date and time the artifact was created.
-
The deployment history, if applicable. Select
 to access details of all deployments for that artifact.
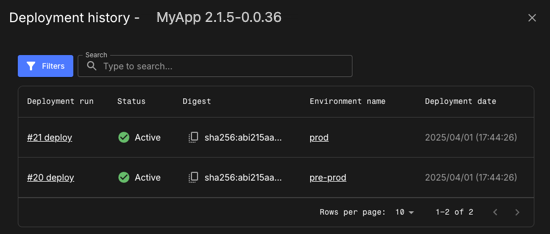
To learn more, refer to:
Environment inventory
If you have executed workflows to deploy artifact versions to infrastructure, track these deployments as environment inventory items. The Environment inventory displays where artifact versions of the component are currently deployed across all environments. Customize the view of the inventory by ordering, showing, and/or hiding any environments.
Artifacts are displayed only if they have been generated by running a workflow that has been configured to collect artifact data.
For more information, refer to:
Properties
View a list of properties associated with a component. Properties created both at the organization level (inherited) and on the component level (original) are displayed in Properties.
For more information, refer to Properties.
Component ID
Every component is identified by a unique multi-hexadecimal ID (UUID).
To locate the component ID, select a component from Components.
Within CloudBees Unify URL in your browser address bar, the component ID is displayed after componentId=.
In the example below, <COMPONENT_ID> is the component ID:
https://cloudbees.io/<YOUR_TENANT>/<ORGANIZATION_ID>/components/<COMPONENT_ID>?componentId=<COMPONENT_ID>&organizationId=<ORGANIZATION_ID>
The component ID is required for using some platform features, including: