An application groups components, environments, and a source repository into a software product you can build, deploy, and release with CloudBees platform. Refer to the applications documentation to gain a deeper understanding of how to use applications in the platform, and use role-based access control to manage permissions for application-related tasks.
A single application may be linked to:
-
A single source code repository.
-
One or more environments.
-
One or more components.
The following sections describe how to access, create, update, and delete applications in the UI.
Access an application
Select an organization, and then select Applications, to display all applications within that organization, including links to associated repositories and workflow runs.

Perform any of the following in the application list:
-
Select the application name to view the application details, or the Repo link to view the repository.
-
Select the run link to view the details of the most recent run.
-
If the run is not manually triggered, select the Trigger link to view the commit in the repository.
|
Select |
To access an application from the list:
-
(Optional) Search for a specific application by entering all or part of its name into Search.
-
(Optional) Select Filter to select for applications by the status of their most recent run. Only status types that are present in the unfiltered list are available in the filter.
-
Select an application name to view the application details.
Create an application
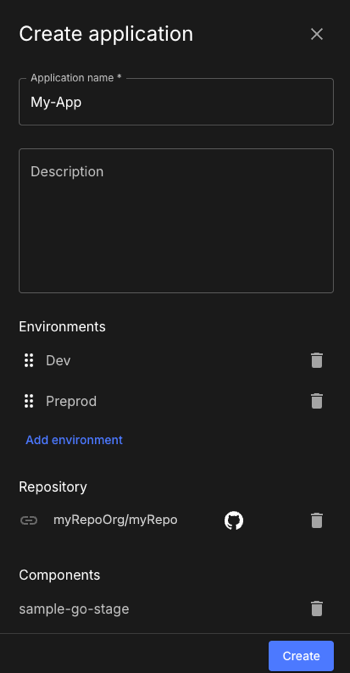
You can create multiple applications in an organization. Connect your application to environments and components within your organization. Integrate a repository with the CloudBees platform, and then link it to your application.
To create an application:
-
Select an organization, and then select Applications.
-
Select Create application.
-
Enter an Application name.
-
(Optional) Enter a Description.
-
(Optional) Select Add environment, and then select an environment from the options. Repeat to add more environments.
To rearrange the environment list, select  next to an environment and drag to the desired position.
-
(Optional) Select Add repository, and then do one of the following:
-
Select a repository from the options, and then select Add.
-
Select
 to display only those repositories available for connection.
-
-
Select Connect your repository to create a new SCM integration, and then create an application.
-
-
(Optional) Select Add component, and then select a component from the options. Repeat to add more components.
-
Select Create.
The application is created accordingly and listed in Applications for your organization.

|
Linking components and a repository to your application allows you to use deployer workflows and staged workflows to coordinate multi-component releases. |
Update an application
You can edit the application name and description, as well as add or remove the following linkages:
-
Environment(s)
-
A single repository
-
Component(s)
To update an application:
-
Select an application.
-
Select
 next to the application you want to update.
 -
Select Edit.
-
Make any desired changes, including:
-
Update the Application name.
-
Update the Description.
-
Link one or more environments. To unlink, select
 next to an environment, and then select Confirm.
 -
Link or unlink a repository:
-
If no repository is linked, select a repository from the options, and then select Add.
-
To unlink, select
 next to a repository, and then select Confirm.
You can only link a single repository to an application. To link to a different repository, first remove the existing linkage.
-
-
Link one or more components. To unlink, select
 next to a component, and then select Confirm.
-
-
Select Save to save changes.
|
If you change the component list of an application, that will invalidate the deployer workflow. You must regenerate or edit the deployer workflow to accommodate these changes. |
Delete an application
A deleted application is completely removed from all organizations in the CloudBees platform, and deletion is irreversible.
To delete an application:
-
Select an application.
-
Select
 next to the application to delete.
 -
Select Delete application.
-
Select Delete. The application is permanently deleted.