Use the CloudBees Unify workflow management features to configure workflows. Begin by accessing the workflows list for an application or component. Then use the composer to configure a standard or staged workflow. Code editor configuration of standard workflow objects is also available.
Workflows list
To access a list of workflows for:
-
An application by accessing the details for an application.
View access steps
-
Use the
 to select an organization or sub-organization.
 -
Select Applications from the left menu.
-
Select the application name to view the application details
-
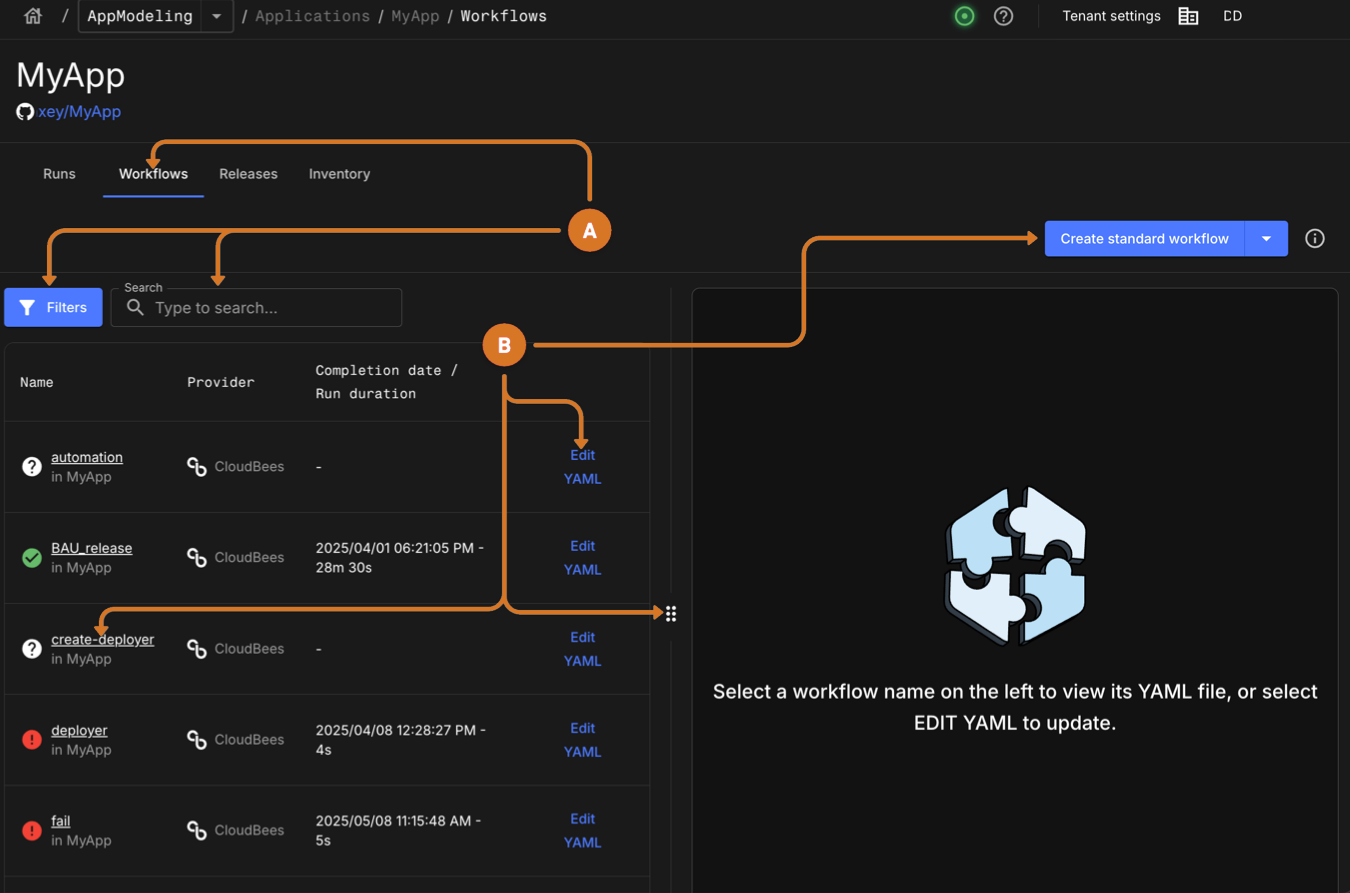
Select the Workflows tab. A list of application workflow runs displays.
-
-
A component by accessing the details for a component.
View access steps
-
Use the
 to select an organization or sub-organization.
 -
Select Components from the left menu.
-
Select the component name to view the component details.
-
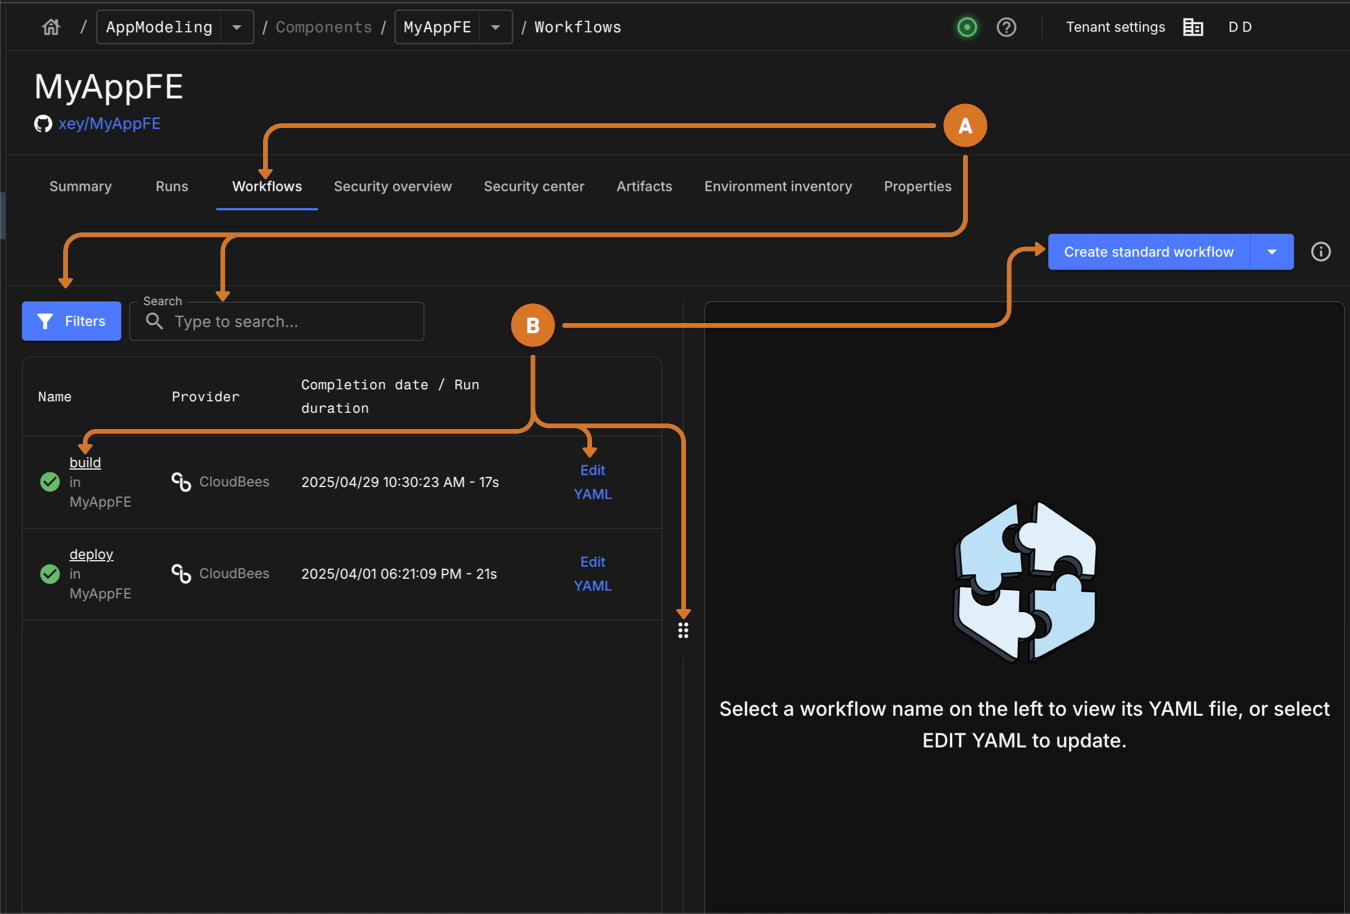
Select the Workflows tab. A list of component workflow runs display.
-
-
Manage workflows
-
Filter list by Status.
-
Use the search to locate specific workflows.
-
-
Use these workflow related features.
-
Configure a new standard or staged workflow by selecting Create standard workflow or Create staged workflow.
-
Access a workflow YAML file.
-
View the workflow YAML file by selecting the workflow name link.
-
Modify workflow in the Composer by selecting Edit YAML.
-
Resize workflow viewer width by dragging
 .
.
-
Configure staged workflow
| Staged workflows is a Preview feature. |
To configure a staged workflow in the Workflow composer:
-
Create a new staged workflow, by navigating to the Workflows list for an application or component. Then selecting Create staged workflow from the menu.
View image
 Figure 3. Select Create staged workflow
 -
Modify and existing staged workflow.
-
Navigate to the Workflows list of an application or component details. Then select the Edit YAML link for the workflow.
View image
 Figure 4. Select Edit YAML on Workflows list
 -
Navigate to the Runs list of an application, component or organization. Then select the workflow name link.
View image
 Figure 5. Select workflow name on Runs list
-
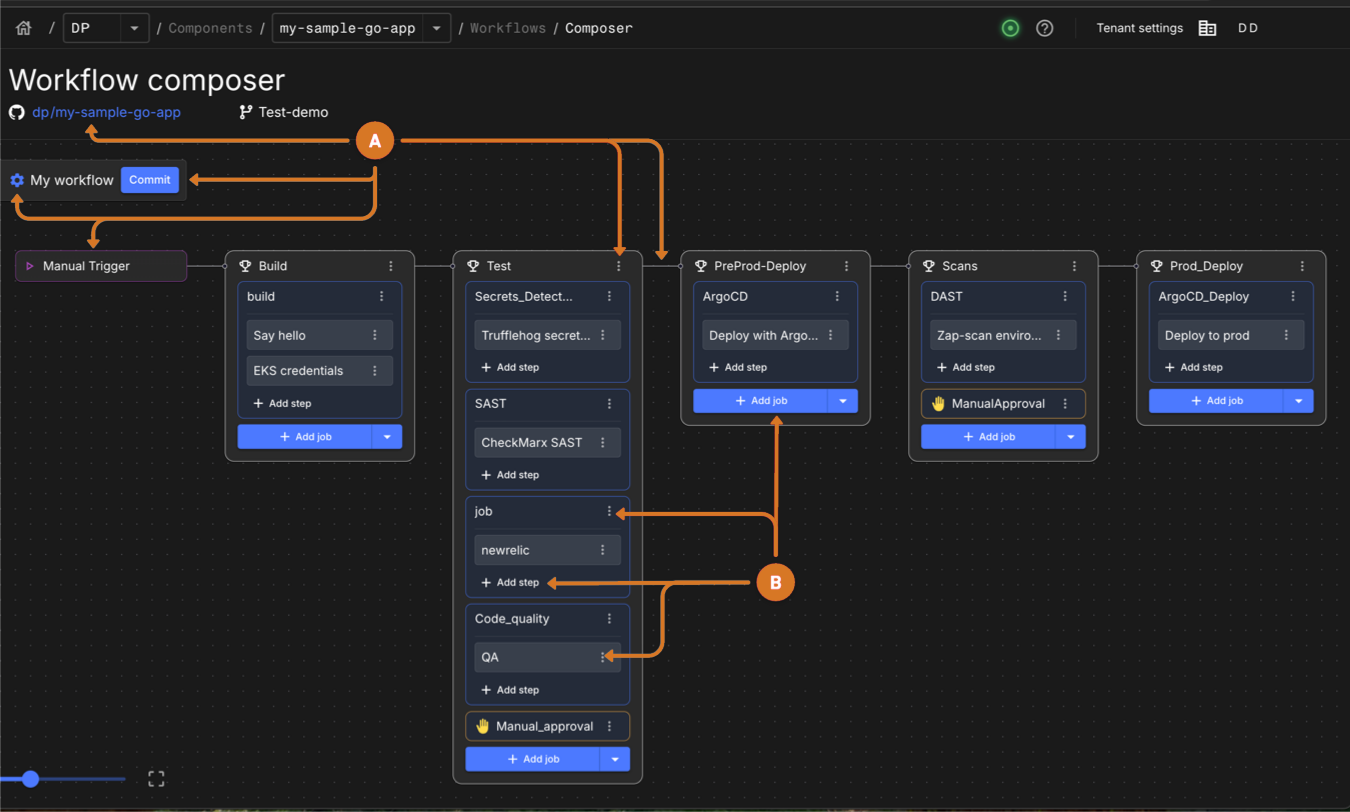
Use the following feature to configure a staged workflow:
-
Use the Workflow composer to:
-
Access the Git repository linked to the workflow by selecting the repository name link
-
Save changes to the workflow by selecting Commit.
-
Modify workflow name and
envkey/value pair settings by selecting .
.
-
-
Configure stages.
-
Add a new stage.
-
Select a connecting line to insert a new stage at that point in workflow sequence.
-
Select
 . A new stage appears at the selected position in the workflow.
-
-
Modify an existing stage by selecting the
 next to a stage, and then select Edit.
-
-
Manage standard or approval jobs.
-
Configure a new job by selecting:
-
+ Add job from the Jobs menu to create a new standard job.
-
Add manual approval from the Jobs menu to create a manual approval job.
-
-
Modify an existing job by selecting the
 next to a job, and then select Edit.
Change job execution order by modifying the needsobject.
-
-
Configure steps.
-
Create a step by + Add step
-
Modify an existing job by selecting the
 next to a job, and then select Edit.
-
-
Reorder stages and jobs.
-
Drag and drop a stage or job to a new location in the workflow sequence.
Job dependencies are updated automatically when a stage is moved to ensure proper job execution order. It is recommended to review and adjust job needsas necessary after reordering stages before committing changes to the repository.
-
Configure standard workflow
Use the Workflow composer visual tool, code editor or both to create and configure a standard workflow. Updates in with the visual tool or the code editor are automatically displayed in both.
Configure a standard workflow in the Workflow composer.
-
Create a new standard workflow, by navigating to to the Workflows list of an application or component details. Then selecting Create standard workflow from the menu.
View image
 Figure 7. Select Create standard workflow
 -
Modify and existing standard workflow.
-
Navigate to the Workflows list of an application or component details. Then select the Edit YAML link for the workflow.
View image
 Figure 8. Select Edit YAML on Workflows list
 -
Navigate to the Runs list for an application, component or organization. Then select the workflow name link.
View image
 Figure 9. Select workflow name on Runs list
-
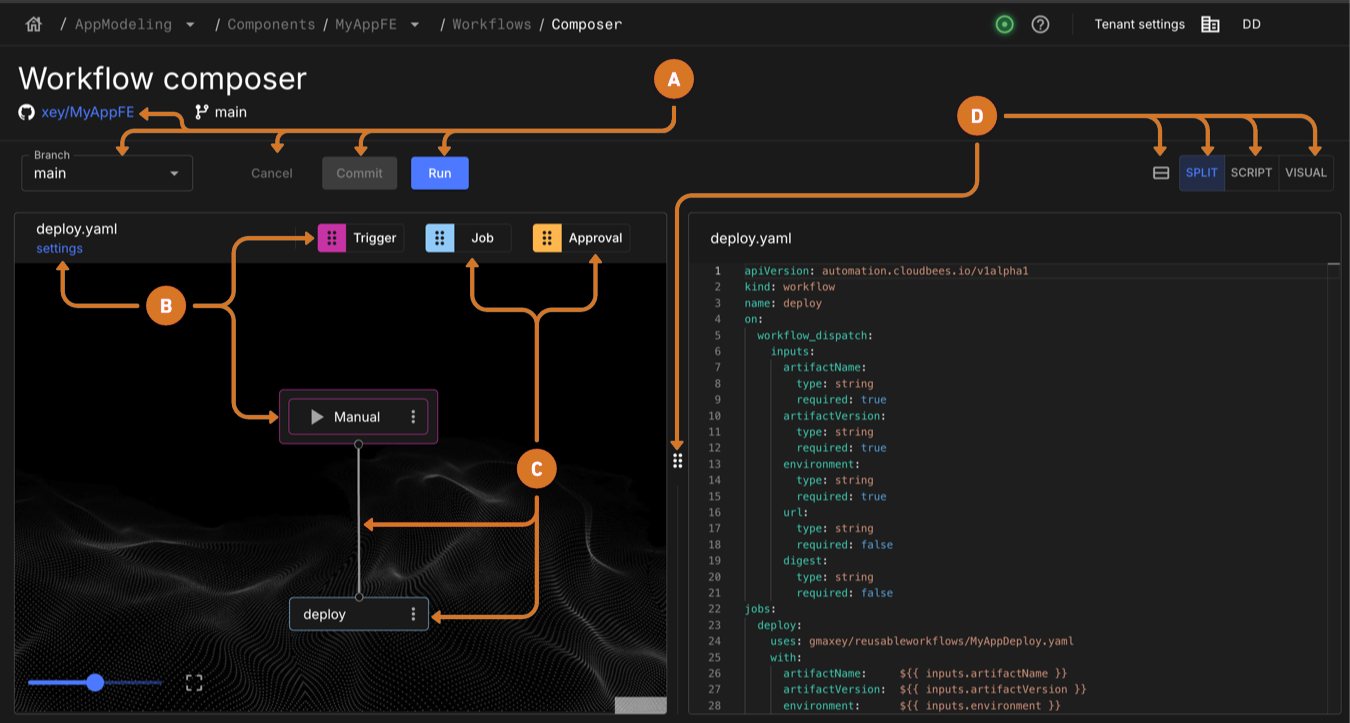
Use the following feature to configure a standard workflow:
-
Use the Workflow composer to:
-
Access the Git repository linked to the workflow by selecting the repository name link
-
Switch the repository branch by selecting branch name.
-
Exit workflow composer without saving changes by selecting Cancel.
-
Save changes to the workflow by selecting Commit.
-
Trigger a new workflow run by selecting Run.
If the Run is not present, add a manual trigger. Refer to Configure a manual trigger.
-
-
Configure workflow settings or triggers
-
Modify workflow name and
envkey/value pairs by selecting settings. -
Select Trigger to add a new or
 to edit an existing push, pull, manual, or schedule trigger.
-
-
Configure a standard or approval job
-
Create a new job by selecting Job or Approval and then dragging it to the job area of the visual composer.
-
Modify an existing job by selecting the
 next to a job, and then select Edit.
 -
Remove job
needsobject by double-clicking on the line connecting jobs.
-
-
Adjust the composer view.
-
Resize composer width by dragging
 .
. -
Display only the visual tool by selecting Visual
-
Display only the code editor selecting Script
-
Display both by selecting Split.
When SPLIT is active, select  to arrange the visual tool above the code editor, or select
  to arrange the visual tool and code editor side by side.
-
Use the workflow code editor
Use the workflow to configure a standard workflow according to YAML formating specifications. For additional details related to configuring workflow objects refer to:
To use the code editor begin by opening a standard workflow in the Workflow composer one of the following ways:
-
Select the Edit YAML link for the workflow on the Workflows page.
-
Select the workflow name link on the Runs page.
Save a workflow
-
In the workflow Composer, select COMMIT.
-
Enter a Commit message.
-
Select a branch to commit to from the following options:
-
Select Commit to a current branch:<current branch>.
-
Select Commit to a new branch, then enter a new branch name.
-
If committing to a new branch, you may optionally select Start a pull request to merge to <your default branch>.
-
-
Select FINISH.
 Figure 12. Commit workflow
 -
Check your repository for the commit.
All CloudBees Unify workflows for your component are saved in .cloudbees/workflowsin the connected repository.
push or pull_request trigger configuration
Configure a workflow run to start with a push or pull-request.
To configure a push or pull-request trigger:
-
Use the code editor to configure push or pull trigger. Refer to CloudBees DSL syntax for code details.
View push and pull trigger code examples
apiVersion: automation.cloudbees.io/v1alpha1 kind: workflow name: Example 2 on: push: branches: - "**" tags: - git-tag-name pull_request: branches: - main jobs: build: steps: - name: Say hello uses: docker://golang:1.20.3-alpine3.17 shell: sh run: | echo "hello world" -
Access trigger configuration features via the workflow Composer.
-
Create a new trigger by selecting Trigger or drag Trigger to the trigger area of the visual composer.
-
Modify an existing trigger by selecting the
 next to a trigger, and then choosing Edit.
-
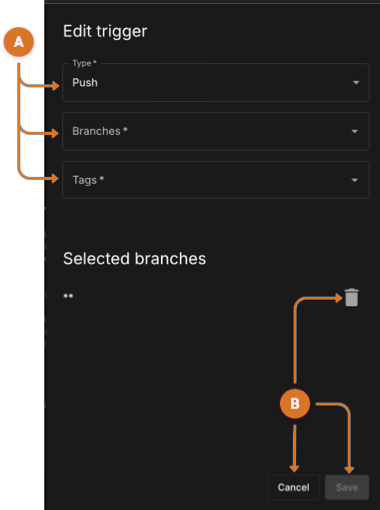
Use these features to configure a push or pull-request trigger.
-
Configure
pushorpull-request-
Ensure Pull request or Push is the selected Type option.
-
Choose one or more branches in the Branches field by:
-
Entering
**to select all branches. -
Selecting an existing branch.
-
Defining a branch pattern name.
-
-
Choose one or more git tags for a push trigger in the
Tagsfield by:-
Defining a tag patten names. (Recommended) e.g.
"v*" -
Entering a specific tag name. e.g.
"v1.0"
-
-
-
Manage trigger.
-
Remove a branch by selecting
 next to a branch.
 -
Exit and discard changes by selecting Cancel
-
Keep trigger configuration changes.
-
Select Save. The trigger is displayed in the visual composer trigger section and in the code editor:
on:pushorpull-request. -
Continue workflow configuration one of the following ways:
-
Use the code editor to configure additional workflow attributes. Refer to Code editor.
-
Finalize changes by saving the workflow.
-
-
-
schedule trigger configuration
Use the schedule trigger to start a workflow run according to configured cron schedules. Scheduled triggers execute only on the default branch of the repository.
| Cron expressions are configured in the UTC timezone. |
Once configured, workflow runs triggered by this schedule appear in the Runs list with trigger by details similar to:
#592 Scheduled At 0, 10, 26, 33, 40, and 50 minutes past the hour, every hour, every day (UTC).
Configure a schedule trigger:
-
Use the code editor to configure a schedule trigger. Refer to CloudBees DSL syntax for code details.
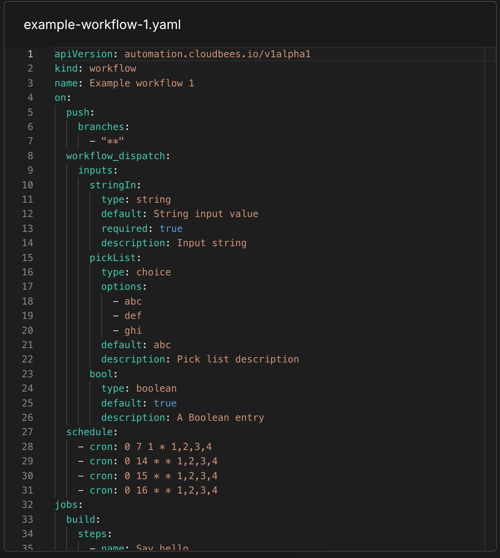
View schedule trigger code examples
apiVersion: automation.cloudbees.io/v1alpha1 kind: workflow name: Example 2 on: push: branches: - "**" schedule: - cron: 0 7 1 * 1,2,3,4 - cron: 0 14 * * 1,2,3,4 - cron: 0 15 * * 1,2,3,4 - cron: 0 16 * * 1,2,3,4 jobs: build: steps: - name: Say hello uses: docker://golang:1.20.3-alpine3.17 shell: sh run: | echo "hello world" -
Access trigger configuration features via the workflow Composer.
-
Create a new trigger by selecting Trigger or drag Trigger to the trigger area of the visual composer.
-
Modify an existing trigger by selecting the
 next to a trigger, and then choosing Edit.
 Figure 14. Edit trigger
 -
Use these features to configure a schedule trigger:
-
Configure schedules
-
Ensure
Scheduleis the selected Type option. -
Enter schedules in cron format.
-
Create schedules by selecting + new schedule.
-
-
Manage schedules
-
Remove a schedule by selecting
 next to a schedule.
 -
Exit and discard changes by selecting Cancel.
-
Keep schedule trigger configuration changes.
-
Select Save. The schedule trigger is displayed in the visual composer trigger section and in the code editor:
on:schedule. -
Continue workflow configuration one of the following ways:
-
Use the code editor to configure additional workflow attributes. Refer to Code editor.
-
Finalize changes by saving the workflow.
-
-
-
workflow_call trigger configuration
Use the workflow_call trigger to enable a workflow to be called to execute as a reusable workflow job.
To configure a workflow_call trigger, use the code editor to configure a workflow call trigger. Refer to Reusable workflows for code details.
workflow_dispatch trigger configuration
|
Only users with administrative permissions can trigger a workflow to run a manual workflow. |
Use the workflow_dispatch trigger to allow users with the proper permissions to manually trigger a workflow run. Add input parameters to the trigger to customize workflow runtime behavior. For example, use a parameter to select the deployment environment, enable or disable a feature during deployment, or select a server or service to deploy.
| Avoid using parameters these types of data as parameter | |
|---|---|
Access tokens |
Payment information |
Binary data |
Personally identifiable information |
Encryption keys and certificates |
Private keys |
Large data files |
Secrets and passwords |
Long strings or complex data structures |
Sensitive configuration files |
Once configured, a user with proper permission can trigger a workflow using the:
-
Composer visual editor by selecting Rerun workflow, New run, or the manual trigger
 button.
 -
Run details: Select Rerun workflow or New run button.
To configure a manual trigger:
-
Use the code editor to configure a
workflow_dispatchtrigger. Refer to CloudBees DSL syntax for code details.View usage example
apiVersion: automation.cloudbees.io/v1alpha1 kind: workflow name: Example 2 on: workflow_dispatch: inputs: stringIn: type: string default: String input value required: true description: Input string pickList: type: choice options: - abc - def - ghi default: abc description: Pick list description boolean: type: boolean default: true description: A boolean entry RetryCount: type: number default: 3 required: true description: Retry deployment a certain number of times. jobs: build: steps: - name: Print inputs(1) uses: docker://alpine:3.21 env: MYSTRINGINPUT: ${{ inputs.stringIn }} run: | echo "String Input: $MYSTRINGINPUT" echo "Selected Option: ${{ inputs.pickList }}" echo "Boolean Value: ${{ inputs.boolean }}" echo "Retry Count: ${{ inputs.RetryCount }}" - name: Conditional Logic(2) uses: docker://golang:1.20.3-alpine3.17 run: | if [ "${{ inputs.boolean }}" = "true" ]; then echo "Boolean is true, proceeding to custom logic." else echo "Boolean is false, skipping some steps." fi - name: Use Pick List Option(3) uses: docker://golang:1.20.3-alpine3.17 run: | case "${{ inputs.pickList }}" in abc) echo "Option ABC selected, executing ABC logic." ;; def) echo "Option DEF selected, executing DEF logic." ;; ghi) echo "Option GHI selected, executing GHI logic." ;; *) echo "Unknown option selected." ;; esac - name: Loop with Retry Count(4) uses: docker://golang:1.20.3-alpine3.17 run: | COUNT=0 while [ $COUNT -lt ${{ inputs.RetryCount }} ]; do echo "Attempt $((COUNT+1)) of deployment task" # Simulate a task, replace with real deployment logic COUNT=$((COUNT+1)) done1 Print Inputs: This step echoes all input values. Useful for verifying correct passage of values. 2 Conditional Logic: Demonstrates how to use a booleaninput to conditionally execute parts of the script based on whether the input istrueorfalse.3 Use Pick List Option: Uses a case statement to handle different logic based on which option is selected from the pickListinput.4 Loop with Retry Count: Uses a while loop to simulate retry logic based on the RetryCountinput. This is useful for tasks that need multiple attempts to succeed, like deployment tasks. -
Access trigger configuration features via the workflow Composer.
-
Create a new trigger by selecting Trigger or dragging Trigger to the trigger area of the visual composer.
-
Modify an existing trigger by selecting the
 next to a trigger, and then choosing Edit.
 Figure 15. Edit manual trigger
 -
Use these feature to configure a manual trigger.
-
Configure a manual trigger:
-
Ensure
Manualis the selected Type option. -
Change parameter order.
-
Select a parameter
 .
. -
Drag the step to new location in parameter sequence.
-
-
Create up to 10 input parameters.
-
Select + add parameter.
-
Select an input parameter type from the menu options.
View parameter type definitions
-
String: Allows users to input a text-based value, which can then be used within the workflow to control behavior, pass data, or configure settings.
-
Number: This function accepts numerical inputs, allowing users to specify integer or floating-point values. For example, you can allocate the number of CPUs or memory units to set a threshold such as
error_threshold: 100. You can also manage versions, timeouts, and IDs. -
Boolean: This parameter type accepts binary values: true or false. It is ideal for toggling features, enabling or disabling specific steps, or controlling conditional logic within a workflow.
-
Choice: This parameter allows users to select a single option from a predefined list of choices. It is particularly useful to guide user input to specific, valid options, ensuring consistency and reducing the risk of errors.
-
Enter a name for the parameter.
-
Complete applicable fields
-
-
Enter a description for the parameter.
-
Enter a default parameter value. This value is applied when value is provided in the request.
-
Make the parameter value required in the request by selecting Required.
If true, an error occurs when no value is provided for the parameter in the request and no default value is defined.
-
-
Configure the parameter.
View usage example
apiVersion: automation.cloudbees.io/v1alpha1 kind: workflow name: Example 2 on: workflow_dispatch: inputs: stringIn: type: string default: String input value required: true description: Input string pickList: type: choice options: - abc - def - ghi default: abc description: Pick list description boolean: type: boolean default: true description: A boolean entry RetryCount: type: number default: 3 required: true description: Retry deployment a certain number of times. jobs: build: steps: - name: Print inputs(1) uses: docker://alpine:3.21 env: MYSTRINGINPUT: ${{ inputs.stringIn }} run: | echo "String Input: $MYSTRINGINPUT" echo "Selected Option: ${{ inputs.pickList }}" echo "Boolean Value: ${{ inputs.boolean }}" echo "Retry Count: ${{ inputs.RetryCount }}" - name: Conditional Logic(2) uses: docker://golang:1.20.3-alpine3.17 run: | if [ "${{ inputs.boolean }}" = "true" ]; then echo "Boolean is true, proceeding to custom logic." else echo "Boolean is false, skipping some steps." fi - name: Use Pick List Option(3) uses: docker://golang:1.20.3-alpine3.17 run: | case "${{ inputs.pickList }}" in abc) echo "Option ABC selected, executing ABC logic." ;; def) echo "Option DEF selected, executing DEF logic." ;; ghi) echo "Option GHI selected, executing GHI logic." ;; *) echo "Unknown option selected." ;; esac - name: Loop with Retry Count(4) uses: docker://golang:1.20.3-alpine3.17 run: | COUNT=0 while [ $COUNT -lt ${{ inputs.RetryCount }} ]; do echo "Attempt $((COUNT+1)) of deployment task" # Simulate a task, replace with real deployment logic COUNT=$((COUNT+1)) done1 Print Inputs: This step echoes all input values. Useful for verifying correct passage of values. 2 Conditional Logic: Demonstrates how to use a booleaninput to conditionally execute parts of the script based on whether the input istrueorfalse.3 Use Pick List Option: Uses a case statement to handle different logic based on which option is selected from the pickListinput.4 Loop with Retry Count: Uses a while loop to simulate retry logic based on the RetryCountinput. This is useful for tasks that need multiple attempts to succeed, like deployment tasks.
-
-
-
Complete manual approval trigger configuration:
-
Exit and discard changes by selecting Cancel.
-
Keep manual trigger configuration changes.
-
Select Save. The manual trigger is displayed in the visual composer trigger section and in the code editor:
on:workflow_dispatch:. -
Continue workflow configuration one of the following ways.
-
Use the code editor to configure additional workflow attributes. Refer to Code editor.
-
Finalize changes by saving the workflow.
-
-
-
Manual approval job setup
Add a Manual approval custom job to insert a workflow approval. Once set up, approvers will be notified via email that an approval response is required.
To configure a manual approval job:
-
Use the code editor to configure an approval job. Refer to Manual approval for code details.
-
Access job configuration features via the workflow Composer.
-
Create a new job by selecting Job or dragging Job to the job area of the visual composer.
-
Modify an existing job by selecting the
 next to a job, and then choosing Edit.
 Figure 16. Create manual approval
 -
Use these features to configure a manual approval job.
-
Complete applicable fields.
-
Enter a name for the approval job.
-
Review or modify the
timeout-minutesdefault value of4320minutes. This is the number of minutes approvers have to respond to the approval request. -
To specify a job or jobs that must successfully complete before the approval job runs.
-
Select
Add needs. -
Select the name of the job.
Use
needsalong withoutputscontext to access parameter input values.To return:
-
All parameter input values provided by a workflow approver in JSON format:
needssyntax of${{needs.<approvalJobName>.outputs.approvalInputValues}}. -
A specific approval parameter input value:
${{ fromJSON(needs.<approvalJobName>.outputs.approvalInputValues).<parameterName> }}.
-
-
-
Select the name of users who can approve the workflow run. Both user IDs and email addresses are supported Approvers field values.
Approval rules and notifications are as follows:
-
If approvers are specified, then:
-
only listed approvers will receive an email notification.
-
only listed approvers can participate in approval process.
-
-
If approvers are not specified, then:
-
only the workflow initiator will receive an email notification.
-
all eligible users can participate in approval process.
-
-
-
Enter instructive text for the approvers. This text will be visible in the approval email notification and run details.
-
Ensure that the person who starts the workflow cannot approve workflow by selecting Disallow workflow initiator from approving.
-
-
Manage input parameters.
-
Change parameter execution order.
-
Select a parameter
 .
. -
Drag the parameter to a new location in the execution sequence.
-
-
Remove a parameter by selecting
 .
. -
Create a new or modify an existing input parameter.
-
Access input parameter configuration fields one of the following ways:
-
Create a new parameter by selecting the Add input link.
-
Modify an existing parameter by selecting the parameter
 .
.
-
-
Modify parameter values.
View input parameter code examples
build-approval: with: approvalInputs: | string-value: type: string retry-count: type: number booleen: type: boolean default: false Picklist: type: choice options: - abc - xyz
-
-
-
Complete approval job configuration.
-
Review the default output values for the approval job by selecting Expand all.
-
Exit and discard changes by selecting Cancel.
-
Keep job configuration changes.
-
Select Save. The approval job is displayed in the visual composer and in the code editor, under
jobs:-
Approval input parameters are listed under
approvalInputs -
delegatesvalue ofhttps://github.com/cloudbees-io/manual-approval/custom-job.yml@v1
-
-
Continue workflow configuration one of the following ways:
-
Use the code editor to configure additional workflow attributes. Refer to Code editor.
-
Finalize changes by saving the workflow.
-
-
-
Reusable workflow job setup
Add a reusable workflow job to call a pre-configured workflow to execute as a workflow job.
Use the code editor to configure a reusable workflow job. Refer to Reusable workflows for code details.
| Currently, the reusable workflow job creation is not supported in the CloudBees Unify UI. |
Standard job setup
To configure a standard job:
-
Use the code editor to configure an approval job. Refer to CloudBees DSL syntax for code details.
-
Access job configuration features via the workflow Composer.
-
Create a new job by selecting Job or drag Job to the job area of the visual composer.
-
Modify an existing job by selecting the
 next to a job, and then choosing Edit.
 Figure 17. Edit job
-
Use these features to configure a standard job.
-
Complete applicable job fields.
-
Enter name for the job.
-
Indicate the job or jobs that must complete successfully before the job runs by selecting
Add needs. -
Specify a job run environment by selecting the name from the Environment options.
-
-
Manage services.
Services is a Preview feature. View Service management information
-
Access service configuration fields of the following ways.
-
Configure new service by selecting the Add service link.
-
Modify an existing service by to create a or the
 next to a service, and then choosing Edit.
-
-
Complete applicable service configuration fields:
 Figure 18. Service
-
Enter a name for the service.
-
Enter the docker image
nameortag. -
Specify the service environment by selecting the name from the Add environment options.
-
The argument values will override the values in the
CMDDockerfile. For details related serviceargsyntax, refer to jobs.<job_id>.services.<service_id>.args
-
-
Manage steps.
-
Change job step order.
-
Select a step
 .
. -
Drag the step to a new location in the job sequence.
-
-
Delete the step by selecting
 in the step header, and then choosing Delete.
 -
Create a new or modify an existing step.
-
Access step configuration fields one of the following ways.
-
Create a new step by selecting the Add step link.
-
Modify an existing step by selecting
 next to a step, and then choosing Edit.
-
-
Complete applicable step configuration fields:
View image of Step fields
 Figure 19. Step
-
Enter a name for the step.
-
Locate and select a preconfigured action or container to execute the job from the Uses field options, or Select from catalog to search the catalog.
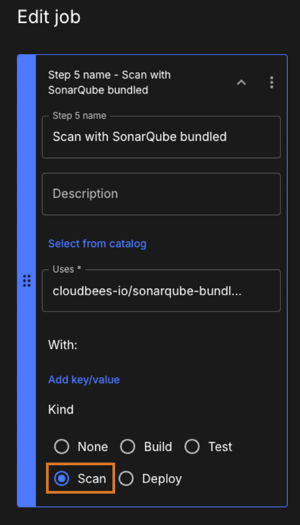
-
Select a Kind option (other than None) to use the data from this step for analytics calculations.
-
Select Deploy to use DORA metrics.
-
Select Build to use Software delivery activity.
-
Select Scan to use Security insights.
-
Select Test to use Test insights.
If the Kind option is inappropriate for the step, the data is not collected.
-
-
-
-
-
Modify job
-
Specify a job output key value pair by selecting Add output.
-
Exit and discard changes by selecting Cancel.
-
Keep job configuration changes.
-
Select Save. The standard job is displayed in the visual composer and in the code editor, under
jobs:. -
Continue workflow configuration one of the following ways.
-
Use the code editor to configure additional workflow attributes. Refer to Code editor.
-
Finalize changes by saving the workflow.
-
-
-
Associate run data with analytics dashboards
To populate all analytics dashboards, you must first create a component and a workflow. To pull data into specific dashboards, you must additionally specify the kind of workflow step, as detailed below:
-
DORA metrics requires both Build and Deploy.
-
Security insights requires Scan.
-
Test insights requires Test.
In the code editor, use the kind keyword in your workflow steps to populate analytics dashboards.
If using the visual tool, specify the kind of step by selecting a Kind option other than None, as in the following example:
| If the Kind option is inappropriate for the step, the data are not counted. |
In the following workflow job example, the build, test, and scan steps are specified.
| 1 | Build step specified. |
| 2 | Test step specified. |
| 3 | Scan step specified. |