Use the following instructions to guide you through integrating CloudBees CI or Jenkins® with CloudBees platform, enabling you to improve visibility and efficiency in managing your CI activities. CloudBees recommends the automatic setup, but you can also download the PEM file with the private key to manually configure your controller.
| To learn more about working with CloudBees CI or Jenkins in CloudBees platform, including technical requirements and limitations, refer to Get started with CloudBees CI / Jenkins® and CloudBees platform. |
Perform the integration in one of the following ways:
-
Automatic connection: The controller credential is automatically set up for you. CloudBees recommends using the automatic connection.
-
Manual connection: Download the private key and add it to your controller yourself.
| Be sure to install the CloudBees Platform Integration Plugin on your controller before proceeding with the integration. |
Use the automatic connection method
Both CloudBees CI and Jenkins can be integrated with the automatic connection method. This is the method recommended by CloudBees.
To connect CloudBees CI or Jenkins automatically to CloudBees platform:
-
Select an organization, and then select .
-
Select Create integration.
-
Select Continuous integration.
-
Select one of the provider options:
-
CloudBees CI controller
-
Jenkins controller
-
-
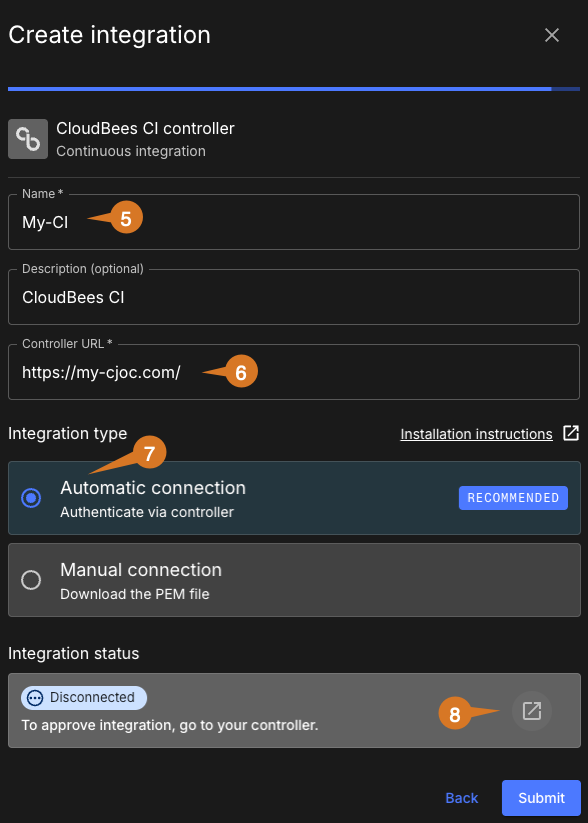
Enter a Name and optional Description.
-
Enter the Controller URL.
The controller URL cannot be edited after the integration is saved. Always use HTTPS for controller URLs. HTTP transmits credentials and key material unencrypted, exposing them to interception. Refer to HTTPS requirements for controller URLs for more information. -
Select Automatic connection.
-
Select the link in Integration status to authenticate via the controller.
-
Check the Integration status; it may take a few minutes to transition from Pending to Connected.
Once you have connected successfully, monitor your CloudBees CI or Jenkins pipelines through CloudBees platform. The following example highlights some of the integration steps.

How the automatic integration works
The CloudBees CI or Jenkins® integration with CloudBees platform creates a public and private key pair, which are associated with CloudBees platform organization ID and endpoint ID. This private key information is installed into the controller, which gets the fingerprint of the public key as well.
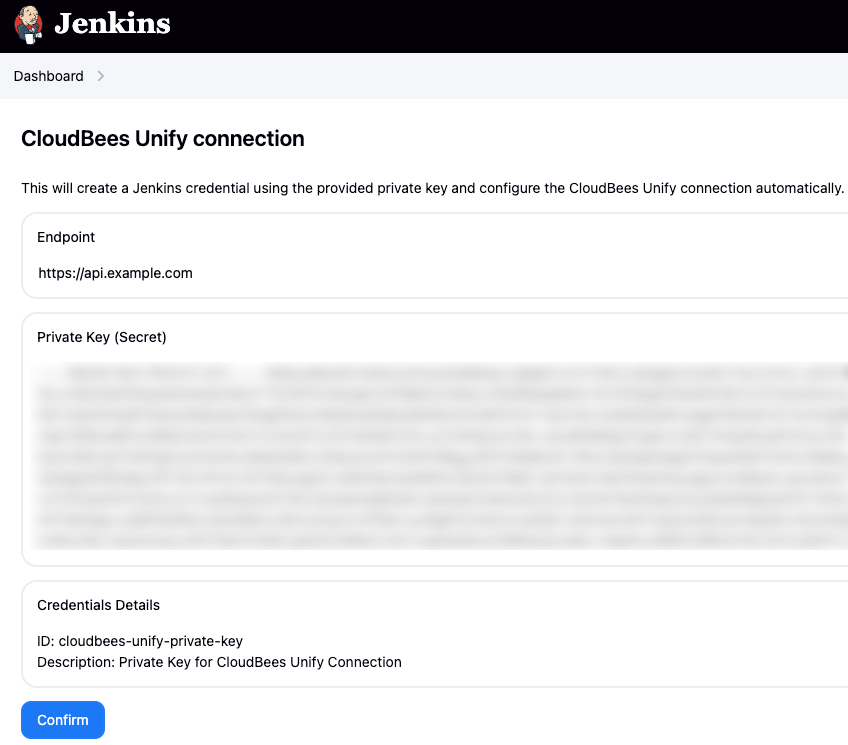
Once the controller has this private key, it creates a Jenkins credential.
To create the Jenkins credential automatically:
-
Go to your controller.
-
Select Confirm.
 Figure 2. Confirming a CloudBees platform connection in a Jenkins controller.
The controller can send data to CloudBees platform once it is credentialed.
Use the manual connection method
Both CloudBees CI and Jenkins can be integrated with the manual connection method. You may want to use this method if you require more control over the integration process.
To connect CloudBees CI or Jenkins manually to CloudBees platform:
-
Select an organization, and then select .
-
Select Create integration.
-
Select Continuous integration.
-
Select one of the provider options:
-
CloudBees CI controller
-
Jenkins controller
-
-
Enter a Name and optional Description.
-
Enter the Controller URL.
The controller URL cannot be edited after the integration is saved. Always use HTTPS for controller URLs. HTTP transmits credentials and key material unencrypted, exposing them to interception. Refer to HTTPS requirements for controller URLs for more information. -
Select Manual connection.
-
Select the download link in Integration status to download the PEM file containing the private key.
-
Perform the following steps in your controller:
-
Go to .
-
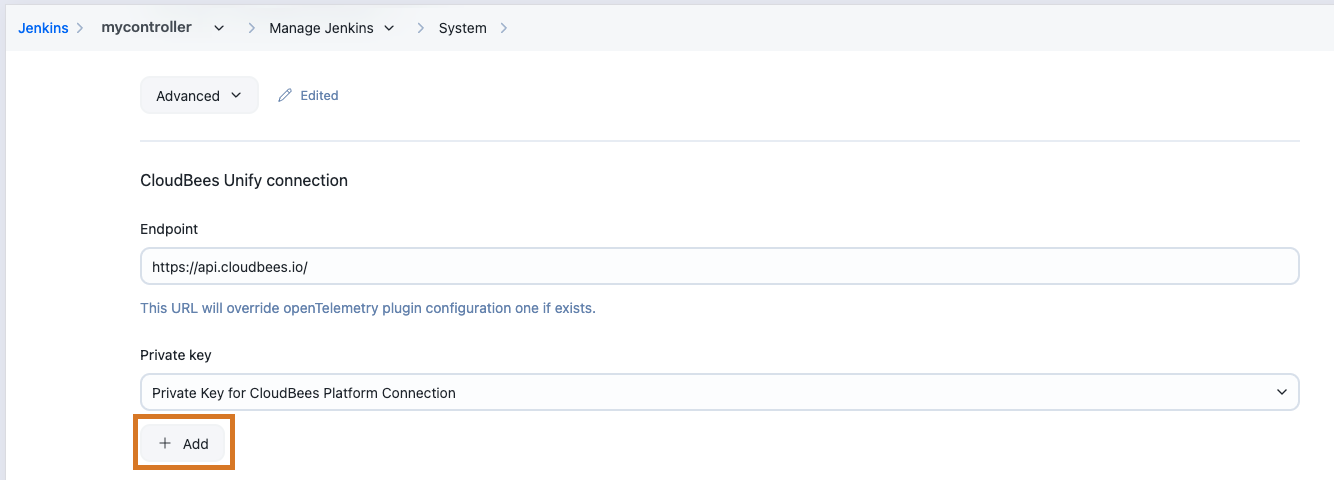
Select Add and select Jenkins.
-
Select Secret text from the Kind options.
-
Paste your private key into Secret.
-
Select Add.
-
Select the new credential from the Private key options.
-
In System, select Save.
 Figure 3. Adding a private key, with Add highlighted.
-
-
In CloudBees platform, check the Integration status; it may take a few minutes to transition from Pending to Connected.
Once you have connected successfully, monitor your CloudBees CI or Jenkins pipelines through CloudBees platform.
Understand the integration status
When you create a new integration, the status transitions from Disconnected to Pending to Connected. The Warning status is displayed only if a previously successful integration has lost data connection to the controller for at least 24 hours.
| Status | Definition and duration |
|---|---|
Disconnected |
Initial status before the user selects the link to go to the controller or download the PEM file. This status also occurs if you have reset or lost connection to the controller, and only a local CloudBees platform state is present. |
Pending |
Status immediately after the user selects the link to go to the controller or download the PEM file. In this status, CloudBees platform has not yet received data from the controller. |
Connected |
Successful integration status, when CloudBees platform is receiving job data from the controller. Remains in this status as long as data is received from the controller within a 24-hour time frame. Transitions to this status from Warning as soon as data is received from the controller at least once within 24 hours. |
Warning |
Status indicating possible integration issue. This status can also occur in response to editing the integration. Transitions to this status if no data has been received from the controller for 24 hours. |
Status remains Pending
The integration status may remain Pending in certain circumstances, even after the connection is approved in the controller. For example, this may occur if the connection is reset or if you delete an integration, and then reconnect the same controller in a different integration. In these scenarios, the status change to Connected does not display immediately, but is displayed as soon as the next event, such as a build run or a job update, is received from the controller.
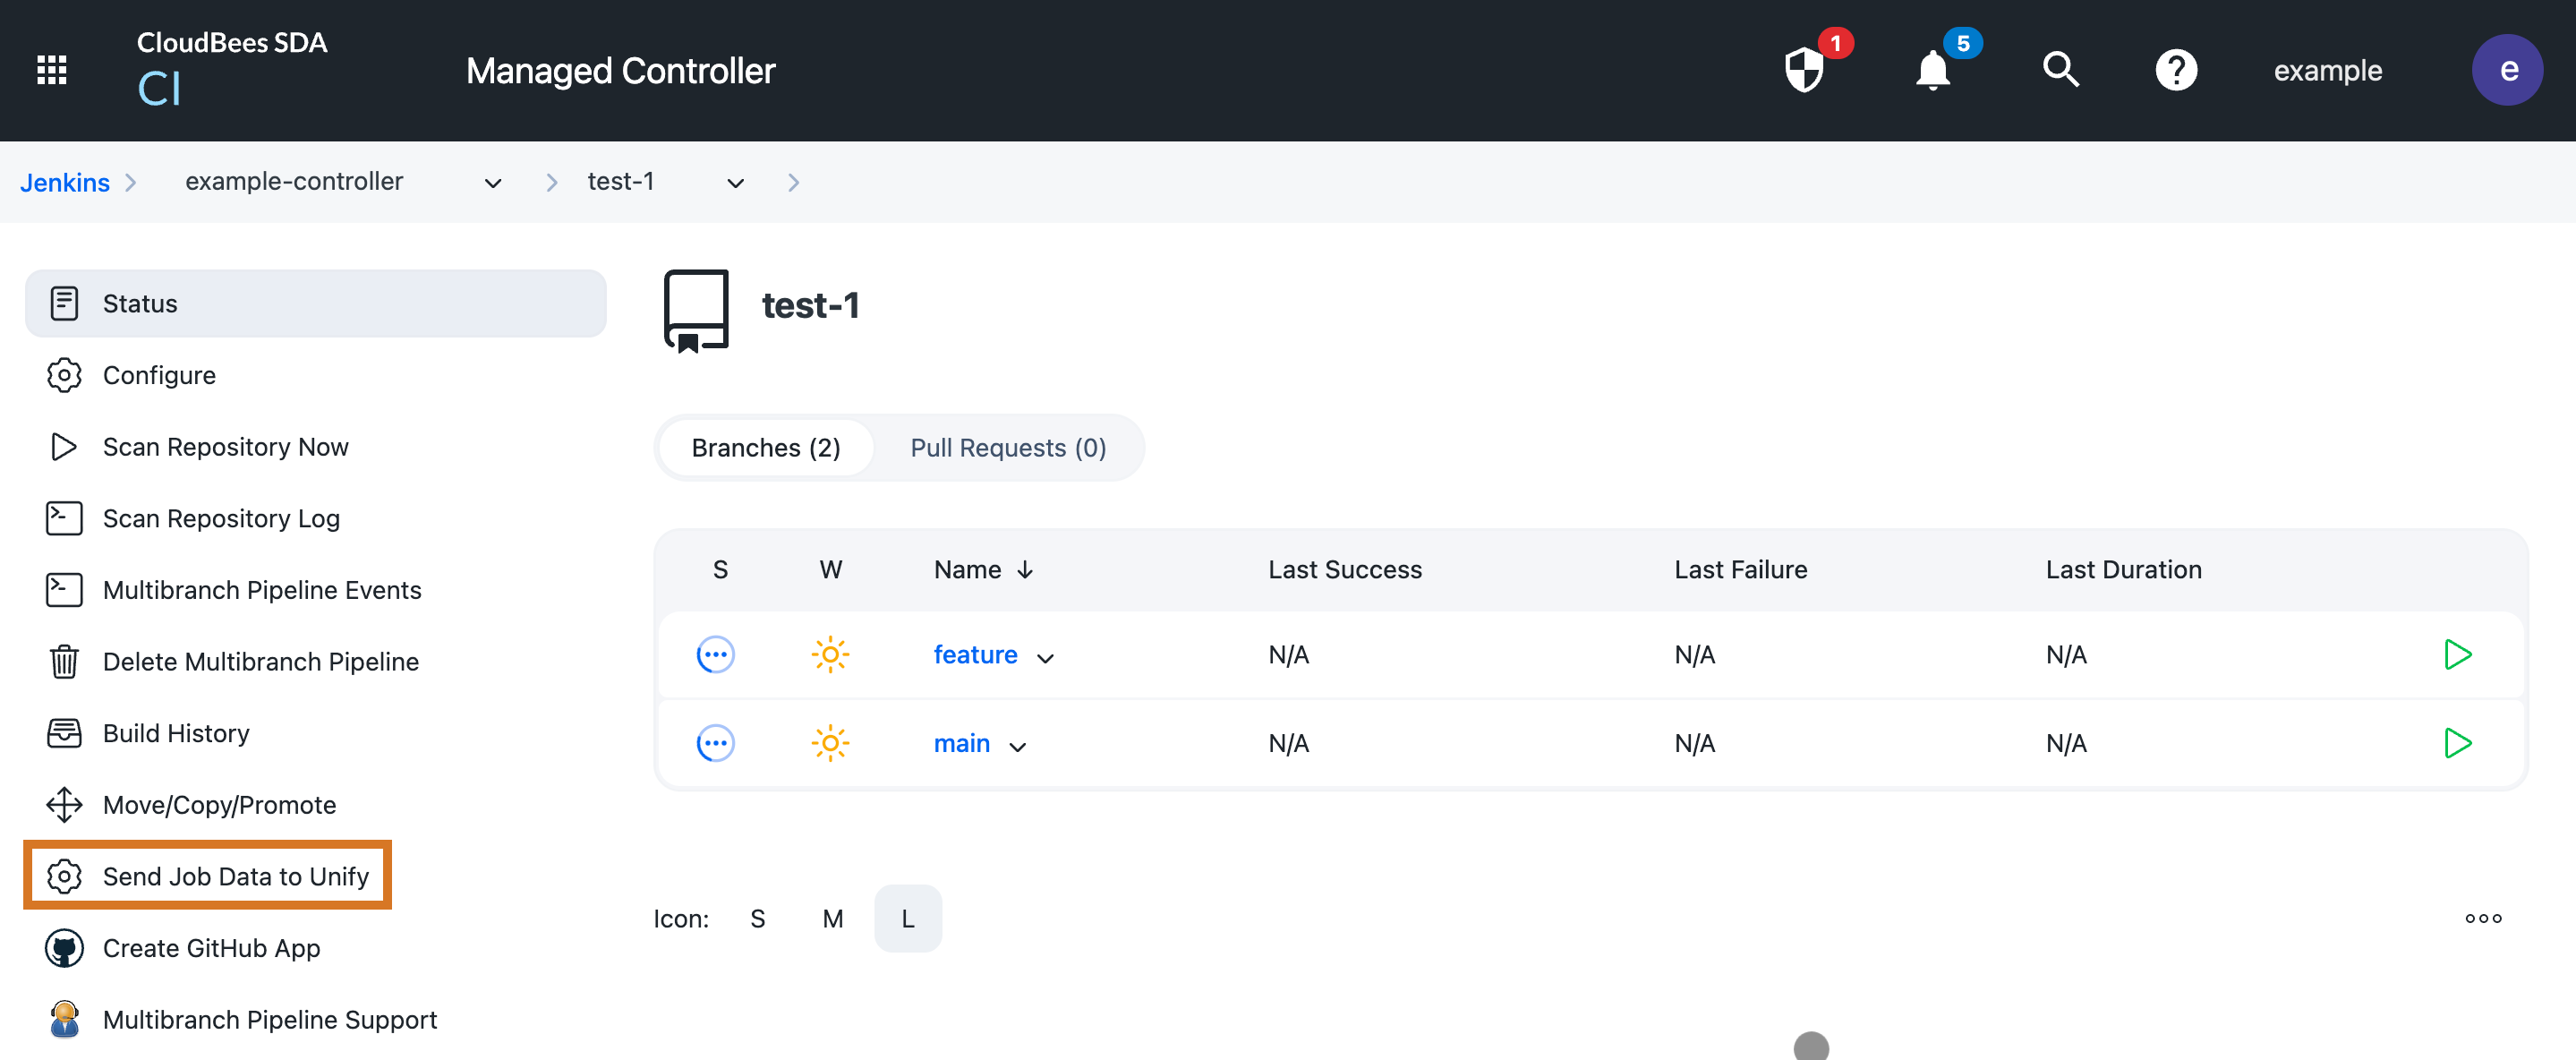
If you still face problems with data sync, select Send Job Data to Unify to manually send job data to CloudBees platform.

Reset a connection
Use the reset feature if you want to update a connection, or if your connection fails. As soon as you initiate a reset, the connection status transitions to Disconnected. If you close your browser at this time, the integration status remains at the status prior to selecting Reset.
In some cases, you may need to select Send Job Data to Unify in the controller to manually sync with CloudBees platform.
Troubleshoot connection issues
If you encounter problems with connecting your CloudBees CI or Jenkins to CloudBees platform, use this section to help you identify the cause and resolve the issue successfully.
| Issue | Probable cause | Solution |
|---|---|---|
Error: |
The integration name matches an existing integration name in your current organization. |
Update the integration name to be unique. |
Error: |
The controller URL matches an existing integrated controller. |
You must enter a controller URL that is unique before you can save the integration. |
The integration cannot be updated or deleted. |
The integration is inherited by your current organization. |
Navigate to the organization where the integration was created to update or delete it. |
The integration status remains Pending during automatic connection. |
The integration has been created, but the |
After redirecting to the controller, you must confirm access before closing the controller window. Refer to Prolonged pending status for more information. |
HTTPS requirements for controller URLs
To secure communication between CloudBees platform and your controller, always use HTTPS for your controller URL. HTTP transmits data in plain text, allowing anyone monitoring network traffic to intercept sensitive information, including authentication credentials, API keys, and private key material. This is particularly critical when integrating controllers, as the configuration process involves transferring:
-
Private keys (in manual connections).
-
Authentication tokens.
-
Organization and endpoint identifiers.
-
Job and build data.
HTTPS uses Transport Layer Security (TLS) to provide three essential security protections:
-
Confidentiality: Encrypts all data in transit, preventing eavesdropping on sensitive information.
-
Integrity: Protects against tampering or modification of requests and responses during transmission.
-
Authentication: Verifies you’re connecting to the legitimate controller, not an imposter or man-in-the-middle attacker.
HTTP connections should only be used in the following limited scenarios:
-
Local testing environments completely isolated from external networks.
-
Development environments where no production credentials or sensitive data are present.
-
Proof-of-concept demonstrations on localhost.
| Production, staging, and any internet-accessible controller integrations must always use HTTPS to protect your organization’s security credentials and operational data. |
For more information on TLS best practices and secure transport configuration, refer to the OWASP Transport Layer Security Cheat Sheet.