The following examples illustrate how you can use the Git and GitHub plugins in CloudBees CD/RO to:
Create a release
This example shows how to add tasks to a pipeline stage to create a release. To create a release, you must:
Create a clone task
You must first create a pipeline and add a task to clone a remote repository.
To create a clone task:
-
Create a new pipeline. For more information, refer to Create a pipeline.
-
For the Pipeline stage, select Add+.
-
Enter Clone as the task name.
-
Click Select Task Type to define the task.
-
From the Plugins list, select the EC-Git plugin and then select the Clone plugin procedure.
-
Select Define, configure the plugin task’s input and output parameters, and select OK.
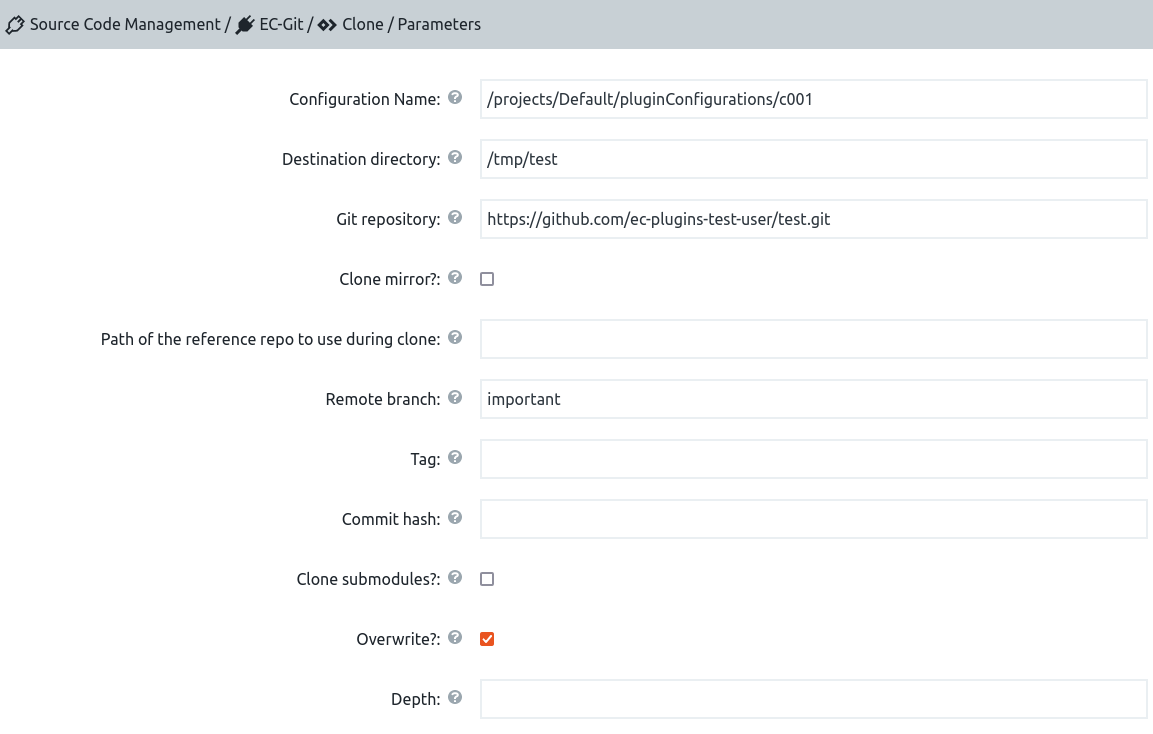 Figure 1. Configure the clone task
 -
Select OK to save your changes.
Create a build task
After creating the clone task, you must create a build task.
To create a build task:
-
For the Pipeline stage, select Add+.
-
Enter Build as the task name.
-
Click Select Task Type to define the task.
-
From the Native list, select Command.
-
Select Define, specify the build settings, and then select OK.
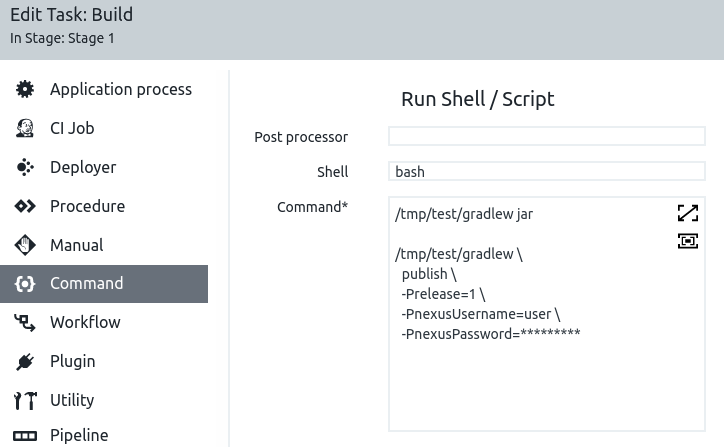 Figure 2. Configure the build task
 -
Select OK to save your changes.
Create a release task
After creating the change task, you must create a release task to create a new GitHub release or update an existing GitHub release.
To create a release task:
-
For the Pipeline stage, select Add+.
-
Enter Create Release as the task name.
-
Click Select Task Type to define the task.
-
From the Plugins list, select EC-GitHub, and then select the Create Release plugin procedure.
-
Select Define, configure the plugin task’s input and output parameters, and then select OK.
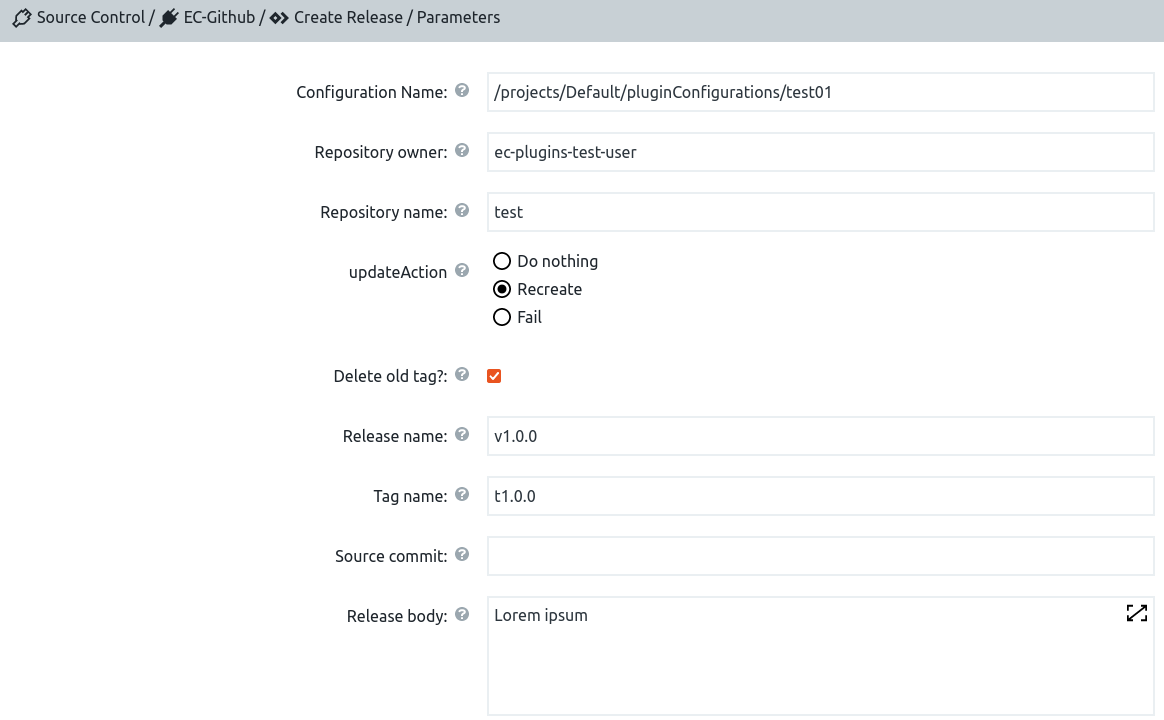 Figure 3. Configure the release task
 -
Select OK to save your changes.
Your pipeline is now configured like the example below:
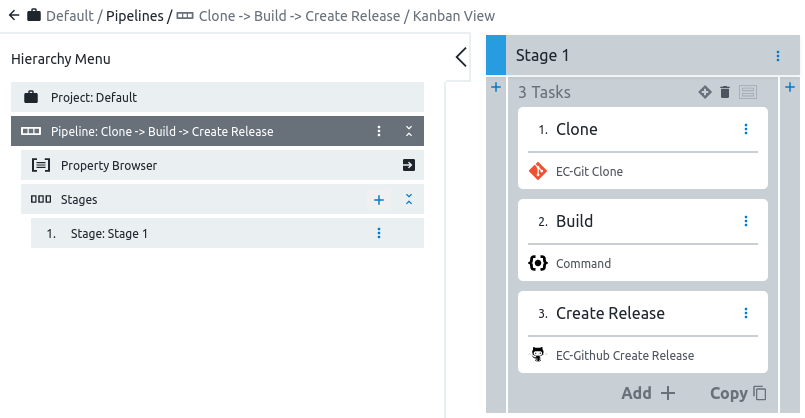 Figure 4. Configured Pipeline
Create a pull request
This example shows how to add tasks to a pipeline stage to create a GitHub pull request for the specified repository. To create a pull request, you must:
Create a clone task
You must first create a pipeline and add a task to clone a remote repository.
To create a clone task:
-
Create a new pipeline. For more information, refer to Create a pipeline.
-
For the Pipeline stage, select Add+.
-
Enter Clone as the task name.
-
Click Select Task Type to define the task.
-
From the Plugins list, select the EC-Git plugin and then select the Clone plugin procedure.
-
Select Define, configure the plugin task’s input and output parameters, and select OK.
 Figure 5. Configure the clone task
 -
Select OK to save your changes.
Create a change task
After creating the clone task, you must create a change task.
To create a change task:
-
For the Pipeline stage, select Add+.
-
Enter Change as the task name.
-
Click Select Task Type to define the task.
-
From the Native list, select Command.
-
Select Define, specify the script settings, and select OK.
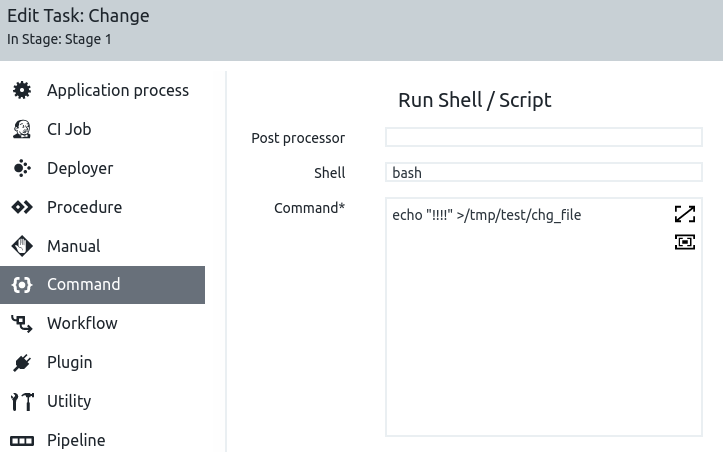 Figure 6. Configure the change task
 -
Select OK to save your changes.
Create a commit task
After creating the change task, you must create a task to commit and push changes to the remote repository.
To create a commit task:
-
For the Pipeline stage, select Add+.
-
Enter Commit + Push as the task name.
-
Click Select Task Type to define the task.
-
From the Plugins list, select EC-Git, and then select the Commit plugin procedure.
-
Select Define, configure the plugin task’s input and output parameters, and then select OK.
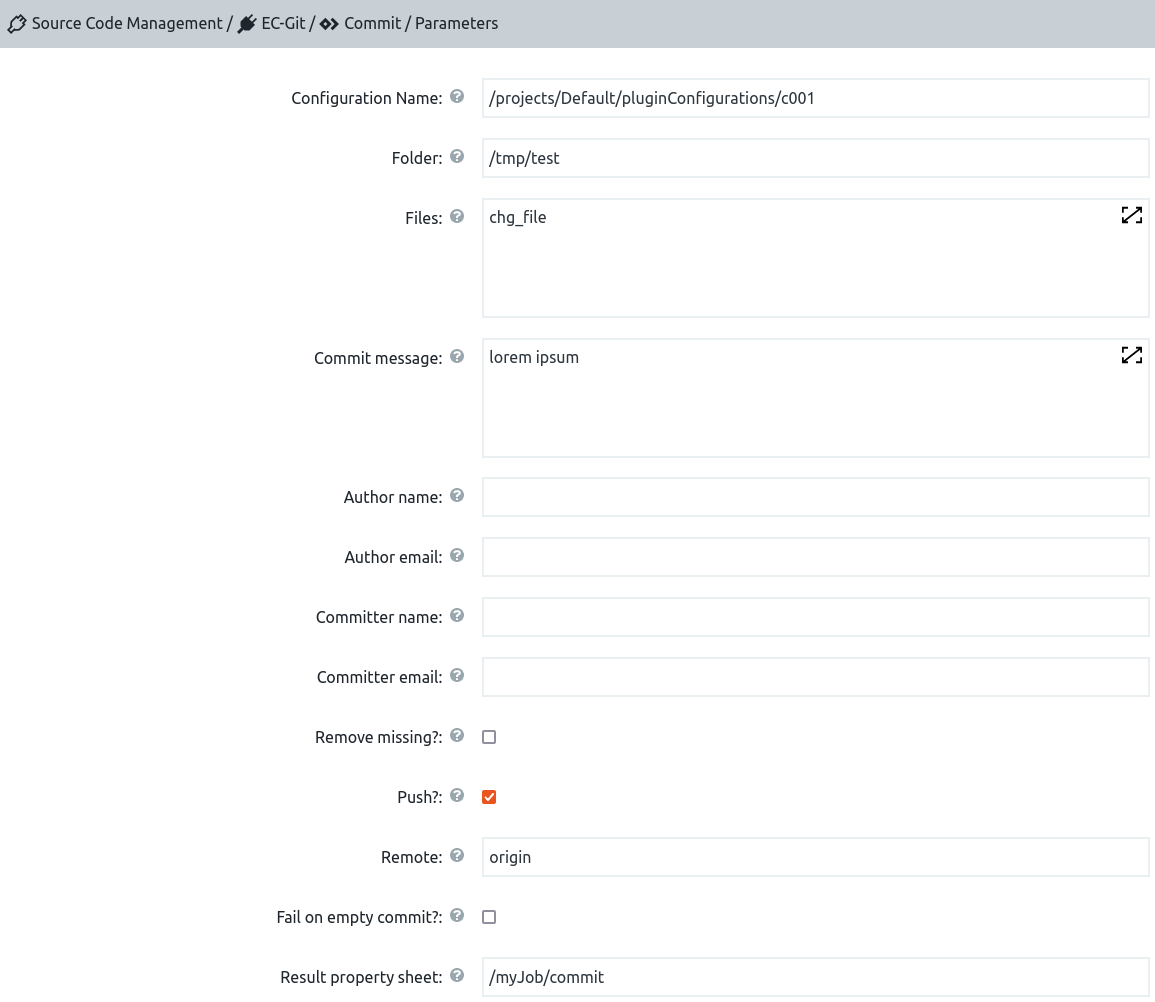 Figure 7. Configure the commit task
 -
Select OK to save your changes.
Create a pull request task
After creating the commit task, you must create a task to create a pull request for the specified repository.
To create a pull request task:
-
For the Pipeline stage, select Add+.
-
Enter Create PR as the task name.
-
Click Select Task Type to define the task.
-
From the Plugins list, select EC-GitHub, and then select the Create Pull Request plugin procedure.
-
Select Define, configure the plugin task’s input and output parameters, and then select OK.
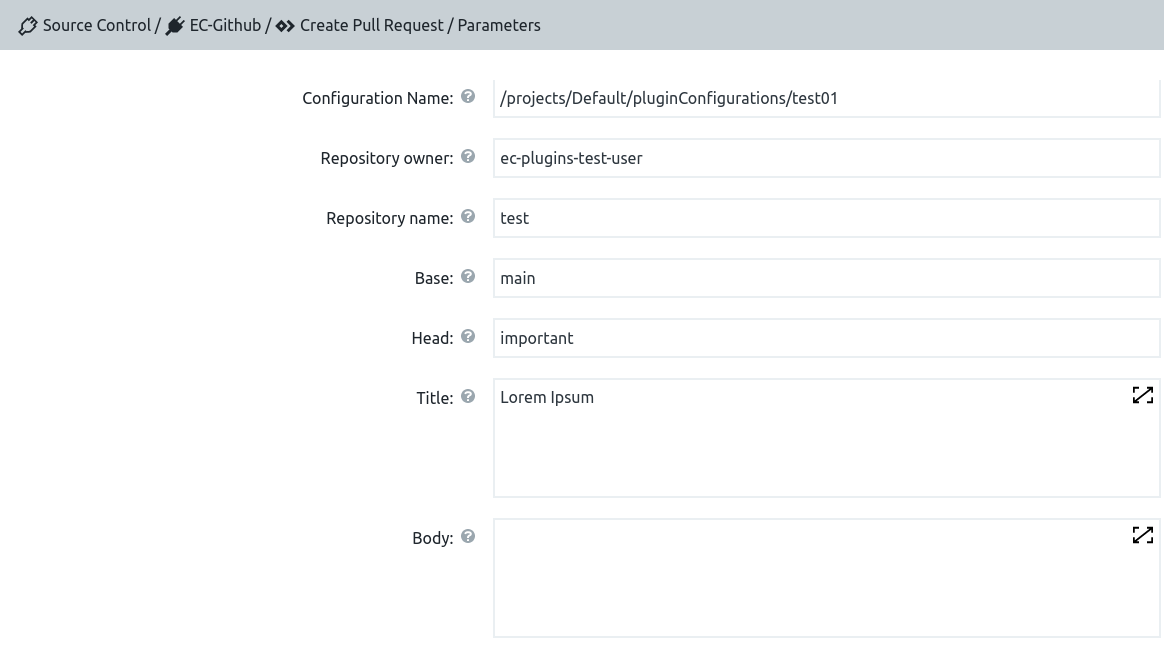 Figure 8. Configure the pull request task
 -
Select OK to save your changes.
Your pipeline is now configured like the example below:
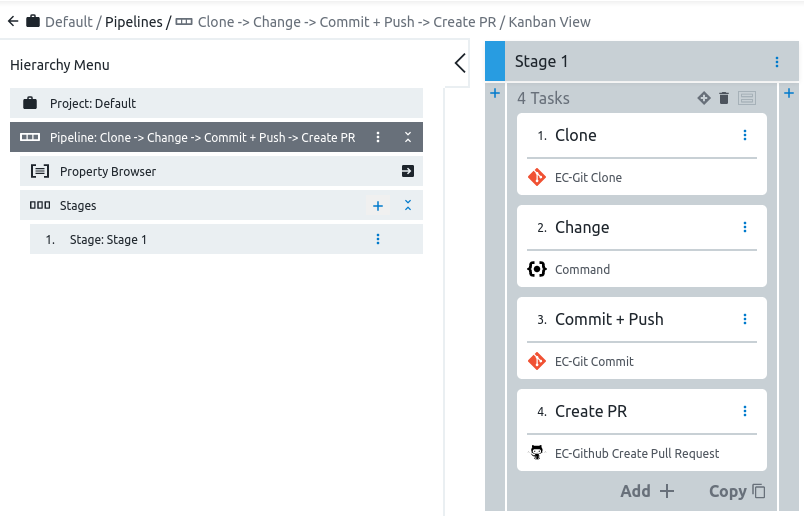 Figure 9. Configured Pipeline
Upload a file
This example shows how to add tasks to a pipeline stage to create a release. To upload a file, you must:
Create a get files task
You must first create a pipeline, add a task to fetch the content of the specified files, and store it in the filesystem or in the specified property.
To create a get files task:
-
Create a new pipeline. For more information, refer to Create a pipeline.
-
For the Pipeline stage, select Add+.
-
Enter Get file as the task name.
-
Click Select Task Type to define the task.
-
From the Plugins list, select EC-GitHub, and then select the Get Files plugin procedure.
-
Select Define, configure the plugin task’s input and output parameters, and then select OK.
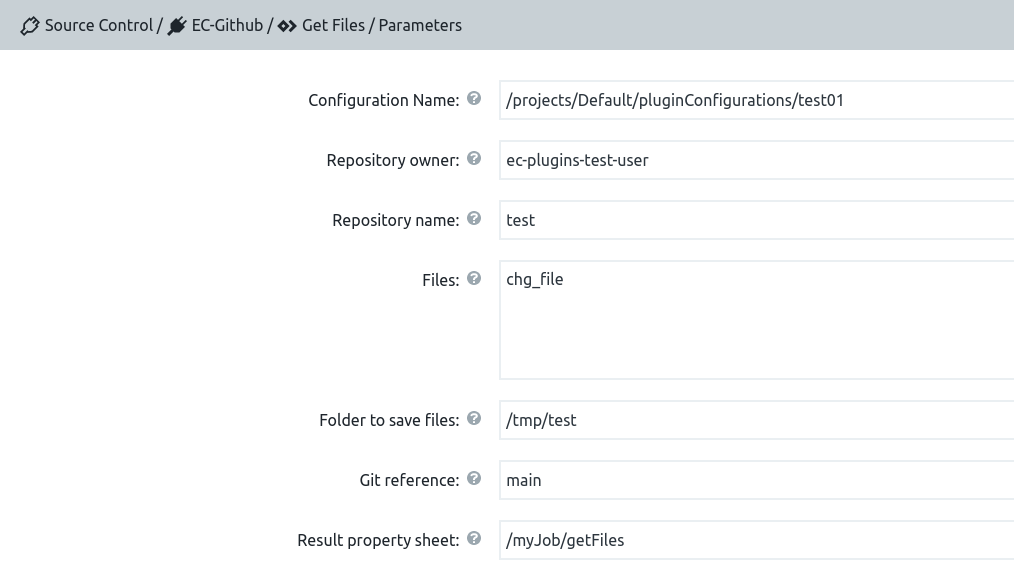 Figure 10. Configure the get file task
 -
Select OK to save your changes.
Create a change task
After creating the get files task, you must create a change task.
To create a change task:
-
For the Pipeline stage, select Add+.
-
Enter Change as the task name.
-
Click Select Task Type to define the task.
-
From the Native list, select Command.
-
Select Define, specify the script settings, and select OK.
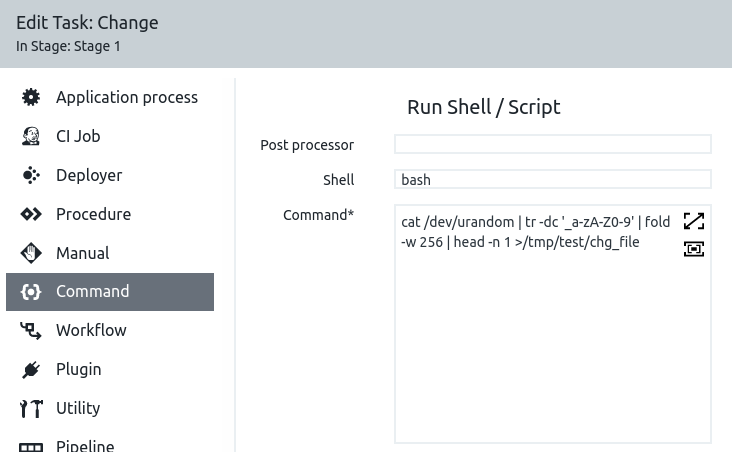 Figure 11. Configure the change task
 -
Select OK to save your changes.
Create an upload files task
After creating the change task, you must create a task to upload files to the specified repository.
To create an upload files task:
-
For the Pipeline stage, select Add+.
-
Enter Upload file as the task name.
-
Click Select Task Type to define the task.
-
From the Plugins list, select EC-GitHub, and then select the Upload Files plugin procedure.
-
Select Define, configure the plugin task’s input and output parameters, and then select OK.
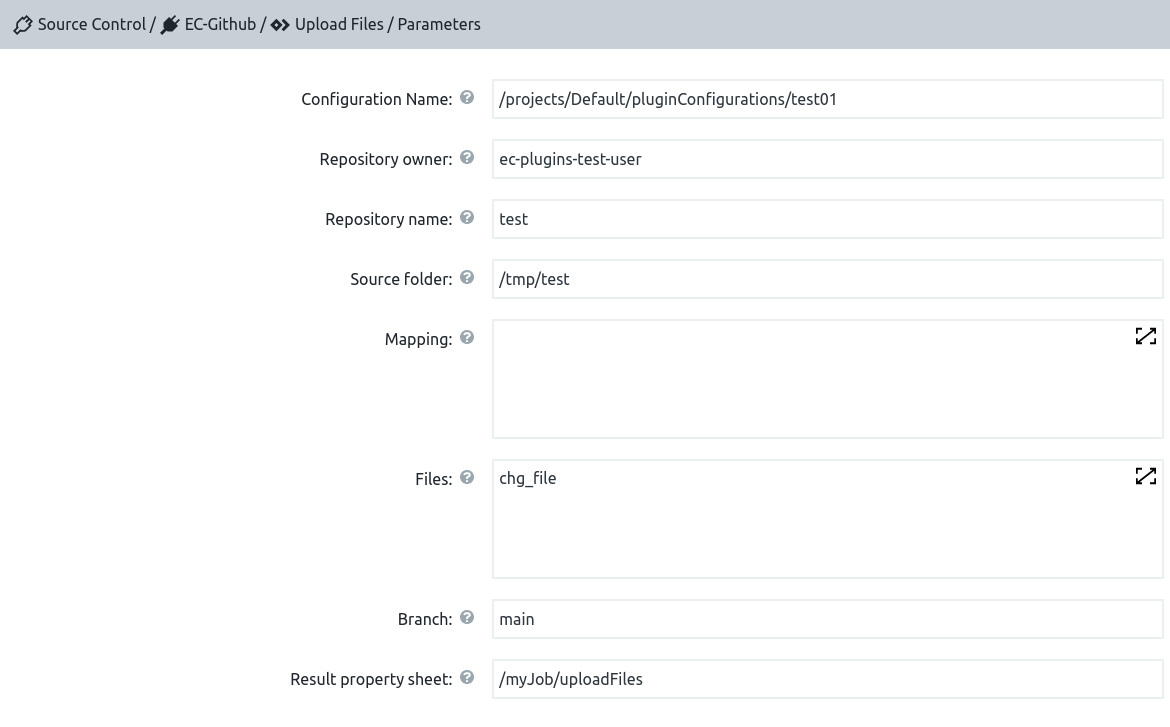 Figure 12. Configure the upload file task
 -
Select OK to save your changes.
Your pipeline is now configured like the example below:
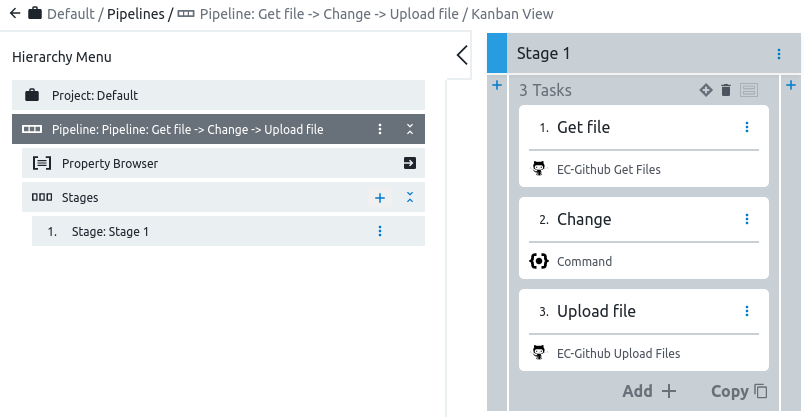 Figure 13. Configured Pipeline