Manage CloudBees CD/RO jobs, pipelines, or releases
The following examples illustrate how to use the CloudBees CD/RO Manager features to:
-
To Abort, Force Abort, or Delete a job, pipeline, or release within IntelliJ IDEA.
-
Access the object related Job details, Pipeline runs, Release runs, or My work features within the CloudBees CD/RO.
-
Respond to CloudBees CD/RO manual task within IntelliJ IDEA. Supported task:
-
Primary approval for pipeline and stage tasks.
-
Retry a job, pipeline, or stage task.
-
Execute manual workflow transitions, such as a process or job waiting for manual retry.
-
Access object management features by opening an IntelliJ project. Then select  CloudBees CD/RO Manager icon.
If the  logo or CloudBees CD/RO plugin is not visible, then you must install the CloudBees CD/RO plugin. Refer to Create CloudBees CD/RO IntelliJ IDEA plugin configurations. logo or CloudBees CD/RO plugin is not visible, then you must install the CloudBees CD/RO plugin. Refer to Create CloudBees CD/RO IntelliJ IDEA plugin configurations.
|

Use the information below to interact with CloudBees CD/RO objects.
-
Choose a plugin feature or action
-
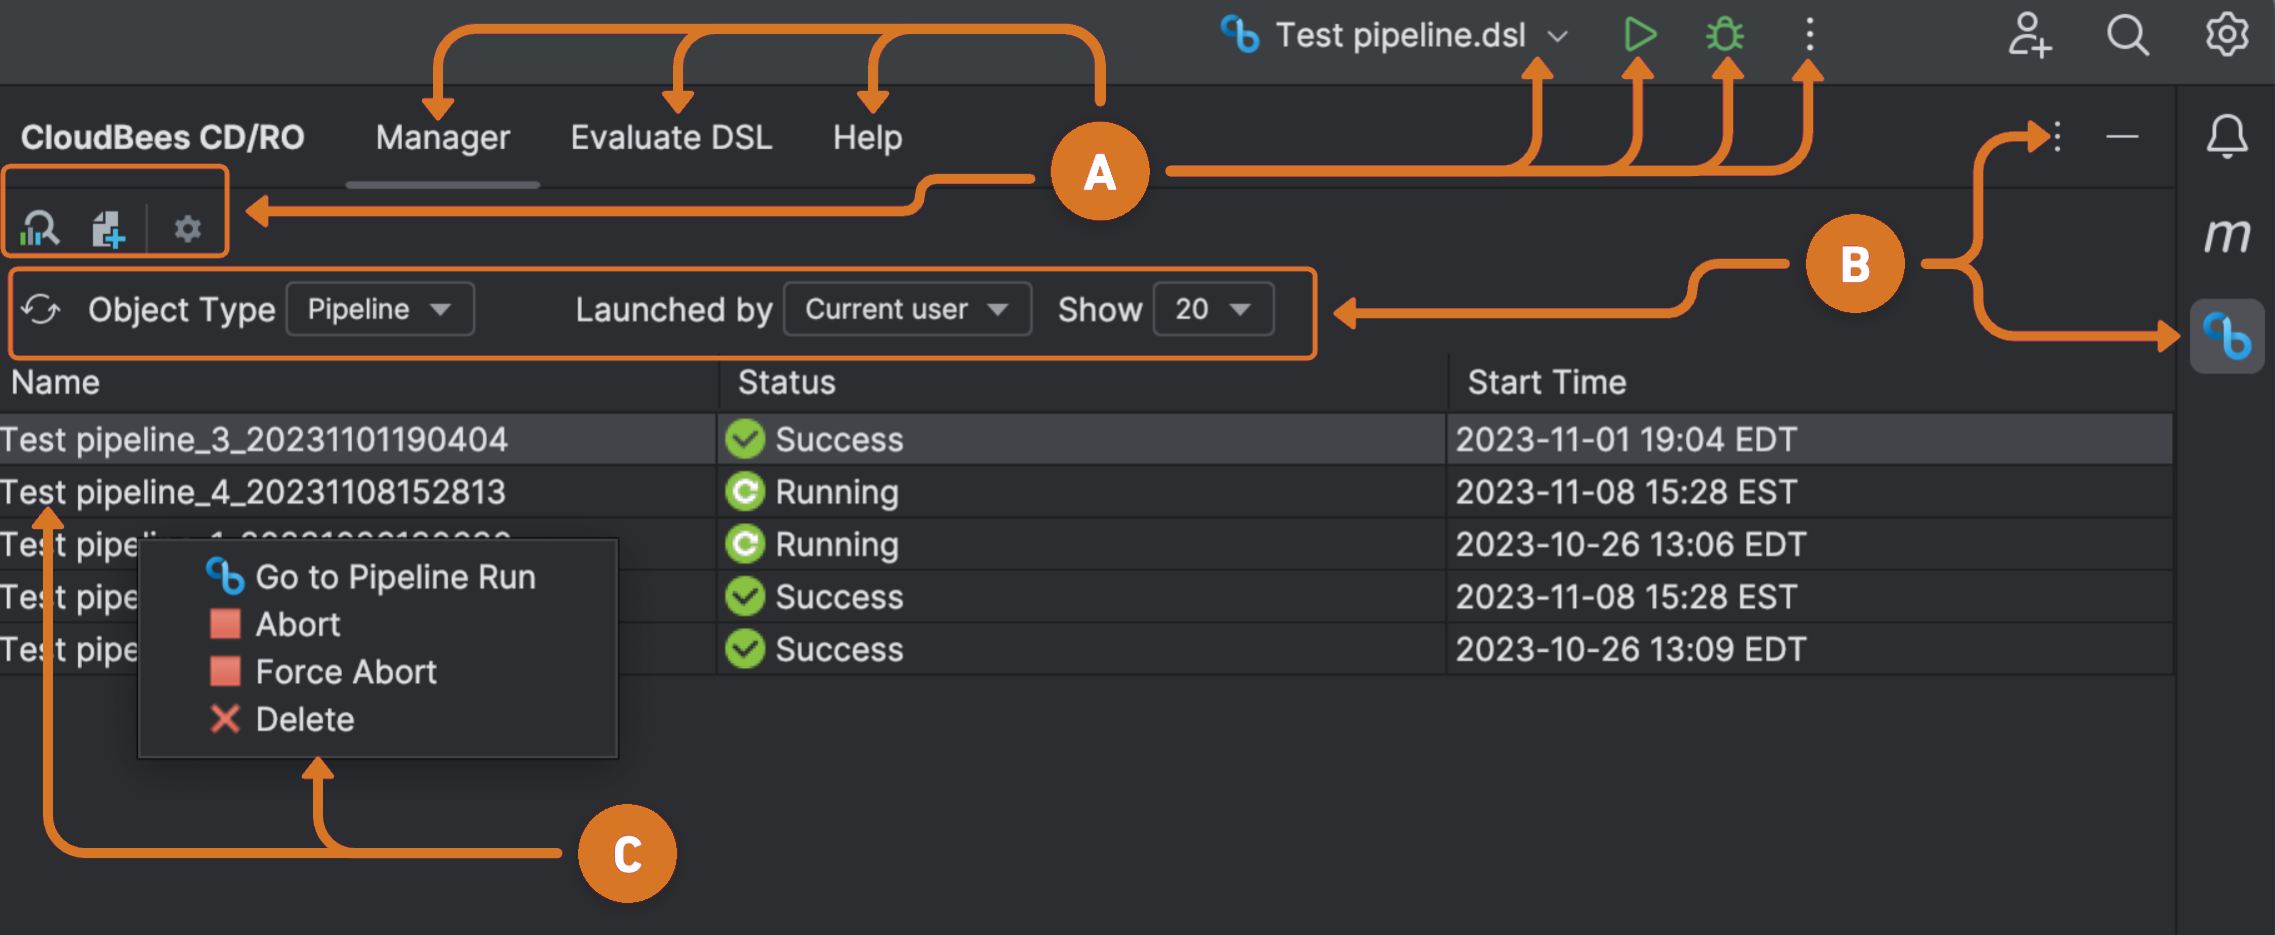
Access CloudBees CD/RO object actions by selecting the Manager tab.
-
Validate yaml or groovy DSL scripts by the selecting the Evaluate DSL tab or
 evalDSL icon. Refer to Validate YAML or Groovy DSL scripts.
 -
View detailed plugin help information.
-
Modify DSL in YAML or Groovy format by selecting the
 Generate Dsl icon. Refer to Use DSL to modify CloudBees CD/RO objects.
 -
Modify DSL script configuration settings by selecting Edit configurations from the current file menu. Refer to Configure DSL script run and debug settings.
-
Configure the connection to CloudBees CD/RO server by selecting the
 Settings icon. Refer to Configure the default connection to the CloudBees CD/RO server.
].
 -
Validate and run a DSL script by selecting the script from the Current File menu. Then select the
 Run icon.
 -
Edit or delete a DSL script configuration by selecting
 three-dots option. Refer to Configure DSL script run and debug settings.
-
-
Choose data to view.
-
Reload the object display by selecting the
 Refresh icon.
 -
Select an Object Type to view. Options are:
-
Job
-
Pipeline
-
Release
-
Work item
-
-
Select the object initiator from the Launched by menu.
-
Select the number of objects to display from the Show menu.
-
Modify plugin visibility options by selecting the
 CloudBees CD/RO icon or
  CloudBees CD/RO three-dots icon.
 -
Display or hide the plugin Manager by selecting the
 CloudBees CD/RO icon.
-
-
Access object actions by right-clicking the object name and selecting an action. Options are:
-
Navigation CloudBees CD/RO specific features. Options are:
-
Go to Job details.
-
Go to Pipeline runs.
-
Go to Release run.
-
Go to Work items.
-
-
Ability to Abort, Force Abort, or Delete object, job, pipeline, or release.
-
Respond to a work item.
-
Create an applications pipeline, releases, or environment
Use these steps to create CloudBees CD/RO objects using DSL.
-
Open a project file in IntelliJ.
-
Right-click on the Intellij project folder where the DSL will be located.
-
Select File from the New menu.
-
Enter a name for the new object. Include
.dslfile extension. Figure 2. New file
 -
Press the Enter key. The new file is displayed in the IntelliJ editor and as a Current File menu option.
-
Enter CloudBees CD/RO object attributes in DSL format.
To use the enabled autocomplete feature for CloudBees CD/RO API commands and objects:
-
Add the import and auto-complete commands to lines 1 and 2 of the DSL file.
import com.electriccloud.client.groovy.ElectricFlow ElectricFlow ef = new ElectricFlow() -
Use
ef.to access a list of available API commands or objects.
-
-
Validate and save script to CloudBees CD/RO server.
Run and debug configurations can be modified for each script. Refer to Configure DSL script run and debug settings. -
Select the script from the Current File menu. Then select the
 Run icon.
 -
Right-click on the object page in the editor or the file name in the project browser. Then select Run and the object name preceded by
 CloudBees logo.
-
Use DSL to modify CloudBees CD/RO objects
Use these steps to edit a CloudBees CD/RO application, pipeline, release, or environment.
-
Open a project file in IntelliJ.
-
Select the
 CloudBees CD/RO Manager icon.
 -
Select the
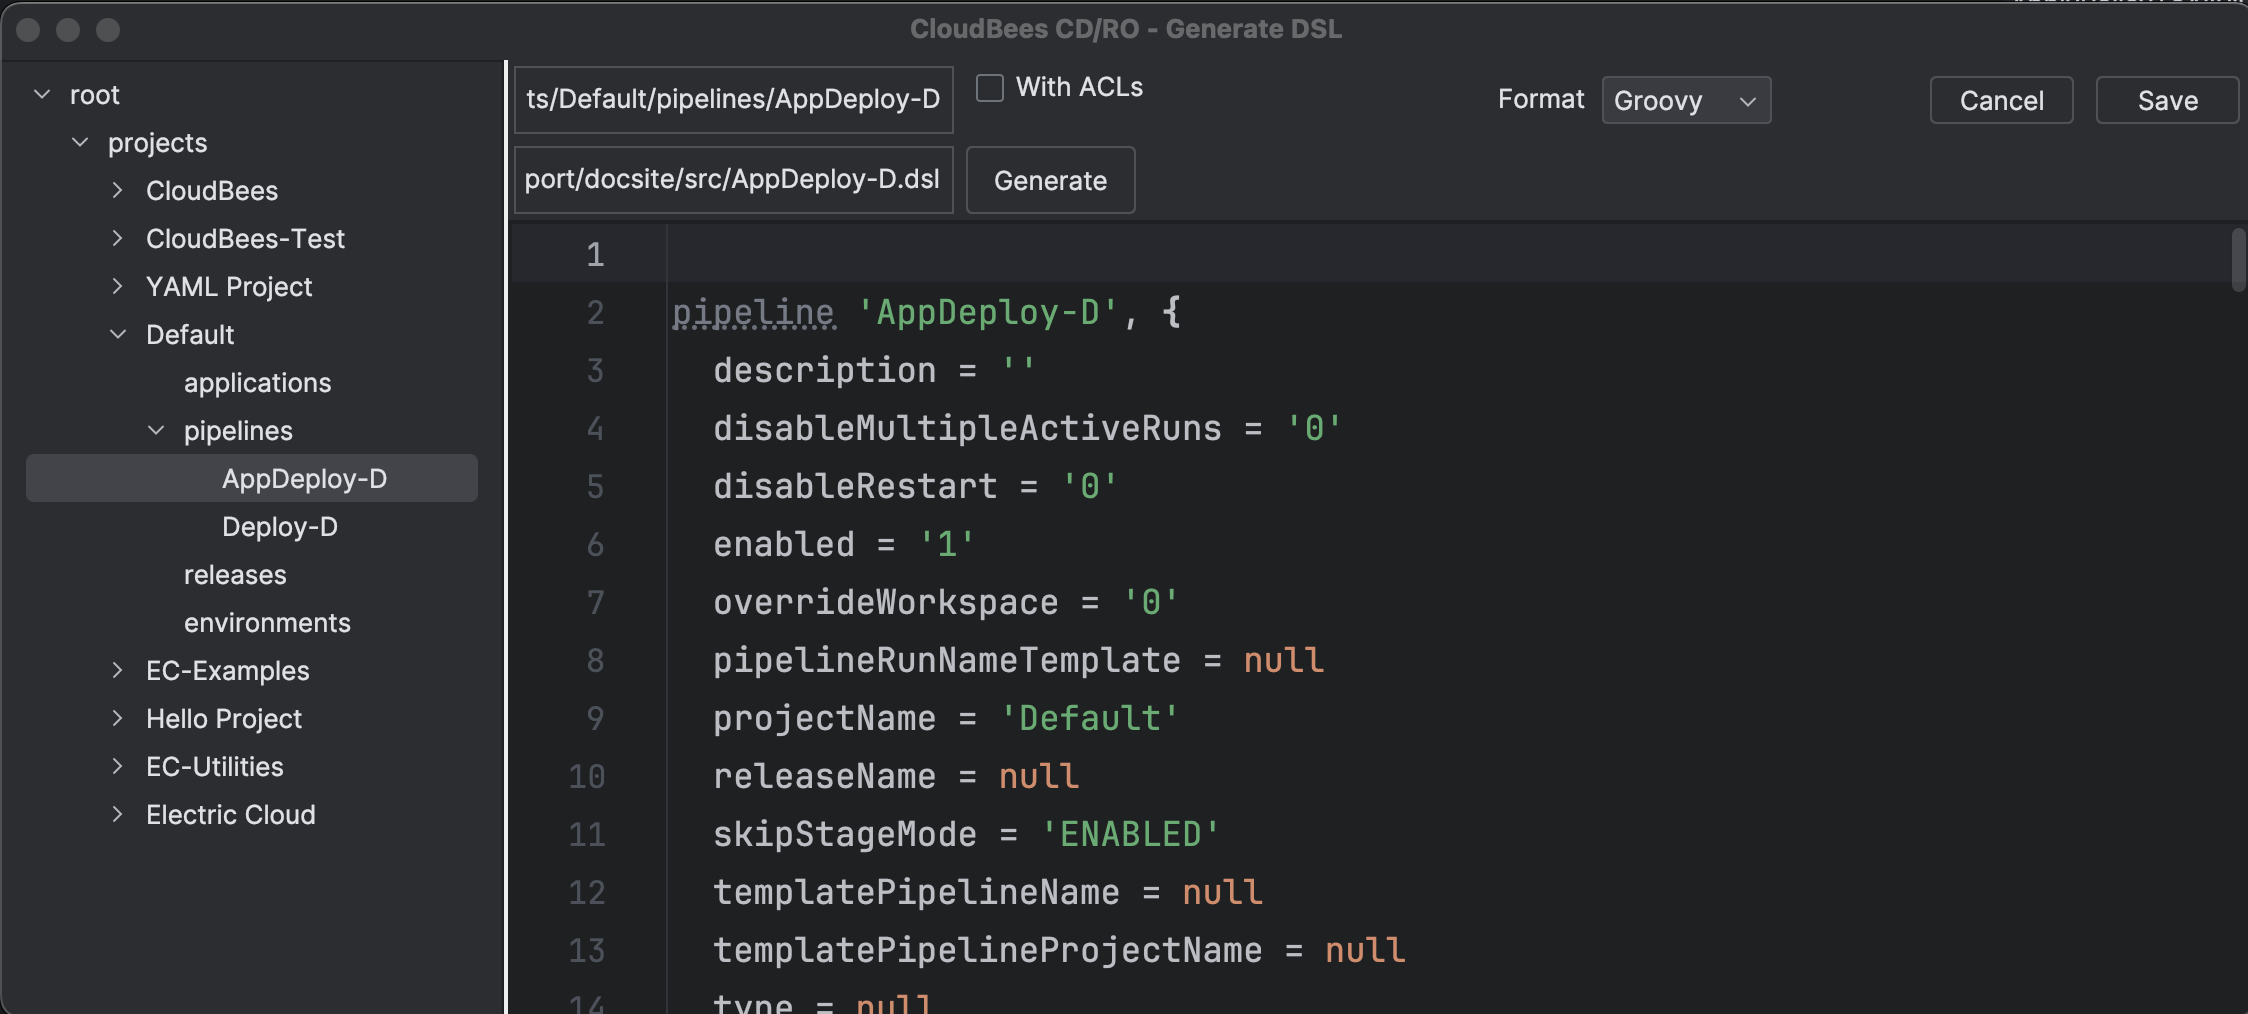
 Generate DSL icon. The CloudBees CD/RO - Generate DLS screen displays.
 -
Use the left navigation to locate and select an object to be copied or modified.
-
Select Generate to save the object to an IntelliJ project location.
-
Change the object file extension from
.groovyto.dsl. Figure 3. CloudBees CD/RO - Generate DSL
 -
Select Save to convert the Groovy file to DSL and open DSL in the IntelliJ editor.
-
Modify the product object in the IntelliJ editor.
-
Add the import and auto-complete commands to lines 1 and 2 in the dsl file.
import com.electriccloud.client.groovy.ElectricFlow ElectricFlow ef = new ElectricFlow() -
Use
ef.to access a list of available API commands or objects.
-
-
Save changes.
-
Generate, validate, and save changes to CloudBees CD/RO server.
-
Right-click on the object page in the editor or the file name in the project browser.
-
Select Run.
-
Select the object name preceded by
 CloudBees logo.
-
-
Save changes locally in the same manner as other IntelliJ project files.
-
Validate YAML or Groovy DSL scripts
Use these steps to evaluate DSL scripts.
-
Open a project file in IntelliJ.
-
Select the
 CloudBees CD/RO Manager icon.
 -
Select the
 EvalDSL DSL icon. The Evaluate DSL tab displays.
 -
Enter DSL script text.
-
Add the import and auto-complete commands to lines 1 and 2 in the DSL file.
import com.electriccloud.client.groovy.ElectricFlow ElectricFlow ef = new ElectricFlow() -
Use
ef.to access a list of available API commands or objects.
-
-
Select execute to evaluate the script.
-
Select Execute. The script evaluation results are displayed in the plugin Console.
Save the script as detailed in the Create an applications pipeline, releases, or environment section.