You can modify the information that appears in the Change History.
Change history timeline
The timeline is at the top of the Change History page.
This example shows the Change History for a property called propertyviewer-1.0.1.
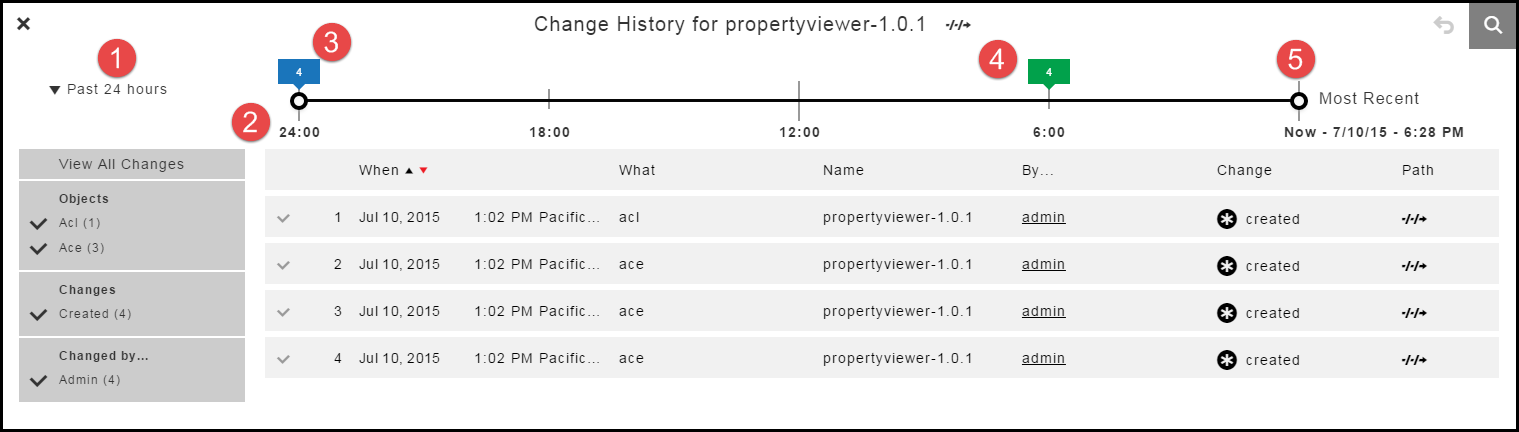
1 |
Time increment. The default is Last Changes. Click the down arrow to select another time increment. |
2 |
The system automatically calculates the minutes, hours, and days since the last successful run. In the example, the last successful run occurred 24 hours ago. The timeline is divided into four 6 hour subdivisions. |
3 |
Total number of changes in the selected time increment. |
4 |
The number of changes that occurred between 6 hours ago and now is 4. When you click the change number, the Change History is updated and shows only those changes. |
5 |
Drag the start and end time markers to view specific changes. |
Default Settings
The default time increment is Last Change.
The entire timeline is displayed, and all the changes are in the list below the timeline.
Number of Changes
The timeline shows the number of changes throughout the time increment. In the following example:
-
There have been 233 changes in the last 24 hours.
-
There have been 213 changes in the last 12 hours.
-
There have been 20 changes in the last 6 hours.

When you change the time increment, there have been two changes in the previous 60 minutes.

Time Increment

The system automatically determines how the timeline is divided for the selected time increment.
When the range is changed to Past 60 Minutes, the timeline changes:
-
The start time is 60 minutes from Now.
-
The end time is when the Most Recent change occurred ( Now ).
-
The timeline has four divisions.

If the increment is Past 7 Days, the timeline has seven one-day divisions.

Moving the Start and End Times Manually
You can manually move the start and end times on the timeline.
When you move the start time to 18:00 and the end time to 6:00, the list of objects in the change history changes.

Setting Custom Time Increments

-
Select Between.
A dropdown opens.
 Figure 8. Set timeline start time and date
 -
Select the time and date for the start of the timeline.
The default settings are 3:30 PM and eight days before the current date.
-
Click OK.
A dropdown opens at the other end of the timeline.
 Figure 9. Set timeline end time and date
 -
Select the time and date for the end of the timeline.
The defaults are 3:30 PM and the current date.
 Figure 10. Time and date for end of timeline
 -
Click OK.
The timeline changes to show only the changes from the start and end times and dates that you selected.
 Figure 11. Custom change history
Change history filters
The Change History has records only for an object and its tracked entities, not all entities belonging to the object. You can use filters to view changes to specific objects, the types of changes, and the users how made those changes if they are tracked.
In this example, instead of selecting View All Changes, you can select specific objects, such as only properties, processes, property sheets, process steps, and process dependencies that have been modified by the Project:Default and Admin users.

When the list of filter criteria is long, not all criteria may appear in the filter list. To see all criteria, use the up or down arrows to see all the options.
This list does not show all users. Use the up and down arrows to see all four of the users.

Click the down arrow to see the other users.
