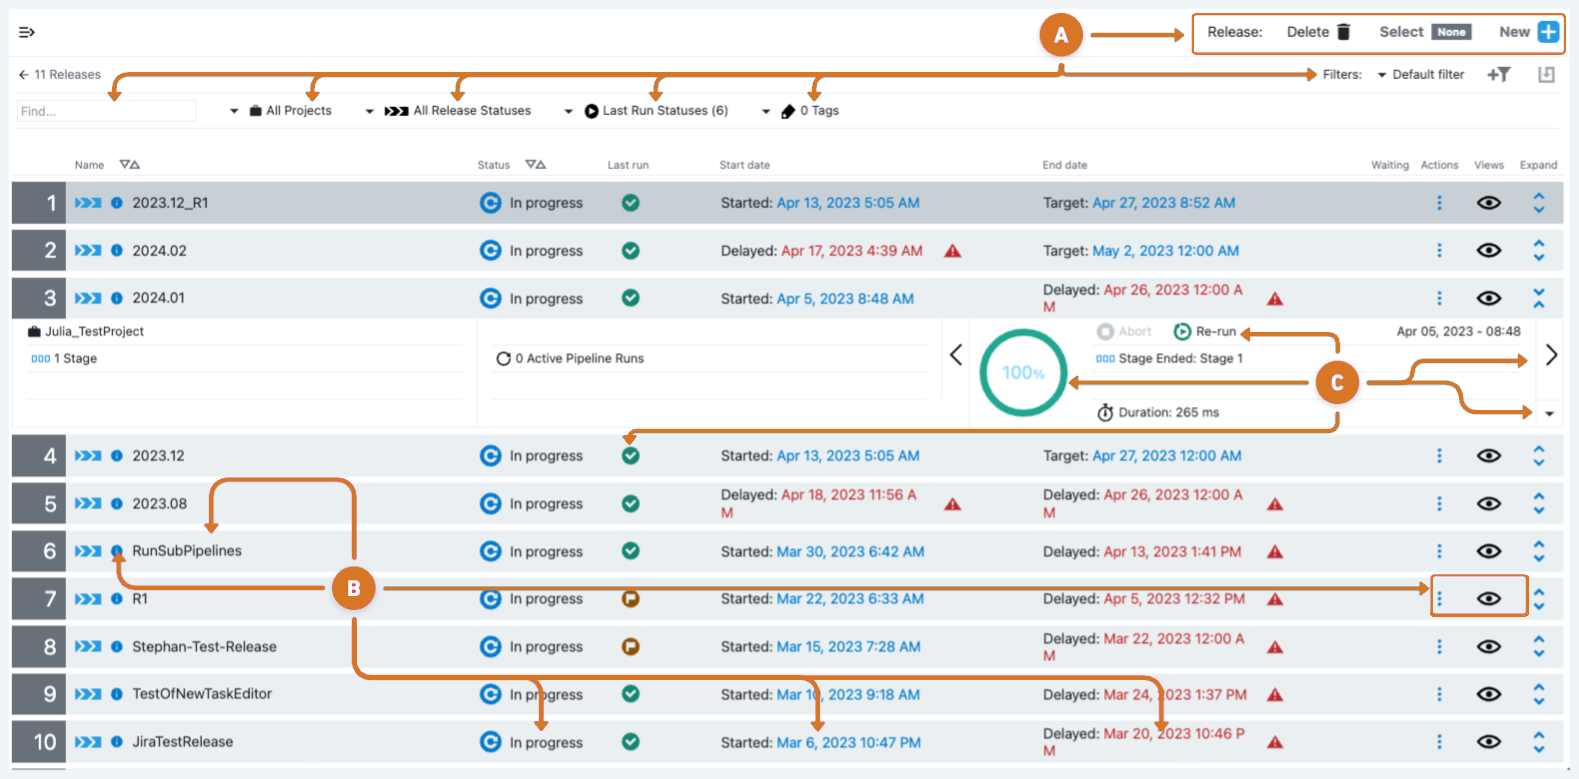
The Release Dashboard, also referred to as the Release List, provides a way for the release team, task assignees, and approvers to view information for planned, active, and completed releases. The releases displayed are based upon access controls.
Access the Release List by navigating to
Release dashboard
The Release Dashboard shows all the releases that you have permission to view:

-
Manage release list.
-
Use the search to locate specific releases.
-
Filter the Release List by project, release status, last run or tags.
-
Create new or modify tags and filters.
-
Remove releases.
-
Select each release to be deleted.
-
Select
 .
.
-
-
Create or duplicate a release by selecting New
 . For more information, refer to Create a new release or Copy an existing release.
-
-
Manage releases attributes.
-
Configure the release.
-
Edit the release by selecting the release
namelink. -
Use the View
 menu options to configure release components.
View modification options.
-
Release editor: Configure release pipeline.
-
DSL editor: Modify release pipeline using DSL.
-
Path to production view: Review release bill of materials.
-
Planned versus actual view for pipeline status: Review planned versus actual release timeline data.
-
Pipeline runs: Manage release pipeline runs.
-
Release portfolio: Review portfolio basic.
-
Release portfolio list: Review the portfolio list
-
-
-
Execute release-related actions.
-
Start the release by selecting Run

-
Select a release three-dots
 and a release action.
View the activity options.
-
Run the Release pipeline: Start the release.
-
Review Previous release pipeline runs: View or start a previously run release pipeline.
-
End the release: Stop the currently running release.
-
Modify release schedules. Alter the release schedules. For more information, refer to Schedules.
-
Configure release event Triggers: Manage release webhook triggers.
-
-
-
Review release Status, Last run, Start date, or End date column data.
-
Modify the release description or tags, by selecting information
 .
.
-
-
Manage release pipelines
-
Restart the release by selecting the

-
Access a specific release pipeline run.
-
Expand or collapse the pipeline details by selecting a Last run status icon or

-
Move between pipeline runs by selecting Next
 or Previous
  arrows.
 -
Configure the pipeline run by selecting the Completion percentage graphic.
-
-
Create a new release
To create a custom release:
-
Select New
 .
. -
Select Create new. The New Release screen displays.
-
Enter a title for the release into thw Name field.
-
Select the project from the Select project options.
-
Select the Start date and End date. Then enter times.
CloudBees added start and end times with v.2023.02.0. This information is not backward compatible in DSL. You cannot import generated DSL of release objects from v2023.02.0 to earlier versions without manual changes. -
Select
 add arrow to add tags. For more information, refer to
Create object tags.
 -
Select Next. The Create new or copy existing pipeline screen displays.
-
Select Create new pipeline to make custom pipeline or choose an existing pipeline to duplicate.
-
Configure applicable pipeline options.
-
Select Disable Pipeline Restart to stop the pipeline from automatically restarting.
-
Select Disable Multiple Active Runs to prevent the pipeline from having more than one active run.
-
Select Override Workspace use instead specific workspace in place of a procedure or process workspace.
-
-
Select OK. The Release editor displays.
-
Use the Release editor features to configure the release pipeline. For more information, refer to Release Editor.
Copy an existing release
To duplicate an existing release:
-
Select New
 .
. -
Select Copy Existing. The New Release from existing screen displays.
-
Select the
Namelink of the release to be copied. -
Enter a title for the release in Name field
-
Select the project from the Select project options.
-
Select the release Start date and End date. Then enter times.
CloudBees added start and end times with v.2023.02.0. This information is not backward compatible in DSL. You cannot import generated DSL of release objects from v2023.02.0 to earlier versions without manual changes. -
Configure applicable release options.
-
Select
 add arrow to add tags. For more information, refer to
Create object tags.
 -
Select Disable Pipeline Restart stop pipeline from automatically restarting.
-
Select Disable Multiple Active Runs to prevent the pipeline from having more than one active run.
-
Select Stage skipping to allow users or groups to skip pipeline stages.
-
Select Override Workspace use instead specific workspace in place of a procedure or process workspace.
-
-
Select Next.
-
Use the Release editor features to configure the release pipeline. For more information, refer to Release Editor.
Create a new release from a template
To create a new release using a catalog item template.
-
Select New
 .
. -
Select Create from catalog item. The New Release create from catalog item screen displays.
-
Select the release template
name. -
Select a project name from the Release project menu.
-
Enter a title for the release in Name.
-
Enter a description in Description.
-
Select the Start date and End date and times.
-
Select OK.
-
Use the Release editor features to configure the release pipeline. For more information, refer to the Release Editor.
Release Editor
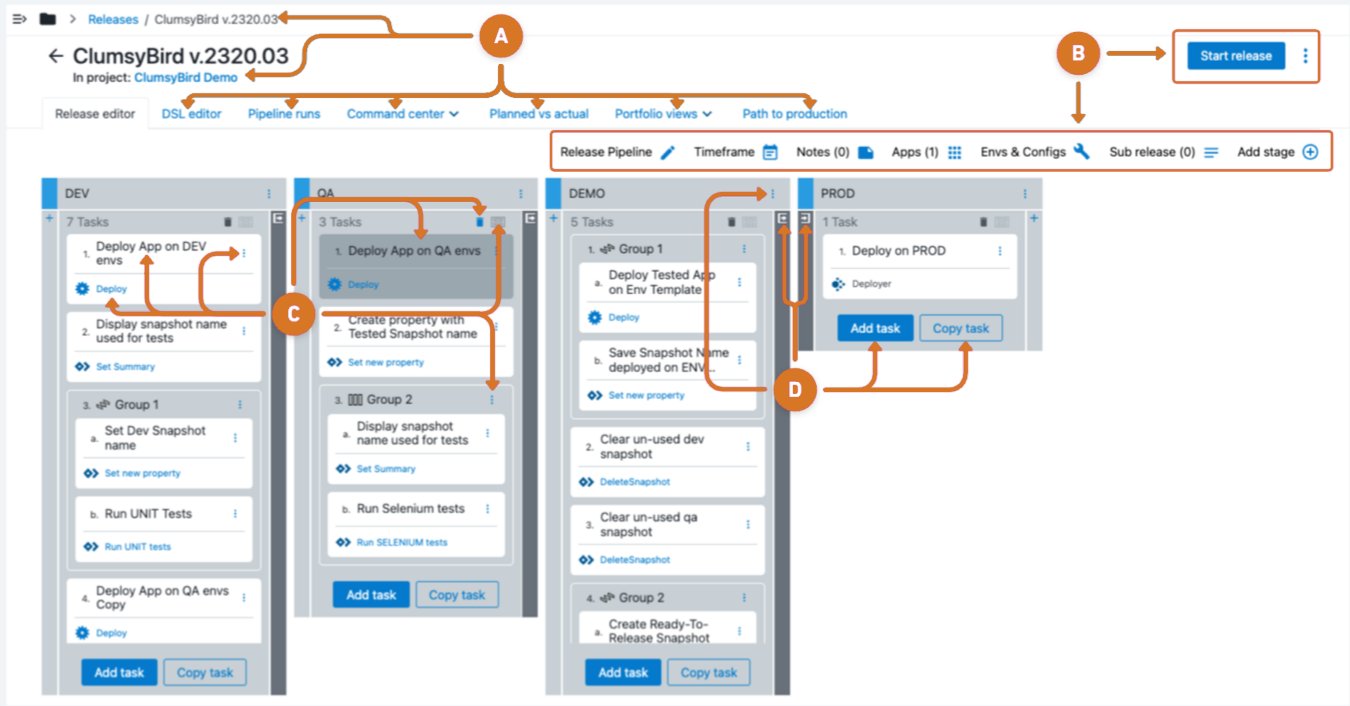
Use the release editor to configure release attributes. Access the CloudBees CD/RO Release editor by navigating to . Then select the release name link.

-
Access release data.
-
Select
 to access the full parent to child path.
 -
Navigate between release management features by selecting one of the following tabs:
-
DSL editor: Configure pipeline using DSL.
-
Pipeline runs: Manage release pipeline runs.
-
Command center: Access command center dashboard and editors.
-
Planned versus actual view for pipeline status: Review planned versus actual release timeline data.
-
Path to production view: Review release bill of materials.
-
-
-
Manage release settings
-
Configure release attributes by selecting one of the these options:
-
Release pipeline: Modify release pipeline, details, parameters, properties, or access control. Change history viewing is also available.
-
Timeframe: Select the start and end dates for the release.
-
Notes: Manage related notes.
-
Apps: Add, modify, or remove release applications.
-
Envs & Configs: Configure release environments.
-
Sub release: Manage sub release.
-
Add stage: Create a new release stage.
-
-
Execute release-related actions.
-
Start the release by selecting Run Pipeline.
-
Modify release settings by selecting the release three-dots
 and a configuration option.
View release configuration options.
-
Details: Choose settings related to tags, pipeline restart, active runs, stage skipping and workspace by selecting Details
-
Save release: Create catalog item based upon the release. Refer to Save a release as a catalog item.
-
Schedules: Modify release schedules. Refer to Schedules for more information.
-
Triggers: Configure event-based triggers.
-
DSL Export: Download the release data in DSL.
-
Properties: Modify release properties. Refer to Configuring properties and property sheets for more information.
-
Access control: Configure access privileges for the release.
-
Change history: Review list of release configuration modifications.
-
End release: Stop the current release.
-
Delete: Remove the release.
-
-
-
-
Configure release tasks.
-
Edit task details, definitions or conditions by selecting the task
namelink. -
Modify task setting by selecting task three-dots
 and a configuration option.
View task modification options.
-
Details: Choose settings related to tags, pipeline restart, active runs, stage skipping, and workspace by selecting Details
-
Parameters: Use to view, add, and delete the parameters attached to the pipeline task.
-
Properties: Modify task properties. Refer to Configuring properties and property sheets for more information.
-
Conditions: Configure task Run if, Wait until and Wait dependency settings.
-
Access Control: Ue to configure access privileges for the task.
-
Change history: Review list of release configuration modifications.
-
Delete: Remove the task.
-
-
Edit task type configuration by selecting the task type
namelink. -
Remove pipeline tasks.
-
Select the tasks to be deleted.
-
Select Delete
 .
.
-
-
Group tasks within a stage.
-
Select the tasks for grouping.
-
Select the Group
 .
Tasks are grouped to run in parallel by default.
-
-
Modify group settings by selecting the
 and a configuration option.
View group configuration options.
-
Details: Choose settings related to tags, pipeline restart, active runs, stage skipping and workspace by selecting Details.
-
Properties: Set one property that applies to all tasks within the group.
-
Run from group: Start the release pipeline at the grouped task.
-
Make Serial or Make Parallel: Set grouped task to run all at once or sequentially.
-
Conditions: Configure group Run if, Wait until and Wait dependency settings.
-
Remove from group: Remove selected task from group.
-
Delete: Remove the group.
-
-
-
Manage release pipeline stage settings
-
Modify task settings by selecting stage three-dots
 and a configuration option.
View stage configuration options.
-
Details: Choose settings related to tags, pipeline restart, active runs, stage skipping and workspace by selecting Details
-
Add Task: Create a new stage task.
-
Copy Task: Copy an existing task into the stage.
-
Run from stage: Start the release from the selected stage.
-
Duplicate: Make a copy of the selected stage.
-
Reorder - After: Move the stage to an earlier position in the release pipeline.
-
Reorder - Before: Move the stage to a later position in the release pipeline.
-
Properties: Modify stage properties. Refer to Configuring a property or property sheet for more information.
-
Conditions: Configure group Run if, Wait until and Wait dependency settings.
-
Access Control: Use to configure access privileges for stage.
-
Change history: Review list of release configuration modifications.
-
Delete: Remove the stage from the release pipeline.
-
-
Configure stage entry or exit gates by selecting
 .
.
-
Save a release as a catalog item
Use these steps to create a release catalog item based upon an existing release. Once created, this item is available to create a new release from the catalog item. Refer to Create a new release from a template.
To create a release template:
-
Access the Release List by navigating to .
-
Select the name of the release to use for template creation. The Release editor displays.
-
Select Save release from the release three-dots
 menu. The Save release as catalog item screen displays.
 -
Select a project for the release catalog item.
-
Enter a name the catalog item.
-
Enter item Description and Additional information.
-
Select OK.