The Release Calendar provides a top-down perspective of all releases and environment reservations in one view. This calendar allows you to view the schedule for releases planned for one or more projects, so you can plan accordingly and avoid conflicts. This calendar also shows the schedule for releases that are in progress or have completed, as well as environment reservations with details (including blackout periods). You can switch between the monthly, weekly, or daily views and show all pipelines scheduled within the selected time period.
For organizations managing multiple releases across multiple teams and shared environments at the same time, it is critical to have centralized visibility to identify schedule and resource conflicts. The Release Calendar gives a top down perspective of all releases and environment reservations in one view. With this calendar view you can:
-
Track completed, in-progress, and planned releases in one view
-
Visualize delivery timelines, environment availability, and blackout periods together to zero in on conflicts
Usage scenarios
A Release has two stages, QA and PROD.
-
The QA stage has the window June 1-15. The PROD stage has the time window June 10-June 30.
-
For the QA stage, once the stage is entered, run the stage tasks daily at 3 P.M. while in the window for the stage.
-
For the PROD stage, do not allow entry to the stage before June 10th. Once entering the stage, run the deployment once.
-
If the release pipeline is started before June 10th, the first stage will not be entered until the entry date is met.
-
If the release pipeline is started after June 15th, the DEV stage will be skipped, and the pipeline will start in PROD.
To open the release calendar, select the Release calendar button at the top of the page. Following is a release calendar with two releases (a running release and a release in planning) and an environment blackout period.

-
Select a release, environment reservation, or a blackout period to view a details popup. Blackout periods might represent company holidays or other significant dates.
A warning displays if you have not yet set your time zone. -
Select an environment blackout to view the start and end dates and times.
-
Select the Month, Week, and Day buttons to toggle among those views.
Filter releases by project
By default, the release calendar displays releases from all projects. You can choose one or more specific projects from the projects menu.
Filtering releases by status
By default, the release calendar displays all releases regardless of their statuses such as running releases or releases in planning. You can filter the list of releases according to status by using the following buttons:
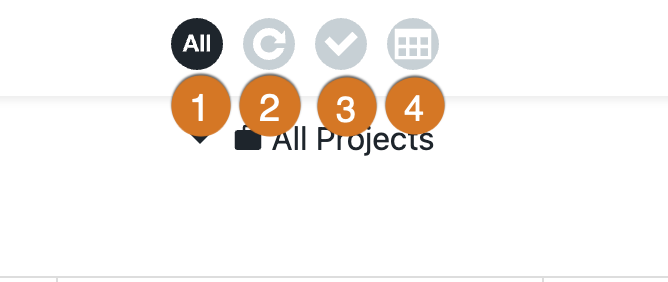
Following are descriptions of the filters:
1 |
All releases |
2 |
Running releases. A running release is one that is in progress, which means that its pipeline is still running. For details about running and ending (completing) a release, refer to Run and end releases. |
3 |
Successful releases. A successful release is one with a pipeline that ran with no errors that you have subsequently completed. For details about running and ending (completing) a release, refer to Run and end releases. |
4 |
Releases in planning. A release in planning is one whose release run has not started. |
Select the release name to open Applications / View Run. For more information, refer to Deploying and Troubleshooting Applications.
Filtering releases by tags
The release calendar supports filtering by tags, allowing you to tailor the calendar view to display only those releases that match specific tags added to each release. Use this feature to quickly identify releases that share common characteristics or requirements.
To filter releases on the release calendar using tags, first add tags such as 'Urgent-Fix' or 'Feature-Update' to relevant releases during creation or updates. These tags can then be used to selectively display releases with those specific attributes.
To add tags to a release:
-
Navigate to .
-
Select a release.
-
In the Release editor view, select the Options menu on the right-hand side, at the top of the Release editor page.
-
Select Release Details.
-
Select the arrow to the right of the Tags option.
-
Specify a name for the tag.
Spaces are not allowed in tag names. -
Select OK.
|
While adding a tag, if you receive the error message: To correct the error:
|
To filter the release calendar using tags:
-
At the top of the Release editor, select Release calendar.
-
Select one of the Tags from the options.
The calendar is updated to display only the releases associated with the selected tag(s).