Use the component security center to review security findings for individual components and understand how security issues affect specific assets within your development pipeline. The component view focuses on technical-level security information, helping developers understand security findings in the context of specific repositories, containers, or code assets. Component-level security management integrates with triage workflows and provides detailed technical context for security decision-making.
The component security center displays findings from implicit security analysis that automatically populate when CloudBees Unify detects security-relevant changes in your development pipeline.
On CloudBees Unify:
-
Issues are security issues reported by security tools.
-
Findings are individual occurrences of a security issue reported in a branch, file, or code location.
-
Severity is the rating reported by the security tool that discovered the finding.
For guidance on when to use the component security center versus the application security center, refer to application-security:explanation/understanding-security-center-workflows.adoc#component-vs-application-security-perspectives.
| Prioritize correlated findings from multiple scanners, as they typically indicate higher-confidence security issues that warrant immediate attention. |
|
You need the View findings by triage status permission to access security findings in the component security center. For permission details, refer to RBAC permissions reference. |
Navigate to the component security center
To access the security center for a specific component:
-
Select an organization from the organization selector.
-
Select Components.
-
Select the component name.
-
Select Security center.
The component security center displays with findings organized by status tabs (Unreviewed, Fix Required, Awaiting Approval, Resolved).
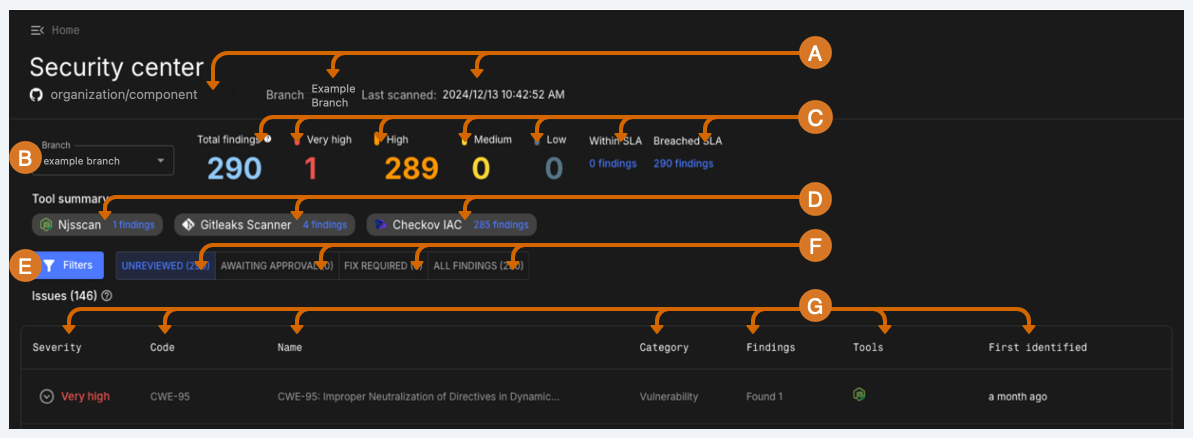
-
Review the GitHub organization and repository names, the branch name, the date and time of the last scan.
-
Select a branch.
-
Review the total number of findings, the number of findings by severity, and the number of findings within or that have breached the SLA.
Select a number of findings to filter issues by that severity, or by findings within or that have breached the SLA.
-
Review the total number of findings, grouped by security tool. Select a tool’s number of findings to filter issues by that tool.
-
Filter issues by one or more of:
-
Asset type.
-
Category:
-
Configuration.
-
License violation.
-
Operational risk.
-
Penetration testing outcome.
-
Policy violation.
-
SCA.
-
Secret violation.
-
Threat modelling outcome.
-
Vulnerability.
-
Risk accepted (RA) findings expiry:
-
Risk accepted findings expiring within a date range.
-
Risk accepted findings expiring by an end date.
-
-
Severity:
-
Very High.
-
High.
-
Medium.
-
Low.
-
SLA status:
-
Breached SLA.
-
Within SLA.
-
-
Status:
-
Open.
-
In progress.
-
Resolved.
-
False positive.
-
Risk accepted.
-
Closed.
-
-
Tools.
-
-
Review the number of findings of each status. Select a status to filter findings by that status. For further information about status, refer to Triage security findings.
-
Review security issue information:
-
Severity: the severity rating reported by the security tool that discovered the finding. Select to review detailed information on each finding of the issue, including:
-
File Name: The name of the file where the finding was discovered. For code findings, select the file name to navigate to the GitHub, Gerrit, or Bitbucket repository containing the file, and the line in the file where the finding is located.
For findings discovered by Coverity on Polaris, CloudBees Unify redirects to the file containing the issue, but does not highlight the line number, as this is not supported by the Coverity tool itself. -
Tools: The tool that discovered the finding.
-
Further details: Review further information provided by the security tool, including CWE reference, and raw data for the finding. Where multiple tools report the same finding, select a tool from the dropdown menu to see information from that tool.
-
-
Code: The vulnerability code, or CWE or CVE number of the issue.
-
Name: The name of the issue.
-
Category: The category of the issue.
-
Findings: The number of findings of that issue.
-
Scanning tools: The tools that reported the issue.
-
First identified: When the issue was first reported.
-
Initiate triage workflows from component view
Connect component-level security findings to organization-wide triage and approval workflows to ensure appropriate security oversight.
Start triage process
To initiate triage for component security findings:
-
From the component security center, review findings in the Unreviewed tab.
-
Select findings that require triage decisions.
-
Select Triage for individual findings. The triage interface provides technical context from the component view to inform your decision.
-
Choose the appropriate triage status:
-
Fix Required: The finding needs to be fixed.
-
For Justification, enter comments for the organization owner, explaining why the fix was required.
-
-
False Positive: The finding is incorrect, or not an actionable issue. Selecting false positive immediately updates the status of the finding, and it appears in dashboards as a false positive finding.
The user can transition the finding back for further triage. An organization owner can also reject the transition to false positive, which reverts the status to Unreviewed.
-
Justification: Enter comments for the organization owner, explaining why the finding is a false positive.
-
Risk Accepted: the issue falls within your risk tolerance. Transition to risk accepted requires approval by an organization owner.
-
For Expiry date, select a date for the risk acceptance to expire. Defaults to 90 days.
-
Justification: Enter comments for the organization owner, explaining why the finding falls within risk tolerance.
-
-
Select Triage Finding:
-
Fix Required findings are moved to the Fix Required tab.
-
False Positive and Risk Accepted findings are moved to the Awaiting Approval tab, to be reviewed by an organization owner.
-
Triage decisions require approval from organization owners according to organization-level approval workflows.
Track triage progress
To monitor triage workflow status from the component view:
-
Select the Awaiting Approval tab in the component security center. Component-level view shows the status of triage requests for findings specific to this component.
-
Review approval workflow progress for your component’s findings. Links connect to broader organizational security oversight while maintaining component-specific context.
-
Check the Fix Required tab for findings that have been approved for remediation. These findings require developer action and can be integrated into development workflows.
For complete triage procedures, refer to Triage security findings.
Triage permissions
By default, only admins can triage findings, but custom user roles can be created to allow users more granular control of triage.
|
Custom permissions assigned to a user belonging to an organization’s system generated teams will not work. Instead, you must assign the user to a custom team. |
The following user role permissions affect triage:
| Role permission | Purpose |
|---|---|
Review risk accepted request |
Review a transition request for a risk accepted finding. |
Review false positive request |
Review a transition request for a false positive finding. |
SLA configuration |
Define the service-level agreement (SLA) for an organization. |
Triage findings |
Triage security findings: transition a finding to fix required, risk accepted, or false positive. |
View findings by triage status |
View security findings in the security center, grouped by triage status. |