You can configure a Jira integration at the application level to automatically create and track security findings as Jira issues, enabling development and security teams to manage the security backlog and monitor remediation directly within Jira. Application-level Jira integration maps your application to a Jira project, defines how security finding statuses correspond to Jira workflow statuses, and specifies the Jira issue type used when creating security issues.
For understanding about Jira ticket creation process, refer to Understanding Jira ticket creation.
When a Jira integration is configured for an application, CloudBees Unify automatically creates a Jira issue when a finding is triaged to Fix Required, and keeps the status synchronized in both Jira and CloudBees Unify.
For instructions on setting up a Jira instance at the organization level, refer to Configure project management integrations.
| To configure a Jira integration for an application, you must be an administrator. For more details, refer to custom role with the Configure integrations permission. |
Prerequisites
-
A Jira integration must be configured at the organization level. For instructions, refer to Configure project management integrations.
-
You must have access to the Jira project where security issues will be created.
Configure a Jira integration
Map your application to a Jira project and configure how security findings are created as Jira issues.
To configure a Jira integration for an application:
-
Select an organization from the organization selector.
-
Select Applications, then select an application name.
-
Select Integrations.
-
Select Create integration.
-
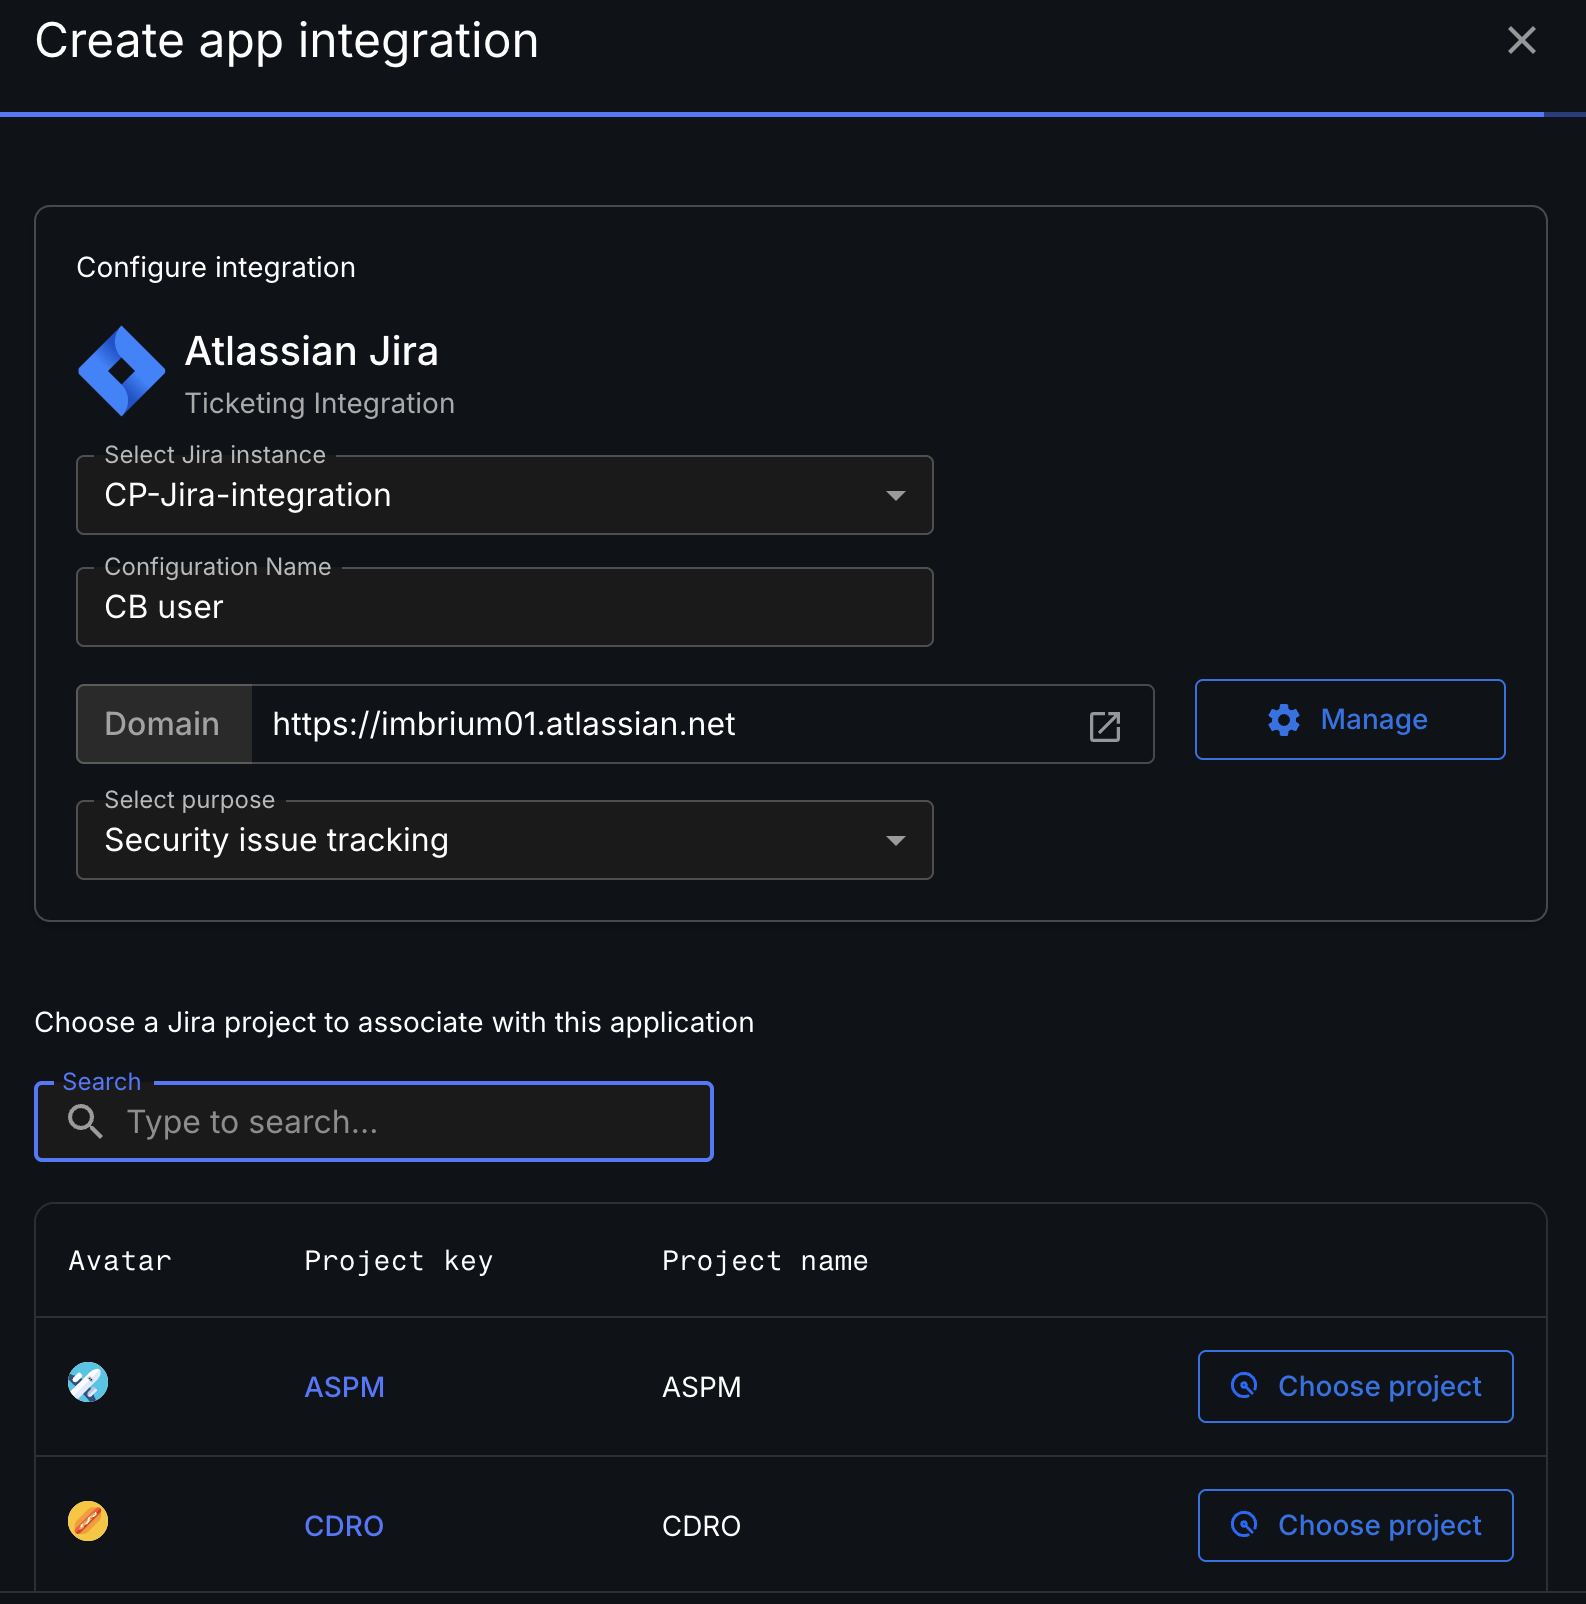
From the Create app integration page, select Atlassian Jira.
-
Complete the following fields:
-
Jira instance: Select the Jira instance from the dropdown list.
The list displays all the configured and inherited Jira integrations of your application’s organization.
-
Domain: The domain field is autopopulated based on the selected Jira instance.
-
Purpose: Select Security issue tracking from the dropdown list.
-
Jira project: Select a Jira project where security issues will be created.
-
Configure Jira project status: Map status to align CloudBees Unify statuses with your Jira workflow statuses. For status mapping details, refer to Configure Jira project statuses.
-
Configure Jira project issues: Map Jira issue type with CloudBees Unify finding status so that all security findings are created in Jira with the correct issue type matching your team’s workflow.
Available Jira issue types are dynamically populated based on the work type scheme assigned to the selected project.
Only standard (non-subtask) work types are available for selection. Subtask work types are not displayed because they require an existing parent issue in Jira and are not relevant to security issues.
-
-
-
Select Save configuration.
The application is now linked to the selected Jira project. Security findings triaged as Fix Required automatically create issues in Jira using the configured work type and status mappings.
Configure Jira project statuses
Status mappings define how CloudBees Unify security finding statuses correspond to statuses in your Jira workflow, ensuring finding state changes in CloudBees Unify are reflected accurately in Jira, and vice versa.
To configure status mappings:
-
In the Configure Jira project statuses section, for each CloudBees Unify security finding status, drag and drop the corresponding Jira workflow status. Following are the security finding statuses.
Table 1. CloudBees Unify security finding statuses CloudBees Unify security status Description Open
Finding detected by a security scan and not yet triaged or acted upon.
In progress
Finding confirmed for remediation and actively being worked on.
False positive
Finding reviewed and determined to be incorrectly flagged as vulnerability.
Risk Accepted
Finding acknowledged as within acceptable risk tolerance for a defined.
Resolved
Finding no longer detected following a clean security scan.
The available Jira statuses depend on the workflow configured in the selected Jira project. -
Select Save configuration.
Status changes to security findings in CloudBees Unify are automatically synchronized with the corresponding Jira issue. Changes made to a Jira issue are reflected in the CloudBees Unify Security Center only when the Jira issue is in the In Progress status.
Similarly, the status of a security finding in CloudBees Unify and its corresponding Jira issue is updated to Resolved only after a scan verifies that the finding has been resolved. Manually changing the Jira issue to Resolved (or another Jira status mapped to Resolved) does not update the status in CloudBees Unify. This behavior ensures that the resolution status reflects verified scan results rather than manual changes, preserving data integrity and audit traceability.
Edit a Jira integration
To edit the Jira integration for an application:
-
Select an organization from the organization selector.
-
Select Applications, then select an application.
-
Select Integrations.
-
Select
 next to the Jira integration.
 -
Select Edit.
-
Update the required fields.
-
Select Save configuration.
Remove a Jira integration
To remove the Jira integration from an application:
-
Select an organization from the organization selector.
-
Select Applications, then select the application name.
-
Select Integrations.
-
Select
next to the Jira integration. -
Select Delete.
-
In the confirmation dialog, select Delete to confirm.
Troubleshoot
What happens if CloudBees Unify does not automatically create a Jira issue when a finding is triaged as Fix Required:
-
Verify the Jira integration configuration: Confirm that the application-level Jira integration is configured correctly and that all messages display Success with no warnings. If the test connection check fails at the organization level, resolve the issue before the application-level Jira integration can work.
-
Check for missing mappings: Verify if you have configured all required mappings for the application-level Jira integration. Missing mappings can prevent CloudBees Unify from creating Jira issues and may indicate a backend connectivity or an API issue. If the issue is caused by a backend problem that is beyond your control, reselect the Jira instance and save the configuration.
-
Check for Jira authentication errors: When selecting the Jira instance, check for error messages such as authentication failure caused by a password change or an expired token. Resolve the authentication issue and save the Jira integration configuration.
-
Confirm the finding status: Verify if the finding was successfully triaged to Fix Required.
-
Verify the integration status: Confirm if the application-level Jira integration is active and properly authenticated.
-
Verify the Jira project and issue configuration: Confirm if the required Jira project and issue configuration are valid.