Enable CloudBees High Availability (HA) on a managed controller running CloudBees CI on modern cloud platforms, from prerequisites through verification.
|
HA may increase the costs of running CloudBees CI as it requires additional resources, like those used to run the replicas and the required network filesystem. |
Enablement checklist
To enable HA on a controller running CloudBees CI on modern cloud platforms, complete the following steps:
-
Prepare your environment with a HA review, which you can redeem through Success Points on CloudBees Support.
Prerequisites
Complete these checks before you install an HA controller:
Configure sticky sessions for Gateway API
For CloudBees CI on modern cloud platforms, you do not need additional load balancer configuration when the gateway implementation supports sessionPersistence and experimental channel CRDs are installed.
When using Gateway API routing, CloudBees CI automatically adds a sessionPersistence specification (GEP-1619) to HTTPRoute resources created for High Availability (HA) controllers.
The specification uses type Cookie with a Session lifetime and does not set a sessionName, letting the gateway implementation generate its own cookie name.
This requires the Gateway API experimental channel CustomResourceDefinitions (CRDs).
Refer to Verify experimental channel CRDs for installation details.
Not all gateway implementations support sessionPersistence.
Refer to the session persistence implementation support table for the current status of each implementation.
If your gateway implementation does not support sessionPersistence (for example, Istio), refer to Configure sticky sessions with Istio in the Gateway API prerequisites.
Review storage requirements
In CloudBees CI on modern cloud platforms, HA requires consistent shared storage between replicas. PersistentVolumeClaims (PVC) used for this purpose must accept an access mode of ReadWriteMany.
The underlying storage provided depends on the Kubernetes platform used.
|
As HA requires real-time shared storage between replicas, it does not support multi-region replication. In addition, there are specific storage requirements to use HA. Review the pre-installation requirements for your platform in Review platform-specific installation requirements. |
Review HA-related known issues
Check whether any of your installed plugins have known HA-related issues:
Provision EC2 agents in HA
The Amazon EC2 plugin allows Jenkins to provision EC2 agents on demand.
When using this plugin in a controller running in HA mode, the following options must be selected in the Cloud configuration:
-
No delay provisioning
-
Clean up Orphan Nodes
-
Terminate idle agents during shutdown
-
Avoid Using Orphaned Nodes
Additionally, the Idle termination time setting must be configured according to the following guidelines:
-
If Maximum Total Uses is set to a value greater than
1, specify a shorter Idle termination time (for example, ~10 minutes). -
If using Minimum number of spare instances, specify a longer Idle termination time (for example, ≥ 60 minutes).
-
If Maximum Total Uses and Minimum number of spare instances are both set to
0, set the Idle termination time to 1 minute (the minimum supported value).
Using different settings for these options is not HA-compatible and may cause unexpected behaviors in HA controllers.
Provision Kubernetes agents in HA
The Kubernetes plugin allows Jenkins to provision agents on demand in a Kubernetes cluster.
The following Pod template settings are not HA-compatible and should not be used in controllers running in HA mode:
-
Time in minutes to retain agent when idle: In an HA controller, Kubernetes agents should be deleted immediately after completing their assigned task. Retaining agents after they become idle may result in orphaned agents if a controller replica exits for any reason.
-
Concurrency Limit: Limits the maximum number of agents the Kubernetes cloud can provision at once. In HA mode, this setting is not synchronized across controller replicas, which may allow agent provisioning to exceed the specified limit.
You can also limit the number of agents that can be provisioned leveraging the Kubernetes cloud capabilities. Refer to the official Kubernetes documentation for more information.
Provision GCE agents in HA
The Google Compute Engine plugin allows CloudBees CI to provision Google Compute Engine (GCE) agents on demand.
|
These settings are required when using the Google Compute Engine plugin in an HA controller. Using different settings is not HA-compatible and may cause unexpected behaviors in HA controllers. |
To configure the Google Compute Engine plugin for HA controllers:
-
Select in the upper-right corner to navigate to the Manage Jenkins page.
-
Select Clouds.
-
Next to the GCE cloud, select .
-
Under Instance Configurations, select the instance configuration to edit.
-
Configure the following options to ensure GCE agents, which are only visible to the replica they are connected to, are cleanly managed by replicas and used for a single build at a time:
-
Set Number of Executors to
1. -
Select Terminate idle agents during shutdown.
-
Under One-Shot, select Enabled.
-
-
If agent boot time is significant, configure Minimum Number of Spare Instances or Minimum Number of Instances to keep prewarmed agents available for immediate builds.
In an HA controller, these values apply per replica, not to the controller as a whole, so plan instance counts accordingly.
-
To restrict when minimum instance counts apply, select Only apply minimum number of instances during specific time range and configure the time range and days of the week.
CloudBees CD/RO data reporting and HA
Sending data from CloudBees CI instances to CloudBees CD/RO, using the CloudBees Software Delivery Automation Data plugin, does not work in HA mode. If you have this plugin installed on an HA controller, uninstall it.
When enabled and connected, if a controller runs in HA mode, this plugin might display errors and exceptions in the logs, but it does not affect the CloudBees CI operation.
Install the HA controllers
Follow these steps to install and configure an HA controller:
Review platform-specific installation requirements
You can install HA on any Kubernetes cluster. The following table contains links to the specific platform installation instructions, and the pre-installation requirements for each one of them.
| Platform | General install guide | Pre-installation requirements |
|---|---|---|
Azure Kubernetes Service (AKS) |
||
Amazon Elastic Kubernetes Service (EKS) |
||
Google Kubernetes Engine (GKE) |
GKE pre-installation requirements (includes High Availability (HA)-specific storage requirements and installation steps) |
|
Red Hat OpenShift (OpenShift) |
||
Kubernetes |
|
Managed controller with custom YAML definitions
Managed controllers require To avoid this error, use If you encounter this error, refer to Controller configuration is not set to |
Start a managed controller in HA mode using the UI
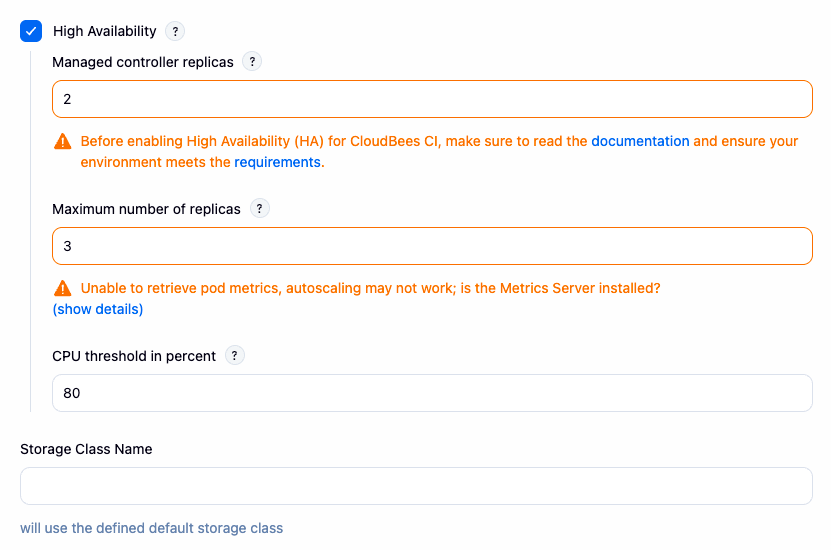
Admin users can easily create managed controllers that run in HA mode by using the UI. Create or configure the managed controller as usual and in the configuration screen, as shown in the following example:
-
From the managed controller Configure page, enable High Availability mode.
-
Enter the number of desired replicas in the Managed controller replicas field.
When creating a managed controller in HA mode, you can set the number of replicas to one. A single replica HA cluster cannot distribute the workload among the different replicas, but for CloudBees CI on modern cloud platforms, this configuration still provides the following HA benefits:
-
Rolling restarts.
-
Rolling upgrades.
In a single-replica HA cluster, if the controller fails, the controller is not available during the recovery process.
-
-
(Optional) If configuring horizontal auto-scaling, configure the following fields. For more information, refer to (Optional) Configure Horizontal Pod Auto-scaling.
-
Enter the Maximum number of replicas if you want auto-scaling. The Metrics server is required in your cluster if you modify this value to enable auto-scaling. Set it to zero to disable auto-scaling.
-
Set the CPU threshold in percent to trigger upscaling or downscaling if auto-scaling has been configured.
-
-
Select the Storage Class Name for the replica’s shared file system. If it is empty, use the default storage class defined in your Kubernetes cluster.
-
(Optional) If you want to customize the
PodDisruptionBudgetfor the managed controller, scroll down to Advanced configuration and add a custom YAML definition. For more information, refer to (Optional) Configure a customPodDisruptionBudgetfor managed controllers. -
(Optional) If you need a larger
/tmpvolume for caches, scroll down to Advanced configuration and add a custom ephemeral volume YAML definition. For more information, refer to (Optional) Configure a custom cache volume. -
Select Save to create the managed controller in HA mode.
When a managed controller is running in HA mode, the Pod status column appears on the operations center dashboard. This column displays how many controller replicas exist for each one of the managed controllers, and how many of them are available.
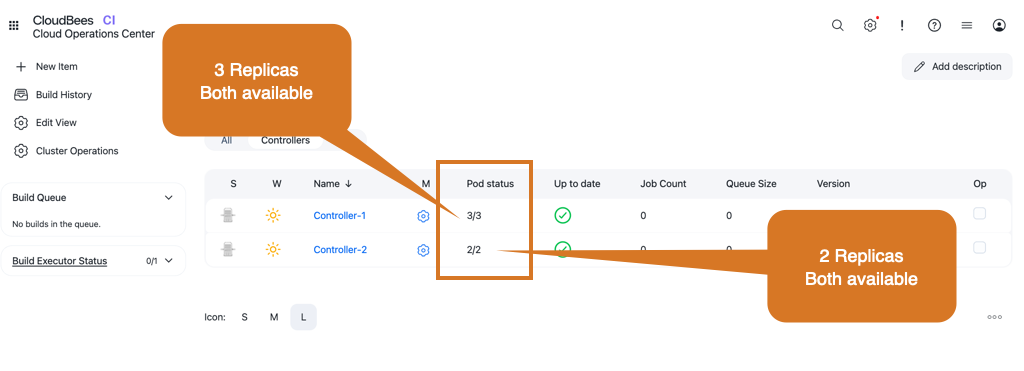 Figure 2. Pod status column
|
Modifying the number of replicas or the container image of a running managed controller does not require you to select Reprovision (which causes an outage) or Rolling Restart from the operations center. CloudBees CI updates the managed controller deployment automatically; a rolling restart happens automatically after you select Save. |
(Optional) Configure Horizontal Pod Auto-scaling
Horizontal auto-scaling is available for managed controllers running in HA mode. It uses Kubernetes Horizontal Pod Autoscaling.
The Horizontal Pod Autoscaling (HPA) controller monitors resource utilization and adjusts the scale of its target to match your configuration settings. For example, if utilization exceeds your defined threshold, the autoscaler increases the number of replicas. For more information on how to set up auto-scaling for your managed controller, refer to Start a managed controller in HA mode using the UI.
|
Kubernetes Horizontal Pod Autoscaling (HPA) is part of the Helm charts provided by CloudBees. However, to use auto-scaling with CloudBees CI High Availability (HA), you need to install the required Metrics server in your cluster. CloudBees CI’s High Availability (HA) has been tested using |
CloudBees recommends performance testing to determine appropriate thresholds that do not affect response time.
For upscale events:
-
No rebalance of builds is performed.
-
Builds continue to run on existing replicas.
-
New builds are typically dispatched to new replicas. Refer to Schedule builds and explicit load balancing for more information.
-
Due to sticky session usage, any existing session remains on the same replica.
-
New sessions are distributed randomly between replicas.
For downscale events:
-
Builds from removed replicas are adopted by the remaining replicas. Refer to Schedule builds and explicit load balancing for more information.
-
Web sessions associated with a removed replica are redirected to remaining replicas.
Upscaling means there are increased builds to serve that consume greater resources. The scheduling of new controller replicas is blocked when the cluster reaches capacity.
To ensure that you have enough resources, CloudBees recommends the following:
-
Use the Kubernetes cluster autoscaler or vendor-specific configuration to ensure that the cluster has enough resources to accommodate the new replicas.
-
Consider the use of dedicated node pools for controllers.
-
Assign a lower priority class to agent pods, so that controller pods are scheduled first. This allows controller pods to evict agent pods, if necessary.
(Optional) Configure a custom PodDisruptionBudget for managed controllers
The default configuration for managed controllers running in HA mode defines a PodDisruptionBudget with the minAvailable property set to 1.
This means that at least one replica must always be available to ensure the availability of the HA controller even during voluntary disruptions, such as node maintenance or upgrades.
CloudBees CI administrators can customize the values for the PodDisruptionBudget for managed controllers running in HA mode by providing a custom YAML definition in the managed controller configuration screen.
The following example shows a custom PodDisruptionBudget YAML example that sets the minAvailable property to 2:
apiVersion: policy/v1 kind: PodDisruptionBudget metadata: name: ${name}(1) spec: minAvailable: 2(2)
| 1 | Keep ${name} exactly as shown. CloudBees CI resolves it automatically to the managed controller’s name; do not replace it with a literal value. |
| 2 | New value for the minAvailable property. The default value is 1. |
(Optional) Configure a custom cache volume
Controllers running in HA mode automatically configure cache-related properties to use per-replica temporary folder locations.
Folders containing these caches are located outside the shared $JENKINS_HOME folder to avoid conflicts.
These folders are used by:
-
The GitHub branch source, to minimize REST API calls.
-
Generic Git repositories to store the repository cache.
-
Both Multibranch Pipelines and standalone Pipelines using the Pipeline script from SCM option, when using plain Git repository references, in certain configurations.
-
Pipeline Groovy libraries when not used in clone mode (with or without caching mode enabled), to maintain checkouts of library SCM repositories.
-
CloudBees Pluggable Storage, to download archived builds from the cloud object storage provider. For more information, refer to CloudBees Pluggable Storage temporary folders.
In CloudBees CI on modern cloud platforms these temporary folders are located within each replica’s container under the /tmp directory.
If /tmp fills up with caches, depending on the platform where CloudBees CI is installed, you may be able to request a larger volume.
As an alternative, you can use a generic ephemeral volume of any desired size with any desired storage class (only read-write-once needs to be supported), as you can see in the following example:
containers: - name: jenkins volumeMounts: - name: tmp mountPath: /tmp volumes: - name: tmp ephemeral: volumeClaimTemplate: spec: accessModes: - ReadWriteOnce storageClassName: <storage-class-name> (1) resources: requests: storage: 200Gi
| 1 | Use the desired storage class name for the ephemeral volume. |
|
Kubernetes does not recognize this volume as ephemeral storage, so the pod is not terminated even if the volume runs out of free space. |
Verify the installation
Once you have installed an HA controller, and before configuring agents and running builds, CloudBees recommends to verify if the main elements in the HA cluster run properly.
Review the HA cluster components
Hazelcast nodes, as described in HA fundamentals, help to create the HA cluster and synchronize the replicas. These nodes must be able to communicate with each other to ensure the desired number of replicas for the cluster.
To verify that Hazelcast nodes can create the cluster with the expected number of replicas, follow these steps:
-
Navigate to the controller running in HA mode.
-
Select in the upper-right corner to navigate to the Manage Jenkins page.
-
Select CloudBees CI High Availability.
-
Select Status on the left.
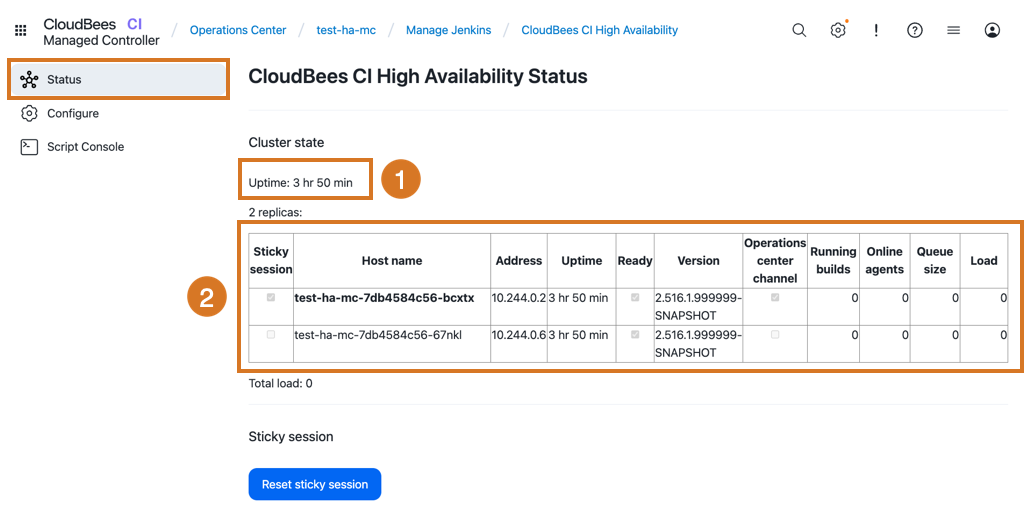
The CloudBees CI High Availability Stages page displays:
-
The uptime since the cluster started.
-
The number of replicas in the cluster with the replica holding the user session selected in the Sticky session field and highlighted in bold.
| If the cluster does not display the expected number of replicas, review the network configuration to ensure the Hazelcast nodes can communicate with each other. |
Check if the load balancer is configured with sticky sessions
The HA load balancer must provide sticky sessions to ensure the user session always uses the same replica.
To ensure that the load balancer uses sticky sessions, follow these steps:
-
Enable developer mode in the controller.
-
Select in the upper-right corner to navigate to the Manage Jenkins page.
-
Select CloudBees CI High Availability.
-
Select Configure in the left pane.
-
Select Enable developer mode.
-
Select Save or Apply.
-
-
Verify the footer displays a banner with the replica name.
-
Refresh the page, navigate through different items in the controller, sign out and sign in several times, and check if the banner always displays the same replica name.
| If the footer banner displays different replica names, review the load balancer configuration to ensure it provides sticky sessions. |
| For HA clusters using ingress-nginx as the load balancer, Reset sticky session in resets the sticky session for the current user, allowing you to test the load balancer configuration again. |
|
Gateway API sticky sessions
When using Gateway API routing, sticky sessions are handled by the If your gateway implementation does not support |
Test reverse-proxied requests
HA controllers load balance the workload among all the controller replicas. When builds run in one replica, and the user is browsing the user interface from another, requests to browse running builds must be reverse-proxied to the replica where the build is running. This reverse-proxied request displays in a footer banner when developer mode is enabled.
To test the reverse proxy is working correctly, follow these steps:
-
Enable developer mode in the controller as described previously.
-
Create a new pipeline job using the code below.
pipeline { agent none stages { stage('Test Job') { steps { input 'Waiting for interaction...' } } } } -
Execute the pipeline job several times by selecting Build Now. HA distributes the build among the different replicas.
-
Verify the Builds widget adds the replica name to the jobs running in other replicas.
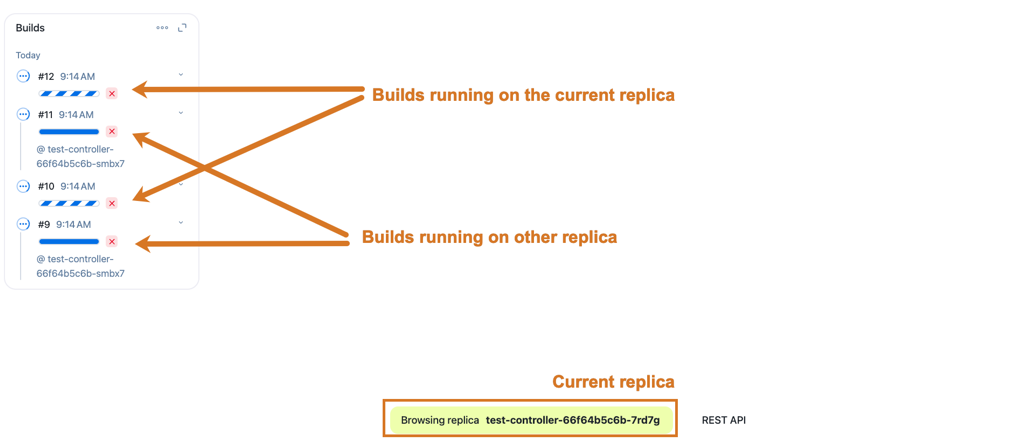 Figure 4. Build widget display the replica name in developer mode
-
In the Builds widget, select one of the builds running in a different replica.
-
Verify that the footer banner displays the reverse-proxied request, from the replica holding the user session to the replica running the build.
 Figure 5. Reverse-proxied request to the replica running the build
-
Finish all the builds before continuing.
| If you cannot browse to the replica running a build, review your reverse proxy configuration to ensure it forwards the requests correctly. |
Troubleshoot the installation
If you encounter a problem while installing HA, review the following known issues. For general HA troubleshooting guidance, refer to Troubleshoot High Availability (active/active).
|
The CloudBees Knowledge Base also contains articles about common issues and solutions for HA. |
Controller configuration is not set to Deployment
If the controller fails to provision with the error:
ERROR: Failed to provision controller ... StatefulSet is only for non-replicated controllers
The issue is caused by including kind: StatefulSet when configuring the controller under Advanced configuration > YAML.
To resolve the issue, select Acknowledge error, Free snapshot, and then navigate to the configuration page and change kind: StatefulSet to kind: ${workloadKind} in the YAML field.
Next steps
-
If you have permanent agents with more than one executor, configure them to work with HA. For more information, refer to Configure your agents to work with High Availability (active/active).
-
Review your jobs to ensure they are compatible with HA. For more information, refer to Audit your jobs for compatibility with High Availability (active/active).