The CloudBees Backup plugin will not backup files which are symlinked in the $JENKINS_HOME folder.
|
The CloudBees Backup Plugin, available only in CloudBees CI, gives you the flexibility to configure backups of:
-
Job build history.
-
Job configurations.
-
Jenkins system configurations, optionally including files in the
$JENKINS_HOMEdirectory, includingmaster.key.
Backup jobs can be triggered in multiple ways:
-
Remotely, using triggers.
-
At periodic intervals by other jobs.
-
By Software Configuration Management (SCM) changes.
The Backup plugin also allows you to configure your backup format and destination, and includes:
-
tar.gzorzipformats. -
Support for storage locally, on Amazon S3, Azure Blob Storage, remote SFTP, or WebDAV.
Last but not least, the Backup plugin gives administrators a familiar interface to schedule and monitor backups.
The CloudBees Backup Plugin is only available in CloudBees CI. However, you can always manually back up your $JENKINS_HOME directory.
|
Create a backup
To create a backup:
-
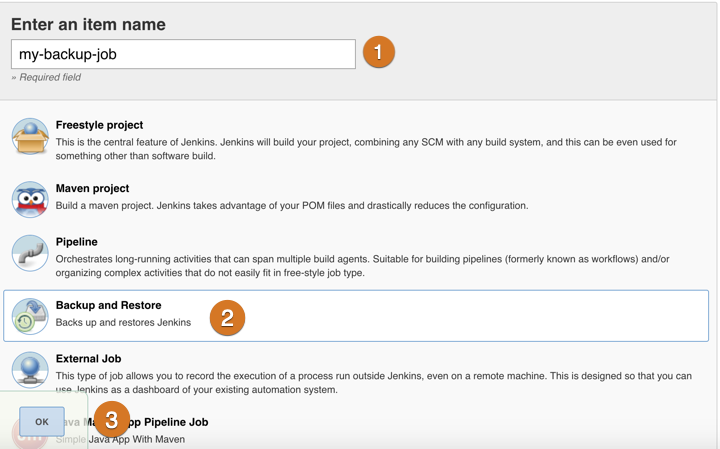
Select New Item.
-
In the Enter Item Name dialog, provide a name for the backup job, select Backup and Restore, and then select OK to save your changes.
-
The job is saved, and you are presented with the Job Configuration screen.
-
Use the Job Configuration screen to configure your backup. You can set configuration parameters for the job as you would for any freestyle project.
Schedule backups
Backup scheduling using the built-in scheduler is covered in detail in Schedule backups in the CloudBees Backup plugin.
To schedule a backup to occur on a specific time interval:
-
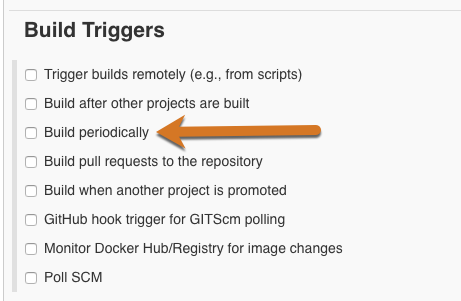
In the Build Triggers section, click to select Build periodically:
-
In the Schedule pane, set the interval upon which you want to schedule the backup. For an explanation of the available scheduling options, see Schedule backups in the CloudBees Backup plugin or select the question-mark icon to the right of the pane.
-
For example, setting
@dailyschedules the job for daily execution, and the Schedule pane provides confirmation of the schedule beneath the pane asWould last have run at Thursday, October 24, 2019 4:57:23 AM UTC; would next run at Friday, October 25, 2019 4:57:23 AM UTC. -
Move on to Set backup options.
Set backup options
To set backup options:
-
Scroll to the Build section of the interface.
-
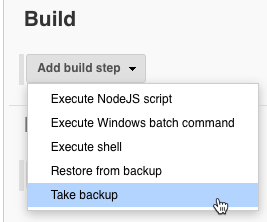
Select Add build step, and then select Take backup:
-
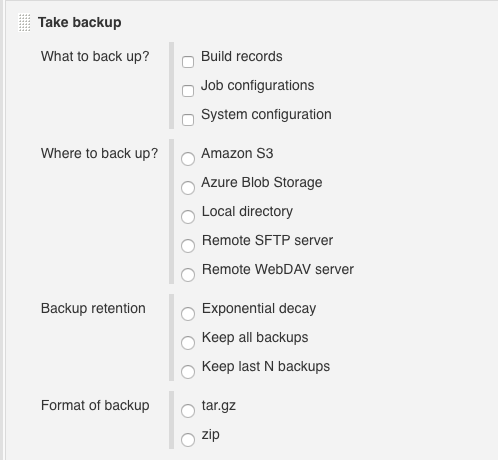
The Take backup builder launches with a series of panels:
What to back up
What to back up has three options:

-
Build records: Backs up all build records, including console output, test results, reports, fingerprints, and anything else displayed in the build.
-
Excludes permits you to exclude certain elements from the build records backup using expressions like
.git/,jobs/scratch-folder/and**/*~.
-
-
Job configurations: Backs up all job configurations, including Source Control Management (SCM) settings, scripts to be executed, and anything else displayed in the jobs configuration screen.
-
Excludes, as it does for Build records, permits you to exclude certain elements from the job configurations backup using expressions like
.git/,jobs/scratch-folder/and**/*~.
-
-
System configuration: Backs up the global instance configuration, including copies of all installed plugins, Update Center settings, and similar configuration parameters.
-
Excludes, as it does for Build records and Job configurations permits you to exclude certain elements from the system configuration backup using expressions like
.git/,jobs/scratch-folder/and**/*~. -
Omit master key excludes
/var/lib/cloudbees-core-cm/secrets/master.keyfrom the backup. CloudBees strongly recommends selecting this option, which prevents a compromised backup from being used to access secrets on the instance. IMPORTANT: If you want to access passwords or other credentials after a backup, back the/var/lib/cloudbees-core-cm/secrets/master.keyfile up to separate secure storage.
-
Where to back up

Where to back up gives you five configurable destinations for your backups:
Amazon S3
This option saves the backup to an Amazon Web Services Simple Storage Service container.
The following permissions are needed on the S3 Bucket and the S3 Bucket Folder objects for backups:
-
s3:GetObject -
s3:PutObject -
s3:DeleteObject -
s3:ListBucket
Example policy:
{ "Version": "2012-10-17", "Statement": [ { "Effect": "Allow", "Action": [ "s3:PutObject", "s3:GetObject", "s3:DeleteObject" ], "Resource": "arn:aws:s3:::mybucket/path/to/folder/*"(1) }, { "Effect": "Allow", "Action": "s3:ListBucket", "Resource": "arn:aws:s3:::mybucket"(2) } ] }
| 1 | The Resource ARN for the S3 Bucket Folder. In this example, mybucket is the S3 Bucket Name and path/to/folder is the S3 Bucket Folder. For more information on the Resource element, refer to the IAM JSON policy elements: Resource |
| 2 | The Resource ARN for the S3 Bucket. In this example, mybucket is the S3 Bucket Name. For more information on the Resource element, refer to the IAM JSON policy elements: Resource |
The Amazon S3 panel has five options:

-
Credentials: A chooser for an Amazon Web Services credential. If this field is left blank, the EC2 IAM Role is used to obtain credentials.
-
The Add button opens an interface to add credentials to the system.
-
-
Region: A chooser for an Amazon Web Services geographic region within which your S3 bucket is available. Regions can be thought of as independent instances of EC2/S3: see the Amazon Web Services region table documentation for more information.
-
S3 Bucket Name: A text field for the name of the bucket within backups are stored. The named bucket must exist on the selected Amazon Web Services Zone. For more information on buckets, see the Amazon Web Services bucket documentation.
-
S3 Bucket Folder: A text field for the name of a folder or folders inside the S3 bucket, within which backup files are created. You can use nested folders, separating them with the
/character. If the specified folders do not exist, they are automatically created. For more information on using folders in buckets, see the Amazon Web Services folder documentation. -
Server-side encryption: Instructs the instance to encrypt the backup using server-side encryption with S3-managed encryption keys. For more information on configuring this capability for your Amazon Web Services instance, see the Amazon Web Services documentation on protecting data using server-side encryption.
After configuring your Amazon S3 backup destination, you can select Validate to validate and test your configuration. If the configuration is not valid, any errors will be displayed:

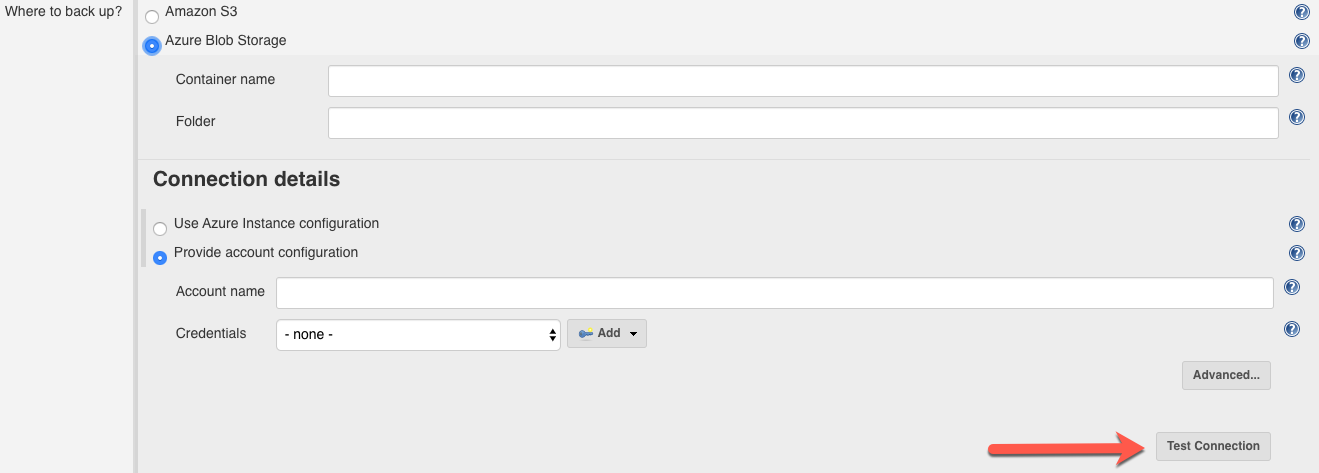
Azure Blob Storage
This option saves the backup to a Microsoft Azure Blob Storage Container.
The Azure Blob Storage panel has five options:

-
Container name: A text field for the name of an existing storage container.
-
Folder: A text field for the name of a folder or folders inside the storage container, within which backup files are created. You can use nested folders, separating them with the
/character. If the specified folders do not exist, they are automatically created. -
Connection Details: Use Azure Instance configuration: Instructs the instance to obtain connection details from Azure instance metadata.
-
Connection Details: Provide account configuration: Permits you to manually specify Azure connection details.
-
Account Name: An existing Azure storage account name. If you need to create a new storage account, sign in to the Azure portal and select Storage accounts.
-
Credentials: A chooser for a "Secret Text" credential that contains the storage account key. The Add button opens an interface to add credentials to the system.
-
-
Advanced: Selecting Advanced reveals the Blob service endpoint URL field. This field identifies a Blob Service endpoint:
-
If you are using a private Azure cloud service or Azure cloud service other than the public Microsoft Azure cloud, enter the Blob service endpoint URL for that service.
-
If you are using the public Microsoft Azure cloud, leave this field blank, and the instance uses the default value of
https://blob.core.windows.net/Blob.
-
After configuring your Azure Blob Service backup destination, you can select Test Connection to test your connection. If the connection is not valid, any errors will be displayed:
Local directory
This option saves the backup to a directory in the local file system of the instance’s host.
Consider the following when evaluating or using this option:
-
To harden against disasters, you should consider using a network or NFS-mounted drive instead of a physical drive on the same machine as the instance. If the system doesn’t have a network or NFS-mounted drive, you may be able to use the Remote SFTP server option to save to a networked location.
-
You should use this location only for backups to avoid undesirable side effects if you set a Backup Retention policy. For example, if you use this location to store information from other processes in addition to the backup job, an overly broad backup retention policy could cause errors or data loss for the non-backup data.
The local directory panel has one option:

-
Directory: The directory within which to store backups. If this directory doesn’t exist, it is created when the first backup occurs.
Remote SFTP server
This option uses Secure File Transport Protocol (SFTP) to save backups to an SSH-capable remote host.
The remote SFTP server panel has four options:

-
Host: The hostname for the remote host.
-
Advanced: Selecting Advanced reveals the Credentials and Port fields:
-
Credentials: A chooser for a "Secret Text" credential that contains the storage account key. The Add button opens an interface to add credentials to the system.
-
Port: Specifies a port to be used for secure communications with the remote host. The default is port 22 (SSH).
-
-
Directory: Specifies the backup directory on the remote host.
-
Perform backup locally first: Instructs the instance to create a temporary local backup file, save that backup to the SFTP server, and then delete the temporary local backup file. This can help reduce upload time, as it uploads a single large file instead of multiple backup files. Be careful when selecting this option on agents with limited disk space: it increases the risk that a backup could fail because of a disk space limitation.
Remote WebDAV server
This option saves the backup to a remote WebDAV server using HTTP BASIC authentication. If a username and password are supplied (via credentials) then that information is used to authenticate the connection. For security, CloudBees strongly recommends the use of HTTPS URLs for the server address.
The remote WebDAV server panel has two options:

-
URL: The URL of the remote WebDAV server. CloudBees strongly recommends using an HTTPS URL for this value.
-
Credentials: A chooser for a "username and password" credential that contains login credentials for the WebDAV server. The Add button opens an interface to add credentials to the system.
The Backup Retention panel
The Backup Retention panel defines the retention policy for your backups: how many backups are kept, and for how long they are kept.
The backup retention policy is important because it helps you avoid excessive disk consumption by outdated backups.
Backup files are named using the job name and the backup job’s build number. This allows you to store the results from multiple backup jobs in a single destination directory without worrying about a collision between two different backup job retention policies: backup files created by one job aren’t affected by another job’s retention policy.
The backup retention panel has three options:

-
Exponential decay: This option instructs the instance to prefer newer backups to older backups, and to retain more recent backups. The number of backups retained is proportional to the formula
e^-t. The advantage of an exponential decay retention policy is that you will always have coverage of the full lifespan of your instance, with coverage weighted towards more recent data, but will also see a regular pruning of backup files to keep disk usage under control. -
Keep all backups: This option instructs the instance to never delete any backup that it has created. This is by far the most resource-intensive option, but can be useful if you are managing backup retention externally with a tool like
logrotate. -
Keep N backups: This option instructs the instance to retain the latest N backups and delete any backups beyond that limit.
Format of backup
Format of backup defines the backup file format: either .tar.gz or .zip. It also provides two processing options.
The format of backup panel has three options:

-
tar.gz: Formats the backup as a gzipped GNU TAR file. This is the default format.
-
zip: Formats the backup as a zipped file.
-
Advanced: Selecting Advanced reveals the Skip recently modified files and Wait and block during backup? options:
-
Skip recently modified files: This is a legacy option that is largely deprecated, as running build jobs are now excluded from backup processes. It was primarily useful in situations where backups failed because they were attempting to archive a file that was actively being modified. This option carries a risk in that certain files are always recently modified at the time a backup runs, and it’s best to restrict the use of this option to back up jobs that are backing up write-once information.
-
Wait and block during backup?: This option causes the entire instance to block on the execution of the backup job. The backup job will wait for all presently running jobs to complete before starting the backup. WARNING: setting this option will delay the completion of all other work on the instance.
-
Save a backup
After you’ve completed configuration of your backup job, select Save to save the backup job.
If you want to come back later and modify the job, you can use the Configure option.
Generate backups from the command line
The backup-master Command-Line Interface (CLI) command can be invoked on any controller, and instructs the backup plugin to perform an immediate backup.
The parameters of the backup are defined in a JSON file and invoked using the command:
jenkins-cli backup-master < backup-configuration.json
Change the backup identifier
By default, the generated backup file is named following the pattern backup-${jenkinsInstanceId}-${timestamp}.
If you want to use a different naming scheme (such as a name identifying the controller), you can provide that naming scheme as an argument to the backup-master command:
jenkins-cli backup-master "my-own-master" < backup-configuration.json
Example JSON backup file
The following JSON code shows an annotated example of a configuration file. You can use this file as a template for your own backup configuration files.
| This JSON example may be copied and pasted: the annotation numbers will not appear in the copied content. |
{ "version" : "1", (1) "data" : { (2) "type": "backup-definition", (3) "backupScope": { (4) "system": { (5) "excludes": "", (6) "omitMasterKey": false (7) }, "jobs": { (8) "excludes": "" (9) }, "builds": { (10) "excludes": "" (11) } }, "backupDestination": { (12) "amazonS3": { (13) "credentialsId": "my-credentials", (14) "region": "us-east-1", "bucketName": "name", "bucketFolder": "folder", "serverSideEncryption": { "enabled": true (15) } }, "azureBlobStorage": { (16) "container": "name", "folder": "path/to/folder/inside/the/container", "connection": "account", (17) "accountConfiguration": { (18) "account": "my-account", "credentialsId": "my-credentials", (14) "blobEndpointUrl": "http://blob.core.windows.net/" } }, "sftp": { (19) "host": "host-name", "port": 22, (20) "credentialsId": "my-credentials", (14) "directory": "/my/personal/directory" }, "webDav": { (21) "url": "https://www.google.es", "credentialsId": "my-credentials" (14) }, "localDirectory" : "/path/to/local/directory" (22) }, "retention": "5", (23) "skipRecent": "off", (24) "format": "tar.gz" (25) } }
| 1 | version (required) - Must be set to 1, and defines the current metadata format for the configuration. |
| 2 | data (required) - The content payload of the configuration. |
| 3 | type (required) - Must be the fixed value backup-definition, which defines this JSON file as a backup configuration file. |
| 4 | backupScope (required) - Specifies "what to back up". At least one option must be configured. For an explanation of available values, see What to back up. |
| 5 | system (optional) - Configures a system-scoped settings backup. |
| 6 | excludes (optional) - Defaults to "". A comma-separated list of Ant-style patterns to exclude from backup (relative to $JENKINS_HOME). For example: .git/, jobs/scratch-folder/, **/*~. |
| 7 | omitMasterKey (optional) - Defaults to false. A boolean value specifying whether the master key file is to be backed up. |
| 8 | jobs (optional) - Configures a scoped settings back up for build jobs. |
| 9 | excludes (optional) - Defaults to "". A comma-separated list of Ant-style patterns to exclude from backup (relative to $JENKINS_HOME). For example: .git/, jobs/scratch-folder/, **/*~. |
| 10 | builds (optional) - Configures a scoped information backup for builds. |
| 11 | excludes (optional) - Defaults to "". A comma-separated list of Ant-style patterns to exclude from backup (relative to $JENKINS_HOME). For example: .git/, jobs/scratch-folder/, **/*~. |
| 12 | backupDestination (required) - Specifies "where to back up". Only one of the possible options may be configured. For an explanation of available values, see Where to back up. |
| 13 | amazonS3 (optional) - Configures the backup to be stored in Amazon S3. |
| 14 | credentialsId (optional) - Defaults to none. Specifies a credential ID in Jenkins that contains the credentials for Amazon S3. |
| 15 | enabled (optional) - Defaults to false. A boolean values indicating whether Amazon S3 server-side encryption should be used. |
| 16 | azureBlobStorage (optional) - Configures the backup to be stored in Azure Blob Storage. |
| 17 | connection (required) - Specifies the source of connection details. Allowed values are instance or account. If instance is specified, details will be obtained from the Azure instance metadata. |
| 18 | accountConfiguration (option) - If connection is set to account, this value is the configuration used. |
| 19 | sftp (optional) - Configures the backup to be stored on a remote SFTP server. |
| 20 | port (optional) - Defaults to 22. The connection port for the SFTP server. |
| 21 | webDav (optional) - Configures the backup to be stored in a remote WebDAV server. |
| 22 | localDirectory (optional) - Configures the backup to be stored in a local directory. |
| 23 | retention (required) - Configures the backup retention policy. Allowed values are exponential, all or a number. |
| 24 | skipRecent (optional) - Defaults to off. Configures how recently modified files should be treated. Allowed values are off, 10s. 30s, 1m and 5m. |
| 25 | format (optional) - Defaults to tar.gz. Defines the format of the backup file. Allowed values are tar.gz and zip. |
Security aspects of backup and restore operations
For security reasons, backup and restore operations run as the user that last saved the backup job. That user is called the "approver" of the backup job.
There are permission checks when running the backup job. For example, if the job is configured to back up the system configuration, then the approver is required to have administration permission in the instance. Users with job creation permissions can create a backup job with any configuration. However, when the actual backup process runs there are various permission checks.
Every time a backup job is saved the user saving it is recorded as the approver, this includes:
-
CLI operations that create and update the backup job.
-
HTTP API operations that create and update the backup job.
-
Move/Copy operations across controllers (using the Move/Copy/Promote feature).
-
Creating a new job as a copy of an existing one.
-
Enabling and disabling the job.
Job rename (or a rename of a parent folder) does not trigger an approver update.
If the backup job is edited in some unsupported way (for example, copy the config.xml from one JENKINS_HOME to another or editing the config.xml manually in the file system), then the next run is executed as the anonymous user. This is very likely to not have the required permissions to run the backup and it will fail. To fix this, a user with the required level of permissions must resave the job from the UI (or another supported way, like CLI or HTTP API), and then that user is recorded as the approver.