Enable CloudBees High Availability (HA) on a controller running CloudBees CI on traditional platforms, from prerequisites through verification. For standard installation instructions, refer to Install CloudBees CI on traditional platforms.
|
HA on Windows controllers is not supported. |
|
HA may increase the costs of running CloudBees CI as it requires additional resources, like those used to run the replicas and the required network filesystem. |
Enablement checklist
To enable HA on a controller running CloudBees CI on traditional platforms, complete the following steps:
-
Prepare your environment with a HA review, which you can redeem through Success Points on CloudBees Support.
-
Prerequisites
Complete these checks before you install an HA controller:
Review web server requirements
CloudBees CI on traditional platforms controllers use a built-in HTTP(S) server (Jetty) when run as a self-contained application directly (java -jar *.war) or indirectly via native package managers or Docker containers.
Refer to Install client controllers for more information.
This built-in server is compatible with HA.
|
Review network requirements
As described in HA fundamentals, controllers running in HA mode require controller replicas to communicate with each other. Your network configuration must open the following required ports to allow this communication:
-
Hazelcast nodes installed in the replicas. The default Hazelcast port is 5701.
-
A reverse-proxy HTTP or TCP connection to access resources from one replica that belong or are connected to another replica. Resources might include:
-
Running builds.
-
WebSocket inbound agents.
-
TCP inbound agents from outside the CloudBees CI network.
-
The load balancer used to distribute traffic among the replicas must support sticky sessions. For more information, refer to Configure the load balancer.
Controller replicas also require the following ports, unless changed:
-
HTTP port (8080).
-
Inbound TCP port for agents (if used). This port is disabled by default and must be explicitly configured.
For more information, refer to Configure network requirements.
Review storage requirements
In CloudBees CI on traditional platforms, all replicas share the same $JENKINS_HOME directory. Each replica must be able to access this shared directory, which is typically mounted on the same path for all replicas.
|
For CloudBees CI on traditional platforms, you must use a shared file system, such as NFS. If using NFS, CloudBees recommends NFS v4.1 or higher. |
To properly configure the NFS client on your controller instances, follow the instructions from the NFS Guide knowledge base article.
Understand Hazelcast
Hazelcast is a key element in the HA architecture. In standard CloudBees CI on traditional platforms installations:
-
A discovery process uses files in
$JENKINS_HOMEto form the HA cluster with controller replicas. -
Some Hazelcast configuration parameters can be managed through JVM arguments when starting the controller. Port switching is an example.
If a controller replica fails to form the cluster, refer to Replicas not forming a controller cluster.
|
For advanced use cases with special network configurations, admins can override the default Hazelcast configuration by providing a custom XML or YAML file. Setting the When using a custom configuration file:
For more information about creating a custom configuration file, refer to the Hazelcast documentation. |
Review HA-related known issues
Check whether any of your installed plugins have known HA-related issues:
Provision EC2 agents in HA
The Amazon EC2 plugin allows Jenkins to provision EC2 agents on demand.
When using this plugin in a controller running in HA mode, the following options must be selected in the Cloud configuration:
-
No delay provisioning
-
Clean up Orphan Nodes
-
Terminate idle agents during shutdown
-
Avoid Using Orphaned Nodes
Additionally, the Idle termination time setting must be configured according to the following guidelines:
-
If Maximum Total Uses is set to a value greater than
1, specify a shorter Idle termination time (for example, ~10 minutes). -
If using Minimum number of spare instances, specify a longer Idle termination time (for example, ≥ 60 minutes).
-
If Maximum Total Uses and Minimum number of spare instances are both set to
0, set the Idle termination time to 1 minute (the minimum supported value).
Using different settings for these options is not HA-compatible and may cause unexpected behaviors in HA controllers.
Provision Kubernetes agents in HA
The Kubernetes plugin allows Jenkins to provision agents on demand in a Kubernetes cluster.
The following Pod template settings are not HA-compatible and should not be used in controllers running in HA mode:
-
Time in minutes to retain agent when idle: In an HA controller, Kubernetes agents should be deleted immediately after completing their assigned task. Retaining agents after they become idle may result in orphaned agents if a controller replica exits for any reason.
-
Concurrency Limit: Limits the maximum number of agents the Kubernetes cloud can provision at once. In HA mode, this setting is not synchronized across controller replicas, which may allow agent provisioning to exceed the specified limit.
You can also limit the number of agents that can be provisioned leveraging the Kubernetes cloud capabilities. Refer to the official Kubernetes documentation for more information.
Provision GCE agents in HA
The Google Compute Engine plugin allows CloudBees CI to provision Google Compute Engine (GCE) agents on demand.
|
These settings are required when using the Google Compute Engine plugin in an HA controller. Using different settings is not HA-compatible and may cause unexpected behaviors in HA controllers. |
To configure the Google Compute Engine plugin for HA controllers:
-
Select in the upper-right corner to navigate to the Manage Jenkins page.
-
Select Clouds.
-
Next to the GCE cloud, select .
-
Under Instance Configurations, select the instance configuration to edit.
-
Configure the following options to ensure GCE agents, which are only visible to the replica they are connected to, are cleanly managed by replicas and used for a single build at a time:
-
Set Number of Executors to
1. -
Select Terminate idle agents during shutdown.
-
Under One-Shot, select Enabled.
-
-
If agent boot time is significant, configure Minimum Number of Spare Instances or Minimum Number of Instances to keep prewarmed agents available for immediate builds.
In an HA controller, these values apply per replica, not to the controller as a whole, so plan instance counts accordingly.
-
To restrict when minimum instance counts apply, select Only apply minimum number of instances during specific time range and configure the time range and days of the week.
CloudBees CD/RO data reporting and HA
Sending data from CloudBees CI instances to CloudBees CD/RO, using the CloudBees Software Delivery Automation Data plugin, does not work in HA mode. If you have this plugin installed on an HA controller, uninstall it.
When enabled and connected, if a controller runs in HA mode, this plugin might display errors and exceptions in the logs, but it does not affect the CloudBees CI operation.
Install the HA controllers
|
If you need to restart a controller, for example, after installing a plugin, make sure that every replica is restarted. |
Follow these steps to install and configure an HA controller:
|
Built-in executors are not supported in HA.
You must set the number of built-in executors to |
Configure the load balancer
You need to set up a load balancer to route HTTP and, if desired, WebSocket, traffic to all the replicas. There are a lot of different load balancers to choose from. CloudBees CI users must configure and set up the load balancer according to their specific requirements.
The load balancer needs two configurations applied:
-
The load balancer must be configured with sticky sessions.
-
You should set up a health check against
/health/.
Configure the controller service
Whether you installed CloudBees CI on traditional platforms using a package manager, that is yum, dnf, zypper, or apt, there are still more changes you need to make to the service configuration files on each replica.
If you installed via yum, dnf, or zypper, that is, an RPM install, you need to update:
-
/etc/sysconfig/cloudbees-core-cm
If you installed via apt, that is, a DEB install, you need to update:
-
/etc/default/cloudbees-core-cm
The following sections document what the values should be updated in the respective service configuration files.
Update JENKINS_HOME
This should be changed from /var/lib/cloudbees-core-cm to whatever the NFS mount is on the replica.
For instance, if you created the NFS mount as /mnt/nfs_cc_home, then the value changes from:
-
JENKINS_HOME="/var/lib/cloudbees-core-cm"
to:
-
JENKINS_HOME="/mnt/nfs_cc_home"
Set JENKINS_ARGS values
There is one mandatory argument to set in JENKINS_ARGS and one optional argument.
First, add an argument to a directory on local disk (not shared disk) for --pluginroot. This specifies where the plugin files should be extracted.
If you did an RPM install, the value should be:
--pluginroot=/var/cache/cloudbees-core-cm/plugins
|
The |
If you did a DEB install, the value should be:
--pluginroot=/var/cache/$NAME/plugins
The optional argument to set is --prefix. Set this argument if you are placing your controller under a domain name instead of using a subdomain.
For example, let’s assume that you want the URL to the controller to be:
https://cloudbees-ci.example.com/cc1/
In this case, you would set the argument to:
--prefix=/cc1
The value is the same for both RPM and DEB installs.
A complete example that includes both arguments, in addition to the default values, for a DEB install looks like:
JENKINS_ARGS="--webroot=/var/cache/$NAME/war --httpPort=$HTTP_PORT --pluginroot=/var/cache/$NAME/plugins --prefix=/cc1"
Set required Java options
|
Refer to Supported JDK versions for the required Java version for your CloudBees CI on traditional platforms release. |
|
The Java options and system properties discussed below are only the values for configuring HA. For the overall JVM recommended arguments to run CloudBees CI on traditional platforms, please review the JVM Recommended Arguments section of Prepare Jenkins for Support. |
The following Java options and system properties are required for the controllers to run in HA mode:
--add-exports=java.base/jdk.internal.ref=ALL-UNNAMED --add-modules=java.se --add-opens=java.base/java.lang=ALL-UNNAMED --add-opens=java.base/sun.nio.ch=ALL-UNNAMED --add-opens=java.management/sun.management=ALL-UNNAMED --add-opens=jdk.management/com.sun.management.internal=ALL-UNNAMED -DexecutableWar.jetty.disableCustomSessionIdCookieName=true -Dcom.cloudbees.jenkins.ha=false -Dcom.cloudbees.jenkins.replication.warhead.ReplicationServletListener.enabled=true
If you did an RPM install, ensure the variable is initialized as an array JENKINS_JAVA_OPTIONS=(…), not a string JENKINS_JAVA_OPTIONS="…", then you can add the following:
JENKINS_JAVA_OPTIONS+=("--add-exports=java.base/jdk.internal.ref=ALL-UNNAMED") JENKINS_JAVA_OPTIONS+=("--add-modules=java.se") JENKINS_JAVA_OPTIONS+=("--add-opens=java.base/java.lang=ALL-UNNAMED") JENKINS_JAVA_OPTIONS+=("--add-opens=java.base/sun.nio.ch=ALL-UNNAMED") JENKINS_JAVA_OPTIONS+=("--add-opens=java.management/sun.management=ALL-UNNAMED") JENKINS_JAVA_OPTIONS+=("--add-opens=jdk.management/com.sun.management.internal=ALL-UNNAMED") JENKINS_JAVA_OPTIONS+=("-DexecutableWar.jetty.disableCustomSessionIdCookieName=true") JENKINS_JAVA_OPTIONS+=("-Dcom.cloudbees.jenkins.ha=false") JENKINS_JAVA_OPTIONS+=("-Dcom.cloudbees.jenkins.replication.warhead.ReplicationServletListener.enabled=true")
If you did a DEB install, update the default JAVA_ARGS value from:
JAVA_ARGS="-Djava.awt.headless=true"
to:
JAVA_ARGS="-Djava.awt.headless=true --add-exports=java.base/jdk.internal.ref=ALL-UNNAMED --add-modules=java.se --add-opens=java.base/java.lang=ALL-UNNAMED --add-opens=java.base/sun.nio.ch=ALL-UNNAMED --add-opens=java.management/sun.management=ALL-UNNAMED --add-opens=jdk.management/com.sun.management.internal=ALL-UNNAMED -DexecutableWar.jetty.disableCustomSessionIdCookieName=true -Dcom.cloudbees.jenkins.ha=false -Dcom.cloudbees.jenkins.replication.warhead.ReplicationServletListener.enabled=true"
(Optional) Configure a custom cache volume
Controllers running in HA mode automatically configure cache-related properties to use per-replica temporary folder locations.
Folders containing these caches are located outside the shared $JENKINS_HOME folder to avoid conflicts.
These folders are used by:
-
The GitHub branch source, to minimize REST API calls.
-
Generic Git repositories to store the repository cache.
-
Both Multibranch Pipelines and standalone Pipelines using the Pipeline script from SCM option, when using plain Git repository references, in certain configurations.
-
Pipeline Groovy libraries when not used in clone mode (with or without caching mode enabled), to maintain checkouts of library SCM repositories.
You may use the CACHE_DIR environment variable to specify a custom base directory for caches. This is useful when you need to use a location different from the default /tmp folder, such as when the new location offers better performance for caching operations or more space.
This base directory must have the correct permissions and ownership, which must be set manually. Here’s a basic example of how to create the directory:
sudo mkdir -p /var/cache/cloudbees-ci sudo chmod 700 /var/cache/cloudbees-ci sudo chown -R cloudbees-core-cm:cloudbees-core-cm /var/cache/cloudbees-ci
The subdirectories are created automatically after the base directory is created.
Configure SSL trust between replicas
Running High Availability (HA) controllers with HTTPS enabled and using self-signed certificates requires additional configuration. Replicas must trust each other’s certificates to support reverse-proxied communication. This includes scenarios where one replica must access a build running on another replica.
To prevent SSL errors due to self-signed certificates, you must:
-
Create a custom TrustStore including the self-signed certificate.
-
Pass the TrustStore to the controller as a JVM argument.
If reverse-proxied connections between replicas still fail with an SSL error after completing these steps, refer to Reverse-proxied connection between replicas fails with an SSL error.
Create a custom TrustStore including the self-signed certificate
cp /etc/ssl/certs/java/cacerts <your-custom-key-store-file>.jks (1) echo "yes" | keytool -importcert -trustcacerts -alias jenkins-ca \ -file <path-to-your-self-signed-certificate>.pem \ -keystore <your-custom-key-store-file>.jks \ -storepass <your-custom-key-store-password> (2)
| 1 | Replace <your-custom-key-store-file> with the name of your custom TrustStore file.
This command assumes /etc/ssl/certs/java/cacerts is the default Java TrustStore file. |
| 2 | Replace <path-to-your-self-signed-certificate> with the path to your self-signed certificate, <your-custom-key-store-file> with the name of your custom TrustStore file, and <your-custom-key-store-password> with the password for your TrustStore file. |
|
Use the default Java TrustStore file ( |
Pass the TrustStore to the controller as a JVM argument
Once the TrustStore is created, you must pass it to the controller as a JVM argument.
-Djavax.net.ssl.trustStore=<your-custom-key-store-file>.jks (1) -Djavax.net.ssl.trustStorePassword=<your-custom-key-store-password> (2)
| 1 | Replace <your-custom-key-store-file> with the path to your TrustStore file. |
| 2 | Replace <your-custom-key-store-password> with the password for your TrustStore file. |
Install HA plugins in the Setup wizard
When customizing the list of plugins to install:
-
Be sure to install the CloudBees High Availability (Active/Active) plugin.
Alternatively, use Configuration as Code (CasC) to define the controller, and include the cloudbees-replicationplugin. -
Do not install the CloudBees High Availability (Active/Passive) Management plugin that is used by the older active-passive HA system. If the CloudBees High Availability (Active/Passive) Management plugin is installed, it should be uninstalled and the replicas should be restarted prior to installing the CloudBees High Availability (Active/Active) plugin.
Verify the installation
Once you have installed an HA controller, and before configuring agents and running builds, CloudBees recommends to verify if the main elements in the HA cluster run properly.
Review the HA cluster components
Hazelcast nodes, as described in HA fundamentals, help to create the HA cluster and synchronize the replicas. These nodes must be able to communicate with each other to ensure the desired number of replicas for the cluster.
To verify that Hazelcast nodes can create the cluster with the expected number of replicas, follow these steps:
-
Navigate to the controller running in HA mode.
-
Select in the upper-right corner to navigate to the Manage Jenkins page.
-
Select CloudBees CI High Availability.
-
Select Status on the left.
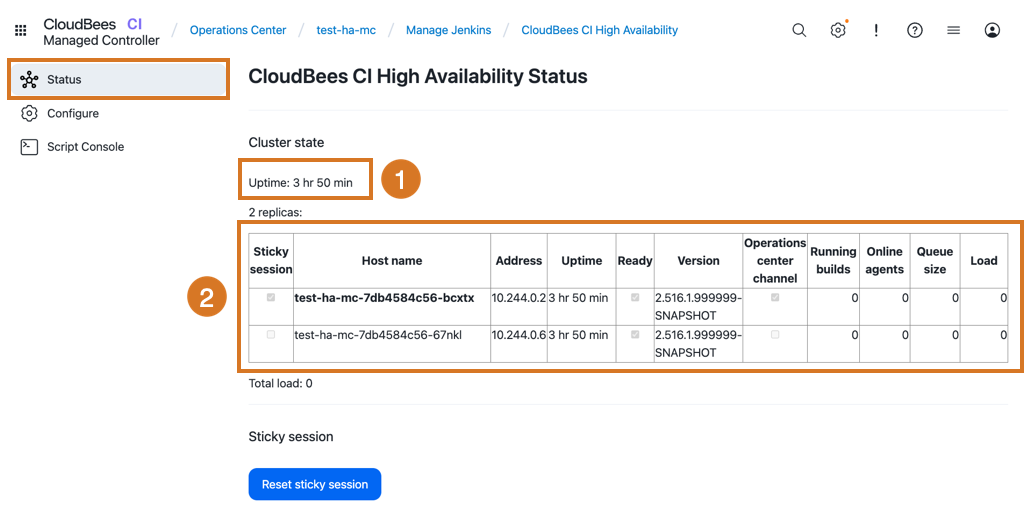
The CloudBees CI High Availability Stages page displays:
-
The uptime since the cluster started.
-
The number of replicas in the cluster with the replica holding the user session selected in the Sticky session field and highlighted in bold.
| If the cluster does not display the expected number of replicas, review the network configuration to ensure the Hazelcast nodes can communicate with each other. |
| For one known cause, refer to Replicas not forming a controller cluster. |
Check if the load balancer is configured with sticky sessions
The HA load balancer must provide sticky sessions to ensure the user session always uses the same replica.
To ensure that the load balancer uses sticky sessions, follow these steps:
-
Enable developer mode in the controller.
-
Select in the upper-right corner to navigate to the Manage Jenkins page.
-
Select CloudBees CI High Availability.
-
Select Configure in the left pane.
-
Select Enable developer mode.
-
Select Save or Apply.
-
-
Verify the footer displays a banner with the replica name.
-
Refresh the page, navigate through different items in the controller, sign out and sign in several times, and check if the banner always displays the same replica name.
| If the footer banner displays different replica names, review the load balancer configuration to ensure it provides sticky sessions. |
Test reverse-proxied requests
HA controllers load balance the workload among all the controller replicas. When builds run in one replica, and the user is browsing the user interface from another, requests to browse running builds must be reverse-proxied to the replica where the build is running. This reverse-proxied request displays in a footer banner when developer mode is enabled.
To test the reverse proxy is working correctly, follow these steps:
-
Enable developer mode in the controller as described previously.
-
Create a new pipeline job using the code below.
pipeline { agent none stages { stage('Test Job') { steps { input 'Waiting for interaction...' } } } } -
Execute the pipeline job several times by selecting Build Now. HA distributes the build among the different replicas.
-
Verify the Builds widget adds the replica name to the jobs running in other replicas.
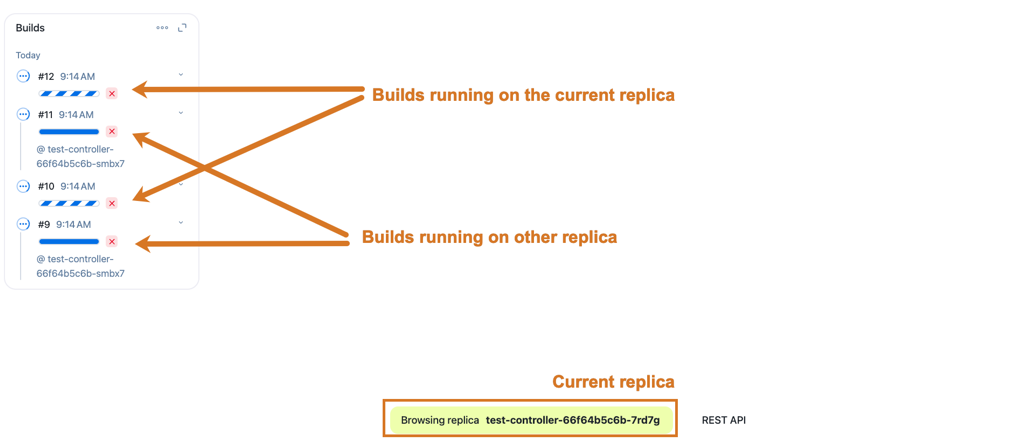 Figure 2. Build widget display the replica name in developer mode
-
In the Builds widget, select one of the builds running in a different replica.
-
Verify that the footer banner displays the reverse-proxied request, from the replica holding the user session to the replica running the build.
 Figure 3. Reverse-proxied request to the replica running the build
-
Finish all the builds before continuing.
| If you cannot browse to the replica running a build, review your reverse proxy configuration to ensure it forwards the requests correctly. |
| For one known cause involving self-signed certificates, refer to Reverse-proxied connection between replicas fails with an SSL error. |
Troubleshoot the installation
If you encounter a problem while installing HA, review the following known issues. For general HA troubleshooting guidance, refer to Troubleshoot High Availability (active/active).
|
The CloudBees Knowledge Base also contains articles about common issues and solutions for HA. |
Replicas not forming a controller cluster
If a controller replica is not forming the cluster, it is not displayed in the CloudBees CI High Availability screen, and the logs may contain an error similar to:
[cloudbees-replication] [5.3.6] [IP]:5701 is added to the blacklist. ... INFO c.h.internal.cluster.ClusterService: [IP]:5701 [cloudbees-replication] [5.3.6] Members {size:1, ver:1} [ Member [IP]:5701 - ID this ] ... [OperationsCenter2 connection to HOSTNAME/IP:50000] Local headers refused by remote: The controller 0-client-controller is already connected
These troubleshooting steps may help solve the issue:
-
Review the installation steps and the required JVM arguments as explained in Prerequisites and Install the HA controllers.
-
Sign in to one of the replicas, and check the IP and port listed in the directory:
JENKINS_HOME/cloudbees-replication-discovery/*. This directory should contain one file per replica.-
If the replica IP and port are what you expect, the problem is likely a network configuration problem. You must check if the replicas can communicate with each other over the IP and port from the
JENKINS_HOME/cloudbees-replication-discovery/*directory. -
If any IP or port has an unexpected value, Hazelcast likely chose another network interface on the machine to bind to. You can configure Hazelcast to bind to a specific network interface by adding the following additional JVM arguments to each replica.
-Dhz.network.interfaces.enabled=true \ -Dhz.network.interfaces.interfaces.interface1='<IP_PATTERN>' \(1) -Dhz.network.port.port=5701 \ -Dhz.network.port.autoincrement=true \ -Dhazelcast.jmx=false \ -Dhazelcast.metrics.jmx.enabled=false \ -Dhazelcast.health.monitoring.delay.seconds=180 \ -Dhazelcast.health.monitoring.threshold.memory.percentage=99 \ -Dhazelcast.health.monitoring.threshold.cpu.percentage=99 \1 Replace <IP_PATTERN> with the IP pattern of the desired network interface. For example, 10.3.10.*searches for a network interface on the machine with an IP between10.3.10.0and10.3.10.255.
Enable the options above on all replicas, and restart them after the change. -
-
If the issue remains unsolved, enable the Hazelcast diagnostic flag in your JVM startup argument,
-Dhazelcast.diagnostics.enabled=true, and add a custom logger to the classcom.cloudbees.jenkins.plugins.replication.hazelcast.FilesystemDiscoveryStrategywith the level FINE to get more information about the replica discovery process.
Reverse-proxied connection between replicas fails with an SSL error
If a client controller running in HA mode has enabled HTTPS using a self-signed certificate, reverse-proxied connections between replicas, such as requests to access one build from a replica different from the one running it, might fail with an SSL error similar to:
javax.net.ssl.SSLHandshakeException: PKIX path building failed: sun.security.provider.certpath.SunCertPathBuilderException: unable to find valid certification path to requested target
This error occurs because the self-signed certificate is not trusted by the JVM running the replica that is trying to access the build. To resolve this issue, you must include the self-signed certificate in the TrustStore used by each replica. Refer to Configure SSL trust between replicas for more information on how to configure the controller to use a custom TrustStore that includes the self-signed certificate.
Next steps
-
If you have permanent agents with more than one executor, configure them to work with HA. For more information, refer to Configure your agents to work with High Availability (active/active).
-
Review your jobs to ensure they are compatible with HA. For more information, refer to Audit your jobs for compatibility with High Availability (active/active).