The Cross Team Collaboration feature is designed to greatly improve team collaboration by connecting team Pipelines to deliver software faster. It essentially allows a Pipeline to create a notification event which will be consumed by other Pipelines waiting on it to trigger a job. The jobs can be on the same controller or on different controllers.
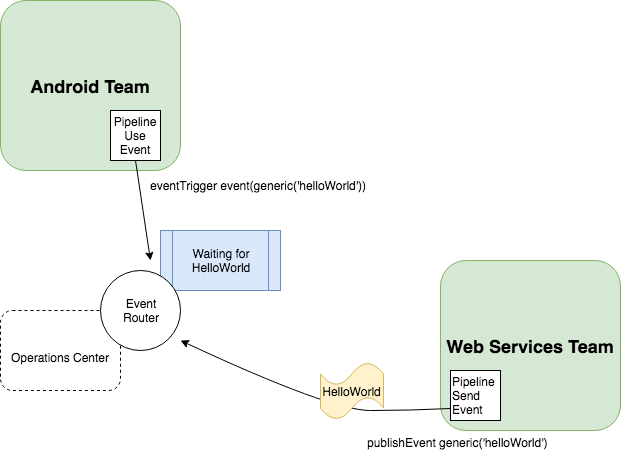
The Cross Team Collaboration feature requires the installation of the following plugins on each CloudBees CI instance:
-
Notification API plugin (required): responsible for sending the messages across teams and jobs.
-
Pipeline Event Step plugin (required): provides a Pipeline step to add a new event publisher or trigger.
-
Operations Center Notification plugin (optional): provides the router to transfer the messages across different teams, and it’s required if you want to implement cross-team collaboration. It is still possible to use the cross-team-collaboration feature without this plugin, by using the local-only mode which allows you to trigger events across different jobs inside the same team.
Configure
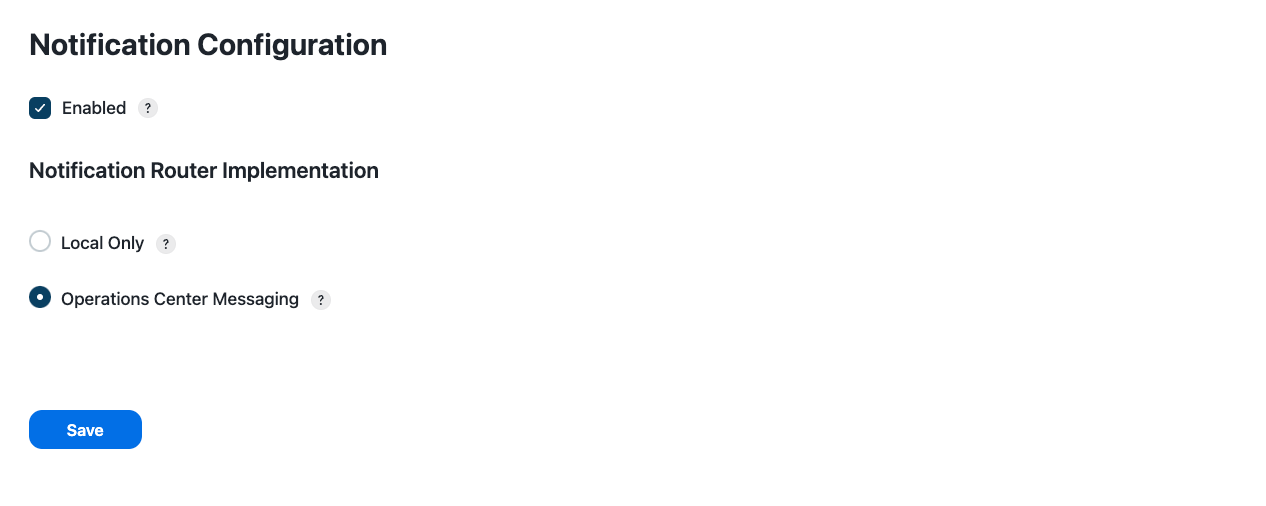
The notification-plugin will provide each Jenkins instance with a notification configuration page (accessible via "<JENKINS_URL>/notifications") where it is possible to enable or disable notifications as well as select the router type.
|
The Operations Center Messaging option will only show up if the Operations Center Notification plugin is installed on the instance. |
| Notifications must be enabled both in operations center and in all controllers that will receive notifications. |
Event types
An event is the information being sent over the wire to notify a team or a job, and it can currently be of two different types:
-
A Simple Event: The simplest event which can only carry over a text event to destination and will always be wrapped in an
eventJSON key. For example,{"event":"helloWorld"} -
A JSON Event: Can potentially carry over any information as long as the JSON object string representation is valid. For example,
{"eventName":"helloWorld", "eventType":"jar"}Jenkins automatically adds some additional fields to your event under the sourceattribute. These details will vary depending on the source that created the event (for example, an external webhook event or a job inside a Team organization) and can be used to create more complex queries. Thissourceattribute name is reserved by Jenkins, and it will be overwritten if you include it at the root level of your own schema.
Publish events
A Pipeline can be configured with a publishEvent step so that each time it gets executed a new event is sent by the internal messaging API to all destinations (meaning all jobs configured with an event trigger inside or outside the same team).
An example of a Pipeline publishing a HelloWorld Simple Event would look like:
pipeline { agent any stages { stage('Example') { steps { echo 'sending helloWorld' publishEvent simpleEvent('helloWorld') } } } }
node { stage("Example") { echo 'Hello World' publishEvent simpleEvent('helloWorld') } }
|
Each simple event is effectively a JSON event which has as outer key
|
An example of a Pipeline publishing a JSON event would look like (any valid JSON string is a valid input):
pipeline { agent any stages { stage('Example') { steps { echo 'sending helloWorld' publishEvent jsonEvent('{"eventName":"helloWorld"}') } } } }
node { stage("Example") { echo 'Hello World' publishEvent jsonEvent('{"eventName":"helloWorld"}') } }
|
Contrary to what happens for simple events, the JSON passed as parameter inside the
|
Both the above Pipelines examples use the declarative Pipeline syntax. Nonetheless, the same step can be added with a scripted syntax.
The Pipeline snippet generator will provide the correct syntax when in doubt:
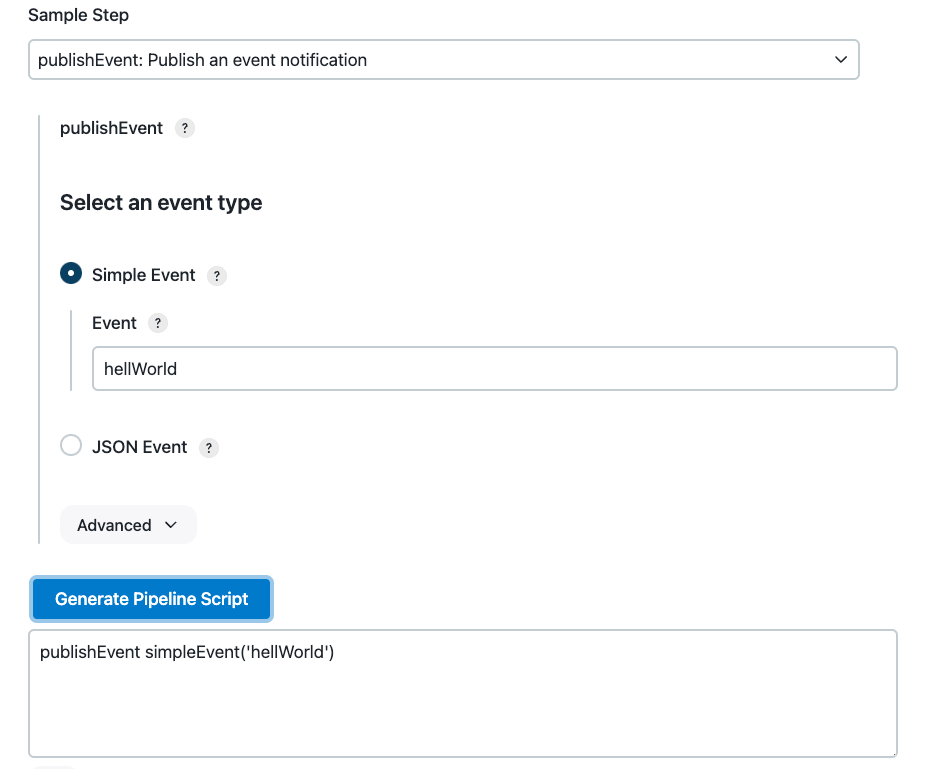
When an event is published, that is, when you run a Pipeline which contains the publishEvent step, all the Pipelines listening on events (event triggers) will be queried, but only the ones for which the trigger condition matches the publishEvent will be executed.
Note that when an Event is published, additional information gets added by default to its JsonObject, including:
-
the source Pipeline job name
-
the source Pipeline build number
-
the source Jenkins URL
-
the source jenkins id
The above information can also be used by the consumer (i.e: for security checks) and can be explored by using the verbose option when publishing an event. Refer to the Verbose logging section on this matter.
Verbose logging
When looking at the snippet generator for the publish event step, you will notice that there is an Advanced section which allows you to enable verbose logging.
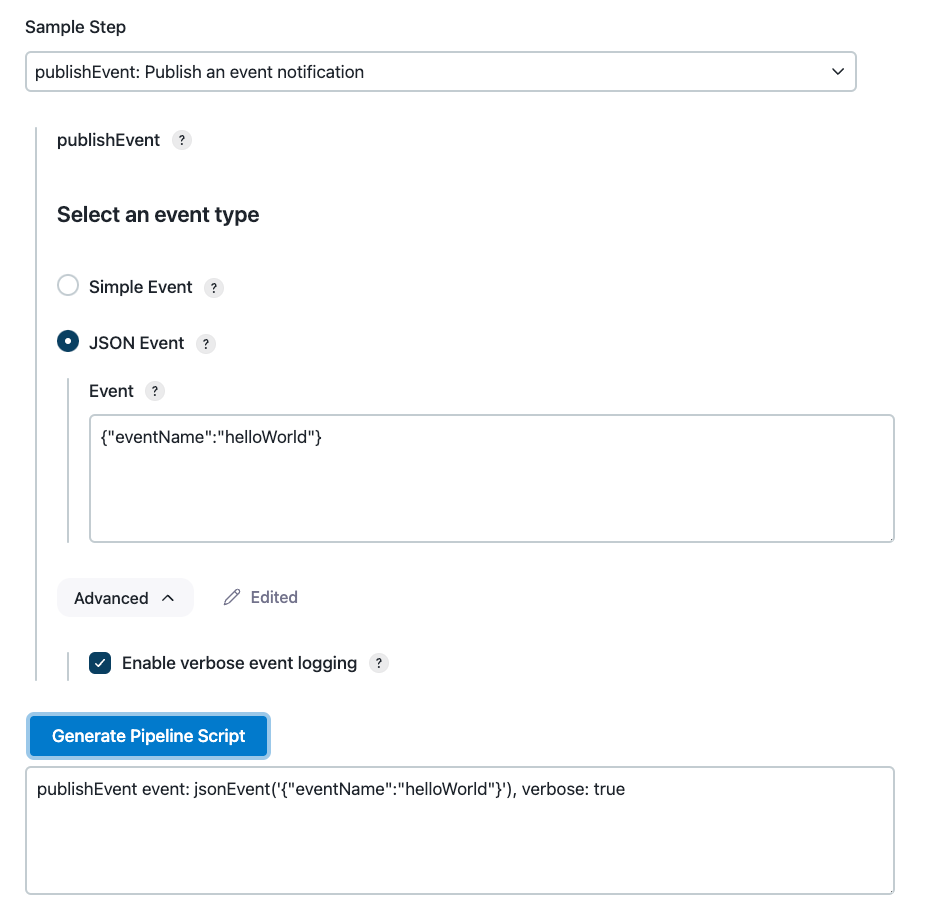
When selected it will generate the following publish event step
publishEvent event:jsonEvent('{"eventName":"helloWorld"}'), verbose: true.
The verbose parameter defaults to false so you will need to specify it in your step only if you want to enable it.
When enabled, the verbose logging will print the generated full event (including the parameters added by default) in the console output of the publisher’s builds
[source,pipeline] { [source,pipeline] stage [source,pipeline] { (Example) [source,pipeline] echo sending helloWorld [source,pipeline] publishEvent Publishing event notification Event JSON: { "eventName": "helloWorld", "source": { "type": "JenkinsTeamBuild", "buildInfo": { "build": 4, "job": "team-name/job-name", "instanceId": "b5d5e0e9de1f45d9e2d6815265e069d5", "organization": "team-name" } } } [source,pipeline] } [source,pipeline] // stage [source,pipeline] } [source,pipeline] // node [source,pipeline] End of Pipeline Finished: SUCCESS
|
The |
Jenkins automatically adds some additional fields to your event under the source attribute. These details will vary depending on the source that created the event (for example, an external webhook event or a job inside a Team organization) and can be used to create more complex queries. This source attribute name is reserved by Jenkins, and it will be overwritten if you include it at the root level of your own schema.
|
Trigger condition
The trigger step can either be based on a specific Simple Event or by writing a query patterns which use jmespath syntax to find matching events. Unlike the publishers, triggers can also be configured directly by using the UI form in the Pipeline job configuration page besides being configurable by the use of an ad-hoc Pipeline step.
For instance, the configuration below:
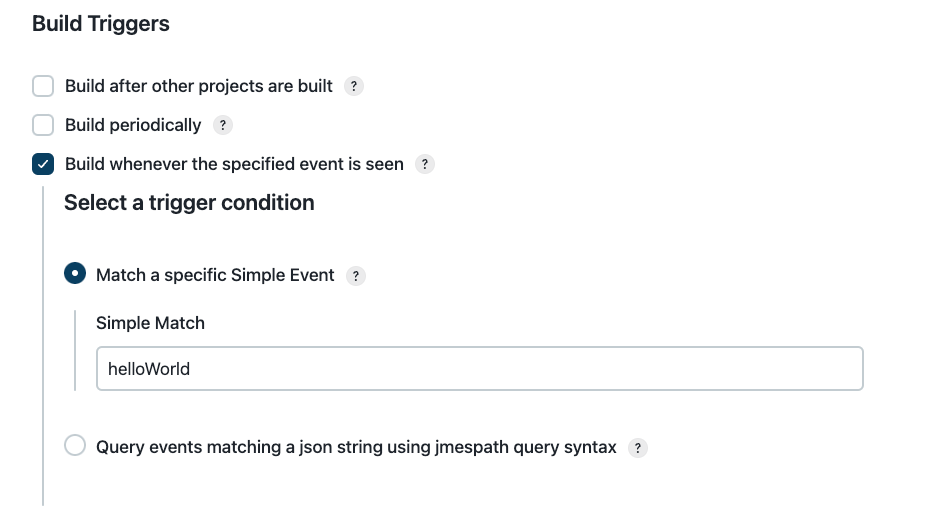
is equivalent to writing the following Pipeline:
pipeline { agent any triggers { eventTrigger simpleMatch("helloWorld") } stages { stage('Example') { steps { echo 'received helloWorld' } } } }
properties([pipelineTriggers([eventTrigger(simpleMatch("helloWorld"))])]) node { stage('Example') { echo 'received helloWorld' } }
Specifying the trigger in a Pipeline script will not register the trigger until the Pipeline is executed at least once. When the Pipeline is executed, the trigger is registered and saved in the job configuration and thus will also appear in the job’s configuration UI.
|
Note that the Pipeline script will have priority on UI configuration, so make sure you follow one approach or the other but do not mix them up. If a trigger is added in the Pipeline and a different one is added via UI, the one in the UI will be deleted in favor of the scripted one. A pipeline job containing a trigger must be manually built once in order to properly register the trigger. Subsequent changes to the trigger value do not require a manual build. |
|
When a job is triggered successively, for a short period of time builds may be consolidated into one. Refer to How do I guarantee that each event triggers a distinct build for a job? for more details. |
When wanting to match a JSON event, the jmespathQuery option is the one you want.
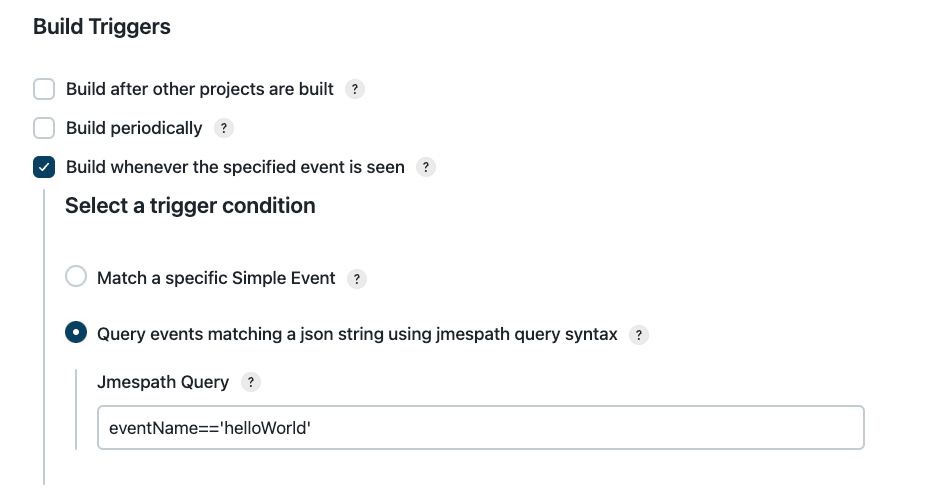
jmespathQuery optionThe UI configuration above is equivalent to writing:
pipeline { agent any triggers { eventTrigger jmespathQuery("eventName=='helloWorld'") } stages { stage('Example') { steps { echo 'received helloWorld' } } } }
properties([pipelineTriggers([eventTrigger(jmespathQuery("eventName=='helloWorld'"))])]) node { stage('Example') { echo 'received helloWorld' } }
|
String values inside a jmespath query must be enclosed in single quotes, for example |
This step will look the eventName key in the notifications and will trigger the job if and only if that property exists, and it is equal to helloWorld, as for example in the following JSON event:
{ "eventName":"helloWorld", "type":"jar", "artifacts": [...] }
The jmespath query syntax can be used to create triggers based on complex conditions. For example, to build a
pipeline when either of two conditions are true, you could write a trigger such as eventTrigger jmespathQuery
("event=='bar' || event=='foo'")
The snippet generator will provide some help in finding the right Pipeline syntax and will provide basic validation on the jmespath query. For additional information, please visit https://jmespath.org
Use cases for notification events of Cross Collaboration
Maven artifacts
Imagine you have a job, which builds and generates a jar, producing a Maven Artifact. Another team is waiting on a new/updated version of an artifact to be generated to do some work.
Using this feature you could configure the upstream job, the one which builds and generates the artifact, to generate an Event and notify the other teams that the artifact has been published.
To do so you could use the Simple type event and configure the upstream Pipeline in this way:
pipeline { agent any stages { stage('Example') { steps { echo 'new maven artifact got published' publishEvent simpleEvent('com.example:my-jar:0.5-SNAPSHOT:jar') } } } }
node { stage("Example") { echo 'new maven artifact got published' publishEvent simpleEvent('com.example:my-jar:0.5-SNAPSHOT:jar') } }
|
In order to extract the specific mvn version the Pipeline is building and put that in a variable, rather than hardcoding it as the example above, you can use |
On the team’s job waiting for the above artifact to be published, you will need to add a trigger that looks like:
pipeline { agent any triggers { eventTrigger simpleMatch('com.example:my-jar:0.5-SNAPSHOT:jar') } stages { stage('Maven Example') { steps { echo 'a new maven artifact triggered this Pipeline' } } } }
properties([pipelineTriggers([eventTrigger simpleMatch('com.example:my-jar:0.5-SNAPSHOT:jar'))])]) node { stage('Example') { echo 'a new maven artifact triggered this Pipeline' } }
|
Reminder: you will need to build the downstream Pipeline once for the trigger to be registered. |
The above Pipeline will be triggered each time a new event with identifier
com.example:my-jar:0.5-SNAPSHOT:jar is published.
You can also be more flexible and instead of waiting on the specific artifact version, you could be awaiting any new artifact for a mvn project. To accomplish that, you could use jmespath queries and configure your downstream job in this way:
pipeline { agent any triggers { eventTrigger jmespathQuery("contains(event, 'com.example:my-jar')") } stages { stage('Maven Example') { steps { echo 'a new maven artifact triggered this Pipeline' } } } }
properties([pipelineTriggers([eventTrigger jmespathQuery("contains(event, 'com.example:my-jar')"))])]) node { stage('Example') { echo 'a new maven artifact triggered this Pipeline' } }
The above Pipeline will be triggered each time a new event is published whose identifier contains a string com.example:my-jar.
Docker images
Similarly, you may want to trigger a job when a new version of a docker image is available. You can configure the upstream Pipeline to publish the event:
pipeline { agent any stages { stage('Docker Example') { steps { echo 'new docker image got published' publishEvent simpleEvent('cloudbees/java-build-tools:LATEST') } } } }
node { stage("Docker Example") { echo 'new docker image got published' publishEvent simpleEvent('cloudbees/java-build-tools:LATEST') } }
Finally, you would configure the downstream job to listen over events with the above identifier:
pipeline { agent any triggers { eventTrigger simpleMatch('cloudbees/java-build-tools:LATEST') } stages { stage('Docker Example') { steps { echo 'a new docker image triggered this Pipeline' } } } }
properties([pipelineTriggers([eventTrigger jmespathQuery("contains(event, 'com.example:my-jar')"))])]) node { stage('Example') { echo 'a new docker image triggered this Pipeline' } }
npm packages
At this point it may come naturally that you can couple any kind of publisher/trigger as long as they share the same identifier. As last example, you may want to trigger a Pipeline any time an upstream job has published a new npm package version.
Your upstream will look like:
pipeline { agent any stages { stage('Npm Example') { steps { echo 'new npm package got published' publishEvent simpleEvent('cloudbees-js@1.0.0') } } } }
node { stage("Npm Example") { echo 'new npm package got published' publishEvent simpleEvent('cloudbees-js@1.0.0') } }
Your downstream will look like:
pipeline { agent any triggers { eventTrigger simpleMatch('cloudbees-js@1.0.0') } stages { stage('Docker Example') { steps { echo 'a new npm package triggered this Pipeline' } } } }
properties([pipelineTriggers([eventTrigger simpleMatch('cloudbees-js@1.0.0'))])]) node { stage('Example') { echo 'a new npm artifact triggered this Pipeline' } }
How do I read the event data?
To continue with the Maven example, you may want to publish more than one artifact. The JSON event would look like the example below.
{ "ArtifactEvent": { "Artifacts": [{ "artifactId": "my-jar", "groupId": "com.example", "version": "1.0.0" }] } }
After you process the event in the triggered job, you can read the event data to know which artifact was updated and to which version.
You can use the currentBuild object to retrieve the build causes.
Specifically, you can use the following to view the build cause data for the event trigger: currentBuild.getBuildCauses("com.cloudbees.jenkins.plugins.pipeline.events.EventTriggerCause").
You can then read the event data and retrieve the version of the first artifact.
pipeline { agent any triggers { eventTrigger jmespathQuery('ArtifactEvent.Artifacts[?groupId == \'com.example\']') } stages { stage('Read Event Data') { steps { script { def eventCause = currentBuild.getBuildCauses("com.cloudbees.jenkins.plugins.pipeline.events.EventTriggerCause") def version = eventCause[0].event.ArtifactEvent.Artifacts[0].version echo "version=${version}" } } } } }
|
Reminder: If the trigger is not an event, you get a null pointer. You must verify the type of trigger and the event data before reading it, or your Pipeline fails. The following section explains how to avoid executing a stage if it was not triggered by an event. |
How do I execute a stage only if it was triggered by an event?
The example in the section, "How do I read the event data?" details only one possible scenario. What if the pipeline is triggered manually or by a different event?
You must make sure that you can obtain event data to read. Additionally, if there was no event, you do not want to run stages that deal with events.
The when { } directive has built-in support to filter on the trigger cause, via when { triggeredBy 'EventTriggerCause' }.
In the example below, the clause was added to ensure the stage Read Event Data runs only when this job is triggered by an event.
pipeline { agent any triggers { eventTrigger jmespathQuery('ArtifactEvent.Artifacts[?groupId == \'com.example\']') } stages { stage('Read Event Data') { when { triggeredBy 'EventTriggerCause' } steps { script { def eventCause = currentBuild.getBuildCauses("com.cloudbees.jenkins.plugins.pipeline.events.EventTriggerCause") def version = eventCause[0].event.ArtifactEvent.Artifacts[0].version echo "version=${version}" } } } } }
What if you also want to filter stages on different artifacts? You can choose to run the Pipeline only if a certain GroupId is mentioned, or only for specific stages on specific artifacts.
You can add this filter to the when {} directive as well, but it can make it difficult to read.
Therefore, CloudBees recommends capturing this filter as a function in a shared library.
String getTriggerCauseEvent() { def buildCauseInfo = currentBuild.getBuildCauses("com.cloudbees.jenkins.plugins.pipeline.events.EventTriggerCause") if (buildCauseInfo && buildCauseInfo[0]) { def artifactId = buildCauseInfo[0].event.ArtifactEvent.Artifacts[0].artifactId return artifactId } return "N/A" }
The example now looks as follows:
pipeline { agent any triggers { eventTrigger jmespathQuery('ArtifactEvent.Artifacts[?groupId == \'com.example\']') } libraries { lib('library-containing-parsing-function@main') } stages { stage('My Jar') { when { allOf { triggeredBy 'EventTriggerCause'; equals expected: 'my-jar', actual: getTriggerCauseEvent() } } steps { echo 'It is my-jar' } } stage('Your Jar') { when { allOf { triggeredBy 'EventTriggerCause'; equals expected: 'your-jar', actual: getTriggerCauseEvent() } } steps { echo 'It is your-jar' } } } }
How do I guarantee that each event triggers a distinct build for a job?
Builds scheduled via the eventTrigger condition of a job are indistinguishable when submitted to the Jenkins queue. When a job is triggered several times successively, multiple builds may be consolidated into a single build in either of the following scenarios:
-
If concurrent builds are disabled (options "Do not allow concurrent builds" in the UI and
disableConcurrentBuilds()in pipeline) -
If several builds are triggered within the Quiet Period
In such cases, all trigger causes are saved and available in the consolidated build cause (also refer to How do I read the event data?):
pipeline { agent any triggers { eventTrigger jmespathQuery('ArtifactEvent.Artifacts[?groupId == \'com.example\']') } stages { stage('Read Event Data') { steps { script { def eventCauses = currentBuild.getBuildCauses("com.cloudbees.jenkins.plugins.pipeline.events.EventTriggerCause") eventCauses.each { // one record per consolidated build cause.. } } } } } }
To change this behavior and have a distinct build per triggered event, set the Quiet Period to 0:
pipeline { agent any options { quietPeriod(0) } triggers { eventTrigger jmespathQuery('ArtifactEvent.Artifacts[?groupId == \'com.example\']') } }
| This solution does not work if concurrent builds are disabled. |
How do I configure my Pipeline downstream job with multiple triggers so that the Pipeline gets built when any of those events are published?
It is not possible to configure your downstream job with multiple event triggers. If you need your Pipeline to be dependent on multiple events, you would need to use a jmespath query trigger. In order to have more flexibility you could use a JSON event type in your publisher (rather than a Simple Event one) and use a specific JSON property which you can match your query against.
For instance, as we saw in the maven section above, you can use a trigger query like query("contains(event, 'com.example:my-jar')") to match any event whose event contains the com.example:my-jar groupId:artifact.
Let’s say you want to trigger all events containing a name JSON field matching a specific string, your jmespath query can look like name=='CustomEvent' to match published events like publishEvent jsonEvent('{"name":"CustomEvent", "type":"jar"}').
Event triggers with external webhook events
The Notification Webhook HTTP Endpoint feature provides the ability to define HTTP endpoints that can receive webhook events from external services. These events are then broadcast to listening Pipelines where they can be used to trigger builds.
Refer to Enable external notification events with external HTTP endpoints for more information about integrating with external webhook events.
Refer to Trigger jobs with a simple webhook for a tutorial on setting up a simple webhook to trigger jobs.