The CloudBees Template plugin gives the Jenkins administrator the opportunity to provide users a simplified and directed experience for configuring jobs, in "domain specific" terms that make sense to your organization. With plain-vanilla Jenkins, users can get confused with a large number of advanced options and switches that they don’t need, resulting in less than optimal user experience and misconfigured jobs. The CloudBees Template plugin is useful in situations like this, because it allows the administrator to define a few parameters that users need to fill in, while the administrator controls precisely how these map to the full general configuration, in one place. In this way, most users are shielded from seeing more of Jenkins than they need to, and the administrator can enforce consistency, best practices, and enterprise rules without overhead.
Another typical use case of the CloudBees Template plugin is when you have a large number of similar-looking jobs that only differ in a few aspects, such as jobs that build different branches of the same product, or teams building a large number of components in a uniform way. When you change a template, all the uses of that template get updated instantaneously, so the administrator does not have to manually update a large set of jobs to fix a shell script, nor does he need to rely on the Groovy console for bulk update.
Yet another way to think of the CloudBees Template plugin is that it’s like writing a plugin without writing a program. If you think about the Ant plugin, for example, it lets you configure Ant invocation with a number of text fields that talk in the domain-specific terms of Ant (referencing targets, properties, VM options, etc.), as opposed to the single text area that is the shell script. Similarly with the Maven plugin, you get a whole project type specifically for invoking Maven, instead of using the generic freestyle project and invoking Maven from it. With the CloudBees Template plugin, you can do these things without actually writing code (or writing only some small Groovy snippets).
Tutorial: Hello world builder
Before we dive into advanced usage, let’s create and use a simple template. In this tutorial, we’ll create a template build step that says "hello".
Define a template
With this plugin enabled, when you select New Job among other options there are several kinds of templates you can create. Create a template you can use as a builder, akin to "Execute shell script", "Execute Windows batch file", or "Invoke Ant", that you can use in configuring freestyle projects.
On your instance, select .

The name you enter here will be used as an identifier referred to from jobs using the template, as well as a default display name. There are no particular characters that are banned from this name, but it is good practice to use simple punctuation and no spaces. Just as with jobs, you can set a more pleasant display name later.
In this tutorial, we name the template "Say Hello World", and select "OK."
The next page that appears is the configuration page for this template. There are two main things to configure here: attributes and a transformer.
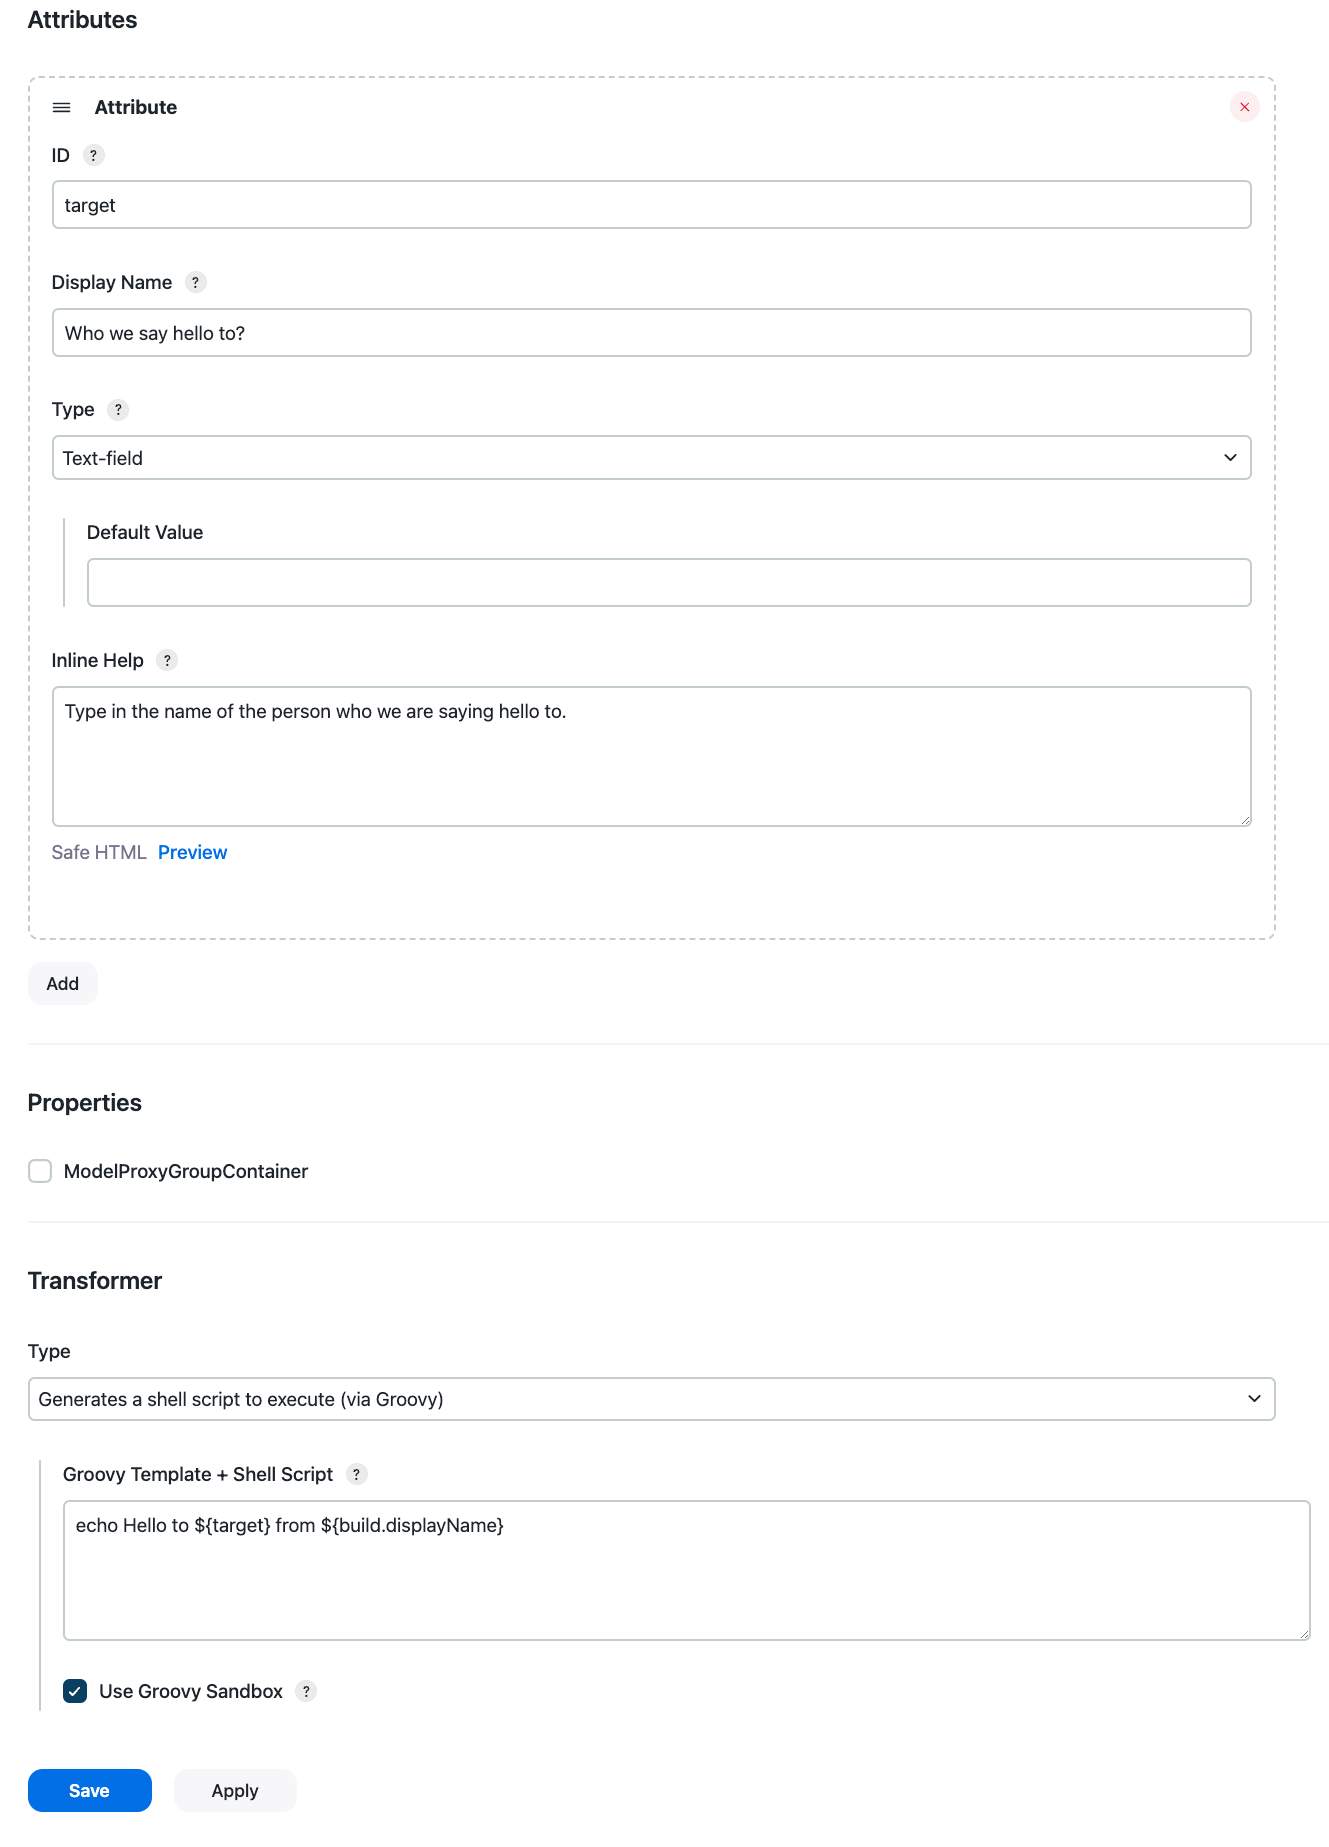
When you define a template, you first ask yourself "What do I want my users to enter when they use my template?" The answer to that question becomes attributes. In this hello world builder, we want the user to configure who we are saying hello to, so we define one attribute named "target" for this purpose. The user should see the single text field for this, so we choose the type accordingly. The display name and inline help are self-explanatory. They control what the user will see when editing freestyle projects to use our new builder.
The second question you should ask when you define a template is "How does it execute?" (Or, more generally, "How does it map to the terms Jenkins understands?") The answer to that question becomes the transformer. In this tutorial, our builder will turn into a shell script that says hello. (Your real template would probably turn into a shell script that gets some real work done—or your template can translate into any other builders, but see the rest of the user guide for that.) So we’ll choose "generate a shell script to execute via Groovy".
In the text area, we’ll enter the shell script that this build step is
going to execute, echo Hello to "${target}" from "${build.fullDisplayName}":
-
${target}: refers to the actual value of the target attribute we defined above. -
${build.fullDisplayName}: is a Groovy expression to access thegetFullDisplayName()method (which returns the full name of the build) of thebuildobject, which refers to the current build in progress.
${build.fullDisplayName} needs to be quoted because this is going to
look like test #1, and # gets interpreted by shell as a comment sign
unless you quote it.
Configure a hello world builder captures this template configuration. When you are done, select "Save" to save this template. Your template is now ready.
Use a template
Now that we have our first builder template, let’s create a freestyle project that actually uses it. Go back to the Jenkins top page, and create a new freestyle project. You’ll be taken to the configuration page. This part of Jenkins should already be familiar to you.
When you select "add build step", you should see the newly created "Say Hello World" builder. You select it, and you see the say hello world builder added to your project. You also see the "target" attribute you defined in the configuration page, as depicted in Use a hello world builder.
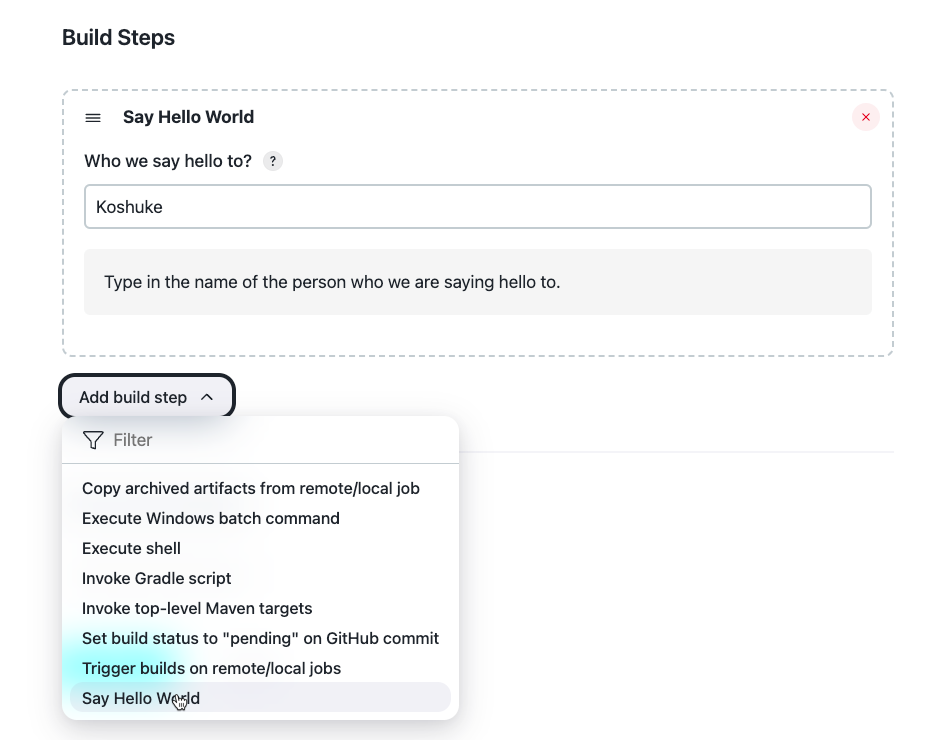
This project is configured to say hello to "Kohsuke". Select save and schedule a new build. In its console output, you should see something like this:
[workspace] $ /bin/sh -xe /tmp/hudson2322666548865862105.sh + echo Hello to Kohsuke from test #1 Hello to Kohsuke from test #1 Finished: SUCCESS
So the template is running as expected.
Change the template definition
Let’s change the definition of the template, and see how it affects the instances.
We’ll go back to the template definition by going back to the dashboard,
selecting the Say Hello World template, and Configure on the left in the template screen.
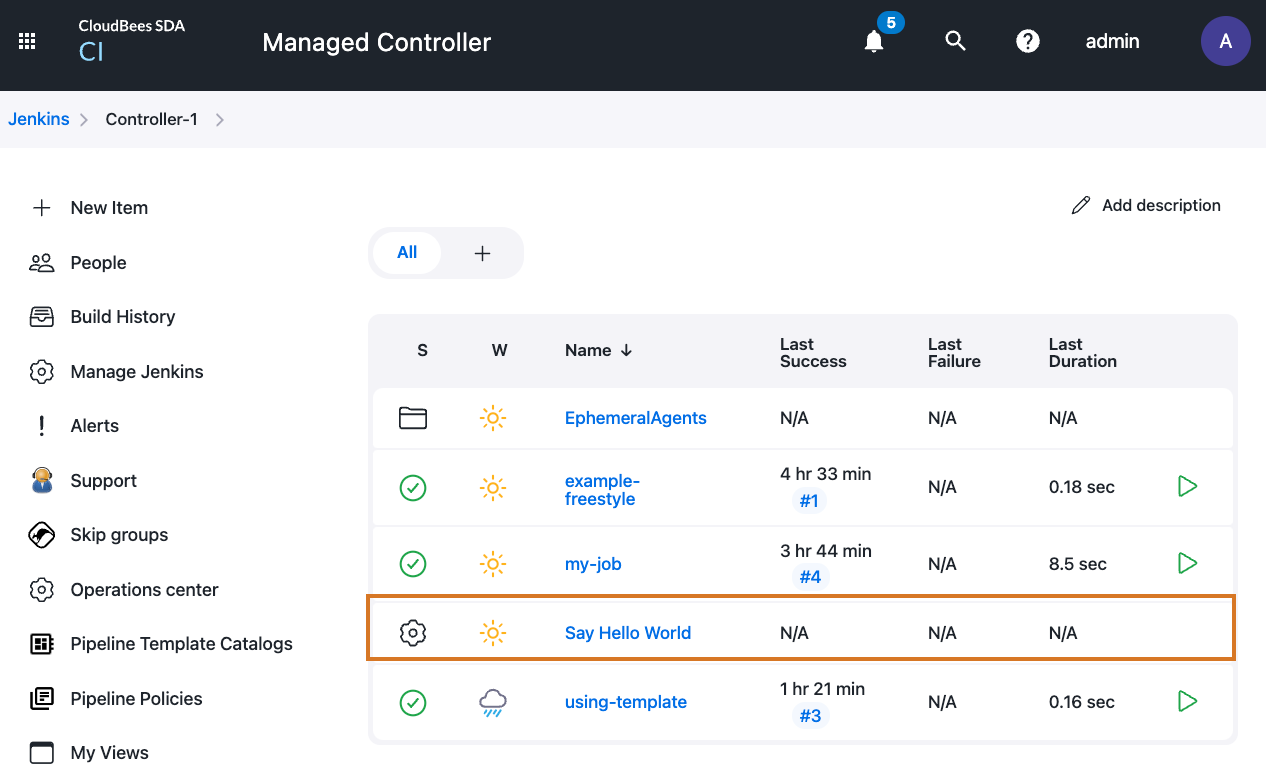

Instead of saying hello, we will now make it say good evening. Select "Save" to save this new definition:
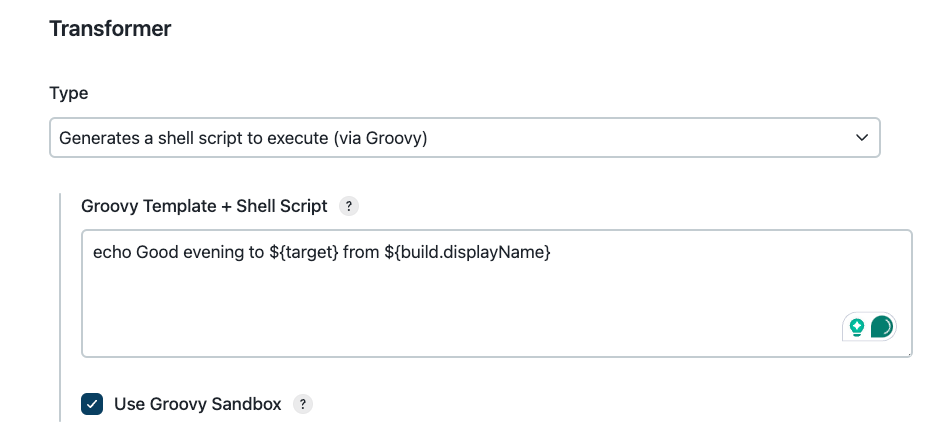
Now, when you update the template definition, all the uses of this template automatically reflect the change you made. So without revisiting the configuration page of the freestyle job, let’s simply schedule another build and see its console output:
[workspace] $ /bin/sh -xe /tmp/hudson2322666548865862105.sh + echo Good evening to Kohsuke from test #2 Good evening to Kohsuke from test #2 Finished: SUCCESS
Our change was indeed reflected in the output.
Tutorial: job template
In the second tutorial, we look at a more complex template that "templatizes" a whole job.
To set the context for this tutorial, look at Jenkins-on-Jenkins (Jenkins on Jenkins), which is the Jenkins server that the Jenkins community runs for itself. On this Jenkins, there are a large number of jobs that build the community-maintained Jenkins plugins:
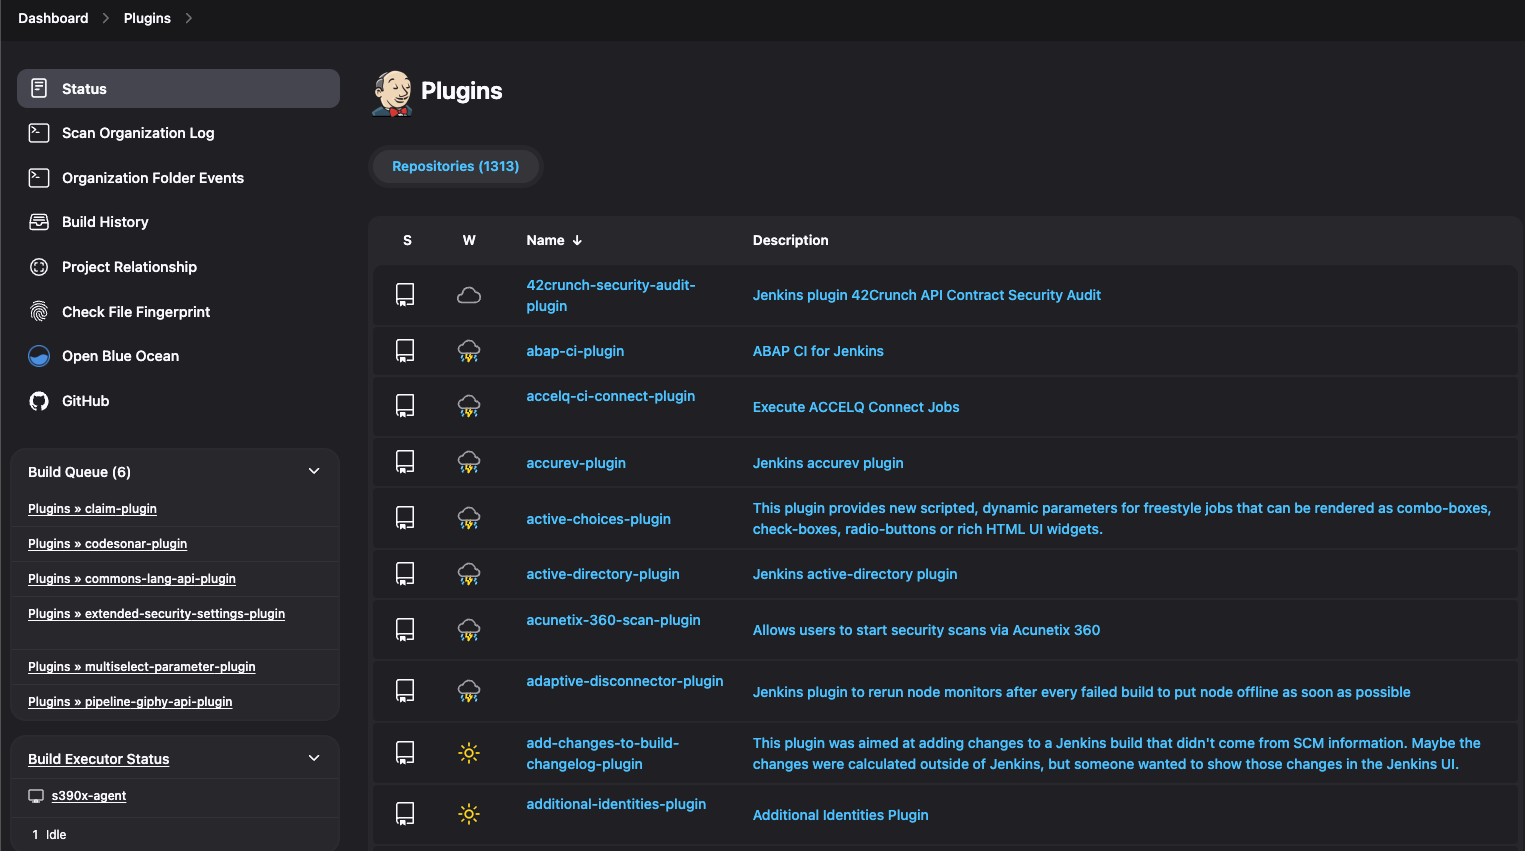
The actual configurations of all these jobs are almost identical. They
each check out a Git repository, run mvn -e clean install, send an
email at the end of the build, and update JIRA issues that are
discovered in the commit messages.
Each time we add a new plugin job, we copy from one of the existing jobs, change the name, and then call it done. But if tomorrow we want to install a new plugin (say we start sending the results to IRC via the IRC plugin) and make a mass change to all the jobs, that’s hopelessly tedious.
This is a prime use case for the CloudBees Template plugin. So let’s see how we could turn jobs like these into a template.
Create a template
First, we go to the top of the page, select the New Job link, and select Job Template and provide a name. If our template were for building Jenkins plugins, we might call it "Jenkins plugin".
Note: Be aware that, by default, there is an Attribute already created that cannot be deleted.
It is Name and refers to the name of the job item which will implement this job template. Do not override it, leave it as it is.
As with the previous tutorial, we just ask ourselves "What does the user [such as a plugin developer] need to configure", and in our case it just involves one question, which is whether the sources are in Git or still in Subversion. (Set aside from the name attribute, which is there by default.)
So in the attribute, we define the "scm" attribute to be a choice between Git and Subversion as shown in "SCM" attribute in the template:
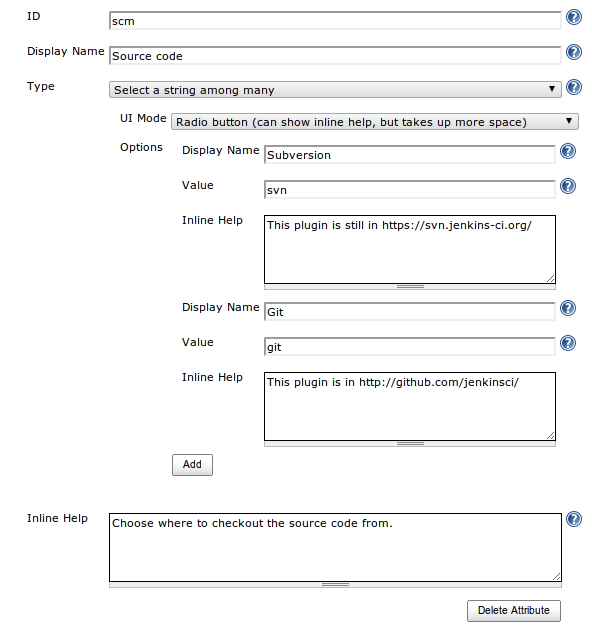
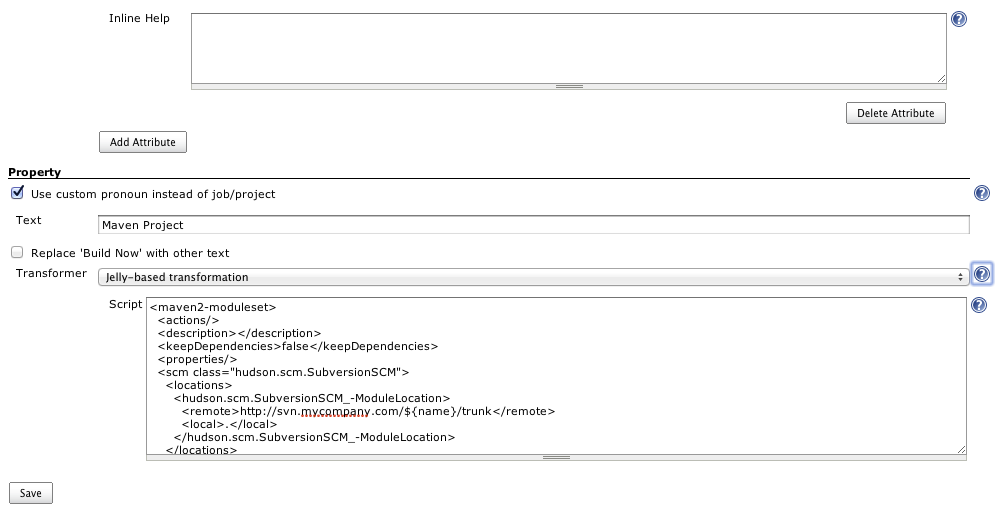
Further down below, we configure the template to refer to jobs as "plugins." While this change is purely cosmetic and only affects what’s shown in the HTML for humans, it nonetheless makes it easier for users to understand, because in this context, "plugin" is a well-defined technical term that has specific meaning, while "job" is not.

Define transformation
Unlike the previous tutorial where we defined a builder template in terms of the transformation into a shell script that we execute, defining a transformation for a job template is more complicated.
The idea here is that we need to tell the CloudBees Template plugin how our model
definition (that consists of the name attribute and the scm
attribute) maps to the actual job definition that Jenkins understands (in
our case that’s Maven2 job type). We do this by defining a
transformation from the model into the XML persisted form of the Maven2
job type. The CloudBees Template plugin uses this transformation to obtain the
XML, then load it up to Jenkins so that it understands how to run it.
So in this tutorial, we use "Jelly based transformation". Jelly is a template language that generates an XML. It is similar to JSTL (the tag library for Java Server Pages), and as long as your transformation doesn’t have a complex computation, it’s a reasonable choice.
The best way to define this transformation is by doing "programming by
example" — that is, we manually configure one representative project, then
obtain its XML representation. Let us assume you are starting with a
Maven project which checks out code from a Git server. We’ll obtain its
XML representation by simply adding config.xml to the job’s URL such as http://your-jenkins/job/this-job/config.xml. (Some web browsers fail to
display the actual XML when browsing such URLs. Try using View Source or
Save functions in such cases, or use a separate download tool like
curl or wget.) Later we will see that there is a shortcut, the Load
Prototype button (currently only supported for Groovy transformations).
Next, we take this XML and insert variables where appropriate. For
example, you see an occurrence of some-repo in the Git configuration,
so we replace that with ${name} as below:
<scm class="hudson.plugins.git.GitSCM"> <userRemoteConfigs> <hudson.plugins.git.UserRemoteConfig> ... <url>git://your-server/${name}.git</url> </hudson.plugins.git.UserRemoteConfig> </userRemoteConfigs> </scm>
There’s one more reference of some-repo down in the root module, but
this is an inferred value. (We can tell because we are never asked to
enter this information in the configuration page.) So we can simply
remove the entire <rootModule> element. Unless you know the internals of
Jenkins, this is a bit of a trial-and-error. Similarly, if you want to
keep XML concise, you can remove a large number of elements from the
configuration XML and Jenkins will still read it and provide
default values. (Again, this involves a bit of trial-and-error in the
general case, although there are some rules of thumb. For example,
boolean fields are always safe to remove, as are most string fields.)
We also need another XML from a plugin that’s building in Subversion to complete this transformation. You can spot the section that configures Subversion, so we do the same variable insertion, and the result is as follows:
<scm class="hudson.scm.SubversionSCM"> <locations> <hudson.scm.SubversionSCM_-ModuleLocation> <remote>https://your-server/trunk/${name}</remote> </hudson.scm.SubversionSCM_-ModuleLocation> </locations> ... </scm>
Now, to switch between two fragments depending on the value of
the scm attribute. To do this, we use a tag library from Jelly that
does the switch/case equivalent, called choose/when (XSLT has the same
elements that do the same thing.) So where we had the scm tag, we add
the following fragment:
<j:choose xmlns:j="jelly:core"> <j:when test="${scm=='git'}"> <scm class="hudson.plugins.git.GitSCM"> <configVersion>2</configVersion> <userRemoteConfigs> <hudson.plugins.git.UserRemoteConfig> <name>origin</name> <refspec>+refs/heads/*:refs/remotes/origin/*</refspec> <url>git://your-server/${name}.git</url> </hudson.plugins.git.UserRemoteConfig> </userRemoteConfigs> <branches> <hudson.plugins.git.BranchSpec> <name>master</name> </hudson.plugins.git.BranchSpec> </branches> <buildChooser class="hudson.plugins.git.util.DefaultBuildChooser"/> <gitTool>Default</gitTool> <submoduleCfg class="list"/> </scm> </j:when> <j:when test="${scm=='svn'}"> <scm class="hudson.scm.SubversionSCM"> <locations> <hudson.scm.SubversionSCM_-ModuleLocation> <remote>https://your-server/trunk/${name}</remote> </hudson.scm.SubversionSCM_-ModuleLocation> </locations> <workspaceUpdater class="hudson.scm.subversion.UpdateUpdater"/> </scm> </j:when> </j:choose>
See Jelly tag library reference for more about these tags. The entire transformation Jelly script will look something like this:
<?xml version='1.0' encoding='UTF-8'?> <maven2-moduleset> <actions/> <description></description> <properties> <hudson.plugins.disk__usage.DiskUsageProperty/> </properties> <j:choose xmlns:j="jelly:core"> <j:when test="${scm=='git'}"> <scm class="hudson.plugins.git.GitSCM"> <configVersion>2</configVersion> <userRemoteConfigs> <hudson.plugins.git.UserRemoteConfig> <name>origin</name> <refspec>+refs/heads/*:refs/remotes/origin/*</refspec> <url>git://your-server/${name}.git</url> </hudson.plugins.git.UserRemoteConfig> </userRemoteConfigs> <branches> <hudson.plugins.git.BranchSpec> <name>master</name> </hudson.plugins.git.BranchSpec> </branches> <buildChooser class="hudson.plugins.git.util.DefaultBuildChooser"/> <gitTool>Default</gitTool> <submoduleCfg class="list"/> </scm> </j:when> <j:when test="${scm=='svn'}"> <scm class="hudson.scm.SubversionSCM"> <locations> <hudson.scm.SubversionSCM_-ModuleLocation> <remote>https://your-server/trunk/${name}</remote> </hudson.scm.SubversionSCM_-ModuleLocation> </locations> <workspaceUpdater class="hudson.scm.subversion.UpdateUpdater"/> </scm> </j:when> </j:choose> <canRoam>true</canRoam> <jdk>(Default)</jdk> <triggers class="vector"> <hudson.triggers.SCMTrigger> <spec>*/15 * * * *</spec> </hudson.triggers.SCMTrigger> </triggers> <goals>-e clean install</goals> <defaultGoals>package</defaultGoals> <mavenName>maven-3.0.3</mavenName> <mavenValidationLevel>0</mavenValidationLevel> <aggregatorStyleBuild>true</aggregatorStyleBuild> <reporters/> <publishers /> <buildWrappers/> </maven2-moduleset>
Now we save the configuration, and our job template is ready.
Go back to the top page, and select New Job. You’ll see the newly created template as one of the options:
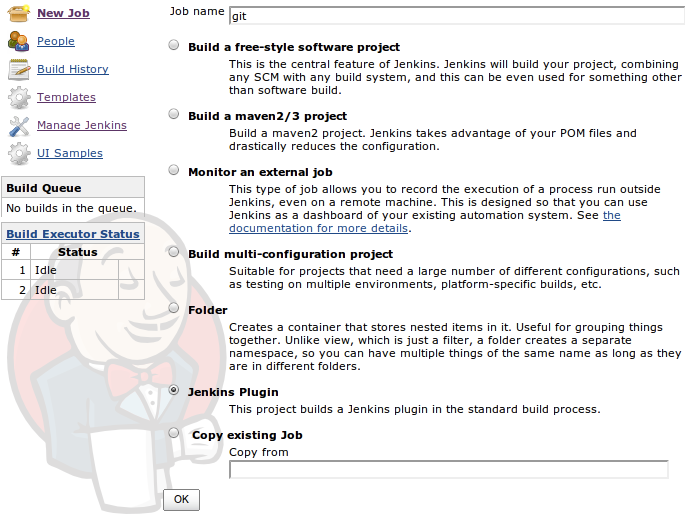
So we type in the name of the plugin that we want to build, say "git", then select OK. The configuration page of this job cannot be any simpler:
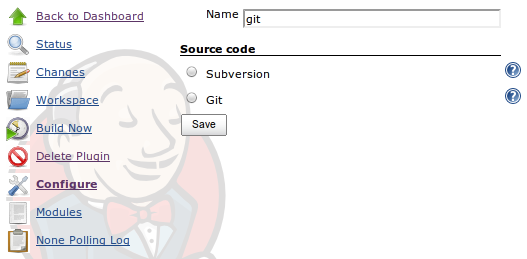
The git plugin lives in the Git repository, so choose that, and save. Let’s schedule a new build, and see it build the plugin.
Concepts
A template is a reusable item of configuration that only exposes a minimal set of parameters to users, and is internally translated to a "standard" Jenkins configuration. Thus, a template can be used to expose a simplified, abstract, restricted representation of Jenkins job configuration to users. Changes to a template immediately apply to everywhere the template is used.
A template is conceptually broken down into a few pieces:
- Model
-
A model defines a set of attributes that constitutes a template. Roughly speaking, you can think of this as a class of an object-oriented programming language. For example, if you are creating a template for your organization’s standard process of running a code coverage, you might create a model that has attributes like "packages to obtain coverage", "tests to run."
- Attribute
-
An attribute defines a variable, what kind of data it represents, and how it gets presented to the users. This is somewhat akin to a field definition in a class definition.
- Instance
-
An instance is a use of a model. It supplies concrete values to the attributes defined in the template. Roughly speaking, the model-to-instance relationship in the CloudBees Template plugin is like the class-to-object relationship in a programming language. You can create a lot of instances from a single template.
- Transformer
-
A transformer is a process of taking an instance and mapping it into the "standard" Jenkins configuration, so that the rest of Jenkins understands this and can execute it. This can be logically thought of as a function.
When we say "template" it actually is a combination of a model and a transformer. And each facet of these concepts is individually extensible—for example, additional transformers can be developed to let you express the transformation in the language of your choice.
Models
Models are hierarchical and can extend other models. This can be used to create some common usage templates, that are not designed for direct usage and will not be instantiated by users, or create concrete templates by specializing them for a dedicated task. When one model inherits another, it inherits all the attributes that are defined in the base model.
For example, a common utility template can handle connection and authentication to enterprise infrastructure, and child templates can use this basis to expose high-level tasks, like deploying a new release.
Template hierarchy is a useful way to manage templates of growing complexity and make attribute definitions mutual.
Templates can be configured as being instantiable by users, or as only ways to encapsulate configurations to be used from other templates by inheritance.
Templates have a dedicated entry in the top page, where the administrator will set up and maintain the templates.
All templates are based on generating Jenkins configuration from a reduced set of attribute, that the user will provide to apply the template for a dedicated job. This major reduction in complexity makes configuring new jobs simple for new users and reduces the risk of misconfiguration.
Attributes
Each attribute represents a fragment of data that constitutes a template, along with how it gets presented in the UI to the users. For example, you might define an attribute called "product code", which stores a string represented in the single-line text field.
Each attribute consists of the following data model:
- ID
-
IDs uniquely identify an attribute among other attributes of the same model. ID is used to refer to an attribute in transformers and other places, so the characters you can use in ID are restricted.
- Display Name
-
Display name is the human-readable name of the attribute. It is used for example when Jenkins present the configuration page to edit an instance.
- Type
-
The type of the attribute primarily determines the type of the data that this attribute holds (such as String or boolean), but it also controls how the data is represented in the UI (for example, is it a single-line text field or a multi-line text area?). For the discussion of available attribute types, see Attribute type reference.
Attribute type reference
The CloudBees Template plugin ships with the following distinct attribute types. Attribute types are also extensible, allowing additional plugins to bring in more types.
Text field
This attribute type holds an arbitrary string value that can be edited through a single line text field. It is the most general purpose attribute type.
Transformers access these values as java.lang.String values.
Text area
This attribute type holds an arbitrary string value that can be edited through a multi-line text area. This is suitable for entering large chunks of text.
Transformers access these value as java.lang.String values.
Checkbox
Checkbox holds a boolean value that can be edited through an HTML checkbox.
Transformers access these values as boolean values.
Nested auxiliary models
A nested auxiliary model allows a model to compose other models. See Auxiliary Template for more discussion.
It supports four different modes.
- Single value
-
The attribute will hold one and only one instance of the specific auxiliary model. In the UI, the configuration of the nested auxiliary model is presented as-is, inline. Let’s say you created an auxiliary model that represents the access credential to your internal package repository called "PackServer Credential." You then create "Acme Corp Pack Build" template that builds and deploys a binary to this package server. This template would want to have an attribute that holds a "Credential" auxiliary model as a nested value in the single mode, since you need one and the only one credential for each job.
- Single value (choice of subtypes)
-
The attribute will hold one instance of the auxiliary model (if instantiable), or one of its (instantiable) subtypes.
- List of values
-
The attribute will hold a list of instances. All the instances must come from a single auxiliary model, but users can add as many/few of them as they wish. A good example of this is the JDK configurations in the system configuration page (where JDK can be thought of as an auxiliary model, which in turns has attributes like name, home, installer, etc.) The UI of this mode will be just like that of the JDK configuration. A button to add/remove/reorder instances of the auxiliary model.
- List of values, including subtypes
-
This is similar to the "list of values" mode above, except that the user can choose from all the instantiable subtypes of the specific nested model type. A good example of this is the build step configuration in a free-style project, where you can add any number of build steps (which are all subtypes of the base model called "Builder".) This mode presents a drop-down menu button that allows the user to choose the specific auxiliary model type to instantiate.
Transformers access these values as an instance (or as a java.util.List
of instances) of auxiliary models. In the pack server / credential
example above, you could access it like i.credential.username (where
i is the instance of the outer model, credential is the ID of the
attribute, and username is the ID of an attribute of the "Credential"
auxiliary model.)
In the modes allowing a choice of subtypes, you can use attrName.model.id (or elementOfAttr.model.id in the case of a list) to identify the actual auxiliary model chosen.
(As usual, before the template instance has been saved, attrName will be null, so you must check for this first.)
The ID will be a fully-qualified path name to the model, such as topFolder/subFolder/my-aux-model.
However rather than listing all possible subtypes using if-then or switch statements in your transformer,
you can use Computed Value to obtain some information from the chosen model in a consistent format.
(The analogy in object-oriented programming would be using a virtual method rather than querying the implementation type of an object.)
Select a string among many
This attribute type is like an enumeration type. The designer of a model can specify a list of name/value pairs, and the user of the model gets to choose one of the pairs as the value. The UI will show the name part of the pair, and the transformers will see the value part of the pair, which mimics how the <select> tag works in HTML.
The designer of a model can choose different UI presentation for the attribute.
Computed Value
This is a special type of attribute, whose value is a result of evaluating a JEXL expression, which is specified during the model definition. The value isn’t editable in the instance configuration screen. This is somewhat akin to defining a getter method (whereas the regular attribute definitions are like defining fields); it lets you specify a program that computes the value, typically based on the value of other attributes.
There are a number of use cases for such a property:
-
To simplify the transformer definition. If your transformer keeps doing a similar manipulation of attribute values over and over again, it is often better to define such a manipulation as a computed attribute (for example, say you define an attribute for a subversion repository URL, and you want its last path component accessible as a separate attribute.)
-
For polymorphic behavior in auxiliary models. Imagine you are defining a model for assembling a book from its chapters, where each chapter can be either a pre-existing PDF in your content repository or a DocBook that needs a transformation. You define this as a base abstract auxiliary model called "Chapter" and then two concrete sub-models. Those sub-models likely define different set of parameters, but it’s often convenient for them to both have the attribute of the same name (say
shellScriptthat evaluates to the shell script that produces PDF) that yield very different values that are computed from other attributes.
At runtime, the actual type of the attribute is opaque; use attrName.toString() to get a string representation of the value within Groovy code.
Normally this is done implicitly by a template transformer, for example in ${attrName}.
Heterogeneous components from descriptors
This advanced attribute type allows a model to hold a collection of arbitrary Describable instances. The discussion of the Describable class and its role in Jenkins goes beyond the scope of this document, but this allows models to reuse plethora of information fragments defined in plugins large and small (such as Subversion checkout location, builders, …)
Of various attribute types that deal with Describables, this attribute type holds a list of them, and it allows all the subtype Describables for the specified base type. A good example of this is the build step configuration in a freestyle project, where users can insert any build steps of various types, so long as they extend the base "build step" type.
Heterogeneous components from descriptors (one instance per descriptor)
This attribute type is a flavor of Heterogeneous components from descriptors. This version also holds a list of Describables, but it only allows up to one instance from one type. A good example of this is the post-build action configuration in a freestyle project, where users can activate an arbitrary number of publishers of various types, but only up to one per type.
Select Item
This attribute type holds a reference to an item in Jenkins. "Item" is the generalization of the top level elements of Jenkins, like Maven and freestyle jobs, folders, etc.
This attribute type can be further constrained by the kind of item it can refer to. This can be done in terms of the job type in Jenkins, or the template it is created from. For example, if you are modeling a test job to be run after a build job, your test job model should refer not just to arbitrary items in Jenkins, but items created from the build job model.
At runtime, this attribute is accessed as an instance of hudson.model.Item.
Select Tool Installation
This attribute type holds a reference to a tool installation, which is a specifically configured instance of JDK, Maven, Ant, etc. plugins that you are using might have added other types.
When you define an attribute, you’ll choose the specific type of the tool (say, Ant), and instances will choose one of the configured installations from this specific kind (say Ant1.6 and Ant1.7, assuming that your system configuration has these two Ant installations configured.)
Most often attributes of this type are used in job and builder
templates. For example, if you define the attribute called jdk in a
job template, your Groovy transformer can use the following code to
inject the chosen JDK into the job configuration. Most other tool
installations (including Ant and Maven) are referenced from within the
specific Builders. You can figure this out through
programming-by-example as described in the tutorial.
<project> <% if (jdk != null) { %> <jdk><%= jdk.name %></jdk> <% } %> ... </project>
At runtime, this attribute is accessed as an instance of
hudson.tools.ToolInstallation. As you see above, a ToolInstallation is
normally referenced through its name property.
Select Credentials
This attribute type holds a reference to credentials defined by the Credentials plugin. The control shows a pull-down with available credentials offered.
This attribute type can be further constrained by the kind of credentials it can refer to. For example, you can restrict the credentials to username/password combinations.
If the template instance is inside a folder, the user will be offered credentials defined in that folder, parent folders, or globally in Jenkins.
At runtime, this attribute is accessed as an instance of
com.cloudbees.plugins.credentials.common.IdCredentials, or a more
specific type if you have requested one. It would normally be used in
XML configuration by calling getId() to retrieve an ID, typically stored
in a field called credentialsId.
Builder Template
Often, developers create build steps as shell scripts to address enterprise requirements, for custom deployments, packaging, notification, QA integration, etc. The same script is used across a large set of jobs and only differ by few attributes. Maintaining such scripts and avoiding copy/paste mistakes can be a nightmare on large Jenkins installations. The builder template creates a new type of builder, thereby eliminating the need of copying a script, and highlighting the things that need to be filled in by users.
A similar goal can be achieved by a custom plugin development. A builder template, compared to a custom plugin, has the following trade-offs:
-
Writing a plugin requires a significant one-time learning cost, whereas a simple template can be developed rapidly. So for simple things, templates tend to get the job done more quickly.
-
A template can be created, modified, or removed without restarting Jenkins.
-
You get a lot more tool assistance for plugin development, thanks to the great IDEs available for Java. So for complex things, plugins tend to get the job done more quickly and elegantly.
Compared to job templates, builder templates tend to be more flexible, as the person configuring jobs still has substantial freedom to control how it works. A builder template is also the easiest kind of template to create, especially in combination with the specialized transformers that generate shell scripts. This makes builder templates the best entry point to the CloudBees Template plugin.
Create a new Builder Template
The new item wizard offers a few options, including that of creating a new Builder Template. The template configuration allows the administrator to define the execution details of any custom tool, which will be exposed to users as a new build step.
Define a transformer
The transformer controls how your Builder Template maps to the actual builder that carries out the build.
One way to define a transformer is to use one of the standard transformers that takes an instance and produces XML. (In this case, the XML should match that saved for a build step in a job configuration.) As we discussed in the tutorial, a good way to do this is programming by example, where you manually create a freestyle project and configure it, then observe what XML it is producing.
The other way to do this, which is often preferable, is to use one of the specialized transformers that only work with builder templates, which we’ll discuss below.
Generate shell script via Jelly/Groovy
For shell scripts, a simpler way to define a builder template is to generate the script using Jelly or Groovy instrumentation to process the attributes and generate the adequate script. These specialized transformers eliminate the need of "programming by example" by focusing on the shell scripts.
See the transformer reference section for more details about the general syntax of Jelly/Groovy template, as well as available variable bindings.
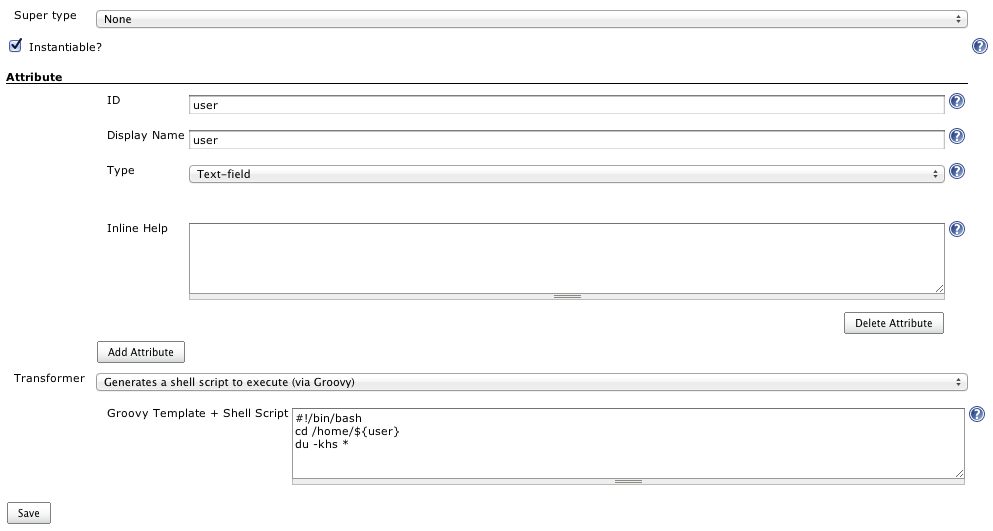
The following screenshot demonstrates a Groovy-generated shell script to
run the du command on an arbitrary user home directory. The ${…}
in the text should not be mistaken for a shell variable reference. These
Groovy expressions are expanded during the transformation before it gets
passed to the shell.
Such templates are easily created by a Unix administrator to automate maintenance processes, and can be used to give users the ability to run tools without the risk of allowing arbitrary commands to be executed.
Predefine variables for shell/batch script
An alternate transformer option, Sets some variables using Groovy then runs a shell/batch script, is also available. Unlike the previous transformer, the shell (or Windows batch) script section is not processed using any template language. Instead, your template attributes are directly available as shell variables, and you can optionally run a Groovy program to define other shell variables (typically based on the Jenkins build object, as in Template evaluation timing).
For example, suppose you have defined an auxiliary template for compiler options (Auxiliary Template has more).
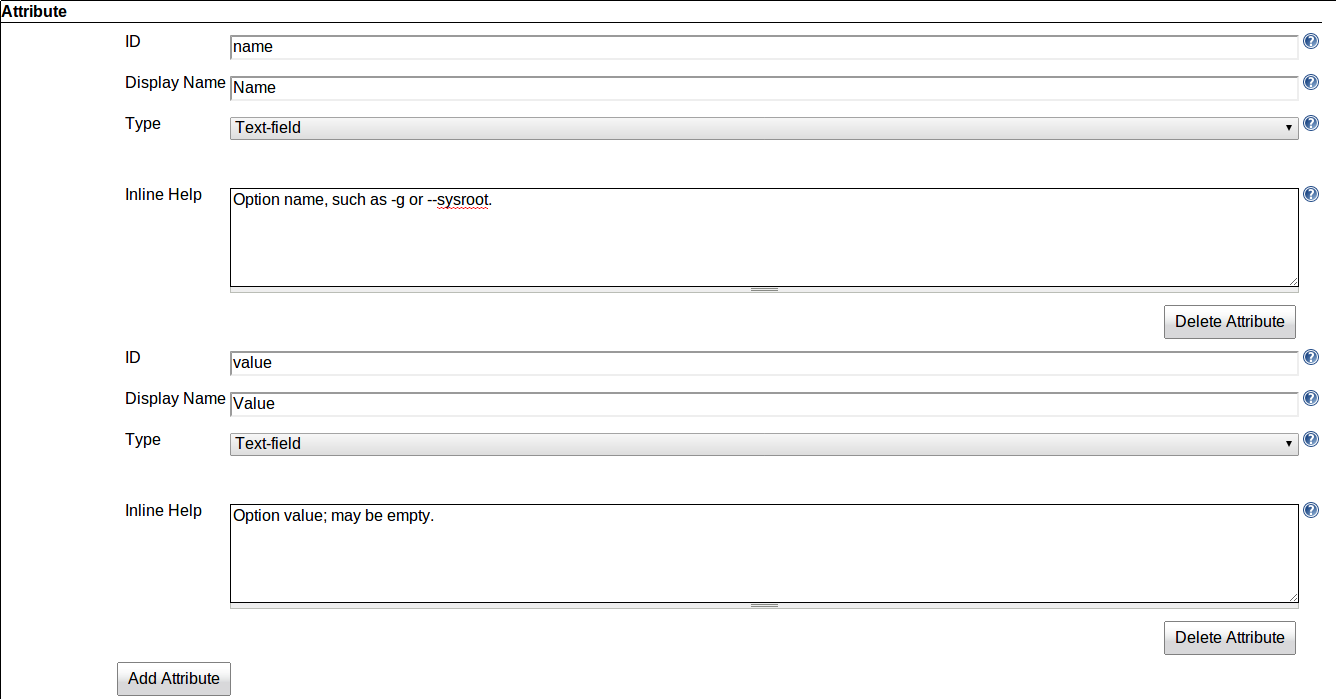
Now if you want to collect a number of options in a builder template, and produce an options variable suitable for interpolation in a shell script, you can use a brief Groovy snippet to process the options into a flat string.
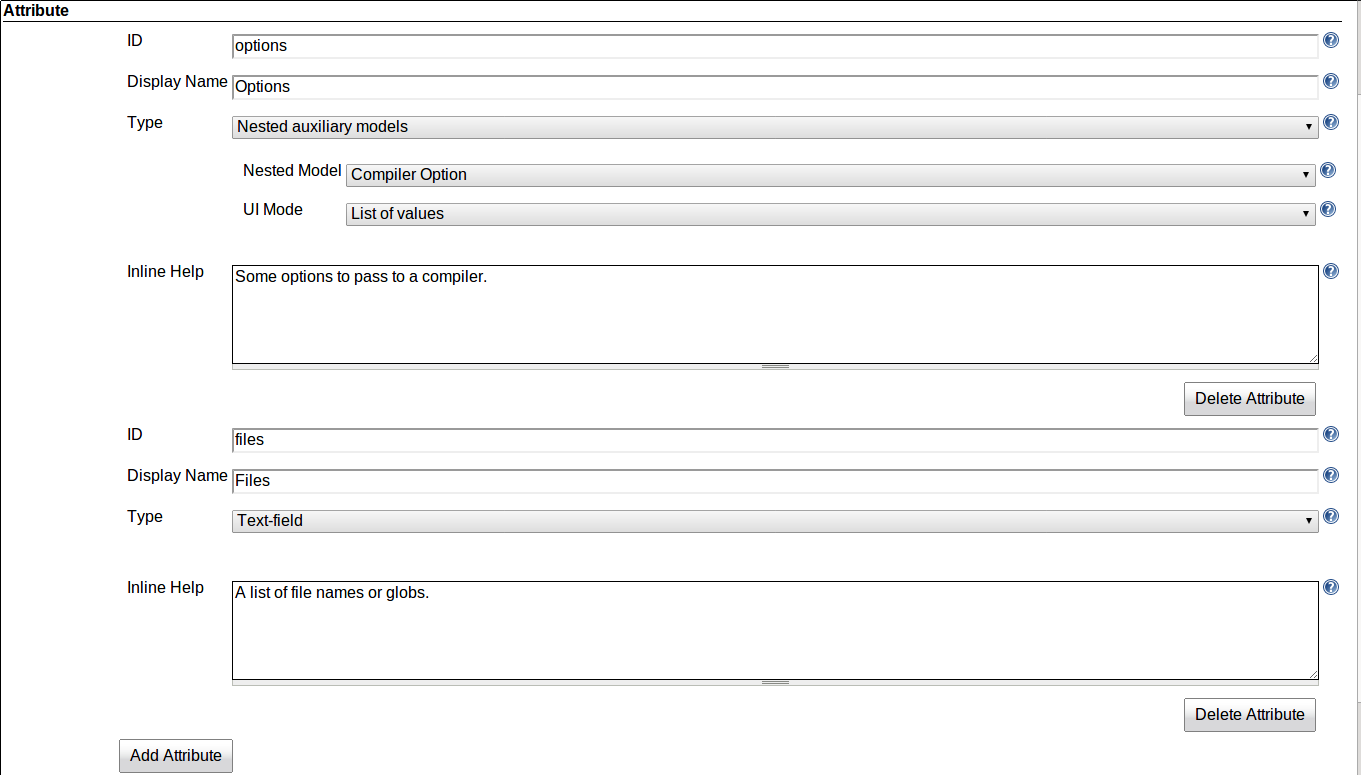
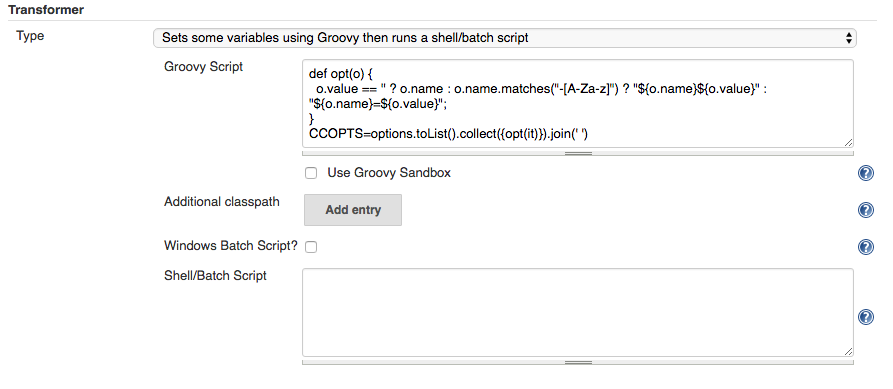
When this builder template is used in a job definition, compiler options may be defined structurally.

The resulting build will run: cc -O3 -g --sysroot=/usr/local *.c
Template evaluation timing
Another key difference of these specialized transformers is the difference in the timing of the template evaluation. The general purpose transformers perform transformation asynchronously from the execution of builds (roughly speaking, think of it as transforming right after the job is configured), whereas these shell script transformers run during the build.
This allows you to perform contextual transformations that depend on the parameters and conditions of the in-progress build (such as the changes in the source code, or what started it).
To do so, use the build variable from within your template to access
the
AbstractBuild object that represents the current build in progress.
|
One special use for a builder template is to use Groovy to compute some variables, and then make them available to subsequent build steps—without actually running anything itself. The Sets some variables using Groovy then runs a shell/batch script transformer can be used for that purpose. Just leave Shell/Batch Script empty, and use something like the following in Groovy Script:
These variables can now be used like any others in subsequent build
steps (for example, |
Publisher Template
Another template type closely related to builder templates is the publisher template.
The only difference is that it creates Publisher instances ("post-build actions" in the UI),
rather than Builder instances ("build steps" in the UI).
Unlike builder templates, publisher templates do not offer any specialized transformers. You can only use the generic Groovy template transformation (or its Jelly equivalent). This is because there is no catch-all publisher analogous to the shell/batch script builders.
Job Templates
In many enterprise situations, you end up with multiple jobs that differ by only a few aspects, such as where the code is checked out from, or the QA servers that are used. Job templates can be used to represent this model in enterprise development by letting projects only define the minimal variable configuration to apply to the model. Thus, a job template offers a higher level of abstraction, as it templatizes the definition of an entire job.
One typical use case of this is that you have lots of components that are written and built the same way. The Jenkins project, for example, has a large number of plugins that are built precisely in the same way. It makes sense to define a template for this, as we did in the tutorial, to centralize the configuration and make it easier to create a new job for a new plugin.
Another typical use case is that you have multiple branches of the same project, actively developed in parallel. Such jobs tend to only differ in version control configuration, and making a template out of them allows you to rapidly set up CI for new branches.
Another use case of the job template is where there is a gap in Jenkins expertise between the Jenkins experts in your organization and the developers at large. Templates can be useful to "dumb down" the user interface and steer them toward the best practices the experts define, thus gaining overall productivity for them.
A custom job type can be also developed as a plugin, but this is one of the most complex extension points in Jenkins. For this reason, we recommend you start with a job template. Only after you start feeling the constraints of the CloudBees Template plugin should you consider rewriting your template as a custom plugin.
Configuration
Job templates need to produce a full job XML definition as a result of
the transformation. As discussed in the tutorial, often the simplest way
to get this done is "programming by example". You manually create a
project (or a few), configure it with all the desired options, and then
get the config.xml file by adding config.xml to the URL, then insert
expressions and statements where you need to reflect actual values from
instances.
|
When using the Groovy template transformation, you can save time by
using the Load Prototype feature to load a named job’s |
|
When a job is initially created from template, all of its attributes
will be null until the user configures it and selects Save. This means
that your transformer must be prepared to accept null attribute values.
Jelly scripts usually have an easy time with this since the JEXL
expression language treats Null attribute check in Jelly scripts
Null attribute check in Groovy scripts
|
A job template will also maintain a list of projects that are using the template, so that an administrator can quickly check the project that follows the success of project structure standardization.
|
There is no special trick to create job templates whose instances have parameters (for example, per-build variables chosen by the user initiating the build). You just need to mentally separate parameters from template attributes, since they are expanded at different times. The Load Prototype feature helps ensure that parameter expansions are escaped and not misinterpreted as template attribute expansions. This blog post goes into detail. |
Folders template
Folders are another feature, described in another document. It allows you to group related jobs and organize them in a hierarchical way, as you’d do with files and directories on a file system.
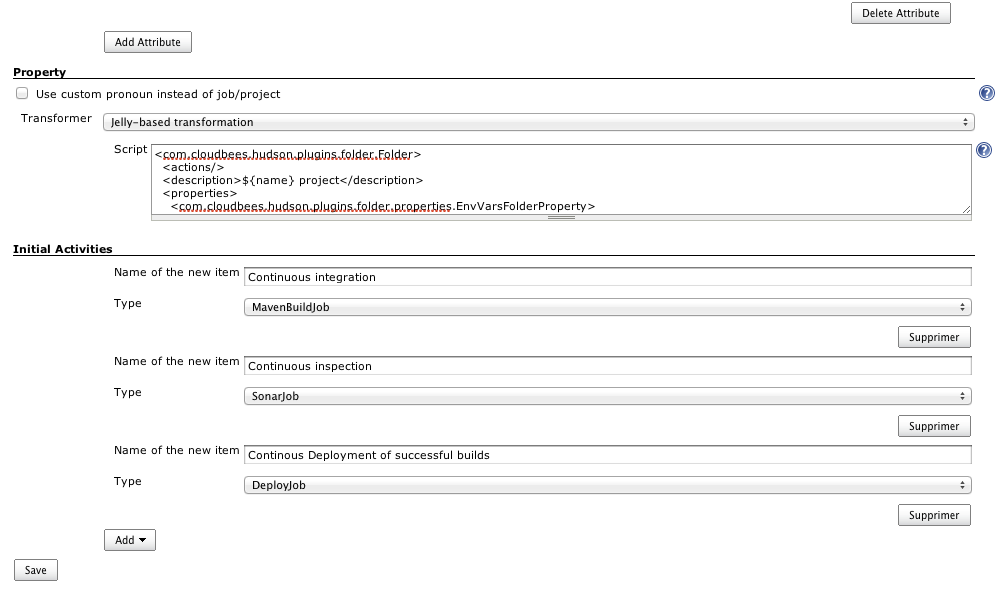
As a container of jobs, a folder template is a useful way to define a set of jobs that follow enterprise rules and best practices. For example, a single folder template could instantly provision a set of jobs that implement your organization’s best practice, for example (1) a continuous integration job that builds the tip of the repository every time a commit is made, (2) a continuous inspection nightly job to populate a sonar server with code quality metrics, and (3) a continuous deployment job to push successful builds to a demo server for dogfood eating.
A folder template can be also useful to clarify the "flavor" of a folder and how it’s supposed to be used. For example, you might have a template for a product, and which contains branch folders that are templates themselves (say because you need multiple jobs for one branch.) Such modeling enables you to now capture relationship between your products as model attributes, which can then translate into lower level configuration, such as trigger relationship.
What a folder template does and does not control
A folder template controls the configuration of a folder itself (that is, everything that appears in the configuration page of the folder), such as the name, the icon, views, and access control matrix.
A folder template also allows you to specify a set of activities that are to be performed when a new instance of the template is created, such as creating jobs inside the new folder, as can be seen in the screenshot below:
But beyond the initial creation, jobs inside a folder aren’t controlled by templates. So with sufficient permissions, users can add/remove jobs and the template change will not void those changes. If this is undesirable, and you prefer to lock things down further, you can use job templates for jobs in a folder template (to restrict the configuration freedom) and use access control to prevent creation/deletion (see RBAC documentation for more details.)
Folder features that work well with templates
There are several features in the folder plugin that work really nicely when combined with a folder template.
Restrict child type in a folder
A folder can be configured to restrict the kind of items that it can contain. When you define a folder template, this is a useful way of strengthening the flavor of a folder. For example, you can say that a product folder template can only contain branch folder templates.
Environment variables
A folder can be configured to define a set of environment variables that
are automatically made visible to all the builds inside the folder. This
is one of the primary ways to use the template attributes and have them
affect what goes on inside a folder. In the earlier example of a folder
template that represents a branch, you can define the environment
variable called BRANCH, and all your jobs can refer to this variable
to choose where to check out the code from.
Model attribute list view column
The CloudBees Template plugin adds a new list view column extension, which lets you display values of the specified attribute from items in the container.
This list view column is useful when you have a folder (or a view) that contains items created from job templates / folder templates. For example, if you have a folder template that represents a product, which in turn contains folder templates that represent branches, you can show the name of the branches in a list view inside the product.
This can be further combined with the "computed value" attribute type to further control what to display.
Auxiliary Template
Auxiliary templates are second-class citizens that are used to create inner structures in other models. As such, they do not get transformed to any Jenkins concepts by themselves.
It is easier to understand an auxiliary template if you think about how you’d model a music CD. A "music CD" model might have properties like title and the year of publication, but it also has a list of tracks, where a track by itself is a model that has several attributes, such as the title, the duration, and the composer. In this example, a track is an auxiliary model.
Auxiliary model is also useful for a set of information appear repeatedly across different models. For example, your software development might involve accessing database, which requires several attributes to model (say host, schema, username, and password.) So as you define various templates that use database, it is convenient to define the database access as an auxiliary model and refer to it from other templates. (The other way to do this is via inheritance, where you define this set of attributes in the base template and derive from it elsewhere. See the extensive discussion between inheritance vs composition in object-oriented programming languages for more analogies and trade-offs.)
Access attributes of auxiliary instances
When you define a model that contains instances of auxiliary models, your transformation will want to access these attributes. See Nested auxiliary models for more details.
Templates defined in folders
Starting with version 4.0, templates may be placed inside folders rather than at top level. When you do this, the template will only be visible in the configuration of jobs (or other templates) in the same folder or a (recursive) subfolder. For example, job templates will be offered from the New Job link only inside the folder defining the template. As another example, a template using a nested auxiliary model attribute will only be able to select an auxiliary model in the current folder (where the main template is defined) or above; and if the base auxiliary model type is abstract (i.e. you can pick subtypes), a job based on the main model will only be able to select concrete subtypes from among those defined in the folder of the job or above.
This feature allows each team to maintain its own set of private templates, while still reusing some global templates if desired. Assuming each team only has Job/Configure permission applied to its own folder (using Role-Based Access Control), that team will only be able to make changes to its own templates, not those of other teams (which it might not even be able to see).
No specific permission is required to use a template, beyond being able to see that it exists (in the current folder or above), i.e. Job/Read; nor is any specific permission required to create a template, other than being able to create any item in a folder, i.e. Job/Create. This is because templates, when expanded, are simply shortcuts to configuration that you could have produced yourself anyway, so they should not generally be privileged or secret. However, you may certainly deny configuration access to a template to some users while still making it available for instantiation, for example by defining an RBAC group on the template which filters out some roles. Alternately, you could define the template in the root of Jenkins or in a high-level folder, and then only offer job configuration permissions to most users in certain subfolders.
Transformer reference
The CloudBees Template plugin comes with a number of built-in transformer implementations. As discussed in the "Concepts" section, logically speaking a transformer is a function that takes an instance and generates the standard Jenkins configuration of something (such as a builder or a job), thereby describing the model in terms that the rest of Jenkins understands.
This chapter describes the available transformer implementations.
Jelly-based transformation
Jelly is an XML-based template engine.
Firstly, it allows you to insert arbitrary Java-like expressions in the
${…} syntax (see
JEXL for the
reference of this syntax), and secondly, it allows you to use tags to do
basic control-flow operations, such as conditional block, for-loop,
switch/case, etc. See Jelly
core tag library reference for more details.
Another benefit of Jelly is that it is guaranteed to produce a well-formed XML, and anything short of that is detected while you are defining a transformer. This reduces the chance of invalid transformer configuration.
Through these tags, Jelly can be abused as a programming language, but that is not really what Jelly is designed for (although at times this is handy.) If you start finding yourself using more Jelly tags than literal XML elements, consider using other transformers, such as Groovy template transformation, which offers more concise syntax.
Variable bindings
During the transformation, all the attributes of the instance are available by their IDs. In addition, the following special variables are available:
- instance
-
this variable refers to the instance object being transformed. This is of type com.cloudbees.hudson.plugins.modeling.Instance.
- model
-
this variable refers to the model that the instance belongs to. This is of type com.cloudbees.hudson.plugins.modeling.Model.
- parent
-
this variable is available for transforming models that produce Items, such as job templates and folder templates (but not builder templates.) This variable refers to the ItemGroup that represents the container of the item, such as a folder or a
jenkins.model.Jenkinsinstance. - parentInstance
-
See Access a folder template’s attributes from a child job template for details.
These variables and their methods/properties can be accessed to perform intelligent transformation.
Groovy template transformation
This transformer is based on
Groovy template, which is
essentially a JSP in Groovy syntax + ${…} style expression, such as
the following:
<foo> <% for (int i=0; i<100; i++) { if ((i%2)==0) { %> <data>${i}</data> <% } } %> </foo>
The benefit of this transformation is that the Groovy syntax, with its close alignment with the Java syntax, makes it easier for Java programmers to perform complex transformation.
Take care to escape dollar signs with backslashes in XML snippets you copy, so they are not misinterpreted as Groovy expressions; for example, one line copied from a folder XML configuration should read:
<properties class="hudson.model.View\$PropertyList"/>
Normally, for reasons of safety and robustness, XML metacharacters like
< in expression values are escaped before being emitted to the output.
If you intend some attribute or computed value to be treated as raw XML
inlined into the job configuration, wrap it in the xml function:
<outerElement>${xml(thisIsTreatedAsXmlText)}</outerElement>
In many cases one of your template attributes is actually a Jenkins
component (or array of them). To embed it in a job config.xml you must
first serialize it. The Templates plugin (as of 4.0) offers a few more
helper functions to make this easy. Most simply, if you have a single
component like a hudson.tasks.Publisher that you want to emit, use the
serialize function:
<publishers>${serialize(publisher)}</publishers>
If you have a collection of components (including an array), for example
because you let the user configure zero or more hudson.tasks.Builders,
use the serializeAll function:
<builders>${serializeAll(builders)}</builders>
Finally, if you have a single component that you want to bind to a field
of a more generic type, the XStream library used by Jenkins for
serialization has a special syntax. To emit a component bound to that
field, you need to also specify the field name. For example, to let the
user configure a hudson.scm.SCM instance and bind that to the scm
field as <scm class="hudson.scm.SubversionSCM">…</scm>, use the
serializeOption function:
${serializeOption(scm, 'scm')}
|
When you use a Groovy template transformation, there is a risk of errors in the programming of the Groovy code, such as infinite loops. This could end up with an expanded template (the result of the transformation) taking unbounded memory and potentially even taking down the JVM. To prevent this from happening. a limit is set for the maximum size of the generated element from a template. The default limit is 1 MB (1024 * 1024 bytes). This limit is configurable via system property:
This is configurable from the Jenkins Script Console too, using:
As usual, that change is not persisted so it will change back to the original value after a restart. Once the right value is found, it needs to be persisted by setting it using the system property. |
Template security
If everyone who defines templates is a Jenkins administrator—specifically if they have the Overall/RunScripts permission, used for example by the Script Console link—then they can write whatever scripts they like in templates. These scripts may directly refer to internal Jenkins objects using the same API offered to plugins. (Script languages included Groovy, used for several transformers; Jelly, also used for a couple of transformers; and JEXL, used in computed value attributes.) Such users must be completely trusted, as they can do anything to Jenkins (even changing its security settings or running shell commands on the server).
However, if some template creators/maintainers are "regular users" with only more limited permissions, such as Job/Configure, it is inappropriate to let them run arbitrary scripts. To support such a division of roles, the Templates plugin as of version 4.0 supports two related systems: script approval, and Groovy sandboxing. As of 4.6 it includes a binding to the Script Security plugin, which should be consulted for general information on these systems. The following guide merely notes how the Script Security plugin is used by Templates.
Script approval
The first, and simpler, security system is to allow any kind of script to be run, but only with an administrator’s approval. There is a globally maintained list of approved scripts which are judged to not perform any malicious actions.
When an administrator saves a template configuration, any scripts it contains are automatically added to the approved list. They are ready to run with no further intervention. ("Saving" usually means from the web UI, but could also mean uploading a new configuration via REST or CLI. See Script templates.)
When a non-administrator saves a template configuration, a check is done whether any contained scripts have been edited from an approved text. (More precisely, whether the requested content has ever been approved before.) If it has not been approved, a request for approval of this script is added to a queue. (A warning is also displayed in the configuration screen UI when the current text of a script is not currently approved.)
An administrator may now go to Manage Jenkins » In-process Script Approval where a list of scripts pending approval will be shown. Assuming nothing dangerous-looking is being requested, just select Approve to let the script be run henceforth.
Builder and publisher templates using unapproved scripts (mainly Groovy or Jelly transformers, but also JEXL computed values) present no special issue: unless and until the script is approved, trying to run a build using that build step will fail. You may retry once the script has been approved.
Job and folder templates using unapproved transformer scripts are a little trickier. Existing template instances will continue to use the former script definition; as soon as the script is approved, they will be updated. New jobs or folders cannot be created from the template until its script is approved. (Currently unapproved computed values will just be left as null, but there is no such fallback option in general for job template transformers.)
Groovy sandbox
Waiting for an administrator to approve every change to a script, no matter how seemingly trivial, could be unacceptable in a team spread across timezones or during tight deadlines. As an alternative option, the Templates plugin lets Groovy scripts be run without approval so long as they limit themselves to operations considered inherently safe. This limited execution environment is called a sandbox. (Currently, no sandbox implementations are available for the Jelly or JEXL languages, so all such scripts must be approved if configured by non-administrators.)
To switch to this mode, simply check the box Use Groovy Sandbox below the Groovy script’s entry field. Sandboxed scripts can be run immediately by anyone. (Even administrators, though the script is subject to the same restrictions regardless of who wrote it.) When the script is run, every method call, object construction, and field access is checked against a list of approved operations. If an unapproved operation is attempted, the script is killed and the template cannot be used.
The Templates plugin ships with a small default allowlist: enough to print the values of template attributes (including those from auxiliary models), and not much else. The Script Security plugin, or other plugins, may offer other allowlisted operations by default.
But you are not limited to the default allowlist: every time a script fails before running an operation that is not yet allowed, that operation is automatically added to another approval queue. An administrator can go to the same page described above for approval of entire scripts, and see a list of pending operation approvals. If Approve is selected next to the signature of an operation, it is immediately added to the allowlist and available for sandboxed scripts.
Most signatures be of the form
method class.Name methodName arg1Type arg2Type…, indicating a Java
method call with a specific "receiver" class (this), method name, and
list of argument (or parameter) types. (The most general signature of an
attempted method call will be offered for approval, even when the actual
object it was to be called on was of a more specific type overriding
that method.) You may also see staticMethod for static (class)
methods, new for constructors, and field or staticField for field
accesses (get or set).
As with unapproved scripts, sandboxed scripts using illegal operations pose no special issue for builder and publisher templates; just try rerunning the build. New job or folder instances again cannot be created from the template until it uses only allowed operations. Existing job or folder templates instances also will not be updated before all operations run by the script are approved; unlike whole-script approval, in this case the instances are not automatically refreshed just because the allowlist has been expanded. To trigger a refresh, re-save the template (or of course you may edit its script to not invoke unapproved operations).
Administrators in security-sensitive environments should carefully
consider which operations to allow. Operations which change state of
persisted objects (such as Jenkins jobs) should generally be denied (and
these have no legitimate use in templates anyway). Most getSomething methods are harmless.
Be aware, however, that even some "getter" methods are designed to check
specific permissions, whereas scripts are often run by a system
pseudo-user to whom all permissions are granted. So, for example,
method hudson.model.AbstractItem getParent (which obtains the folder
containing a job) is in and of itself harmless, but the possible
follow-up call method hudson.model.ItemGroup getItems (which lists
jobs by name within a folder) checks Job/Read. This second call would be
dangerous to allow unconditionally, because it would mean that a user
who is granted Job/Create in a folder would be able to read at least
some information from any jobs in that folder, even those which are
supposed to be hidden according to, for example, RBAC role filtering; it would
suffice to create a job template using a Groovy transformer like this:
<project><description>I sniffed ${parent.getItems()}!</description></project>
When instantiated as a throwaway job, its description would display at
least the names of supposedly secret projects. You may instead select
Approve assuming permission check for getItems; this will permit the
call when run as an actual user (for example when someone saves the
templatized job), while forbidding it when run as the system user (for
example when someone saves the template and its instances are updated in
the background). In this case, getItems will actually return only
those jobs which the current user has access to, so if run in the former
case (by saving the templatized job), the description will show just
those jobs they could see anyway. This more advanced button is shown
only for method calls (and constructors), and should be used only where
you know that Jenkins is doing a permission check.
Advanced template techniques
In this section, we discuss various techniques to create and maintain sophisticated templates.
Navigate around objects in context
Sophisticated templates require accessing information available in the rest of the Jenkins object model. For example, let’s say your "test" job template has an attribute that refers to the corresponding "build" job, and you’d want the test job to change its behaviours based on the configuration of the build job.
This kind of template can be best written as "Groovy-based transformer", since it provides concise syntax to navigate around the object model and access information. In order to work with the Jenkins object model you need some basic familiarity with that API; Jenkins Javadoc is the starting point.
Instance to Item, Item to Instance
The Instance type refers to a Map-like object that retains the values of
attributes for a model, and during the transformation, the current
instance is always accessible as the instance variable.
When those instances are from templates that map to jobs in Jenkins
(such as job template and folder template), these instances are of the
com.cloudbees.hudson.plugins.modeling.impl.entity.EntityInstance class,
which defines the item property that lets you access the corresponding
hudson.model.Item instance (such as FreeStyleProject object and a Folder
object.) So for example, instance.item.isDisabled() would check if the
job is disabled or not.
Conversely, those items that are created from their templates have the
instance property that allows you to navigate back to the instance. In
other words, instance.item.instance==instance. For items that are not
created from any templates, this property returns null. Also note that
this property is defined in Groovy, and not in Java, and therefore it is
only accessible when using Groovy transformers.
Access a containing folder
One of the useful technique to eliminate redundancy in job templates is to access information of the folder that contains jobs. For example, you might define a folder property that specifies the name of the branch, then templatize jobs inside this folder so that it uses this information to determine where to check out.
To facilitate such a use case, there’s the parent property accessible
during a transformation of templates that map to jobs in Jenkins (such
as job template and folder template.) This property refers to the
instance of ItemGroup, which is typically
com.cloudbees.hudson.plugins.folder.Folder instance (that represents the
folder that contains the job) or Jenkins (if the job isn’t contained in
any folder but a top-level.)
Access a folder template’s attributes from a child job template
While the parent property can be used to access the parent Folder
itself, if you have a Job template as a child of a Folder template it
can be very useful to access the attributes of the Folder template
directly from the Job template. For this use case the parentInstance
variable is analogous to the instance variable only it allows
accessing the attributes of the parent Folder template.
Unlike other techniques mentioned above, to use parentInstance you
need know nothing about the Jenkins object model, since you have direct
access to the template attributes which are exposed as simple objects.
There are a number of issues to be aware of when using the
parentInstance variable:
-
parentInstancewill benullwhen the Job template is instantiated outside a Folder template -
While
parentInstancewill be non-null when the Job template is instantiated as one of the jobs in the "Initial Activities" only theparentInstance.nameattribute will have a non-null value until the user saves the Folder template configuration
Therefore, when using the parentInstance variable it is necessary to
ensure that it is used defensively, as any NullPointerException thrown
when attempting to instantiate the Job template can cause the folder
template to fail to instantiate also.
When using the parentInstance variable, it is recommended to use the
Groovy transformer for the Job template as that provides both the
"Elvis" operator (?:) and the safe navigation operator (?.) both of
which combine to allow safer template instantiation. For example,
${parentInstance?.someAttribute?:"someDefault"} is a safe Groovy
expression to return the value of the someAttribute attribute of the
parent template instance, falling back to someDefault if the job is
either instantiated outside a Folder template or while the value of
someAttribute has not been defined by the user.
If you will be repeating multiple references to the same attribute
within the same Job template, it would make sense to create a Computed
attribute in the Job template and use a JEXL expression to evaluate the
value to use as that makes it easier to refactor the expression, for example, if
you need to change the default value. In the context of JEXL
expressions, JEXL also supports the "Elvis" operator and performs safe
navigation by default. For example,
${parentInstance.someAttribute?:"someDefault"} is a safe JEXL
expression to return the value of the someAttribute attribute of the
parent template instance, falling back to someDefault if the job is
either instantiated outside a Folder template or while the value of
someAttribute has not been defined by the user.
|
The recommendation is to test that your Job template can be instantiated with sensible defaults outside a Folder template before attempting to add the Job template creation as an initial action for a folder template, as this provides a fast way to verify that your template is coded defensively. |
There are a couple of additional points you may want to consider:
-
If you have triggers in the jobs, you may want to structure the template such that the triggers are disabled while the attributes from the parent instance are invalid to prevent the job from being triggered prior to the parent folder template being configured correctly
-
The "Elvis" operator only supplies the default value for
nullvalues. It does not supply the default for empty strings. If you need the default to apply for bothnulland an empty string, you will need to write your expression accordingly -
It is easy for users to accidentally add leading/trailing whitespace to values that they input in the template attributes. If such whitespace could affect your template you will need to structure the template accordingly.
Script templates
When working with large installations using many templates or many templatized jobs, it is often useful to be able to perform bulk operations using scripts. (Many of these operations are available only in the 4.0 and later versions of the plugin.)
REST API operations
The most important operation involving templates is creating and updating instances. For builder and publisher templates (and any auxiliary templates they use), there is no special support in Jenkins: the usual REST methods to create and update job configuration (/config.xml) work. Refer to an existing job using such templates for an example of the syntax.
Job and folder templates, however, are special and have a dedicated REST
API. A single endpoint (URL) is used for creating and updating job and
folder templates: /instantiate, which is added to the URL of the
template (never the job). You may POST to this URL, giving it a query
parameter job with the full path to the intended or actual templatized
job. The message body must be an XML document with root element values;
the child element names and text contents define attributes to set on
the template instance. This single API can be used to create a job (or
folder) from a template; update the attributes of an existing
templatized job (using this template); or even to convert a job using a
different template, or no template at all. Refer to the REST API link
on the template’s index page for details and examples.
(You may also use most regular REST APIs to work with templatized jobs.
/createItem can be used to create a templatized job; you must specify
the
<com.cloudbees.hudson.plugins.modeling.impl.jobTemplate.JobPropertyImpl>
section giving the template and attributes, and the main body of the job
such as <project>, but the transformer will be run to fill in the
details. GET /config.xml works fine, though POST to this same URL does
not currently rerun the transformer automatically. /api/xml and the like
can be used to obtain information about the associated template and
attributes as well.)
Since templates are stored as regular items in the Jenkins folder tree as of 4.0, regular REST APIs for CRUD (create/read/update/delete) of templates themselves work as with anything else. Also, POST to /config.xml on a job/folder template will automatically rerun the transformer on any instances, just as if you had saved it from the UI. You can also use /api/xml and similar to obtain information about a template, such as its attributes or supertype.
Access control is similar to interactive use: you must have Job/Read permission on the template for most operations, Job/Create on a folder to create a templatized job in it, Job/Configure to change the configuration of a templatized job.
CLI commands
The Jenkins CLI is often more convenient to use from scripts than the
REST API. There is a command instantiate which has the same
capabilities as the REST /instantiate. First give the command the path
and name of the (desired or existing) templatized job. You can then add
-t specifying the path and name of the template (only necessary when
creating a new job, or converting to this template). Then give -a with
a name=value pair for each attribute you wish to set.
As with the REST API, there is no special syntax for CRUD on templates
themselves. The same commands used for regular jobs work on templates
(at least in Jenkins 1.538 and later). Again as a convenience,
update-job applied to a job/folder template will reconfigure any
instances.
Groovy scripts
Sometimes using the Groovy script console (/script), the Scriptler
plugin, etc. is the easiest way to work with templates. Most operations
with templates or templatized jobs will not require any special APIs.
There are two things you might want to call directly in the Templates
plugin when working with job or folder templates:
-
If you have a reference to job or folder template (
com.cloudbees.hudson.plugins.modeling.impl.entity.EntityModel), you can call reconfigureInstances() to regenerate any instances after updating its definition (or otherwise changing what the transformers would produce). -
If you have a reference to a templatized job, you can call EntityInstance.from(Item) to obtain an instance object. This is mainly used to call setValue(String, Object) to change attributes, and save() to run the transformer and update the job definition.
-
You can create a new templatized job or folder as well. If
gis a ModifiableTopLevelItemGroup (such as Jenkins root, or a Folder), you can callg.createProject(model.asDescriptor(), "new-job-name", true)to create a new item. If you need any additional attributes (beyond
name), you can use the steps given above starting withEntityInstance.fromto define and save them.
Miscellaneous features
Some other features in CloudBees CI are designed to enhance your use of templates.
View Creation Filter plugin
The CloudBees View Creation Filter plugin allows you to specify that a view may only contain certain item types. To use it, when creating a new view, pick Restrict what can be created in this view from the Add Job Filter pulldown. Then you can select a list of item types; only items of those types will be permitted to be added to the view via the New Item menu.
While these types might be built-in types such as Freestyle project, you will also see your own job templates listed as choices.
You may also want to use the Template Type Filter to add all instances of a given template by default. Currently, you cannot prevent other kinds of items from being added via the Jobs checkbox list (tracked as CJP-1501).
Groovy View plugin
The CloudBees Groovy View plugin provides a Groovy Script View you can select when creating a new view in a Jenkins folder or at top level. It allows you to generate any content you like in the view (subject to the limitations of the system’s configured markup language).
To create interesting content, you can refer to the folder as ${it} and calculate some contents.
But when used with a templatized folder, you can also use ${instance} to the refer to the template instance, from which you can get the values of template attributes.
This is useful since your folder template can predefine a Groovy script view which generates a dynamic view according to both the current contents of the folder and its templatized configuration.