Pipeline as Code describes a set of features that allow Jenkins users to define pipelined job processes with code, stored and versioned in a source repository. These features allow Jenkins to discover, manage, and run jobs for multiple source repositories and branches—eliminating the need for manual job creation and management.
Pipeline as Code provides a consistent way to build and deploy services and applications by treating them as code. It is used as a tool to execute underlying tasks for various stages of a software delivery lifecycle and takes away the implementation details.
Both declarative and scripted Pipelines are Pipeline as Code. Before Pipelines, jobs were configured using the UI, and were part of the config.xml files rather than the code.
|
Pipeline as Code provides the following benefits:
-
Allows integration of your Pipeline with your code thereby making it easier to collaborate. When you update your Pipeline, your changes are automatically picked up.
-
Lets you track changes to Pipelines using source control. If you store Pipelines in a version control system and a change to the Pipeline causes a build to break, then it can be fixed before it is merged or can easily be reverted. It can also be restored more easily.
|
To use Pipeline as Code, projects must contain a file named Additionally, one of the enabling jobs needs to be configured in Jenkins:
|
Fundamentally, an organization’s repositories can be viewed as a hierarchy, where each repository may have child elements of branches and pull requests.
+--- GitHub Organization +--- Project 1 +--- main +--- feature-branch-a +--- feature-branch-b +--- Project 2 +--- main +--- pull-request-1 +--- etc...
Prior to Multibranch Pipeline jobs and Organization Folders, CloudBees Folders could be used to create this hierarchy in Jenkins by organizing repositories into folders containing jobs for each individual branch.
Multibranch Pipeline and Organization Folders eliminate the manual process by detecting branches and repositories, respectively, and creating appropriate folders with jobs in Jenkins automatically.
Jenkinsfile
The presence of the Jenkinsfile in the root of a repository makes it eligible for Jenkins to automatically manage and execute jobs based on repository branches.
The Jenkinsfile should contain a Pipeline Script, specifying the steps to execute the job.
The script has all the power of Pipeline available, from something as simple as invoking a Maven builder,
to a series of interdependent steps, which have coordinated parallel execution with deployment and validation phases.
A simple way to get started with Pipeline is to use the Snippet Generator available in the configuration screen for a Jenkins Pipeline job. Using the Snippet Generator, you can create a Pipeline script as you might through the drop-downs in other Jenkins jobs.
CloudBees users have more options than only using Jenkinsfile. See Custom Pipeline as Code Scripts.
The following example shows how "Pipeline as Code" would be written to a Jenkinsfile and checked into a project’s source control
repository:
pipeline { agent any(1) stages { stage('Build') {(2) steps {(3) sh 'make'(4) } } stage('Test'){ steps { sh 'make check' junit 'reports/**/*.xml'(5) } } stage('Deploy') { steps { sh 'make publish' } } } }
| 1 | agent indicates that Jenkins should allocate an executor and workspace for this part of the Pipeline. |
| 2 | stage describes a stage of this Pipeline. |
| 3 | steps describes the steps to be run in this stage |
| 4 | sh executes the given shell command |
| 5 | junit is a Pipeline step provided by the JUnit plugin for aggregating test reports. |
node { stage('Build') { sh 'make' } stage('Test') { sh 'make check' junit 'reports/**/*.xml' } stage('Deploy') { sh 'make publish' } }
Custom Pipeline as Code scripts
Pipeline as Code describes how to create multibranch projects and organization folders automatically from SCM repositories containing a Jenkinsfile.
This file serves two functions: it contains the Pipeline script which defines the project’s behavior; and it indicates which repositories and branches are ready to be built by Jenkins.
For large organizations with a homogeneous build environment, keeping a Jenkinsfile in every repository could be undesirable for several reasons:
-
The content could become redundant. This risk can be minimized by using global libraries to define a DSL for the organization’s builds, though the syntax is limited to what Groovy supports.
-
Developers may not want to see any Pipeline script in their repositories. Again this can be minimized using global libraries to some extent: the learning curve can be restricted to copying and editing a short example
Jenkinsfile. -
Some organizations may not want to have any Jenkins-specific files in repositories at all.
-
Administrators may not trust developers to write Pipeline script, or more broadly to define job behavior. While the Groovy sandbox defends against malicious scripts (for example, changing system configuration or stealing secrets), it does not prevent overuse of shared build agents, questionable plugin usage, lack of timeouts or resource caps, or other mistakes or poor decisions.
To support administrators wanting to restrict how Pipelines are defined, CloudBees CI includes an additional option for multibranch projects and organization folders. With this option, the configuration in Jenkins consists of both the name of a marker file, and the Pipeline script to run when it is encountered.
For a single repository, create a Multibranch Pipeline. Configure your branch source as usual, but then under Build Configuration » Mode, select Custom script. Select a Marker file, which will be the name of a file in matching repositories. Under Pipeline » Definition, you may type in a Pipeline script directly, or use Pipeline script from SCM to load the definition from an external source.
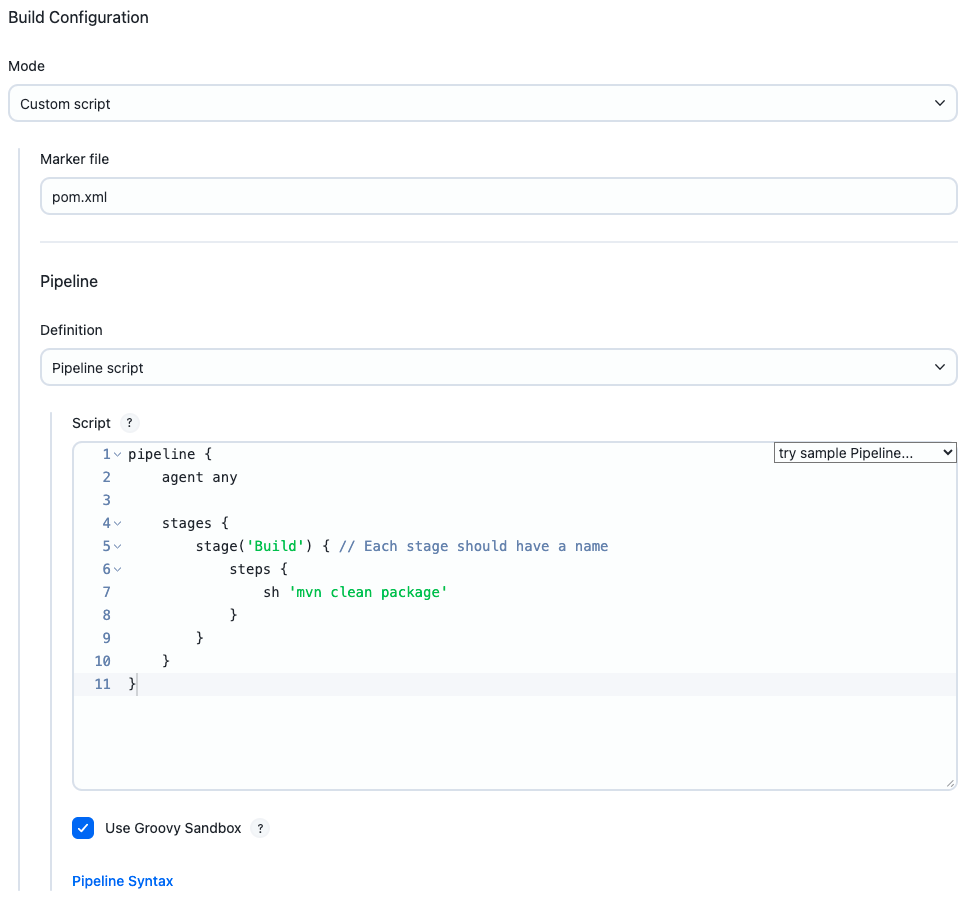
More commonly, you will want to configure a project definition applicable across an entire organization. To do this, create a GitHub Organization. Configure your repository source as usual, but then under Project Recognizers, delete Pipeline Jenkinsfile and add Custom script instead.
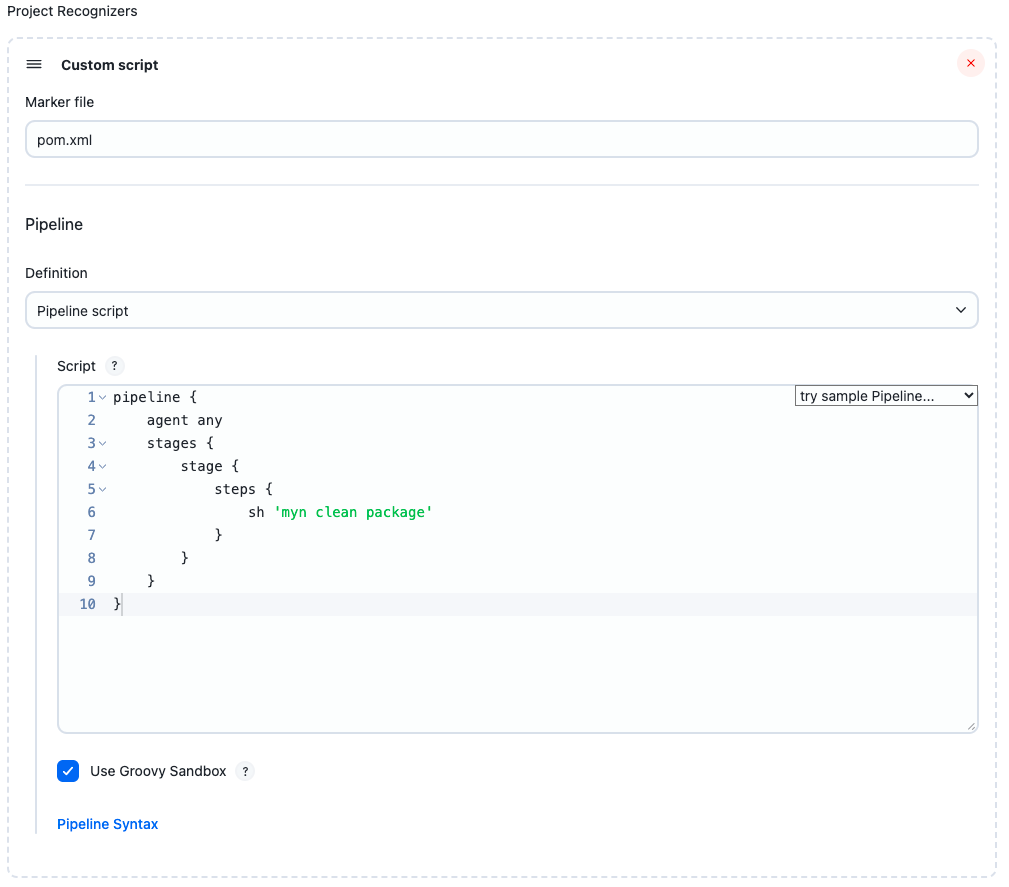
In this example, any repository containing a Maven pom.xml at top level will be recognized as a buildable Jenkins project.
As usual with Pipeline as Code, checkout scm checks out the repository sources on a build node.
Note that you may have multiple project recognizers defined for a single organization: say, one for pom.xml and one for build.gradle.
Only one recognizer will be used for a given repository: the first one that finds its marker file in at least one branch.
You can even include the standard Pipeline Jenkinsfile recognizer in the list as one option.
Trusted files
There is also a facility for limiting what changes may be made in untrusted branches (such as pull requests filed by people not authorized to push to the main repository).
In the standard recognizer, Jenkinsfile will always be read from a trusted branch (such as the base branch of an untrusted pull request).
This ensures that an outsider cannot alter the overall build process merely by filing a pull request.
When using custom factories, or in some cases when using Jenkinsfile, you may want to restrict modifications to other files too.
To do so, just have your script call the readTrusted step, which returns the text of a repository file, aborting if it has been modified in an untrusted branch.
For example, to simulate the standard Pipeline Jenkinsfile recognizer you could use a custom recognizer based on Jenkinsfile with the following script:
evaluate(readTrusted 'Jenkinsfile')
(Currently, the standard recognizer would quietly ignore modifications to Jenkinsfile in untrusted pull requests, whereas this script would fail the build.)
The return value could be ignored if you merely wanted to ensure that a file used by some other process was not modified.
With the marker file Makefile:
readTrusted 'Makefile' node { checkout scm sh 'make' }
Untrusted pull requests could edit regular source files, but not Makefile.
Here anyone is free to edit Makefile, because it is run inside a container, and to create or edit image to specify the build environment.
But only committers to the repository can create or edit extra.groovy.
Folder computation
Multibranch Pipeline projects and Organization Folders extend the existing folder functionality by introducing 'computed' folders. Computed folders automatically run a process to manage the folder contents. This computation, in the case of Multibranch Pipeline projects, creates child items for each eligible branch within the child. For Organization Folders, computation populates child items for repositories as individual Multibranch Pipelines.
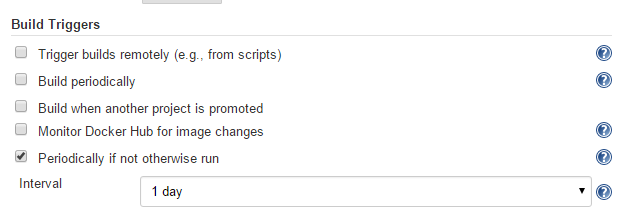
Folder computation may happen automatically via webhook callbacks, as branches and repositories are created or removed. Computation may also be triggered by the Build Trigger defined in the configuration, which will automatically run a computation task after a period of inactivity (this defaults to run after one day).
Information about the last execution of the folder computation is available in the Folder Computation section.
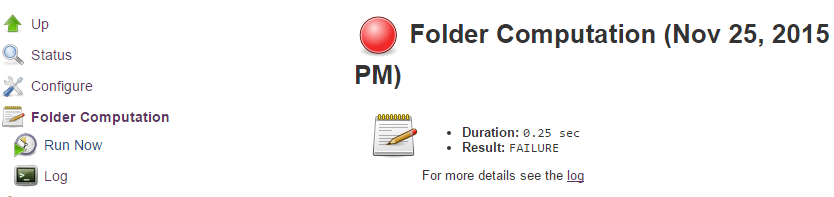
The log from the last attempt to compute the folder is available from this page. If folder computation doesn’t result in an expected set of repositories, the log may have useful information to diagnose the problem.
Configuration options
Both Multibranch Pipeline projects and Organization Folders have configuration options to allow precise selection of repositories. These features also allow selection of two types of credentials to use when connecting to the remote systems:
-
scan credentials, which are used for accessing the GitHub or Bitbucket APIs
-
checkout credentials, which are used when the repository is cloned from the remote system; it may be useful to choose an SSH key or "- anonymous -", which uses the default credentials configured for the OS user
| If you are using a GitHub Organization, you should create a GitHub access token to use to avoid storing your password in Jenkins and prevent any issues when using the GitHub API. When using a GitHub access token, you must use standard Username with password credentials, where the username is the same as your GitHub username and the password is your access token. |
Multibranch Pipeline projects
Multibranch Pipeline projects for a repository
The Multibranch Pipeline project scans a repository, creating the Pipeline projects for branches, pull requests, and/or tags, depending on the criteria you specify.
To define a project you create a Pipeline script in a Jenkinsfile in the root directory of a branch in the project.
It is not necessary to use exactly the same Pipeline script in each branch. Instead, you can have different Pipeline scripts defined in different branches, or add and remove Jenkinsfiles depending on your use cases.
After the project is created, Jenkins immediately runs that project.
Removing a Pipeline script from a branch removes the associated projects from the Multibranch Pipeline.
You can restrict the branches that are examined by using a regular expression on the GitHub Multibranch Pipeline configuration page.
This plugin fits into the larger "Pipeline as Code" story; for more information, refer to Understand and implement Pipeline as Code.
Work with GitHub pull requests
Multibranch pipeline projects have a wide range of other options for controlling which Pipeline projects are created and when they are run. For example, you can choose to build origin-repository pull requests in addition to, or instead of, building the plain branches; and you can choose to build pull requests without merging with the base branch, or in addition to building the merge product. The following features are included:
-
The GitHub user or organization repository’s pull requests are treated as projects.
-
Pull request and branch build result status reported back to GitHub.
When the proper webhooks are configured, Jenkins reports the status of the pull request’s projects to GitHub. The status is reported as follows:
-
Success - the job was successful
-
Failure - the job failed and the pull request is not ready to be merged
-
Error - something unexpected happened; example: the job was aborted in Jenkins
-
Pending - the job is waiting in the build queue
Create a Multibranch Pipeline project
Let us go through the steps for creating a Multibranch Pipeline project. In this example we will be using the following environment to create a Multibranch Pipeline.
-
Jenkins controller 2.263.4
-
Agent connected to that controller (labelled "Linux")
-
Tunnel set up via ngrok to send webhooks from GitHub to the Jenkins controller.
-
A repository for the application to get data for the Multibranch project. In this example, we are using the
multibranch-sample-apprepository.
To create a Multibranch Pipeline, complete the following steps.
-
Ensure that you have authenticated credentials for your repository. In this example we use the GitHub app for authentication. For step-by-step instructions on creating a GitHub application, refer to Use GitHub App authentication. For instructions on adding the credentials to your repository, refer to Add the Jenkins credential.
-
Go to the controller dashboard and select New Item.
-
In the Enter an item name field, type in the name for the Multibranch Pipeline project that you want to create. For this example, let us name the project
sample-multibranch. -
Scroll down and select Multibranch Pipeline.
-
Select OK. The General settings page is displayed.
-
Scroll down to Branch Sources. Select the Add source dropdown and select GitHub.
 Figure 1. Add source - GitHub
 -
Select the credentials for your repository from the Credentials dropdown. These are the credentials you created for the GitHub app.
-
Provide the URL for the repository. In this example, we are using the
multibranch-sample-apprepository. Your URL should look something like thishttps://github.com/your-organization/multibranch-sample-app.git.Ensure that you have a Jenkinsfile in the root of your repository as the build is configured to look for a Jenkinsfile in the root of a branch. -
Select Save.
 Figure 2. Branch sources
You will notice that the webhook has been received by the Jenkins controller and is being processed.
If you now create a new branch in your repository, that branch will be automatically added to the project that you created. A PR associated with this project will also be created automatically. You can specify a repo from GitHub Enterprise using this method. The API endpoint will be automatically inferred.
Manually add the API endpoint
-
Select Repository Scan and enter the
API endpointandOwner.The API endpointis either the default GitHub endpoint or an alternate API endpoint of a self-hosted GitHub Enterprise account. Users can add servers/API endpoints on the page. TheOwneris the name of the GitHub Organization or GitHub User Account.After scanning, the Repository drop-down will populate with the available repositories. Select the appropriate repository from the list.
If your organization or user account has a large number of repositories, and then you select Repository, the scan may time out. If the scan does not work for this reason, you should select Repository HTTPS URL and enter the specific repository’s URL instead. -
Select Behavior options.
-
Select the Property strategy and, if applicable, add properties. This setting allows users to define custom properties for each branch or apply the same properties to all branches. Properties:
-
Pipeline branch speed/durability override - This setting allows users to change the default durability mode for running Pipelines. In most cases this is a trade-off between performance and the ability for running pipelines to resume after unplanned Jenkins outages.
-
Suppress automatic SCM triggering - This setting suppresses the normal SCM commit trigger coming from branch indexing.
-
After configuring these items and saving the configuration, Jenkins will automatically scan the repository and import appropriate branches.
| Discover branches and strategy options are extensible, so other plugins may contribute additional options. This set of steps only describes the default options. |
Behavior options for GitHub branch sources
-
Discover branches - determines which branches are discovered.
-
Strategy options:
-
Exclude branches that are also filed as PRs - If you are discovering origin pull requests, you may not want to also build the source branches for those pull requests.
-
Only branches that are also filed as PRs - Similar to discovering origin pull requests, but discovers the branch rather than the pull request. This means env.GIT_BRANCH will be set to the branch name rather than PR-#. Also, status notifications for these builds will only be applied to the commit and not to the pull request.
-
All branches - Ignores whether the branch is also filed as a pull request and instead discovers all branches on the origin repository.
-
-
-
Discover pull requests from origin - determines how pull requests from origin are discovered.
-
Strategy options:
-
Merging the pull request with the current target branch revision - Discover each pull request once with the discovered revision corresponding to the result of merging with the current revision of the target branch.
-
The current pull request revision - Discover each pull request once with the discovered revision corresponding to the pull request head revision without merging.
-
Both the current pull request revision and the pull request merged with the current target branch revision - Discover each pull request twice. The first discovered revision corresponds to the result of merging with the current revision of the target branch in each scan. The second parallel discovered revision corresponds to the pull request head revision without merging.
-
-
-
Discover pull requests from forks - determines how pull requests from forks are discovered.
-
Strategy options:
-
Merging the pull request with the current target branch revision - Discover each pull request once with the discovered revision corresponding to the result of merging with the current revision of the target branch.
-
The current pull request revision - Discover each pull request once with the discovered revision corresponding to the pull request head revision without merging.
-
Both the current pull request revision and the pull request merged with the current target branch revision - Discover each pull request twice. The first discovered revision corresponds to the result of merging with the current revision of the target branch in each scan. The second parallel discovered revision corresponds to the pull request head revision without merging.
-
-
Trust options - In order to protect against a malicious pull request modifying the Jenkinsfile, which would allow it to run Pipeline code on the Jenkins controller, you can define the trust policy for pull requests from forks:
Even with these trust options, you should make sure no secrets are made available to the agent running the build if accepting PRs from forks. -
Nobody - Pull requests from forks will all be treated as untrusted. This means that where Jenkins requires a trusted file (for example, Jenkinsfile) the contents of that file will be retrieved from the target branch on the origin repository and not from the pull request branch on the fork repository.
-
Contributors - Pull requests from collaborators to the origin repository will be treated as trusted; all other pull requests from fork repositories will be treated as untrusted.
If credentials used by Jenkins for scanning the repository do not have permission to query the list of contributors to the origin repository, then only the origin account will be treated as trusted. This will fall back to Nobody. All collaborators are trusted, even if they are only members of a team with read permission. -
Everyone - All pull requests from forks will be treated as trusted.
This option can be dangerous if used on a public repository hosted on GitHub. -
From users with Admin or Write permission - Pull requests forks will be treated as trusted if and only if the fork owner has either Admin or Write permissions on the origin repository.
This is the recommended policy. This strategy requires the Review a user’s permission level API; as a result, on GitHub Enterprise Server versions before 2.12, selecting this policy is the same as trusting Nobody.
-
-
Organization folders
Organization Folders offer a convenient way to allow Jenkins to automatically manage which repositories are automatically included in Jenkins.
Particularly, if your organization utilizes GitHub Organizations or Bitbucket Teams, any time a developer creates a new repository
with a Jenkinsfile, Jenkins will automatically detect it and create a Multibranch Pipeline project for it.
This alleviates the need for administrators or developers to manually create projects for these new repositories.
Create a GitHub Organization project
This plugin creates a new project type, a GitHub Organization. The GitHub organization project creates a Multibranch Pipeline for each repository in an organization. This Multibranch Pipeline then creates a separate project for each branch that contains a Jenkinsfile in the top level directory.
To use this plugin, you must have GitHub credentials with the appropriate access level to your project (see the section on credentials below) installed in Jenkins.
Set up your GitHub Organization as follows:
-
From the Jenkins dashboard select New Item > GitHub Organization. Enter an item name and select OK.
 Figure 3. Create a new GitHub Organization
 -
On the Projects tab, enter the details for GitHub Organization.
 Figure 4. GitHub Organization details
 -
Select or add new Credentials.
These credentials must have sufficient permissions to at least see the repositories and their contents for the intended user or organization. -
In the Owner field, specify a username or an organization name.
-
Save, and wait for the Scan Organization to run. The project progress is displayed to the left hand side.
 Figure 5. Scan Organization project
 -
You may need to refresh the page after it runs to see your repositories. Each of the repositories that you have imported is represented by a Multibranch Pipeline project. The configuration of these projects is controlled by the parent GitHub Organization project. The imported repository is represented as a folder containing a project for each branch with a Pipeline script defined in a
Jenkinsfilein the root directory. You cannot modify the settings on these folders.
Select GitHub Organization project credentials
There are two different types of credentials for the GitHub organization:
-
Scan credentials: used to access the GitHub API
-
Checkout credentials: used to clone the repository from GitHub
You can use different credentials for each as long as they have the appropriate permissions. There is an anonymous option for checkout. Regardless, you should create a GitHub access token to use to avoid storing your password in Jenkins and prevent any issues when using the GitHub API. When using a GitHub access token, you must use standard Username with password credentials, where the username is the same as your GitHub username and the password is your access token. Other options available are:
-
Repository name pattern - a regular expression to specify which repositories are included
-
API endpoint - an alternate API endpoint to use a self-hosted GitHub Enterprise
-
Checkout credentials - alternate credentials to use when checking out the code (cloning)
After configuring these items and saving the configuration, Jenkins will automatically scan the organization and import appropriate repositories and resulting branches.
Orphaned item strategy
Computed folders can remove items immediately or leave them based on a desired retention strategy. By default, items will be removed as soon as the folder computation determines they are no longer present. If your organization requires these items remain available for a longer period of time, simply configure the Orphaned Item Strategy appropriately. It may be useful to keep items in order to examine build results of a branch after it’s been removed, for example.

Icon and view strategy
You may also configure an icon to use for the folder display. For example, it might be useful to display an aggregate health of the child builds. Alternately, you might reference the same icon you use in your GitHub organization account.
Example
To demonstrate using an Organization Folder to manage repositories, we’ll use the fictitious organization: CloudBeers, Inc.
-
Select New Item.
-
Enter
cloudbeersfor the item name. -
Select GitHub Organization, and then select OK.
-
Optionally, enter a better descriptive name for the Description, such as 'CloudBeers GitHub'. In the Repository Sources section, complete the section for "GitHub Organization". Make sure the owner matches the GitHub Organization name exactly, in our case it must be: cloudbeers. This defaults to the same value that was entered for the item name in the first step. Next, select or add new "Scan credentials" - we’ll enter our GitHub username and access token as the password.
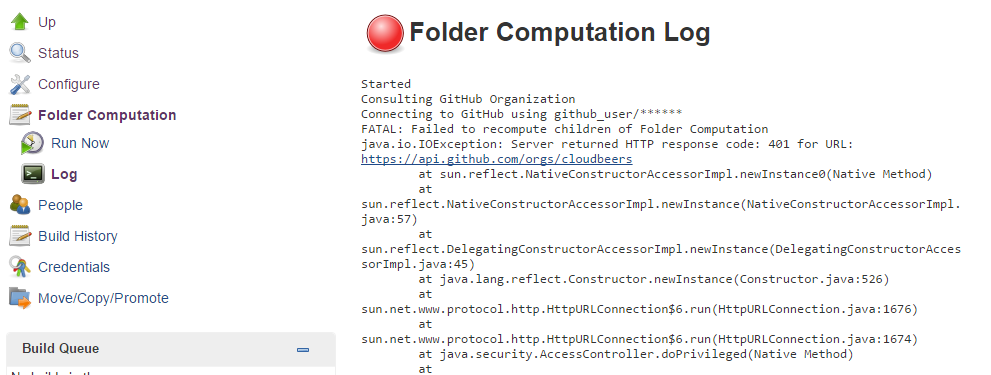
 Figure 8. Folder computation
 -
After saving, the folder computation will run to scan for eligible repositories, followed by multibranch builds.
-
Refresh the page after the job runs to ensure the view of repositories has been updated.
 Figure 9. CloudBeers GitHub
 -
At this point, you are finished with basic project configuration and can now explore your imported repositories. You can also investigate the results of the jobs run as part of the initial Folder Computation.
 Figure 10. Explore imported repositories
| To utilize Bitbucket Team, follow the same set of steps, select Bitbucket Team instead of GitHub Organization as the new item type, and enter appropriate Bitbucket credentials. |
Additional Resources
-
Docker Jenkins sample app that uses Docker containers to manage test and deployment environments