The CloudBees Skip Next Build plugin allows you to skip building a job for a short period of time. While you could skip building a job by disabling it from the job configure page, you would need to remember to enable the job.
Use this plugin:
-
If you are going to take some external resources that the build requires offline for maintenance, and you don’t want to see any build failure notices.
-
If you are merging a major feature branch, and you want to prevent builds until after the merge is completed.
The plugin adds a ![]() Skip Builds action to all jobs. When a skip is applied to the job, a message with an orange background appears across the main job page as shown in the image below.
Skip Builds action to all jobs. When a skip is applied to the job, a message with an orange background appears across the main job page as shown in the image below.
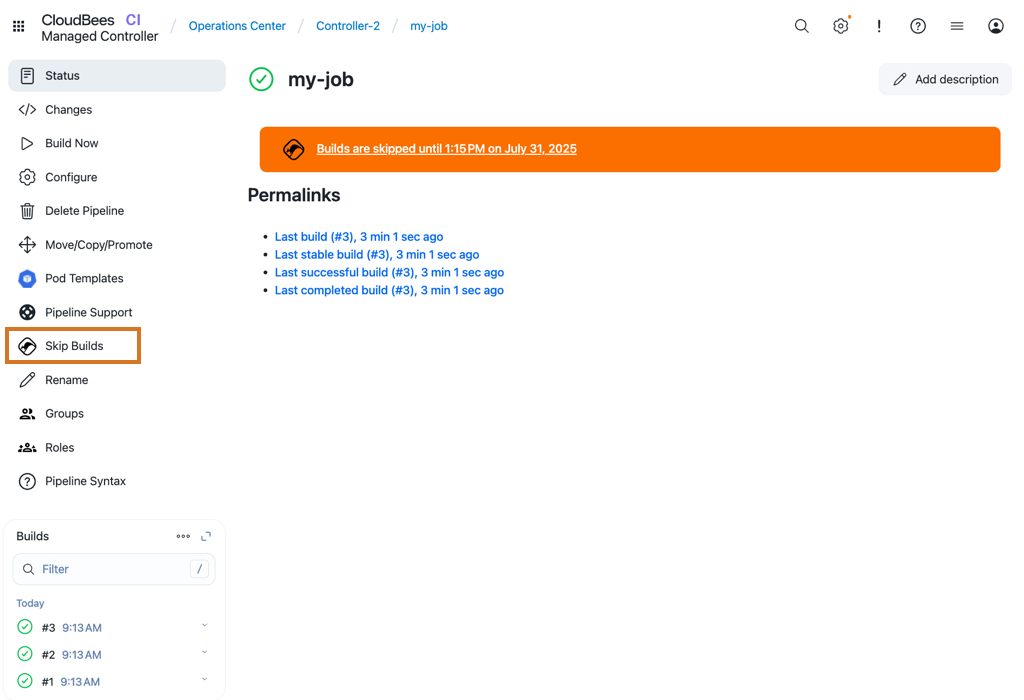
To apply a skip to a folder or job:
-
Select a job or folder from your controller dashboard.
-
Select
 Skip builds on the left navigation menu. The Skip builds page displays.
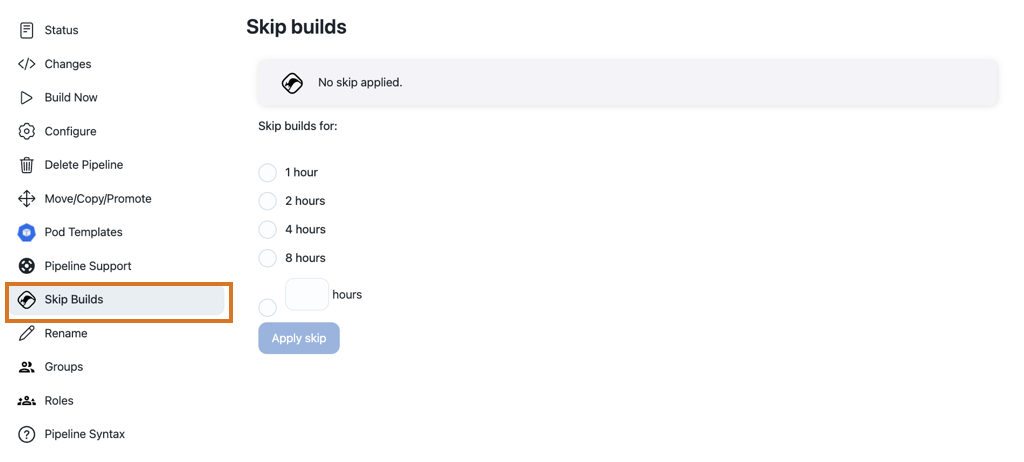 Figure 2. Apply a skip to a folder/job
 -
Under Skip builds for, select how long to apply the skip. You can select a value from 1 to 8 hours or enter a value up to 100 in the hours field.
-
Select Apply skip. A message displays across the main job page that builds are skipped until the specified time.
| When a skip is applied to a folder, all jobs within the folder will be skipped. |
To remove a skip from a folder or job:
-
Select
 Skip builds on the left navigation menu.
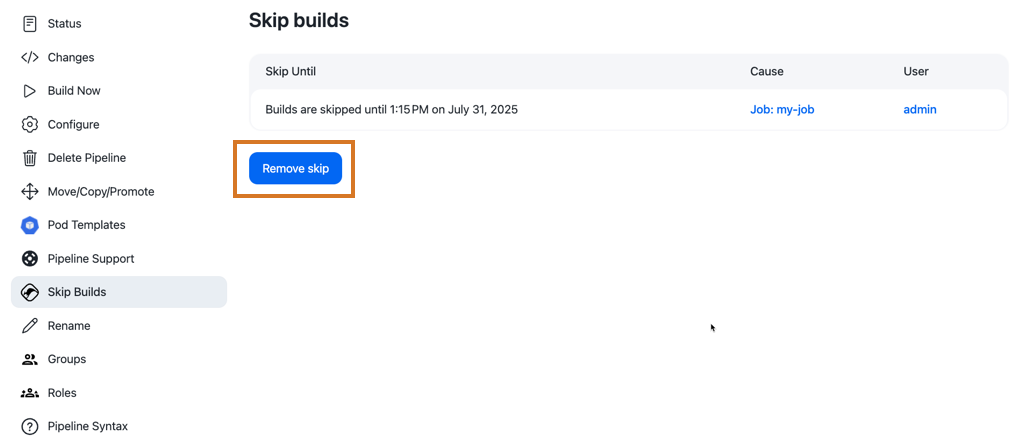 Figure 3. Remove a skip from a job
 -
Select Remove skip to remove the skip. If the skip was not applied directly to the folder/job but instead is either inherited from a parent folder or originating from a skip group, the screen will look similar to the image below.
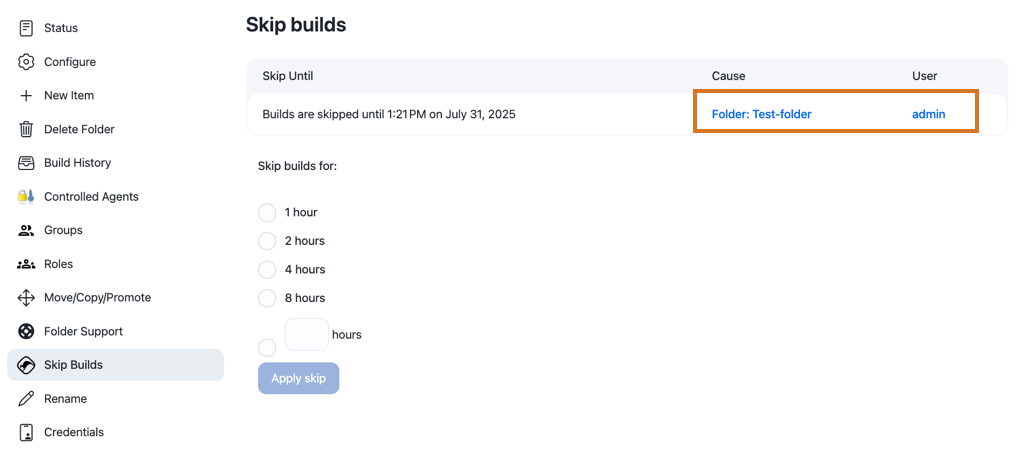 Figure 4. Trying to remove a skip from a job where the skip is inherited from a parent folder
The link(s) in the table of active skips can be used to navigate to the corresponding skip.
Skip groups
Depending on how the jobs in your Jenkins instance are organized and the reasons for skipping builds, it may be necessary to select a disjoint set of jobs from across the instance for skipping.
Skip groups can be used to combine jobs from different folders so that they can be skipped as a single group. The Jenkins administrator configures skip groups in the global configuration.
To create a skip group from the controller dashboard:
-
Select in the upper-right corner to navigate to the Manage Jenkins page.
-
Select System.
-
Select Skip groups from the breadcrumb context menu.
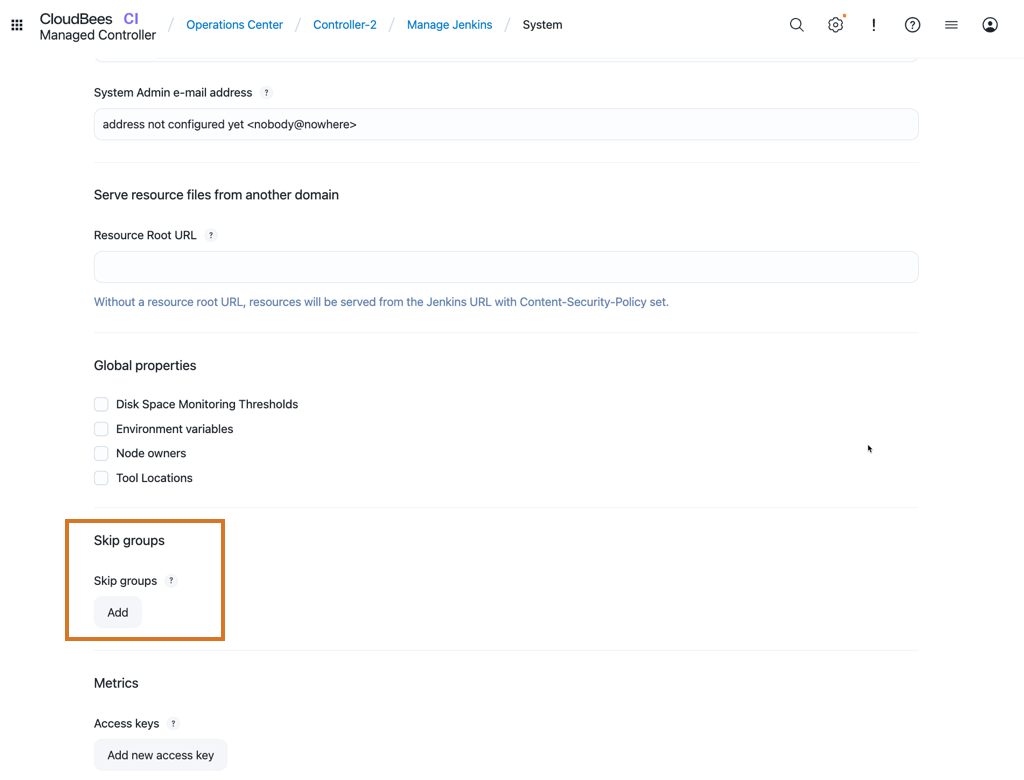 Figure 5. Skip groups
 -
Select Add.
-
Configure the skip group.
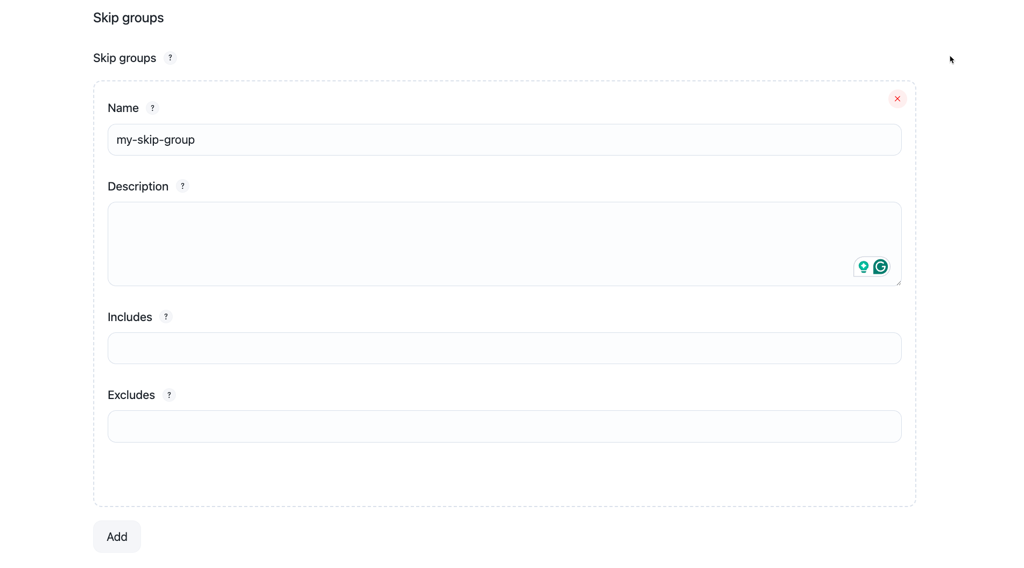 Figure 6. Add a skip group to the Jenkins global configuration
-
Enter a skip group title in the Name field.
-
Enter information in the Description field that explains to users why the skip has been applied to their jobs.
-
Use ANT Path expressions in the Includes: and Excludes: fields to identify jobs to be included or excluded from the skip group.
-
Includes: An expression to match elements to be added in the skip group, coming from the Jenkins instance.
-
Excludes: An expression to match elements from the skip group that will be excluded from the Skip Group.
To configure the ANT Path expressions for the Include: and Excludes: fields use the following example.
myproject(a folder for your development project):-
build jobs for branches and features:
-
myproject/build-core -
myproject/build-api -
myproject/build-ui -
myproject/build-data
-
-
release jobs for the application:
-
myproject/release-test -
myproject/release-qa -
myproject/release-prod
-
If you are planning on releasing your project and would like to skip all the build projects, but not the release jobs, you can create a skip group by entering the following in the Includes: field:
-
Includes:
myproject/build-**
If your project has additional jobs:
-
testing jobs for the application:
-
myproject/test-commons -
myproject/test-ui -
myproject/test-regression
-
You can create a skip group by entering the following in the Excludes: field:
-
Includes:
myproject/** -
Excludes:
myproject/release-**
When you use the Includes: field for ANT Path expressions, you do not have to use the Excludes: field. However, you cannot use the Excludes: field without the Includes: field.
-
-
-
-
Select Add again if you want to create more skip groups.
Add folders or jobs to a skip group
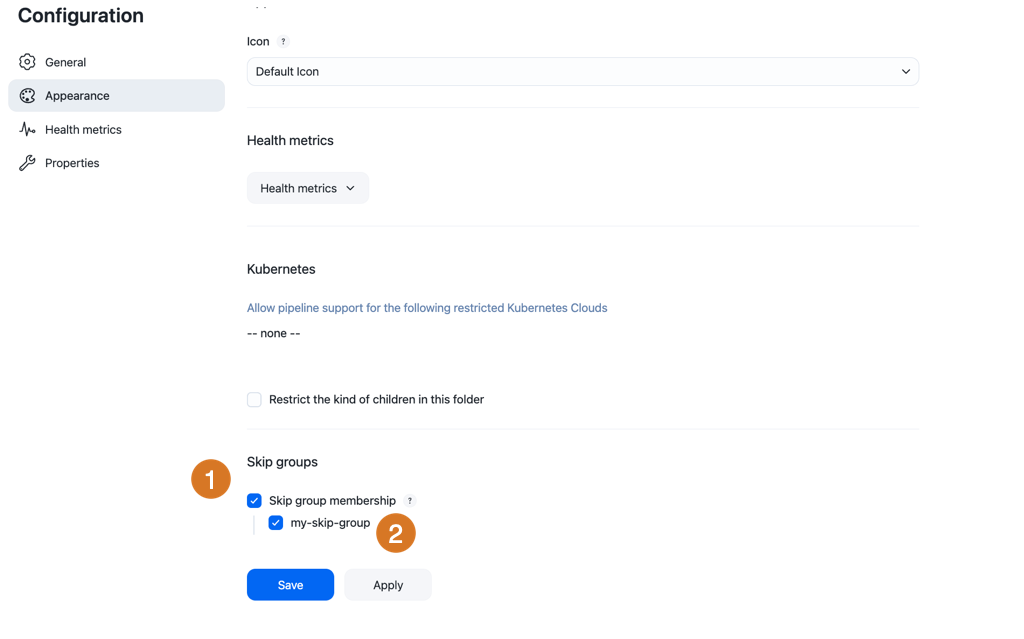
Once skip groups are defined, you can configure the jobs and/or folder membership from the job/folder configuration page.
-
Select Skip group membership.
-
Select a skip group.
When there is at least one skip group defined in a Jenkins instance, the page is enabled. The Skip groups page contains a table that lists the available skip groups.
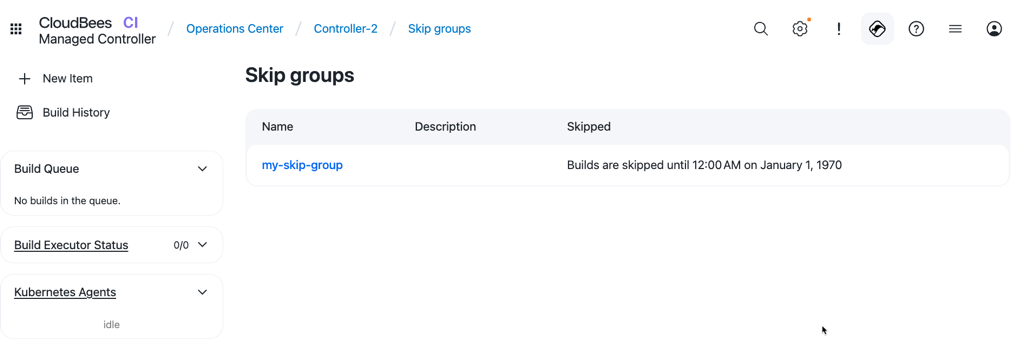
To manage the skip state of a skip group, select the skip group name in the table to navigate to that skip group’s details page.
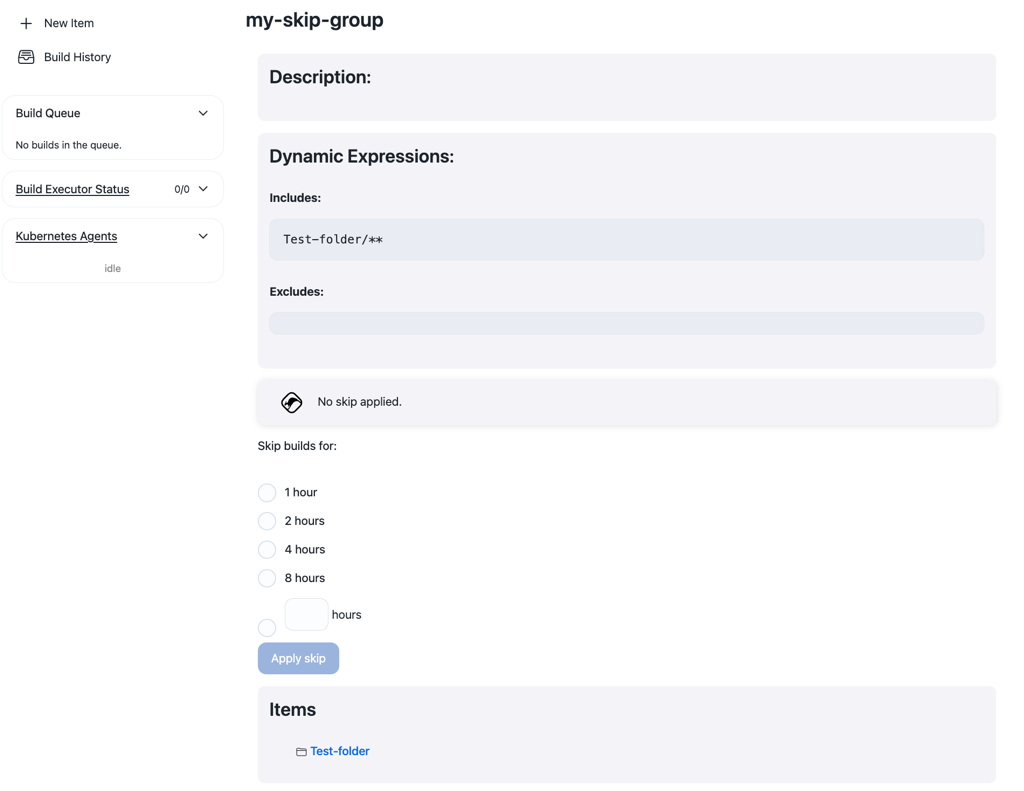
The details page displays the current status of the skip group and lists all the items that are a direct member of this skip group.
| Where folders are a member of a skip group, the skip group membership will be inherited by all items in the folder. |
Control skips with Jenkins CLI
The Skip Next Build plugin adds a number of Jenkins CLI commands for controlling skips.
apply-skip: Enables the skip setting on a job.
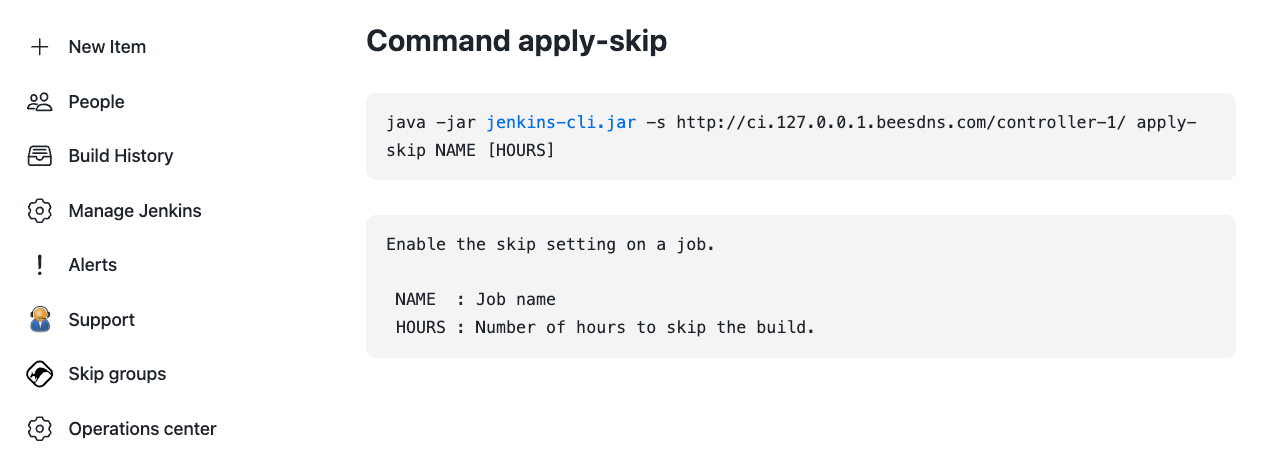
This command takes two parameters:
-
The full name of the job.
-
The number of hours the skip should be active.
apply-folder-skip: Enables the skip setting on a folder.
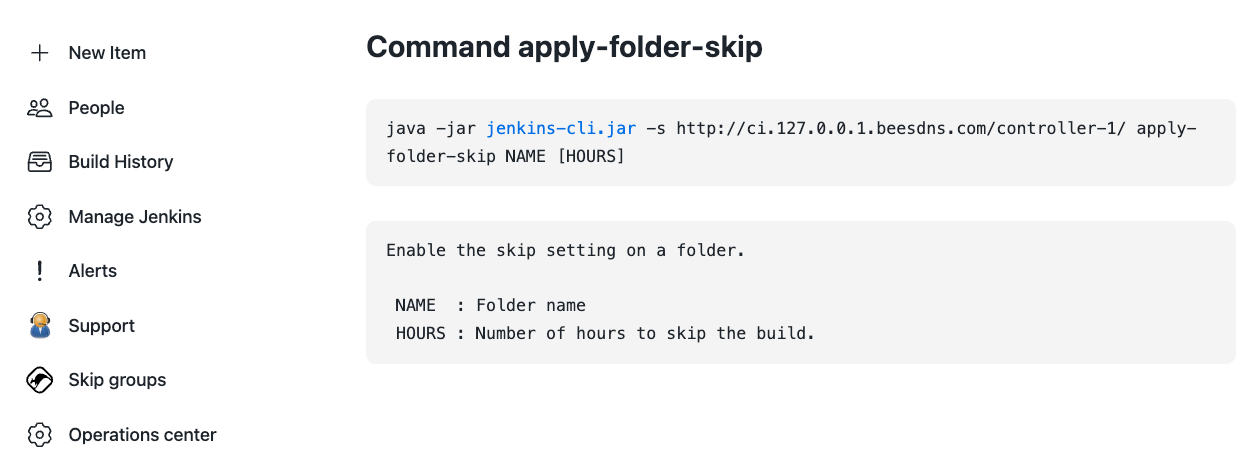
This command takes two parameters:
-
The full name of the folder.
-
The number of hours the skip should be active.
skip-group-on: Enables the skip setting on a skip group.

This command takes two parameters:
-
The name of the skip group.
-
The number of hours the skip should be active.
remove-skip: Removes the currently active skip setting from a job.

This command takes only one parameter: the full name of the job.
remove-folder-skip: Removes the currently active skip setting from a folder.

This command takes only one parameter: the full name of the folder.
skip-group-off: Removes the currently active skip setting from a skip group.

This command takes only one parameter: the name of the skip group.