The operations center enables the sharing of agent executors across connected controllers in the operations center cluster.
A connected controller is a client controller, a managed controller, or a team controller that is connected to operations center.
Shared agents can be used in both CloudBees CI on traditional platforms and CloudBees CI on modern cloud platforms.
CloudBees CI on modern cloud platforms can use Kubernetes agents. However, CloudBees CI on modern cloud platforms users might want to use shared cloud agents along with shared cloud configuration instead if, for example:
-
You have Windows agents, but your cluster cannot use Windows nodes.
-
Your computers run software with limited licensing.
|
For a controller to use shared agents, the Operations Center Cloud plugin must be installed and configured on the controller. If the controller was installed with the "suggested plugins", then this plugin should be installed by default. However, before configuring shared agents in the operations center, it is prudent to verify that this plugin is installed on any controller that will use these shared agents provisioned by the operations center. Then use to add an "Operations Center Agent Provisioning Service" cloud. |
Currently, there are a number of restrictions on how agents are shared:
| Restriction | Description |
|---|---|
Non-standard launcher |
If a non-standard launcher is used, the plugin defining the launcher must be installed on all the controllers within scope for using the shared agent, and the plugin versions on the controller and the operations center server must be compatible in terms of configuration data model. An example of known non-compatibility would be that the ssh-agents plugin before 0.23 uses a significantly different configuration data model from the model used post-1.0. This specific configuration data model difference is not of concern because the current versions of Jenkins all bundle versions of ssh-agents newer than 1.0. |
Shared agent usage |
Shared agents can only be used by sibling controllers or by controllers in sub-folders of the container where the shared agent item is defined. |
One-shot build mode |
Shared agents operate in a "one-shot" build mode, unless the controller loses its connection with the operations center server. When the connection has been interrupted, controllers use any matching agents on-lease to perform builds. If there are no agents on-lease to the controller when the connection is interrupted, the controller may be unable to perform any builds unless it has dedicated executors available. |
Shared agent with more than one executor |
If an agent is configured with more than one executor, the other executors are available to start builds while at least one executor is in use, and no more builds than the number of configured executors have been started on the agent. In other words, if an agent is configured with four executors, then accepts up to four builds on a controller, but after at least one build has completed, it is returned immediately after it becomes idle even if fewer than four builds have been run during the lease interval. |
To use the sharing model with team controllers, define the shared agent in the Teams folder to apply it to all team controllers.
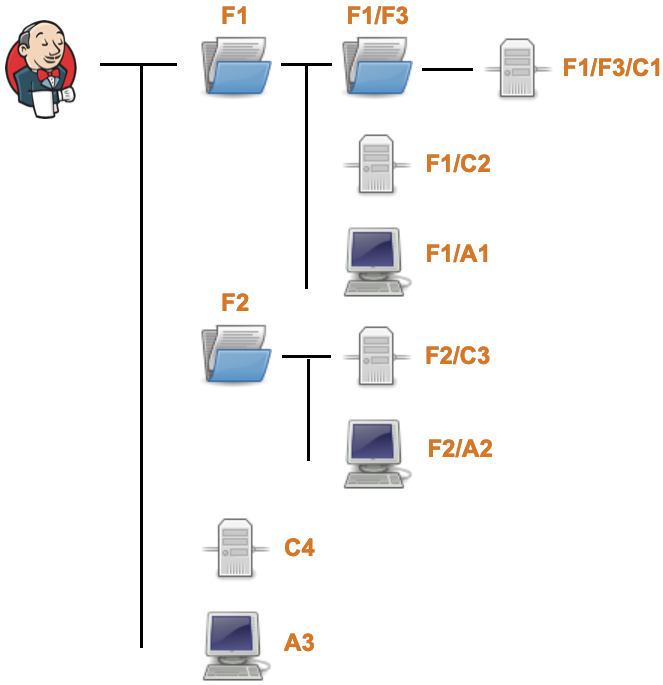
The sharing model used for shared agents is the same as the credentials propagation and Role-Based Access Control plugin’s group inheritance model. Consider the following configuration:

-
There are three folders:
F1,F2, andF1/F3 -
There are three shared agents:
F1/A1,F2/A2andA3 -
There are four client controllers:
F1/F3/C1,F1/C2,F2/C3andC4
The following logic is used to locate a shared agent:
-
If there is an available shared agent (or shared cloud) at the current level and that agent has the labels required by the job, then that agent is leased.
-
If there is no matching shared agent (or shared cloud with available capacity) at the current level, then proceed to the parent level and repeat.
Thus:
-
F1/F3/C1andF1/C2are able to perform builds onF1/A1andA3but not onF2/A2.F1/A1is preferred as it is "nearer". -
F2/C3is able to perform builds onF2/A2andA3but not onF1/A1.F2/A2is preferred. -
C4is only able to perform builds onA3
Under normal operation, when an agent is leased to a controller, it is leased for one and only one job build. After the build is completed, the agent is returned from its lease. This is known as "one-shot" build mode. If the connection between the controller and the operations center server is interrupted while the agent is on lease, the controller is unable to return the agent until the connection is re-established. While in this state, the agent is available for re-use by the controller.
Install shared agents
You can install shared agents one of two ways.
-
To create a shared agent, you must first decide how you want it created:
-
If you want to create the shared agent item at the root of the operations center server (example: the agent is available to all controllers), navigate to the root and select the New Job action on the left menu.
-
If you want to create the shared agent item within a folder in the operations center server (example: the agent is available only to controllers within the folder or within the folder’s sub-folders), then navigate to that folder and select the New Item action on the left menu.
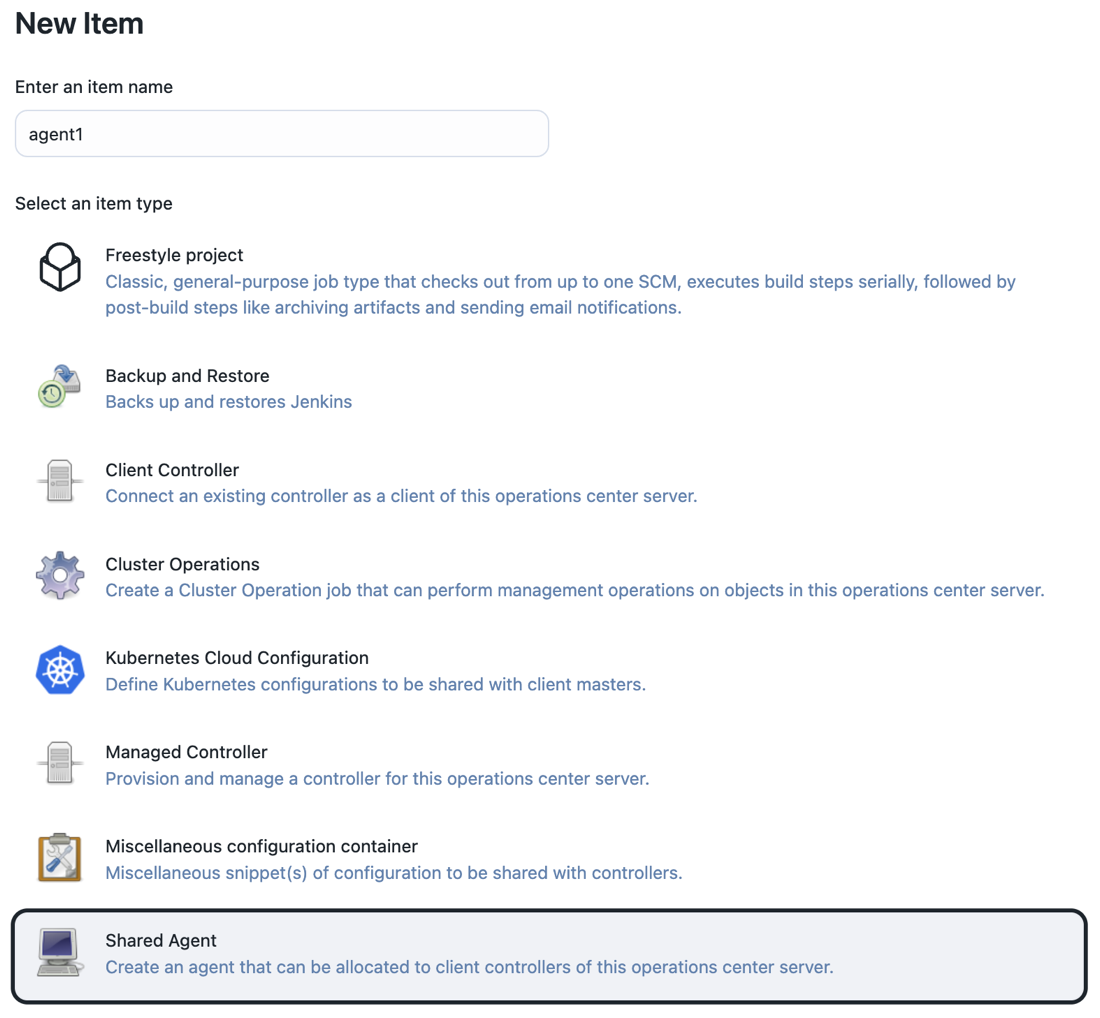
In either case, the standard new item screen appears:
 Figure 2. New item screen
-
-
Provide a name and select Shared Agent as the type.
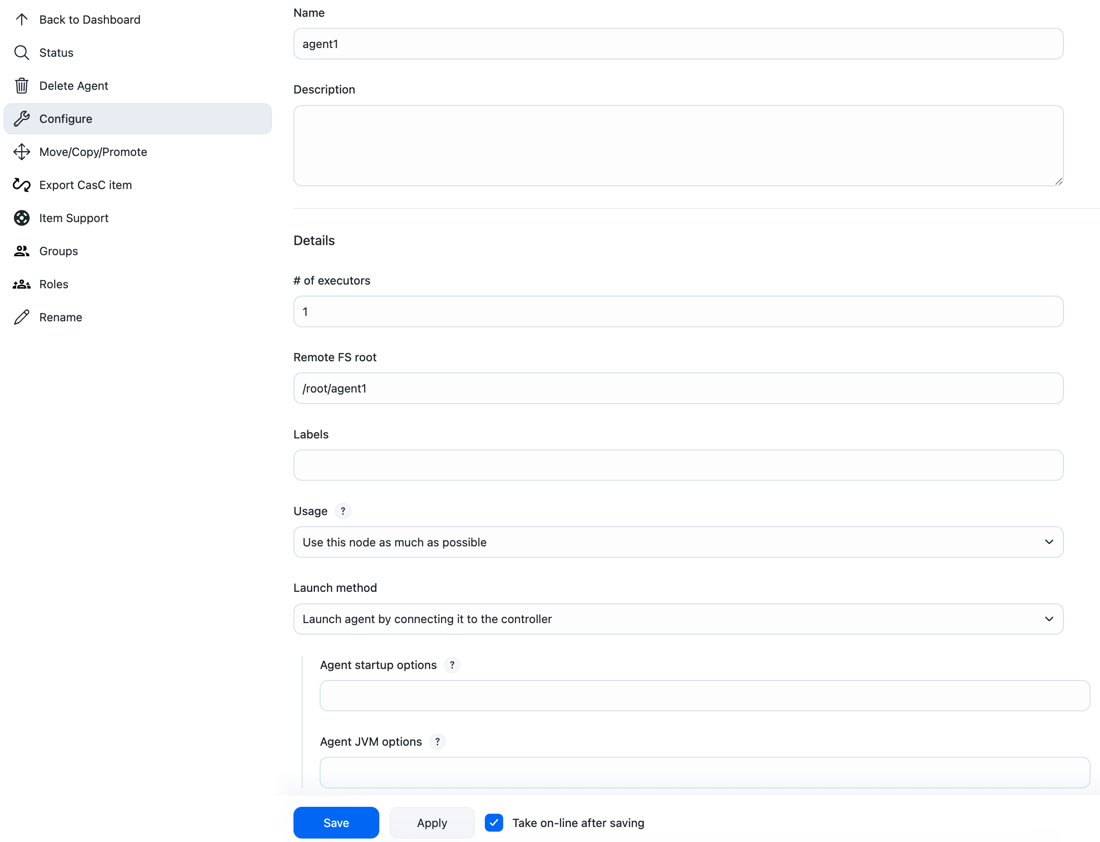
Once the agent has been created, you are redirected to the configuration screen. A newly created shared agent is in the off-line state.
The configuration screen options are analogous to the standard Jenkins agent configuration options.
-
When the agent configuration is complete, save or apply the configuration. If you do not want the agent to be available for immediate use, deselect the Take on-line after save/apply checkbox before saving the configuration.
Inject node properties into shared agents
You can inject node properties into the shared agent when it is leased to the controllers through the operations center Cloud plugin. The initial implementation only provides support for two specific types of node properties:
-
Environment Variables
-
Tool Locations
|
If you have written your own custom plugins that provide custom implementations of NodeProperty, you can write a custom plugin for operations center that provides implementations of com.cloudbees.opscenter.server.properties.NodePropertyCustomizer with the appropriate injection logic for these custom node properties. |
To inject node properties:
Select the Inject Node Properties option on the configuration screen and then add the required node property customizers:
-
Environment variables adds/updates the environment variables node property with the supplied values.
-
Tool Locations adds/updates the tool locations. The required tool installers must be defined with the same names both on operations center and on the controller to which agents are leased.
Review common shared agent tasks
Take an agent offline
To take a shared agent offline, (for example, for maintenance of the server that hosts the shared agent process or to make configuration changes to the shared agent):
Navigate to the shared agent screen and select Take offline.
Test a shared agent’s SSH connection
You can use SSH to protect the connection between your controllers and shared agents. CloudBees CI provides a Test SSH Connection option that lets you validate the SSH connection details, to ensure they are correct.
For more information, refer to Test the SSH connection to an agent.
Delete a shared agent
To delete a shared agent, take the agent off-line first. If the shared agent is online, select Delete to take the agent off-line first.

Move a shared agent
A shared agent can be moved between folders by selecting Move on the shared agent screen.
|
When moving shared agents, the inbound agent launch commands include the path to the agent, so if you move an inbound shared agent, you need to update the inbound agents to connect to the new location. Any agents that are connected while the move is in progress are unaffected. If the operations center controller is restarted or fails over in a HA cluster, however, the inbound agents are unable to reconnect until they are reconfigured with the new path. |
Recover "lost" agents
Occasionally, due to lost connections between controllers and the operations center Server, a shared agent may become temporarily stuck in an on-lease state, whereby the operations center Server believes the agent to be leased to a specific controller, but the controller has no knowledge of the shared agent.
Built-in safety mechanisms identify and recover any such "lost" agents. By their nature, these processes perform cross-checks to ensure that an agent in use is not incorrectly recovered.
To start the recovery process, the controller that the agent is leased to must be connected to the operations center server. Once the connection is established, it can take up to 15 minutes for the recovery process to progress through its checks. Under normal circumstances, the checks are completed in less than two or three minutes.
If the automatic recovery processes fails, there is a Force release link that can be used to force the lease into a returned state.
| Forcing a lease into a released (returned) state bypasses all the safety checks that ensure that the agent is no longer in use. |
Review CLI operations that support shared agents
The following CLI operations are designed to support management of shared agents:
-
create-jobcan be used to create a shared agent -
disable-agent-tradercan be used to take a shared agent off-line -
enable-agent-tradercan be used to take a shared agent on-line -
list-leasesqueries the active leases of a shared agent -
shared-agent-force-releasecan be used to force release of a "stuck" lease record -
shared-agent-deletecan be used to delete a shared agent
