To successfully execute builds in a CloudBees CI environment, it is required to set up build agents, computers designated to run build tasks under the direction of a controller. These agents can be virtual machines, Docker containers, or physical machines, serving either as shared resources or dedicated units for specific controllers.
This guide provides comprehensive instructions for configuring build agents across both CloudBees CI on modern cloud platforms and CloudBees CI on traditional platforms. You’ll learn the necessary steps to set up agents, ensuring they integrate seamlessly within your CloudBees CI cluster. From creating and connecting agents to understanding various launch mechanisms, this document aims to equip you with the knowledge to optimize build execution and resource management.
Connect build agents
This content applies only to CloudBees CI on traditional platforms.
A build agent is a computer that handles the tasks of running builds, at the direction of a controller. It can be a virtual machine (VM), a Docker container, or it can run on bare metal. Within the context of a CloudBees CI cluster, a build agent can be a shared resource for client controllers. A build agent can also be dedicated to a specific controller.
What is a build agent?
Before installing a build agent, learn what a Jenkins agent is.
Set up an agent
It is a best practice to build on a build agent instead of the built-in node that comes pre-configured on the controller. A build agent can take many forms - a VM, a Docker container, or a Kubernetes pod, for example.
Create an agent node
To add an external build agent to your controller:
-
Select in the upper-right corner to navigate to the Manage Jenkins page.
-
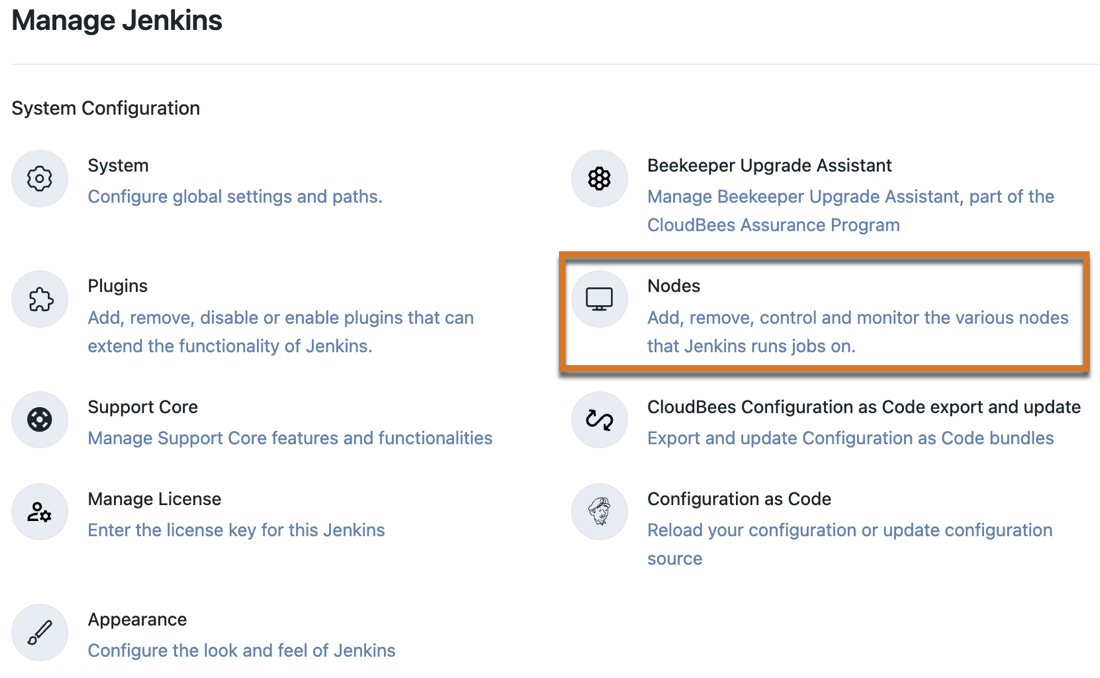
Select Nodes.
 Figure 1. Manage nodes
 -
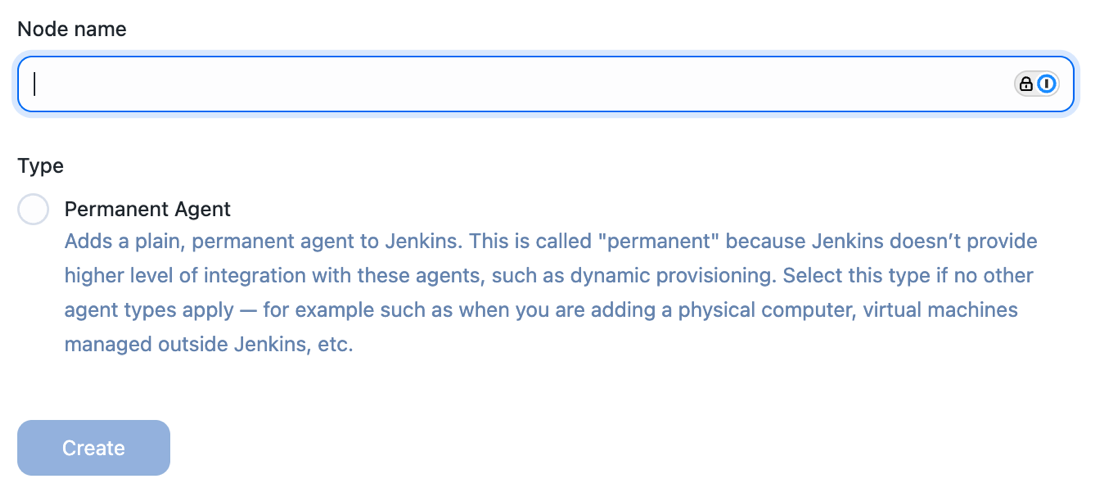
Select New node.
 Figure 2. New node
 -
Type a unique node name.
 Figure 3. Unique node name
 -
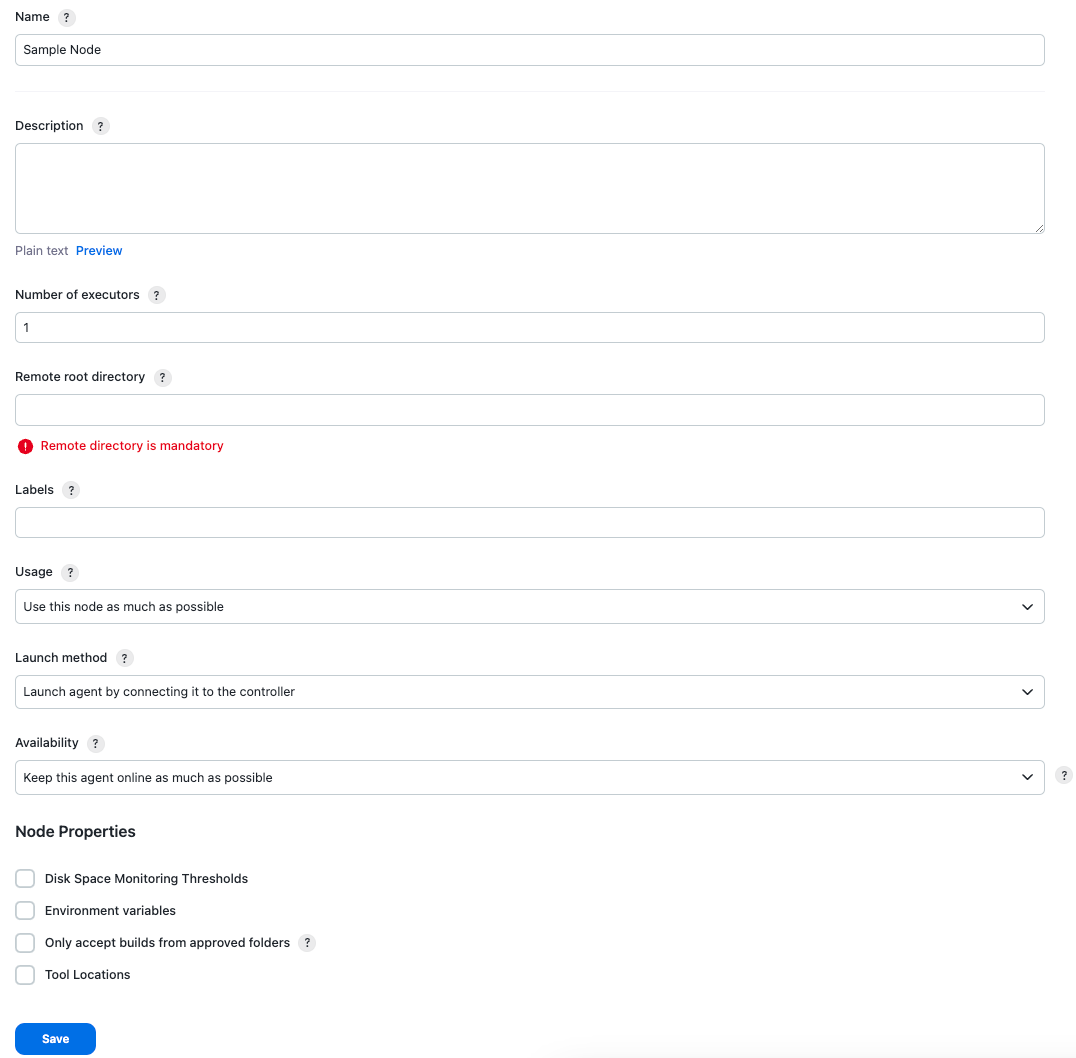
On the Node configuration page, enter all the required values, depending on the type of build agent.
 Figure 4. Node configuration
You can launch a Jenkins agent machine in many ways. Select one of the methods to launch a new node. CloudBees recommends that Windows users use JNLP and that Linux users use SSH. -
After selecting Save, Jenkins should either try to launch the agent machine, or prompt you for next steps for creating the machine.
Connect inbound agents using WebSocket for Agent Remoting Connections
CloudBees CI supports using WebSocket transport to connect inbound agents to controllers. This works for shared agents and clouds, as well.
| This feature is available in CloudBees CI version 2.222.2.1 and later. |
This functionality lets you make a connection via HTTP(S), then holds the connection open to create a bidirectional channel to send data back and forth between controllers and inbound agents.
No special network configuration is needed since the regular HTTP(S) port for your controller is used for all communications.
For additional details about WebSocket support in Jenkins, refer to JEP-222: WebSocket Support for Jenkins Remoting and CLI.
To connect inbound agents:
-
On the Agent Configuration screen, in Launch method, select Launch agent by connecting it to the controller.
-
Select Use WebSocket. Enabling the Use WebSocket option allows the agent to make a connection to the WebSocket.
-
Follow the instructions on the Agent page to connect the agent. For more details, refer to Launching inbound agents.
Connect a shared agent
With CloudBees CI, you can connect one or more shared agent to the operations center, making it available to all the controllers connected to the operations center. By sharing agents among controllers, you can balance workloads and make efficient use of resources.
Launch inbound TCP agents
This content applies only to CloudBees CI on modern cloud platforms.
CloudBees CI provides a number of ways to connect remote agents. Two of the most popular are outbound SSH agents and inbound TCP agents. SSH agents are most commonly used on Unix platforms, and they are initiated by the controller. The controller creates the connection when it is needed. Inbound TCP agents are most commonly used on Windows platforms, and they are initiated by agents. The agent connects to the controller first, and then the controller sends commands as needed.
For security reasons, it is important to run jobs on agents and not controllers. Builds that run on the controller can read or modify files in $JENKINS_HOME. This access can be used to perform activities that impact the entire installation, such as installing plugins, reading credentials, and creating new jobs. You should generally configure the controller to have no executors, and run builds only on build agents. For more information, refer to Security implications of building on controllers in the Jenkins documentation.
This topic describes some of the primary mechanisms for launching inbound TCP agents.
Launch mechanisms
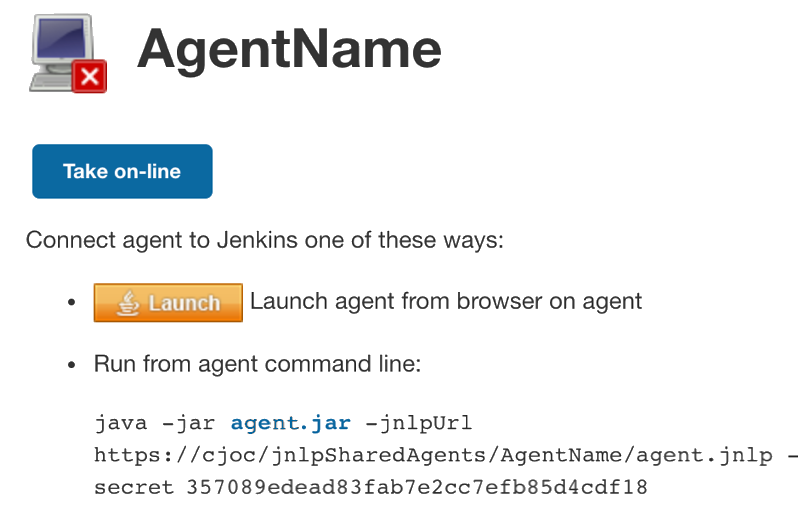
The agent status page for TCP agents contains the following information:

If you use a mechanism other than the Launch button, this page contains the information you need to launch the agent. The string of hex digits is a secret key the client uses to establish the connection. Depending on how you connect, you may also need the agent name, "AgentName" in this example, or the jnlpURL.
Launch button
The Launch button is the only launch mechanism that uses JNLP. When you select the button, a JNLP file is downloaded and launched with Java WebStart.
While this is the simplest method, it has many drawbacks and is not recommended. This is an outdated technology that has been deprecated. It requires an interactive user, and if the agent terminates, you have to select the button again.
Download JNLP file
Another launch mechanism runs the agent from a script or command line to retrieve the JNLP file. This mechanism does not use JNLP or WebStart. Instead, it obtains the connection information from the downloaded file. Internally, this is a two-step process, first the file connects to an HTTP(S) port to retrieve the connection information, and then it extracts the information and connects to the TCP port.
Before you use the command to launch an agent, you must download the agent.jar file.
You can obtain the correct version from your Jenkins server from a link similar to https://myjenkins.example.com/jnlpJars/agent.jar.
The operations can be combined in a script, cron job, or service.
A typical example of this command is:
java -jar agent.jar \ -jnlpURL <jnlp url> \ -secret <secret key> \ -workDir <work directory>
Connect directly to TCP port
You can also connect directly to the TCP port. Connecting directly to the TCP port lets you skip downloading the connection information file. However, you must provide some of the information that the downloaded file contains. If you use this method, you must pull the information together into a single, complete value from its multi-line display representation.
You must provide the following information:
-
Agent name.
You can obtain the agent name from the agent status page.
-
Host and port, provided in a standard
HOST:PORTformat.The host can be whatever name or address resolves to the server. You can obtain the port value by examining the JNLP file or looking at the Agents section of the server’s Security page.
-
Jenkins instance identity.
Each Jenkins instance has its own instance identity. The agent needs this key to complete the connection. You can obtain the instance identity from the script console. Refer to the Jenkins documentation for more information about using the script console.
Using the script console, execute the following command:
hudson.remoting.Base64.encode(org.jenkinsci.main.modules.instance_identity.InstanceIdentity.get().getPublic().getEncoded())Then, capture the result to pass into the agent invocation. For more information about using the script console, refer to Script console in the Jenkins documentation.
Alternatively, you can view the instance identity value by visiting the Instance Identity page from your Jenkins server at a link similar to https://myjenkins.example.com/instance-identity.
You also must download the agent.jar file from your Jenkins server from a link similar to https://myjenkins.example.com/jnlpJars/agent.jar.
Once you have obtained the prerequisite files and data, you can launch the agent with a command like this:
java -cp agent.jar hudson.remoting.jnlp.Main \ -headless \ -workDir <work directory> \ -direct <HOST:PORT> \ -protocols JNLP4-connect \ -instanceIdentity <instance identity> / <secretString> <agentName>
The protocols parameter is optional, but it is useful to limit the agent to protocols that are supported by the server.
The only currently supported and recommended protocol is JNLP4-connect.
| Entering the secret string in plain text on the command line means that this information could be retrieved by someone with access to the active processes list. If you are concerned about someone accessing your secret string, CloudBees recommends downloading the JNLP file as the more secure launch method. You can alternatively use a variable when you enter the secret string. |
This mechanism uses a different JAR entry point than when you download the JNLP file. The available parameters and default behavior may differ between the two entry points.
Install as a Windows service
On a Microsoft Windows platform, you can install the agent as a Windows service. This allows the Windows infrastructure to manage the process lifecycle.
To configure the agent as a Windows service, launch the agent using one of the other mechanisms that doesn’t require it to run as headless. In the agent GUI, select .
For additional information, refer to How to install several Windows agents as a service.
Parameters
There are a number of different launch parameters that control how agents connect and behave.
The available parameters and default behaviors may vary depending upon the entry point.
You can obtain usage information by executing java -cp agent.jar hudson.remoting.jnlp.Main or java -jar agent.jar --help.
Not all parameters work together, and some parameters require the use of others.
There are also system or environment variables that control some advanced behaviors documented in the Remoting configuration table below. Many of these must be configured on both the controller and the agent. Changing some of these parameters may result in unreliable behavior.
One of these parameters that is supported with defined behavior is NO_PROXY.
Similar to the usage in a number of other applications, this controls which hosts should be excluded from proxy configurations.
| System property | Default value | Description |
|---|---|---|
hudson.remoting.ClassFilter.DEFAULTS_OVERRIDE_LOCATION |
null |
The path to a file containing alternative regex patterns for remoting class filtering. |
hudson.remoting.FlightRecorderInputStream.BUFFER_SIZE |
1048576 |
Size (in bytes) of the flight recorder ring buffer used for debugging remoting issues. |
hudson.remoting.Launcher.pingIntervalSec |
0 |
Seconds between ping checks to monitor health of agent nodes; |
hudson.remoting.Launcher.pingTimeoutSec |
240 |
If ping of agent node takes longer than this, consider it dead; |
hudson.remoting.RemoteClassLoader.force |
null |
Class name string. Forces loading of the specified class name on incoming requests. |
hudson.remoting.Engine.socketTimeout |
30 minutes |
Socket read timeout in milliseconds. If timeout happens and the |
hudson.remoting.SynchronousCommandTransport.failOnSocketTimeoutInReader |
false |
Boolean flag. Enables the original aggressive behavior, when the channel reader gets interrupted by any |
hudson.remoting.ExportTable.unexportLogSize |
1024 |
Defines the number of entries to be stored in the unexport history that is analyzed during the invalid object ID analysis. |
|
false |
Boolean flag, which allows disabling particular protocols in remoting. Property example: |
org.jenkinsci.remoting.nio.NioChannelHub.disabled |
false |
If specified, only the protocols from the list will be tried during the connection. The option provides protocol names, but the order of the check is defined internally and cannot be changed. |
NO_PROXY (or no_proxy) |
N/A |
Provides specifications for hosts that should not be proxied. |
The @ argument annotation
If you prepend any command-line argument with the @ symbol, it invokes special behavior.
For example, recent versions of Jenkins show in the UI that one form of launching inbound TCP agents is:
echo <secret key> > secret-file java -jar agent.jar -jnlpUrl <jnlp url> -secret @secret-file -workDir <work directory>
This varies from the Download JNLP launch method because the secret key is stored in a file, rather than passed directly through the command line.
The behavior is more general than using the information from the agent status page.
Any argument passed to the program (not interpreted by Java) may start with an @.
The agent interprets the rest of that argument as the name of a file, "secret file" in the example above.
The agent reads this file and augments the command line with an argument for each line in the file.
As an expanded example, you could extract agent configuration information by incorporating this line in command agent management scripts:
java -jar agent.jar \ @agent_options.cfg
with an "agent_options.cfg" file for each agent like this:
-jnlpUrl <jnlp url> -secret <secret key> -workDir <work directory>