|
Once you understand what HA is, what it provides, its benefits and the main elements within the HA architecture, this section presents a recommended workflow for deploying an HA cluster. |
CloudBees recommends the following steps to get your cluster ready for HA:
Review your network and storage configurations to meet the requirements for HA
Network configuration for HA
As described in HA fundamentals, controllers running in HA mode require controller replicas to communicate with each other. Your network configuration must open the following required ports to allow this communication:
-
Hazelcast nodes installed in the replicas. The default Hazelcast port is 5701.
-
A reverse-proxy HTTP or TCP connection to access resources from one replica that belong or are connected to another replica. Resources might include:
-
Running builds.
-
WebSocket inbound agents.
-
TCP inbound agents from outside the CloudBees CI network.
-
For CloudBees CI on traditional platforms, the load balancer used to distribute the traffic among the replicas must be configured to use sticky sessions. There are no additional considerations needed for CloudBees CI on modern cloud platforms.
Install a storage system that meets the requirements for HA
In CloudBees CI on modern cloud platforms, HA requires consistent shared storage between replicas. PersistentVolumeClaims (PVC) used for this purpose must accept an access mode of ReadWriteMany.
The underlying storage provided depends on the Kubernetes platform used.
Refer to Install HA on CloudBees CI on modern cloud platforms for more information.
In CloudBees CI on traditional platforms, as all the replicas share the same JENKINS_HOME directory.
They must be able to access this shared directory, which is typically mounted on the same path for all the replicas.
You must use a shared file system like NFS to store the JENKINS_HOME directory.
Refer to Install HA on CloudBees CI on traditional platforms for more information.
Migrate your non-HA controller to HA
CloudBees CI controllers not running in HA mode can be migrated to HA mode. Migrated controllers must meet the specific storage requirements described before.
|
If the managed controller already uses a volume with |
Migrate an existing managed controller to High Availability (HA) describes the process to migrate a non-HA controller to an HA controller for CloudBees CI on modern cloud platforms.
For CloudBees CI on traditional platforms, no migration is required if the client controller is already using a shared file system for JENKINS_HOME.
If the client controller is not using a shared file system, and assuming that the destination volume is already mounted and is shared file system, the following steps provide a general overview of the migration process:
-
Set the
$JENKINS_HOMEenvironment variable to the destination volume, the NFS-compatible shared filesystem used by the controller replicas when running in HA mode. -
Perform an initial sync between the current
$JENKINS_HOMEvolume and the destination volume. Use, for example,rsyncas described below:rsync -avvu --delete <old-JENKINS_HOME> <new-JENKINS_HOME>(1)1 Replace <old-JENKINS_HOME>with the path for the previous$JENKINS_HOME, and<new-JENKINS_HOME>with the destination path used as the new$JENKINS_HOME. -
Stop the non-HA controller.
-
Perform a new sync between the current
$JENKINS_HOMEvolume and the destination volume.rsync -avvu --delete <old-JENKINS_HOME> <new-JENKINS_HOME>(1)1 Replace <old-JENKINS_HOME>with the path for the previous$JENKINS_HOME, and<new-JENKINS_HOME>with the destination path used as the new$JENKINS_HOME. -
Apply the configuration change that HA requires. Refer to Install HA (active/active) on CloudBees CI on traditional platforms for more information about these configuration changes.
-
Restart the controller, now running in HA mode.
Install the HA controllers
HA is available for CloudBees CI on modern cloud platforms and CloudBees CI on traditional platforms. Refer to Install HA (active/active) on CloudBees CI on modern cloud platforms and Install HA (active/active) on CloudBees CI on traditional platforms for more information.
|
High Availability (HA) on Windows controllers is not supported. |
|
Built-in executors are not supported in HA.
Controllers running in HA mode must set the number of built-in executors to |
Verify the HA cluster installation
Once you have installed an HA controller, and before configuring agents and running builds, CloudBees recommends to verify if the main elements in the HA cluster run properly.
To verify the HA cluster installation, review the following:
Review the HA cluster components
Hazelcast nodes, as described in HA fundamentals, help to create the HA cluster and synchronize the replicas. These nodes must be able to communicate with each other to ensure the desired number of replicas for the cluster.
To verify that Hazelcast nodes can create the cluster with the expected number of replicas, follow these steps:
-
Navigate to the controller running in HA mode.
-
Select in the upper-right corner to navigate to the Manage Jenkins page.
-
Select CloudBees CI High Availability.
-
Select Status on the left.
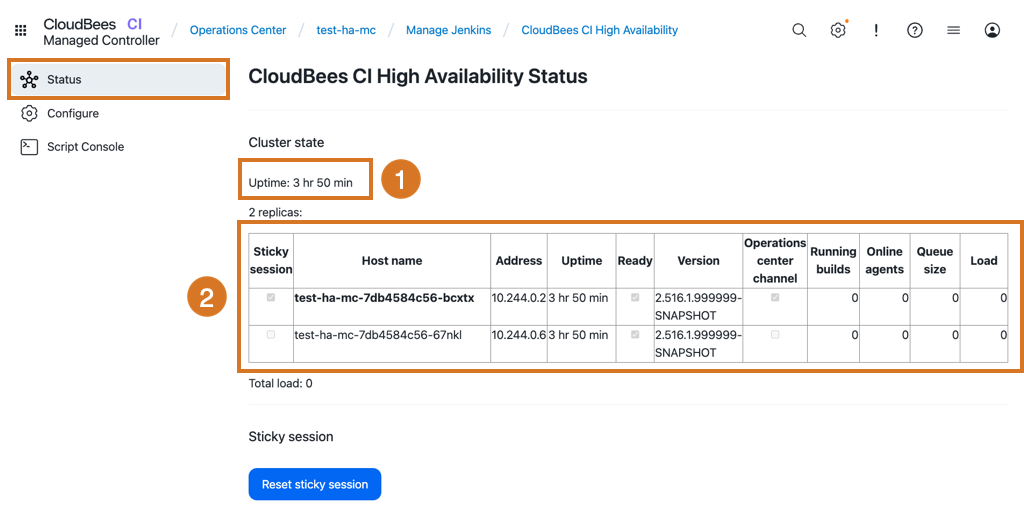
The CloudBees CI High Availability Stages page displays:
-
The uptime since the cluster started.
-
The number of replicas in the cluster with the replica holding the user session selected in the Sticky session field and highlighted in bold.
| If the cluster does not display the expected number of replicas, review the network configuration to ensure the Hazelcast nodes can communicate with each other. |
Check if the load balancer is configured with sticky sessions
The HA load balancer must provide sticky sessions to ensure the user session always uses the same replica.
To ensure that the load balancer uses sticky sessions, follow these steps:
-
Enable developer mode in the controller.
-
Select in the upper-right corner to navigate to the Manage Jenkins page.
-
Select CloudBees CI High Availability.
-
Select Configure in the left pane.
-
Select Enable developer mode.
-
Select Save or Apply.
-
-
Verify the footer displays a banner with the replica name.
-
Refresh the page, navigate through different items in the controller, sign out and sign in several times, and check if the banner always displays the same replica name.
| If the footer banner displays different replica names, review the load balancer configuration to ensure it provides sticky sessions. |
| For HA clusters using ingress-nginx as the load balancer, Reset sticky session in resets the sticky session for the current user, allowing you to test the load balancer configuration again. |
Test reverse-proxied requests
HA controllers load balance the workload among all the controller replicas. When builds run in one replica, and the user is browsing the user interface from another, requests to browse running builds must be reverse-proxied to the replica where the build is running. This reverse-proxied request displays in a footer banner when developer mode is enabled.
To test the reverse proxy is working correctly, follow these steps:
-
Enable developer mode in the controller as described previously.
-
Create a new pipeline job using the code below.
pipeline { agent none stages { stage('Test Job') { steps { input('Waiting for interaction...') } } } } -
Execute the pipeline job several times by selecting Build Now. HA distributes the build among the different replicas.
-
Verify the Builds widget adds the replica name to the jobs running in other replicas.
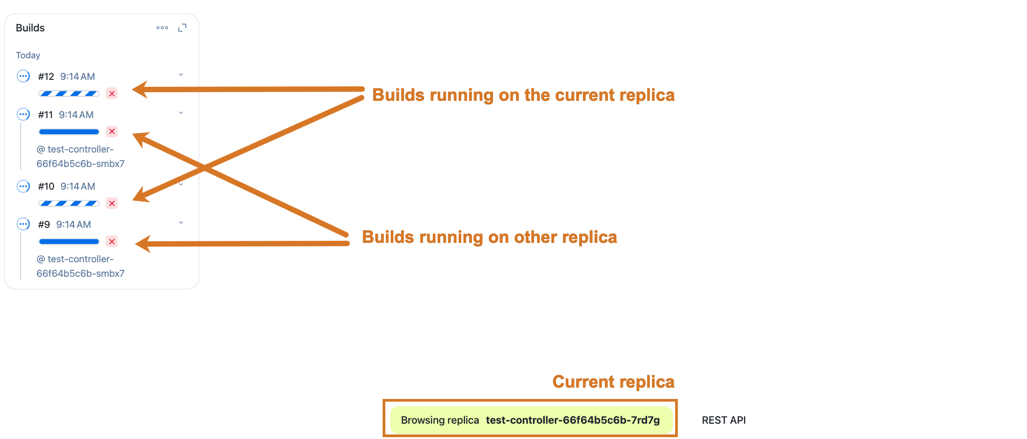 Figure 2. Build widget display the replica name in developer mode
 -
In the Builds widget, select one of the builds running in a different replica.
-
Verify that the footer banner displays the reverse-proxied request, from the replica holding the user session to the replica running the build.
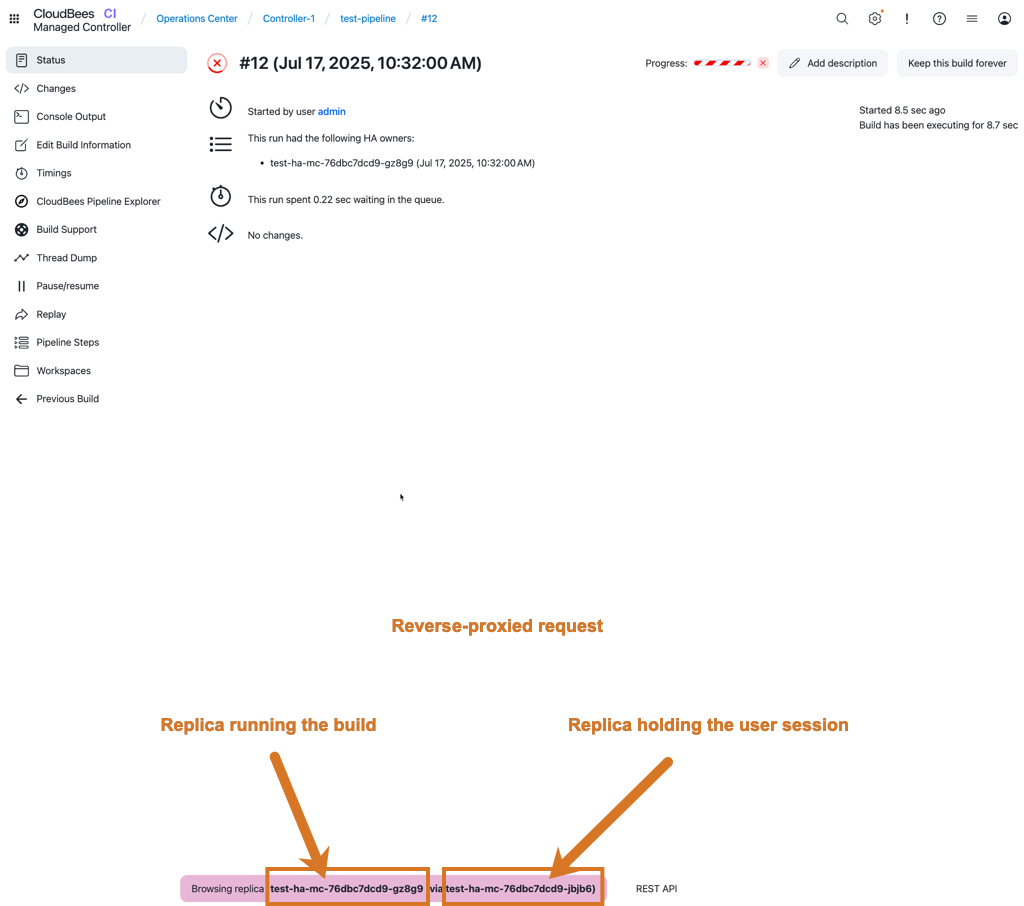 Figure 3. Reverse-proxied request to the replica running the build
 -
Finish all the builds before continuing.
| If you cannot browse to the replica running a build, review your reverse proxy configuration to ensure it forwards the requests correctly. |
Configure your agents to work with HA
CloudBees CI supports a range of agent connection modes in HA, but each agent must have only one executor. As an agent can connect to only a single replica at a time, agents with multiple executors cannot be properly shared, and are not supported by CloudBees CI High Availability (HA).
A single executor requirement is not a problem for cloud agents as they normally define only one executor. They are provisioned, use this executor, and are de-provisioned later.
Permanent agents as multiple-executor agents for HA
Agents require one executor to work with a controller running in HA mode. However, you can configure permanent or static agents to automatically generate single-executor agent clones that simulate the behaviour of a multi-executor agent. To configure a permanent agent to simulate a multi-executor agent for HA, you can use one of the following methods:
-
Automatically from the GUI.
-
Manually from the GUI.
-
Using CloudBees Configurations as Code (CasC).
Automatically from the GUI.
If the permanent agent does not have one executor, CloudBees CI displays an administrative monitor. If this administrative monitor displays, and you select Apply Migration, CloudBees CI automatically migrates the permanent agent configuration to the required configuration for HA.

Manually from the GUI
To manually configure your permanent agent to work with HA:
-
Navigate to the agent configuration screen.
-
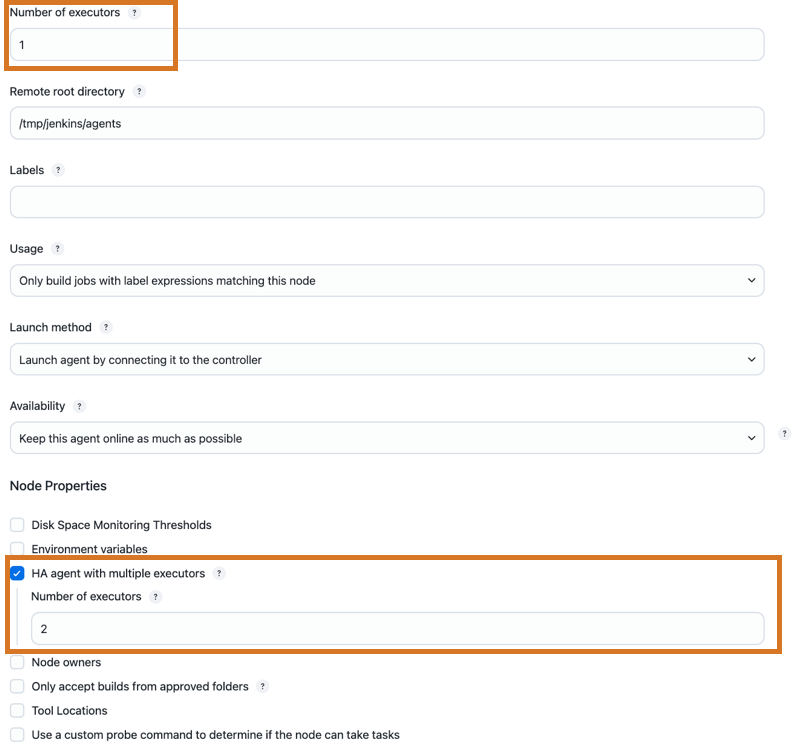
Verify that the agent has only one executor.
-
In the Node Properties section, select the HA agent with multiple executors option, and set the number of executors according to your needs.
For outbound agents (usually SSH agents), from the configuration screen, select CloudBees High Availability for the Availability (retention strategy) field. The agent is kept offline until requested by a replica. CloudBees CI, when needed, brings the permanent outbound agent online temporarily.

|
CloudBees recommends using an outbound launch method for permanent agents in HA controllers. These agents set a direct connection between the replica and the agent and are simpler and more efficient than inbound agents where the requests from the agents must be routed to the correct replica. |
Using CloudBees Configurations as Code (CasC)
With CloudBees Configuration as Code (CasC) it is possible to configure a permanent agent as a multi-executor agent compatible with HA using code snippets similar to the examples below that display the non-HA compatible configuration and the changes requires to make it HA compatible:
nodes: - permanent: ... launcher: inbound: {} name: <your-permanent-agent-name>(1) numExecutors: 3(2) ... retentionStrategy: "always"
| 1 | Replace <your-permanent-agent-name> with the name of your permanent agent. |
| 2 | Set the number of executors according to your needs. |
nodes: - permanent: ... launcher: inbound: {} name: <your-permanent-agent-name>(1) numExecutors: 1(2) nodeProperties: - cloudbeesHighAvailabilityMultipleExecutors:(3) numExecutors: 3(4) .... retentionStrategy: "always"
| 1 | Replace <your-permanent-agent-name> with the name of your permanent agent. |
| 2 | Set the non-HA option number of executors to 1. |
| 3 | Use the cloudbeesHighAvailabilityMultipleExecutors property to define the permanent agent as a multi-executor agent for HA. |
| 4 | Set the number of HA compatible single-executor clones according to your needs. |
nodes: - permanent: ... launcher: nioSsh: ... name: <your-permanent-agent-name>(1) numExecutors: 3(2) ... retentionStrategy: "demand"
| 1 | Replace <your-permanent-agent-name> with the name of your permanent agent. |
| 2 | Set the number of executors according to your needs. |
nodes: - permanent: ... launcher: nioSsh: ... name: <your-permanent-agent-name>(1) numExecutors: 1(2) nodeProperties: - cloudbeesHighAvailabilityMultipleExecutors:(3) numExecutors: 3(4) .... retentionStrategy: "cloudbeesHighAvailability"(5)
| 1 | Replace <your-permanent-agent-name> with the name of your permanent agent. |
| 2 | Set the non-HA option number of executors to 1. |
| 3 | Use the cloudbeesHighAvailabilityMultipleExecutors property to define the permanent agent as a multi-executor agent for HA. |
| 4 | Set the number of HA compatible single-executor clones according to your needs. |
| 5 | For outbound agents in HA controllers, set retentionStrategy always to cloudbeesHighAvailability. |
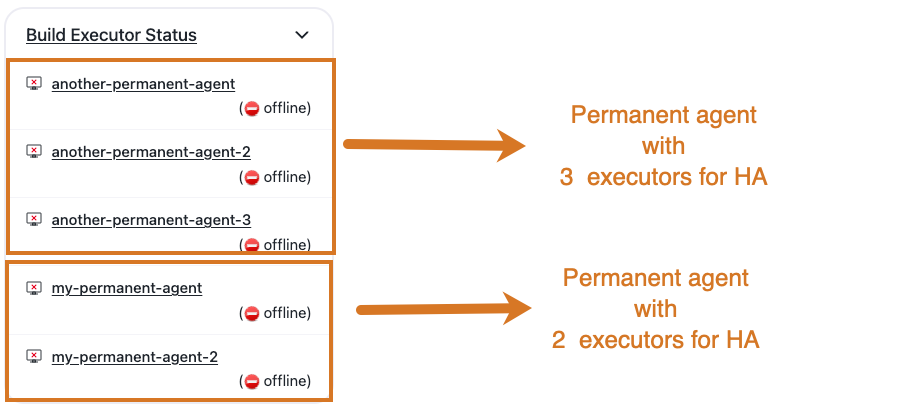
When configured properly, the controller clones the original agent to create the executors. These read-only clones are managed by the controller itself, which adds or removes clones and reconfigures them in response to updates to the original permanent agent.
All the permanent agent clones have one executor and use different folders within the executors
folder inside the original permanent agent root directory. Outbound agents automatically have the
workDir settings for all the clones.
CloudBees CI displays the clones as individual one-executor agents in the Build executor status.
|
Permanent outbound agents configured as multi-executor agents that use either If this strategy is selected, the connection to the read-only clones fails. |
Audit your jobs to ensure they are compatible with HA
|
To get the most out of High Availability (HA) capabilities, CloudBees recommends testing your jobs in a non-HA controller environment first. Two Pipeline capabilities are relevant to HA:
Non-Pipeline projects such as Freestyle or Maven projects run in the replica where they started. Non-pipeline project builds are aborted when the replica running them ends for any reason, such as a rolling restart or upgrade, and no other replica can take over the build. Therefore, no HA is provided for those jobs. |
|
By default, controllers set the Default Speed/Durability Level option to This option is required in HA to allow build adoption in case of a replica failure. An administrative monitor displays if you change this option at controller level or override it at the job level. |
Even though HA is not provided for non-pipeline projects, High Scalability (HS) can be achieved by adding more replicas to the cluster. However, if auto-scaling is enabled for CloudBees CI on modern cloud platforms, after a period of high workload and growth in the number of replicas, when the workload goes back to normal and the number of replicas decreases as a part of a scale-down process, non-Pipeline projects running in the removed replicas are aborted and not adopted by other replicas.
|
The Declarative Pipeline Migration Assistant can help you migrate your Freestyle or Maven projects to Declarative Pipeline projects. |
The following Pipeline steps are not currently supported in HA controllers:
-
build -
lock
|
CloudBees CI can emulate an HA-compatible |
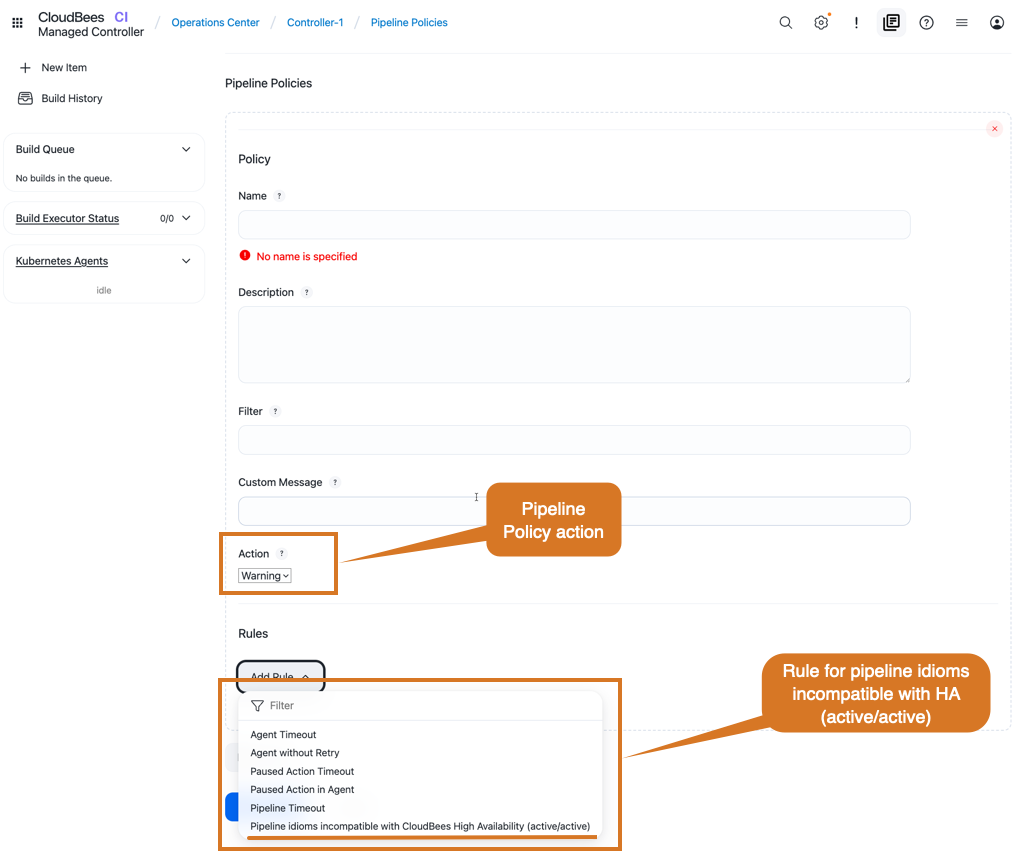
If you plan to use controllers running in HA mode, you can define Pipeline policies.
Use these to either warn developers about those incompatible steps (Warning policy), or to prevent developers from using them (Fail policy).
The rule used for this kind of policy is Pipeline idioms incompatible with Cloudbees High Availability (active/active), as displayed in the image below:
Refer to Enforce standards with Pipeline Policies for more information about how to define and apply pipeline policies to your controller.
Emulate the build step in HA controllers
The build step, provided by the pipeline-build-step plugin, does not support HA.
When used, CloudBees CI does not distribute the workloads among the replicas, and always executes the job in the replica where the build step is called.
If the upstream build is adopted, it may keep waiting indefinitely for the downstream build to finish.
Controllers running in HA mode can emulate the build step.
This emulation provides an alias for the build step with an HA-compatible behaviour.
This alias replaces all the pipeline build steps in the pipeline scripts with the build step emulation.
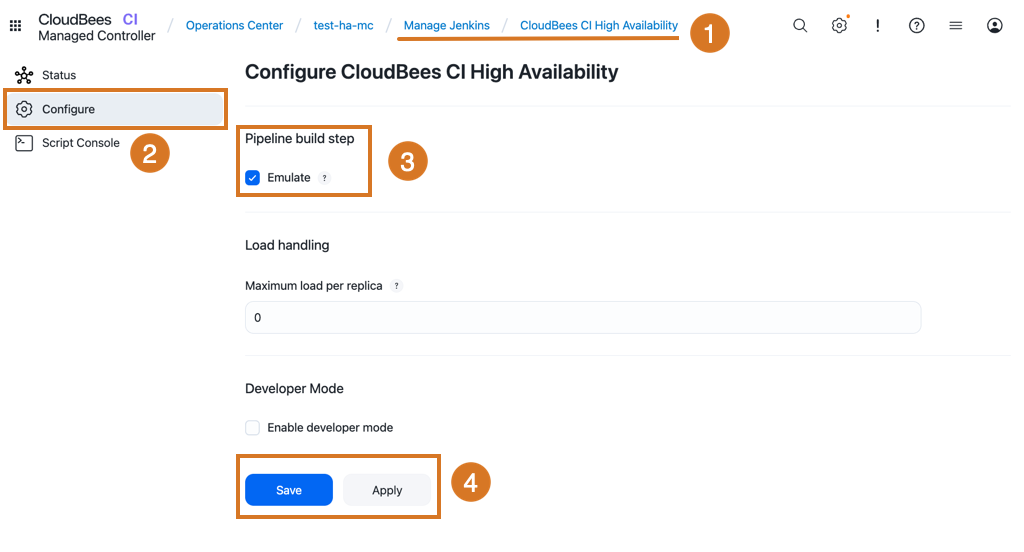
To enable the build step emulation in a controller:
-
Navigate to
-
Select Configure on the left.
-
Select Emulate from Pipeline build step.
-
Select Save or Apply.
build step|
If the Emulation does not support all the
|
Parameterized scheduled jobs in HA controllers
The Parameterized Scheduler plugin is not compatible with HA controllers. Builds triggered by the plugin are started in all the HA controller replicas. To avoid this scenario in HA controllers, CloudBees recommends taking one of the following approaches to work around the issue:
-
Use the generic
cronsyntax for the Build periodically option in a placeholder build job, and within that placeholder job, use thebuildor thetriggerRemoteJobstep with parameters to trigger the actual job.Refer to Cluster-wide job triggers for more information about the
buildandtriggerRemoteJobsteps and how to pass parameters. -
Use the generic
cronsyntax for the Build periodically option in the actual job and check thecurrentBuild.getBuildCausesto adjust the job behaviour with the correct parameters if the job has been triggered and not manually started.
Review additional valuable information about HA
REST-API endpoints and HA
When running a controller in HA mode, requests to API pull-based endpoints may return information about the controller replica that responds to the API request instead of aggregated information about all the controller replicas part of the HA cluster. To retrieve aggregated information, refer to High Availability (HA) considerations.
Blue Ocean and HA
The Blue Ocean plugin may not accurately display running builds that are owned by other replicas.
| CloudBees recommends the CloudBees Pipeline Explorer plugin. |
|
Starting with the July 2026 CloudBees CI release, Blue Ocean and team controllers will reach end-of-life (EOL) and will no longer be supported. After this date, Blue Ocean and team controllers will not receive updates, security patches, or technical support and will be removed from the CloudBees Assurance Program (CAP). What this means for you:
CloudBees strongly encourages all customers to complete their migration away from team controllers before the EOL date to ensure uninterrupted service. For detailed migration guidance, please refer to In-place conversion of team controllers to managed controllers. If you have questions or need assistance, please contact CloudBees Support. |
HA and costs
HA may increase the costs of running CloudBees CI as it requires additional resources, like those used to run the replicas and the required network filesystem.
Troubleshooting HA problems
Refer to High Availability (active/active) troubleshooting for information about troubleshooting problems with HA.
In addition to the general troubleshooting information, the CloudBees Knowledge Base contains articles about common issues and solutions for HA.