This content applies only to CloudBees CI on modern cloud platforms.
The Install CloudBees CI guide describes how to install CloudBees CI on different cloud providers and configurations, such as:
The installation process described in these guides covers a default CloudBees CI on modern cloud platforms setup where the operations center and managed controllers are all deployed in the same Kubernetes cluster and in the same namespace. However, CloudBees CI can be deployed using different setups or deployments, as listed below:
-
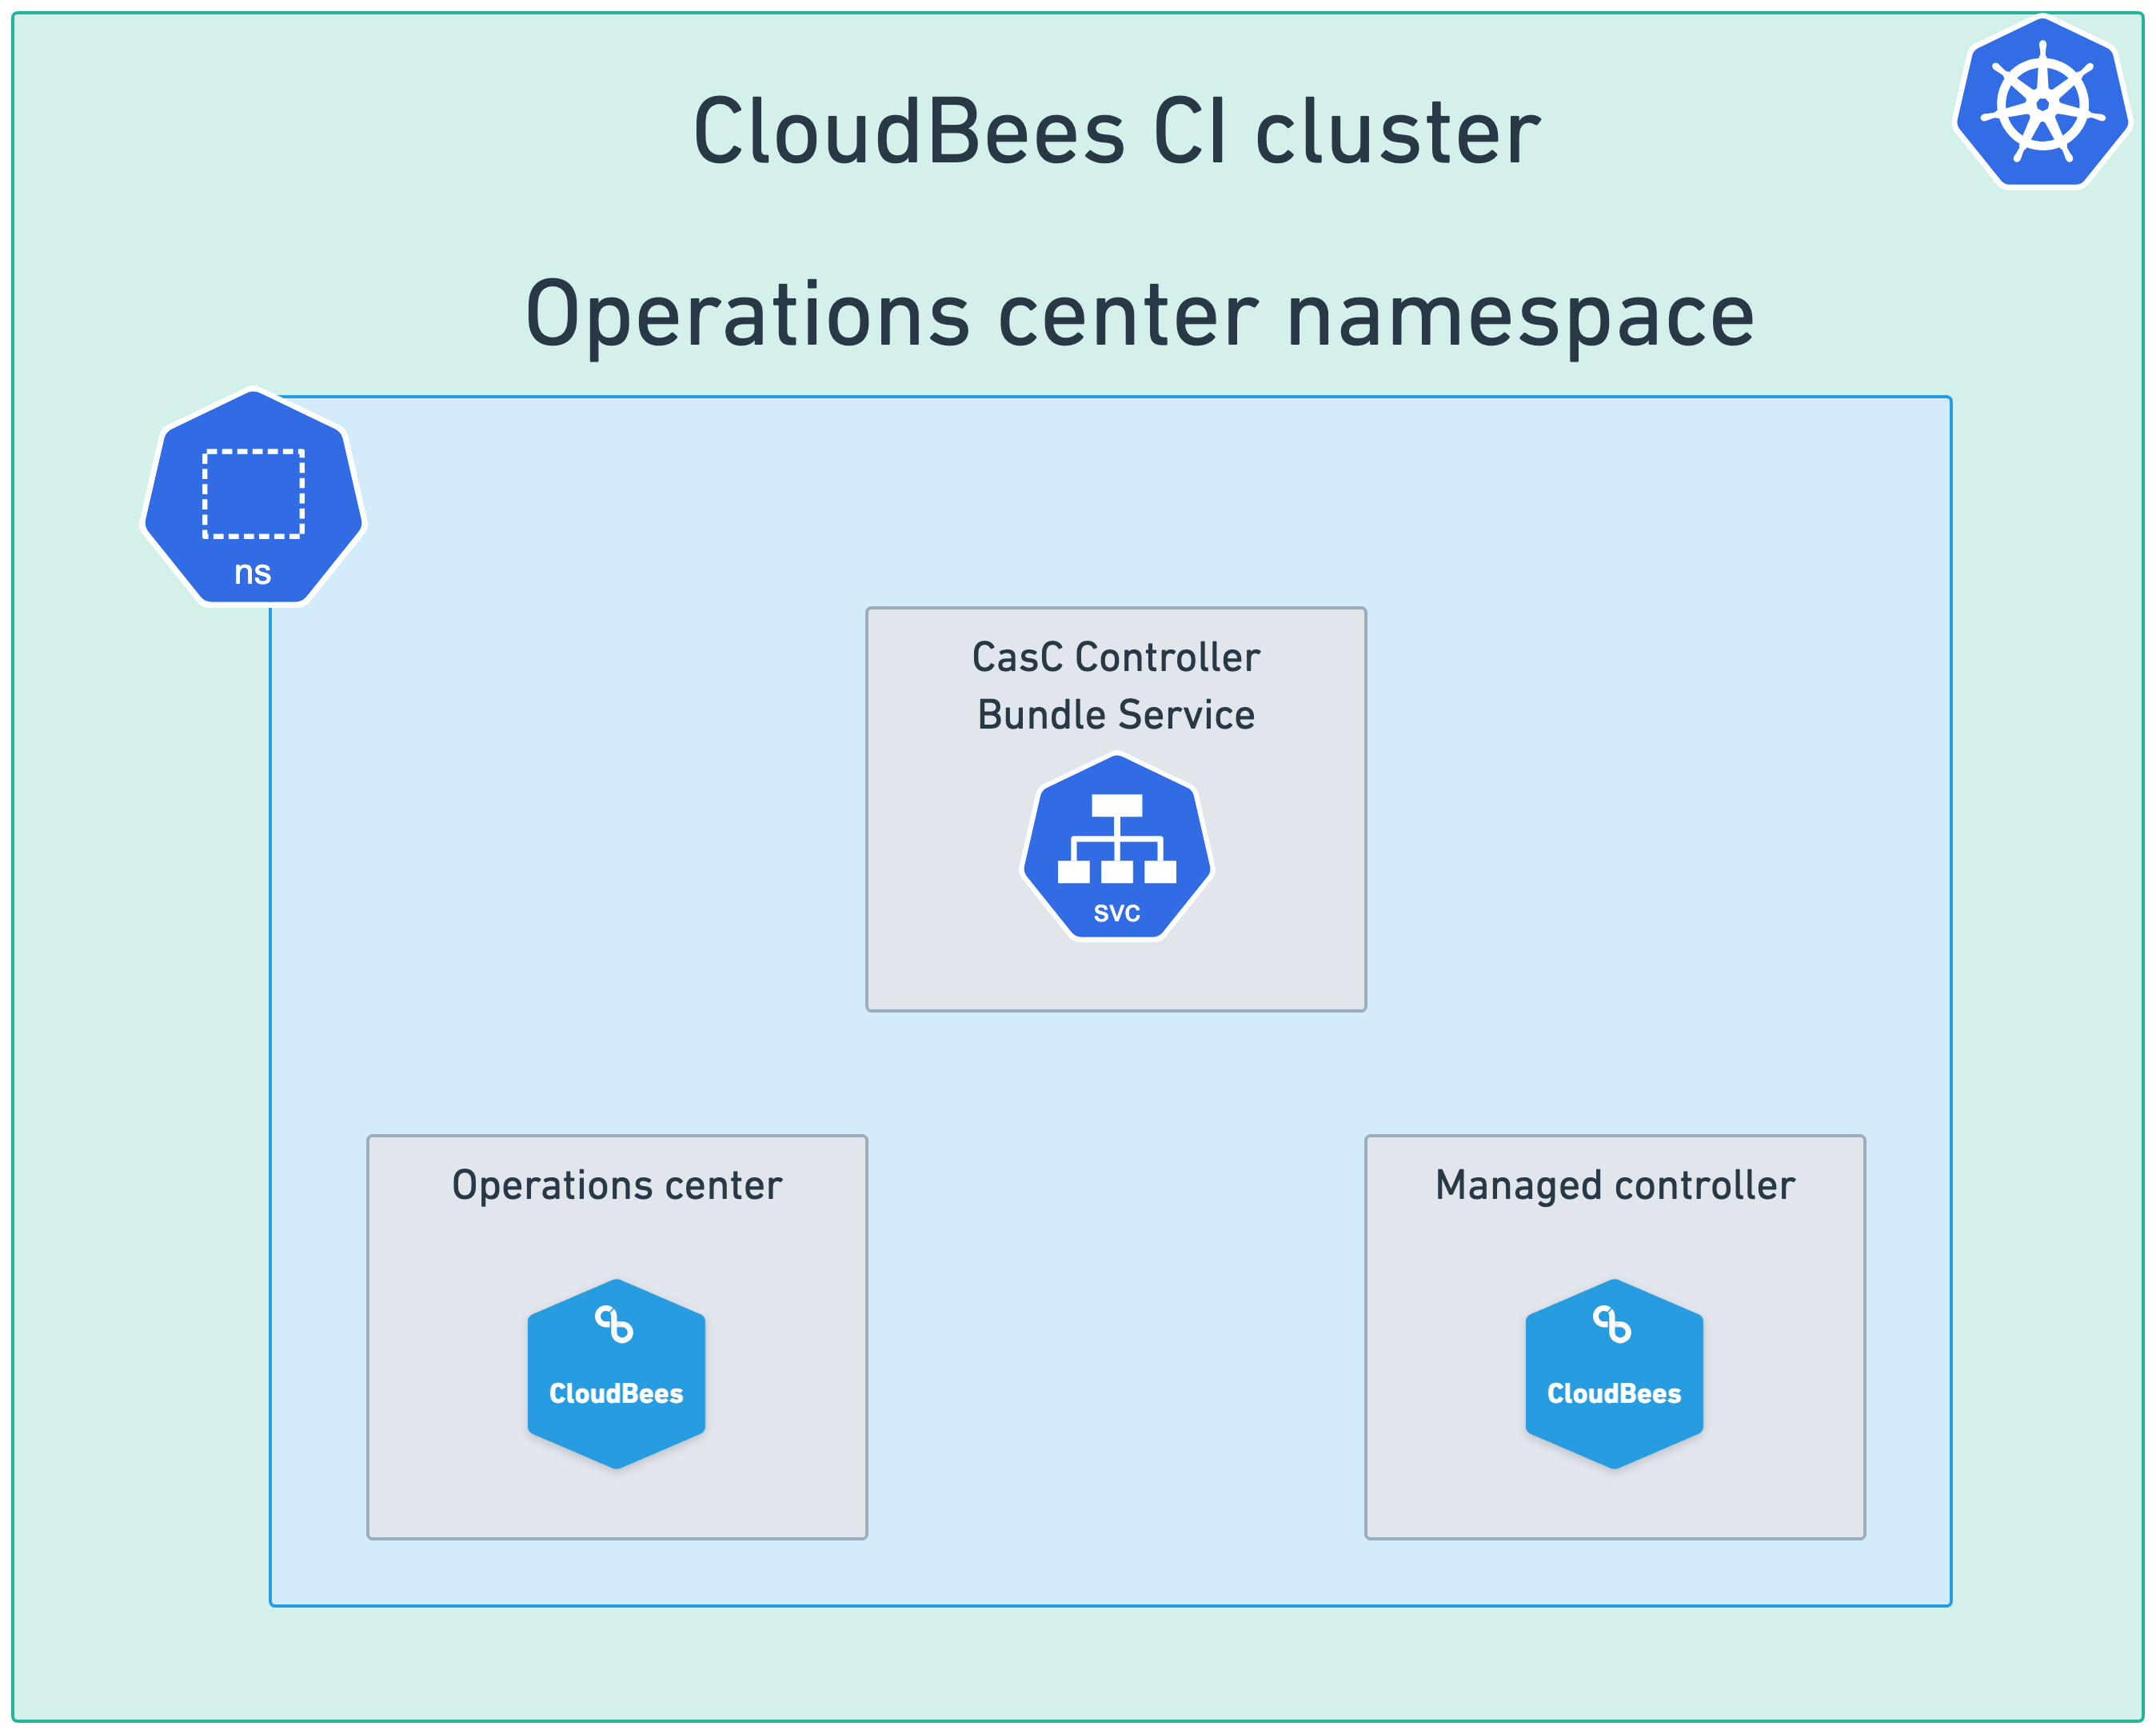
Single cluster and single namespace for the operations center and managed controllers. This is the default configuration, as described in the installation guides. In this setup, the namespace used to install CloudBees CI is referred to as the operations center namespace.
-
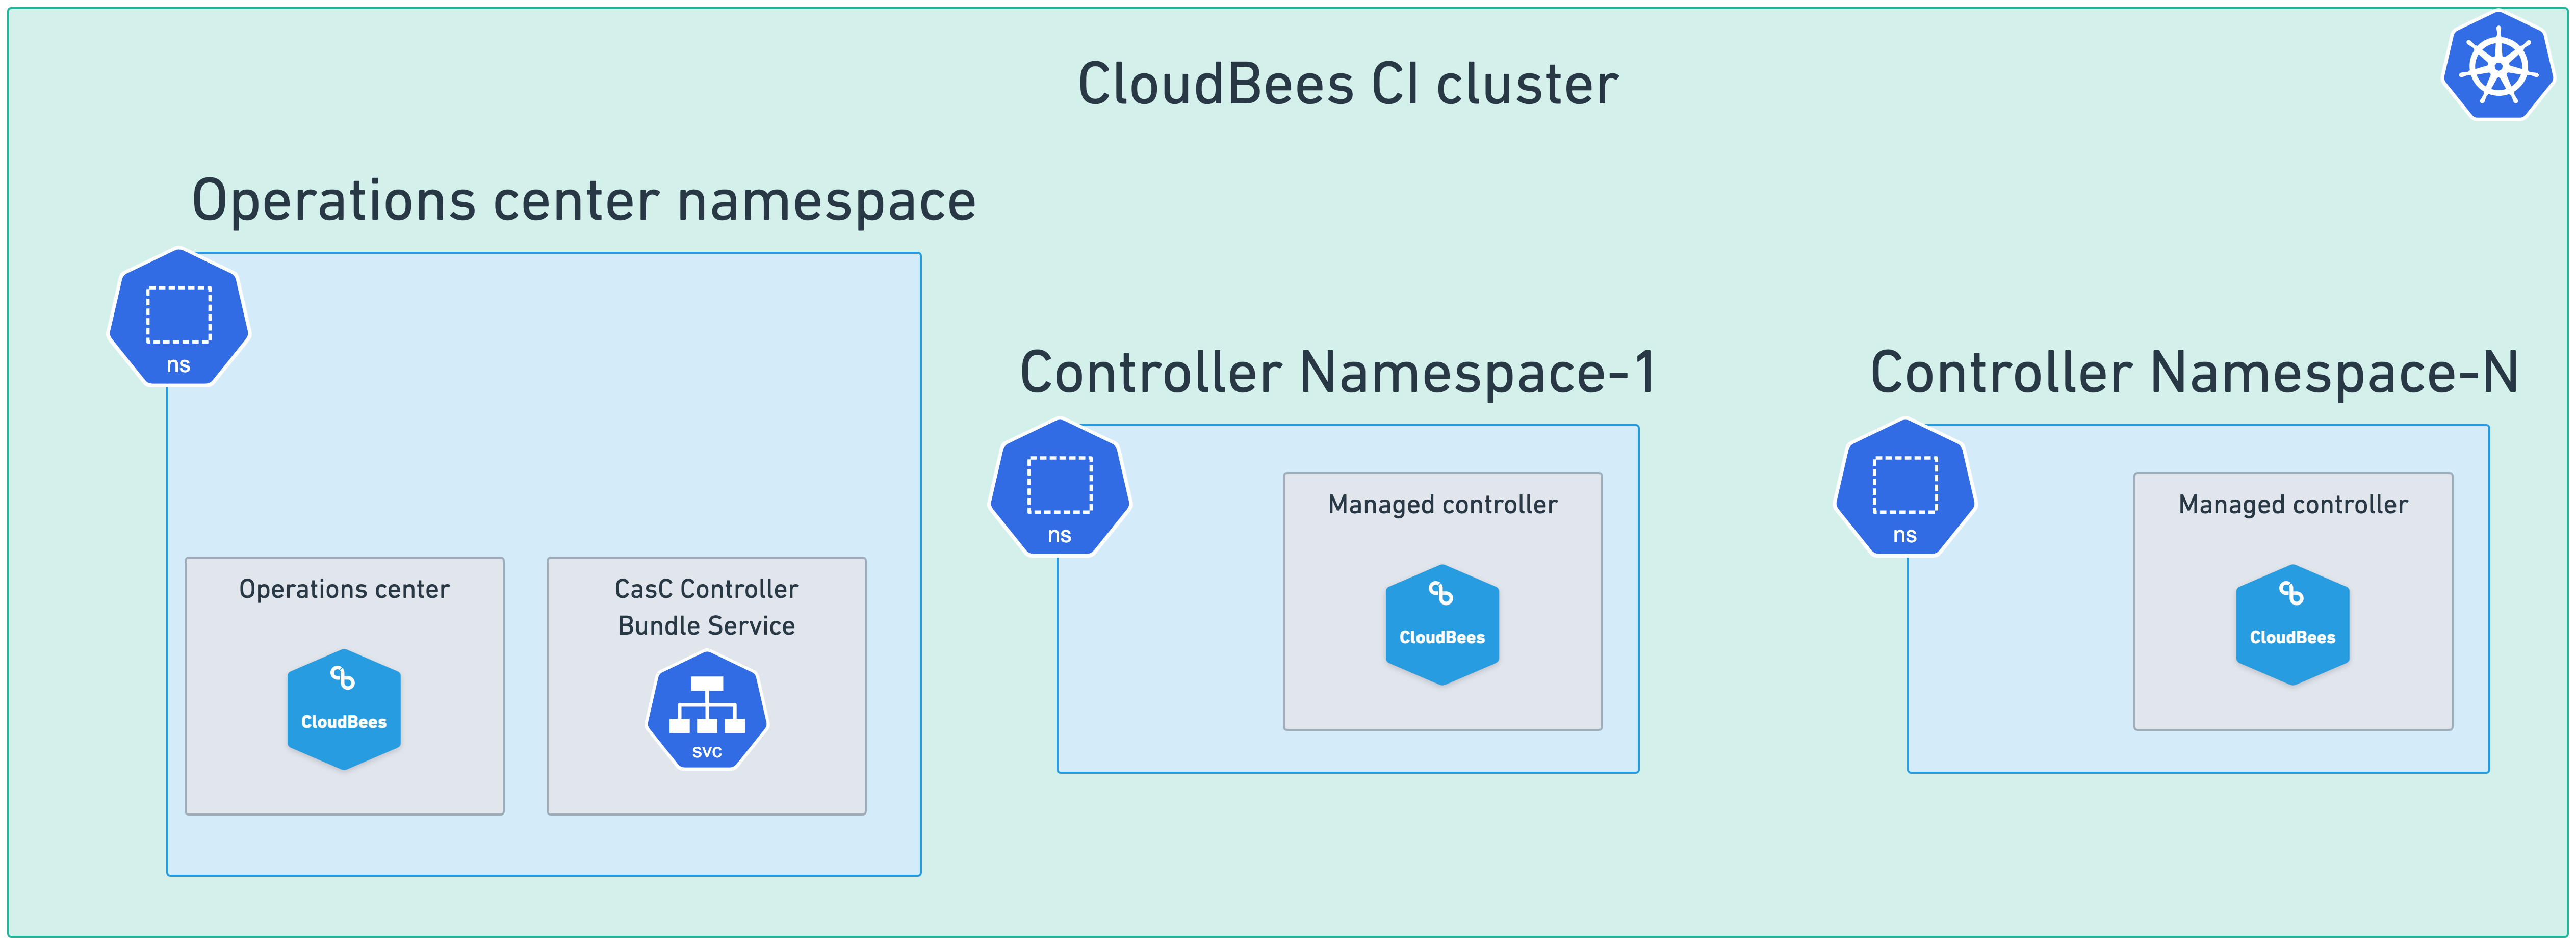
Single cluster and multiple namespaces where there is one namespace for the operations center, and one or more namespaces for the managed controllers.
-
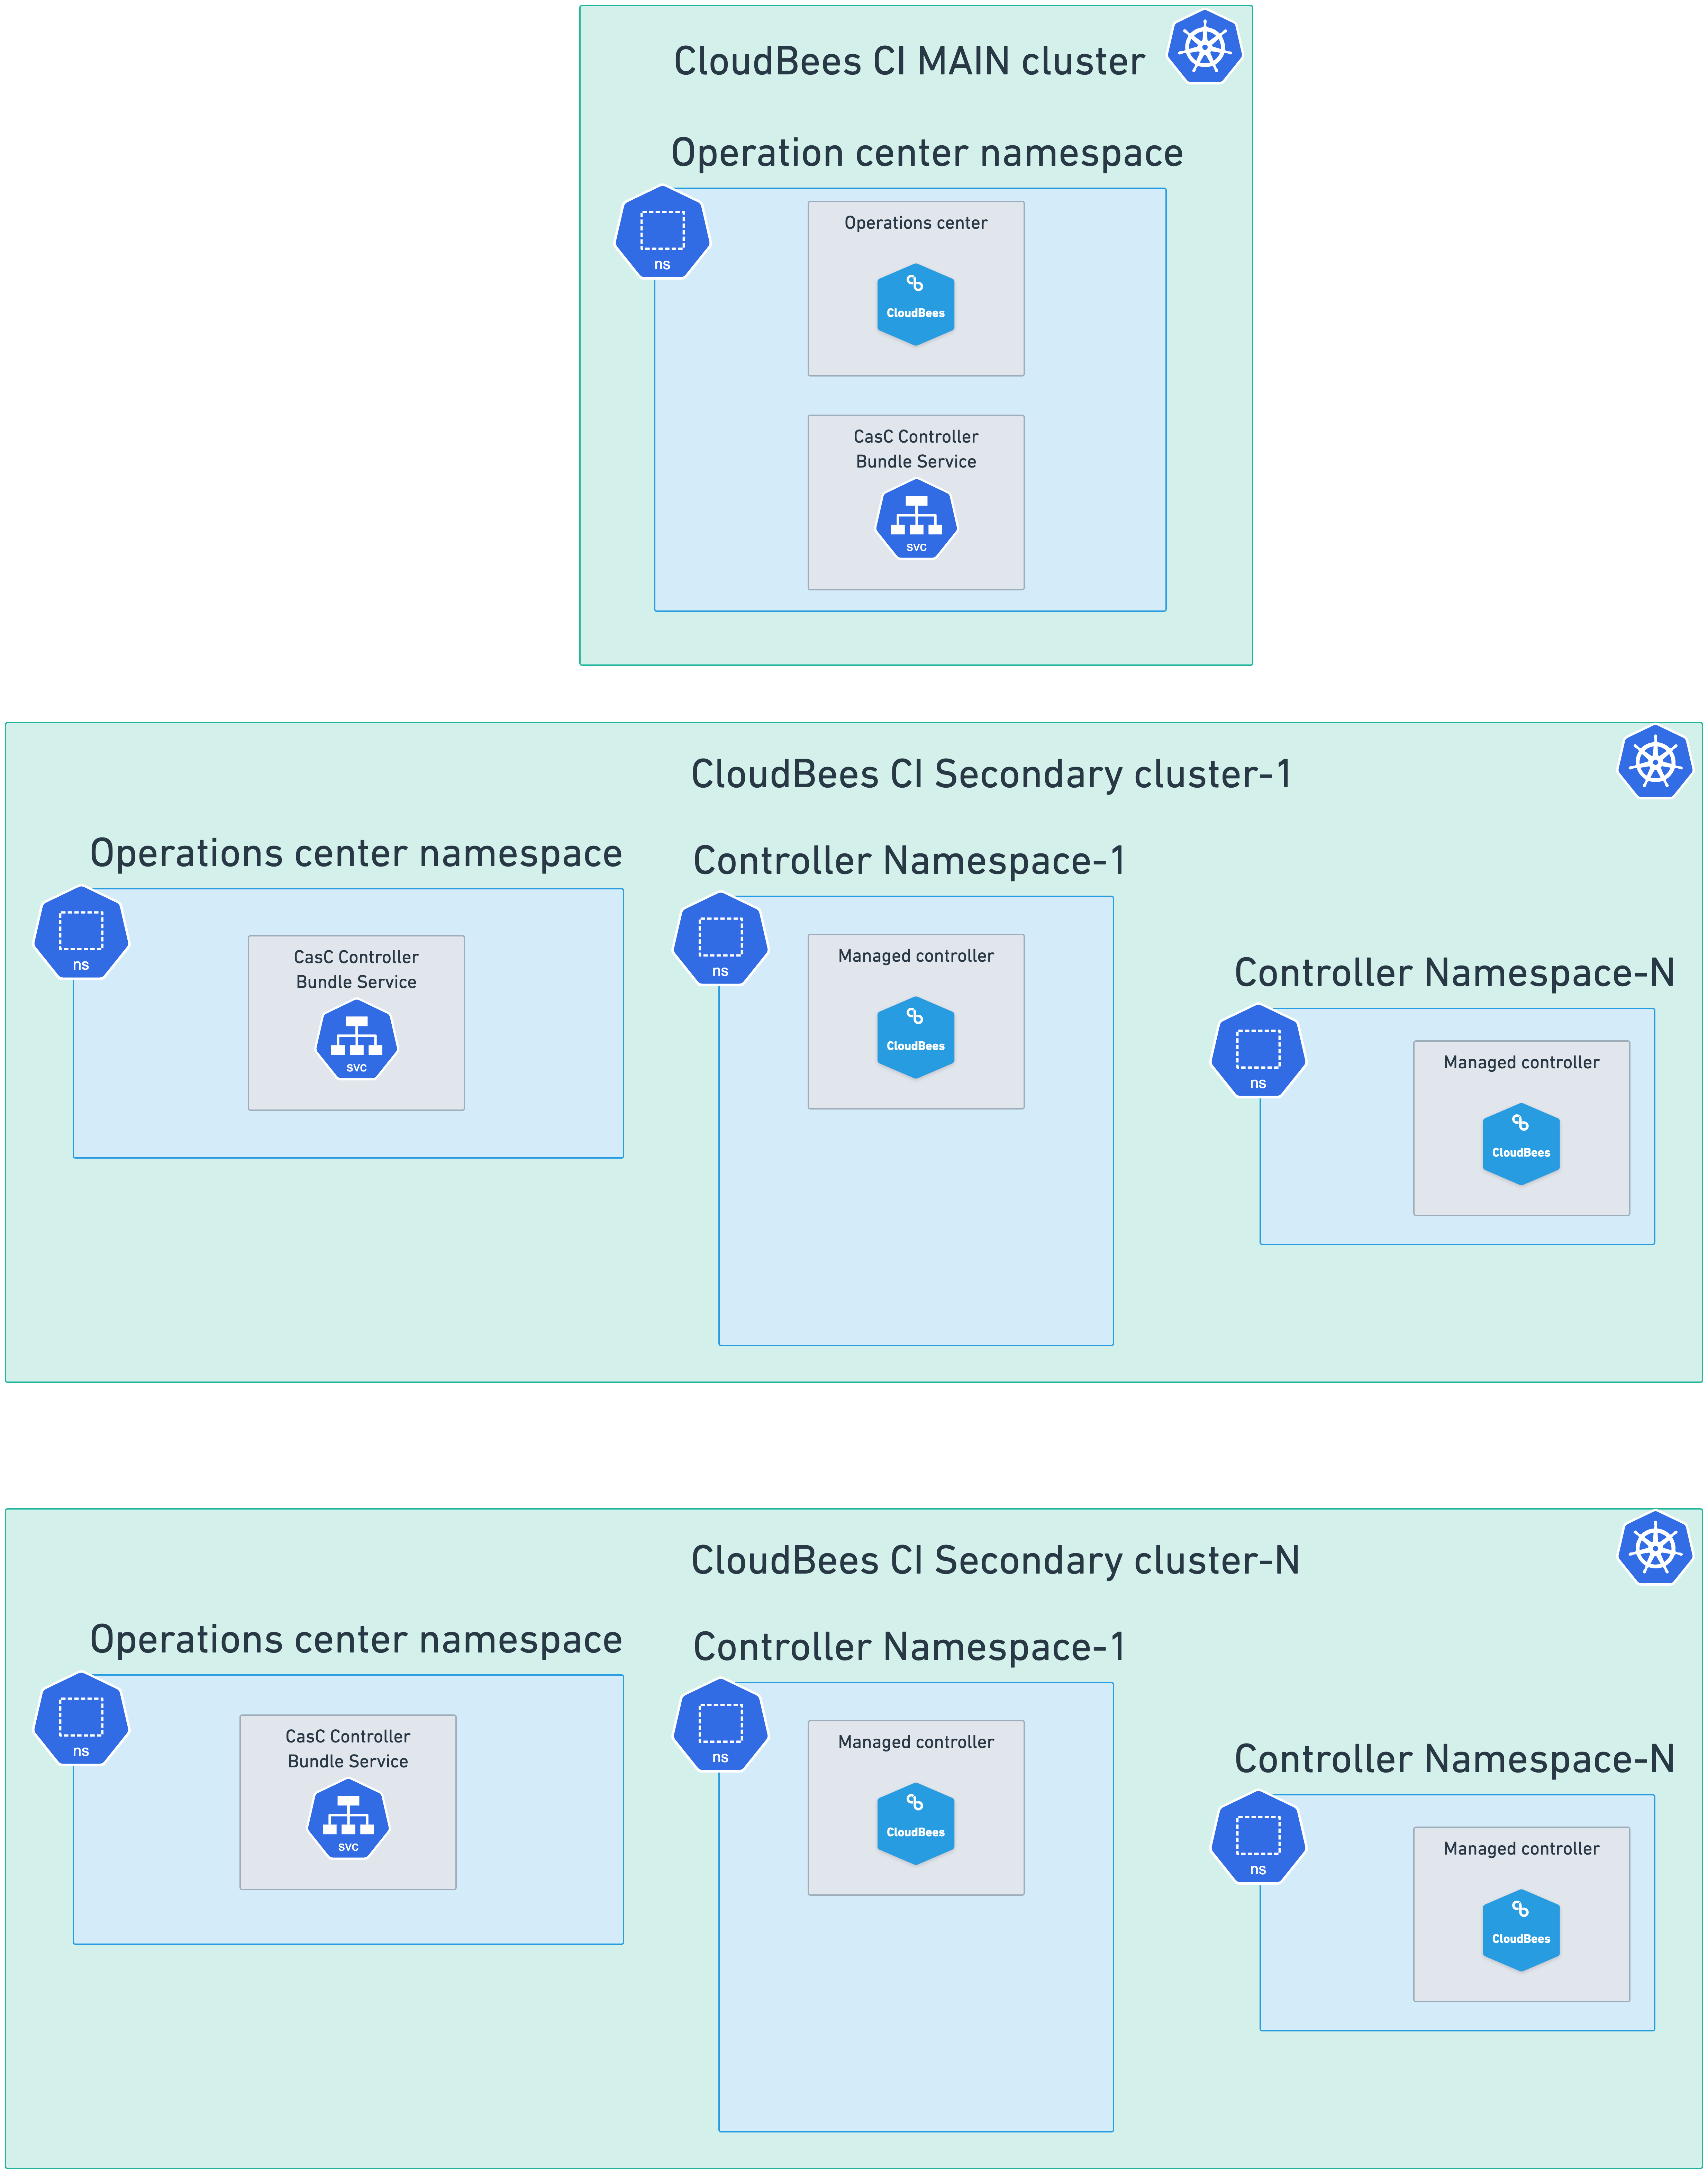
Multiple cluster setups, where the main cluster hosts the operations center in a single namespace, and there are one or more secondary clusters, each with a namespace for the operations center, and one or more namespaces for the managed controllers.
The separation of the operations center and managed controllers into different clusters or namespaces can be useful to:
-
Separate divisions or business units that need to run workloads in individual clusters or namespaces.
-
Leverage Helm charts and Configuration as Code (CasC) to configure, provision, and update using version-controlled configuration files.
Single cluster and single namespace
This is the default configuration as described in the installation guides. In this configuration, the operations center and all managed controllers are deployed in the same Kubernetes cluster and in the same namespace. Services, such as the CasC Controller Bundle Service, if enabled, are also deployed in this namespace.
Refer to Enable the CasC Controller Bundle Service for information about how to enable these services.

Single cluster and multiple namespaces
In this configuration, the operations center is deployed in a single namespace, and one or more managed controllers are deployed in one or more additional namespaces. This allows you to separate the operations center from the managed controllers, which can be useful for security or organizational purposes.
To deploy this setup, follow these steps:
-
Create the namespace for the operations center.
-
Install the operations center in the previously created namespace following the default setup for your infrastructure as described in the installation guides. Services, if desired, should be enabled during the operations center installation in this namespace.
-
Create one or more controller namespaces.
-
Create the following
values.yamlfile:OperationsCenter: Enabled: false Master: Enabled: true OperationsCenterNamespace: <oc-namespace>(1)1 Replace <oc-namespace>with the name of the namespace where the operations center is deployed. -
Run the following
helm installcommand on each controller namespace:helm install <your-release-name> cloudbees/cloudbees-core \ --namespace <ctrl-namespace> \ -f values.yaml(1)1 Replace your-release-namewith the name you want for the release (i.e.controllers) and<ctrl-namespace>with the name of each specific controller namespace.
|
If you enabled any service, such as the CasC Controller Bundle Service, during the operations center installation, these services must be disabled in the |

Multiple cluster setups
CloudBees CI can be deployed with a multiple cluster configuration. This type of configuration have two common use cases.
-
Agents in a separate Kubernetes cluster. In this use case, agents are deployed in a separate Kubernetes cluster from the cluster where a controller is set up. A controller can be configured to schedule agents between several Kubernetes clouds. Note that no control mechanism is available to spread the load across different Kubernetes clusters because a pod template is tied to a Kubernetes cloud. Refer to Provision agents in a separate Kubernetes cluster from a managed controller controller for more information.
-
Controllers in multiple Kubernetes clusters. In this use case, the operations center runs in one Kubernetes cluster, the main cluster. Some controllers run in the same cluster as the operations center, and other controllers can run in a separate cluster, in a single or in multiple namespaces.
To deploy this setup, follow these steps:
-
Create a namespace for the operations center in the main cluster (i.e.:
oc) -
Create a namespace for the operations center in each secondary cluster using the same name as the main cluster.
-
Create one or more controller namespaces in each secondary cluster.
-
Install the operations center in the previously created namespace in the main cluster following the default setup for your infrastructure as described in the installation guides. Services, if desired, should be enabled during the operations center installation in this namespace.
-
For only one of the controller namespaces in each secondary cluster, create the following
values.yamlfile:OperationsCenter: Enabled: false rbac: installCluster: true(1) Master: Enabled: true OperationsCenterNamespace: <your-oc-namespace>(2)1 The rbac.installCluster: trueproperty is required to allow the operations center to manage the controllers in the secondary clusters (the required service account, cluster role, and cluster role binding are created in the operations center namespaces on the secondary clusters).2 Replace <your-oc-namespace>with the name of the namespace where the operations center is deployed in the main cluster.
|
If services, such as the CasC Controller Bundle Service were enabled in the main cluster, they should be enabled in this For example, if the CasC Controller Bundle Service was enabled in the main cluster, you should add the following to the
|
-
Using the previous
values.yamlfile, run the followinghelm installcommand on only one of the controller namespaces for each cluster:helm install <your-release-name> cloudbees/cloudbees-core \ --namespace <ctrl-namespace> \ -f values.yaml(1)1 Replace your-release-namewith the name you want to release (i.e.controllers) and<ctrl-namespace>with the name of the namespace for the managed controllers -
If you have more than a controller namespace in each cluster; for the rest of the controller namespace in each cluster, create a different
values.yaml:OperationsCenter: Enabled: false(1) Master: Enabled: true OperationsCenterNamespace: <your-oc-namespace>(2)1 The operations center is disabled. 2 Replace <your-oc-namespace>with the name of the namespace where the operations center is deployed in the main cluster. -
Run the following
helm installcommand using the previously createdvalues.yamlfile:helm install <your-release-name> cloudbees/cloudbees-core \ --namespace <ctrl-namespace> \ -f values.yaml(1)1 Replace your-release-namewith the name you want to release (i.e.:controllers) and<ctrl-namespace>with the name of the namespace for the managed controllers.
|

Add a new Kubernetes cluster endpoint
After the Multiple cluster setups, where you have configured your CloudBees CI environment to be able to run managed controllers in multiple Kubernetes clusters, for each of the clusters, you must add and configure a new Kubernetes cluster endpoint to the operations center which runs in the main cluster.
To add a new Kubernetes cluster endpoint follow these steps:
-
Create a
kubeconfigfile for each one the Kubernetes clusters where you want to deploy managed controllers for your CloudBees CI installation. -
Configure the operations center in the main cluster and use those kubeconfig files to add a new Kubernetes cluster endpoint to the operations center.
Create a kubeconfig file
For each of the Kubernetes clusters where you want to deploy managed controllers, you must create a kubeconfig file. This file contains the information needed to connect to the Kubernetes cluster with the right permissions to create and manage managed controllers and is used later to configure the a Kubernetes cluster endpoint in the operations center running in the main cluster.
-
Install the Krew the plugin manager for kubectl.
-
Install the view-serviceaccount-kubeconfig plugin using Krew. This plugin allows you to create a kubeconfig file for a specific ServiceAccount in a Kubernetes cluster.
kubectl krew install view-serviceaccount-kubeconfig -
For each Kubernetes cluster where you want to deploy managed controllers, run the following command to create a kubeconfig file:
kubectl config set-context --current --namespace=<your-oc-namespace> (1) kubectl apply -f - <<EOF apiVersion: v1 kind: Secret type: kubernetes.io/service-account-token metadata: name: cjoc-external annotations: kubernetes.io/service-account.name: cjoc (2) EOF kubectl view-serviceaccount-kubeconfig cjoc > <kubeconfig-file-name> (3)1 Replace <your-oc-namespace>with the name of the operations center namespace in the main cluster.2 cjocis the default ServiceAccount name; or use the value you set for therbac.serviceAccountNameproperty in thevalues.yamlfile when installing CloudBees CI in the secondary cluster.3 Replace kubeconfig-file-namewith the name you want for the kubeconfig file for each cluster. CloudBees recommends using a name that identifies the cluster, such askubeconfig-<cluster-name>.yaml.
Each of the kubeconfig files created must be similar to the one below.
apiVersion: v1 kind: Config clusters: - name: <cluster-name> cluster: certificate-authority-data: <CLUSTER_CA_BASE64_ENCODED> server: <KUBE_APISERVER_ENDPOINT> contexts: - name: <context-name> context: cluster: <cluster-name> namespace: <your-oc-namespace> user: <service-account-name> current-context: <context-name> users: - name: <service-account-name> user: token: <SERVICEACCOUNT_TOKEN>
Configure the operations center in the main cluster
After the previous step, where you created a kubeconfig file for each of the Kubernetes clusters where you want to deploy managed controllers, you must configure the operations center in the main cluster to be able to connect to those clusters. You must add a new Kubernetes cluster endpoint for each of them.
To add a new Kubernetes cluster endpoint to the operations center:
-
Select in the upper-right corner to navigate to the Manage Jenkins page. Select Configure Controller Provisioning, and under Kubernetes Cluster endpoints, the list of endpoints is displayed.
The first one corresponds to the current cluster and namespace that operations center is running.
-
Select Add.
-
Pick a name to identify the cluster endpoint.
-
Set up credentials by creating a Secret file credentials using the kubeconfig file you created for the Kubernetes cluster.
-
Pick a namespace. If left empty, it uses the name of the namespace where the operations center service account is deployed.
-
Set the Controller URL Pattern to the domain name configured to target the Ingress controller on the Kubernetes cluster.
-
The Jenkins URL can be left empty, unless there is a specific link between clusters requiring access to the operations center using a different name than the public one.
-
Select Use WebSocket to enable WebSockets for all managed controllers that use this endpoint. See Using WebSockets to connect controllers to operations center for details about WebSockets.
-
-
Select Validate to make sure the connection to the remote Kubernetes cluster can be established and the credentials are valid.
-
Select Save.
Add a managed controller to a specific Kubernetes cluster
To add a new managed controller to a specific Kubernetes cluster:
-
Navigate to the operations center.
-
Select New Item.
-
In the New Item screen, enter the name of the new managed controller on the Enter an item name field.
-
Select Managed Controller as the type of item to be created.
-
Select OK.
-
In the managed controller configuration screen, use the Cluster endpoint dropdown list to select the cluster where you want to deploy the new managed controller.
-
Adjust the controller configuration to your needs.
-
If you do not want to use the default storage class from the cluster, set the storage class name through the dedicated field.
-
If the Ingress Controller is not the default one, use the YAML field to set an alternate Ingress class.
kind: "Ingress" spec: ingressClassName: <your-ingress-class-name>(1)1 Replace <your-ingress-class-name>with the name of the Ingress class you want to use for this managed controller. -
Select Save to provision the new managed controller on the selected Kubernetes cluster.
Network considerations for multicluster setups
Keep in mind the following information about networking for provisioned controllers and agents:
-
When provisioning a controller on a remote Kubernetes cluster, the Kubernetes API must be accessible from the operations center.
Upon startup, a controller connects back to the operations center through HTTP or HTTPS when using Websockets. If you are not using WebSockets, it connects using inbound TCP. If the controller is located in a different Kubernetes cluster.
-
The operations center must provide its external hostname so that the controller can connect back.
-
If using WebSockets, the operations center HTTP / HTTPS port must be exposed.
-
If not using WebSockets, the operations center inbound TCP port must be exposed.
-
-
When provisioning an agent on a remote Kubernetes cluster, the Kubernetes API must be accessible from the managed controller.
Upon startup, an agent connects back to its controller. If the agent is in a different Kubernetes cluster:
-
The controller must provide its external hostname so that the controller can connect back.
-
If using WebSockets, the controller HTTP / HTTPS port must be exposed.
-
If not using WebSockets, the controller inbound TCP port must be exposed.
Refer to Connect inbound agents.
-
-
In order for controllers to be accessible, each Kubernetes cluster must have its own Ingress controller installed, and the configured endpoint for each controller should be consistent with the DNS pointing to the Ingress controller of that Kubernetes cluster.
-
Bandwidth, latency, and reliability can be issues when running components in different regions or clouds.
-
Operations center <> Controller connection is required for features like shared agents, licensing (every 72 hours) or SSO. An unstable connection can result in the inability to sign in, unavailable shared agents or an invalid license if the disconnected time is too long.
-
Controller <> agent connection is required to transfer commands and logs. An unstable connection can result in failed builds, unexpected delays, or timeouts while running builds.
-
Controller provisioning configuration
To provision controllers in their own namespaces, each controller must use a specific subdomain. For example, if the operations center domain is ci.example.org and the URL is https://ci.example.org/cjoc/, a controller dev1 should use the subdomain dev1.ci.example.org or dev1-ci.example.org. It is preferable to use dev1-ci.example.org if using wild card certificates for the domain example.org.
To configure each controller to use a specific subdomain in the operations center:
-
Select in the upper-right corner to navigate to the Manage Jenkins page.
-
Select Configure Controller Provisioning.
-
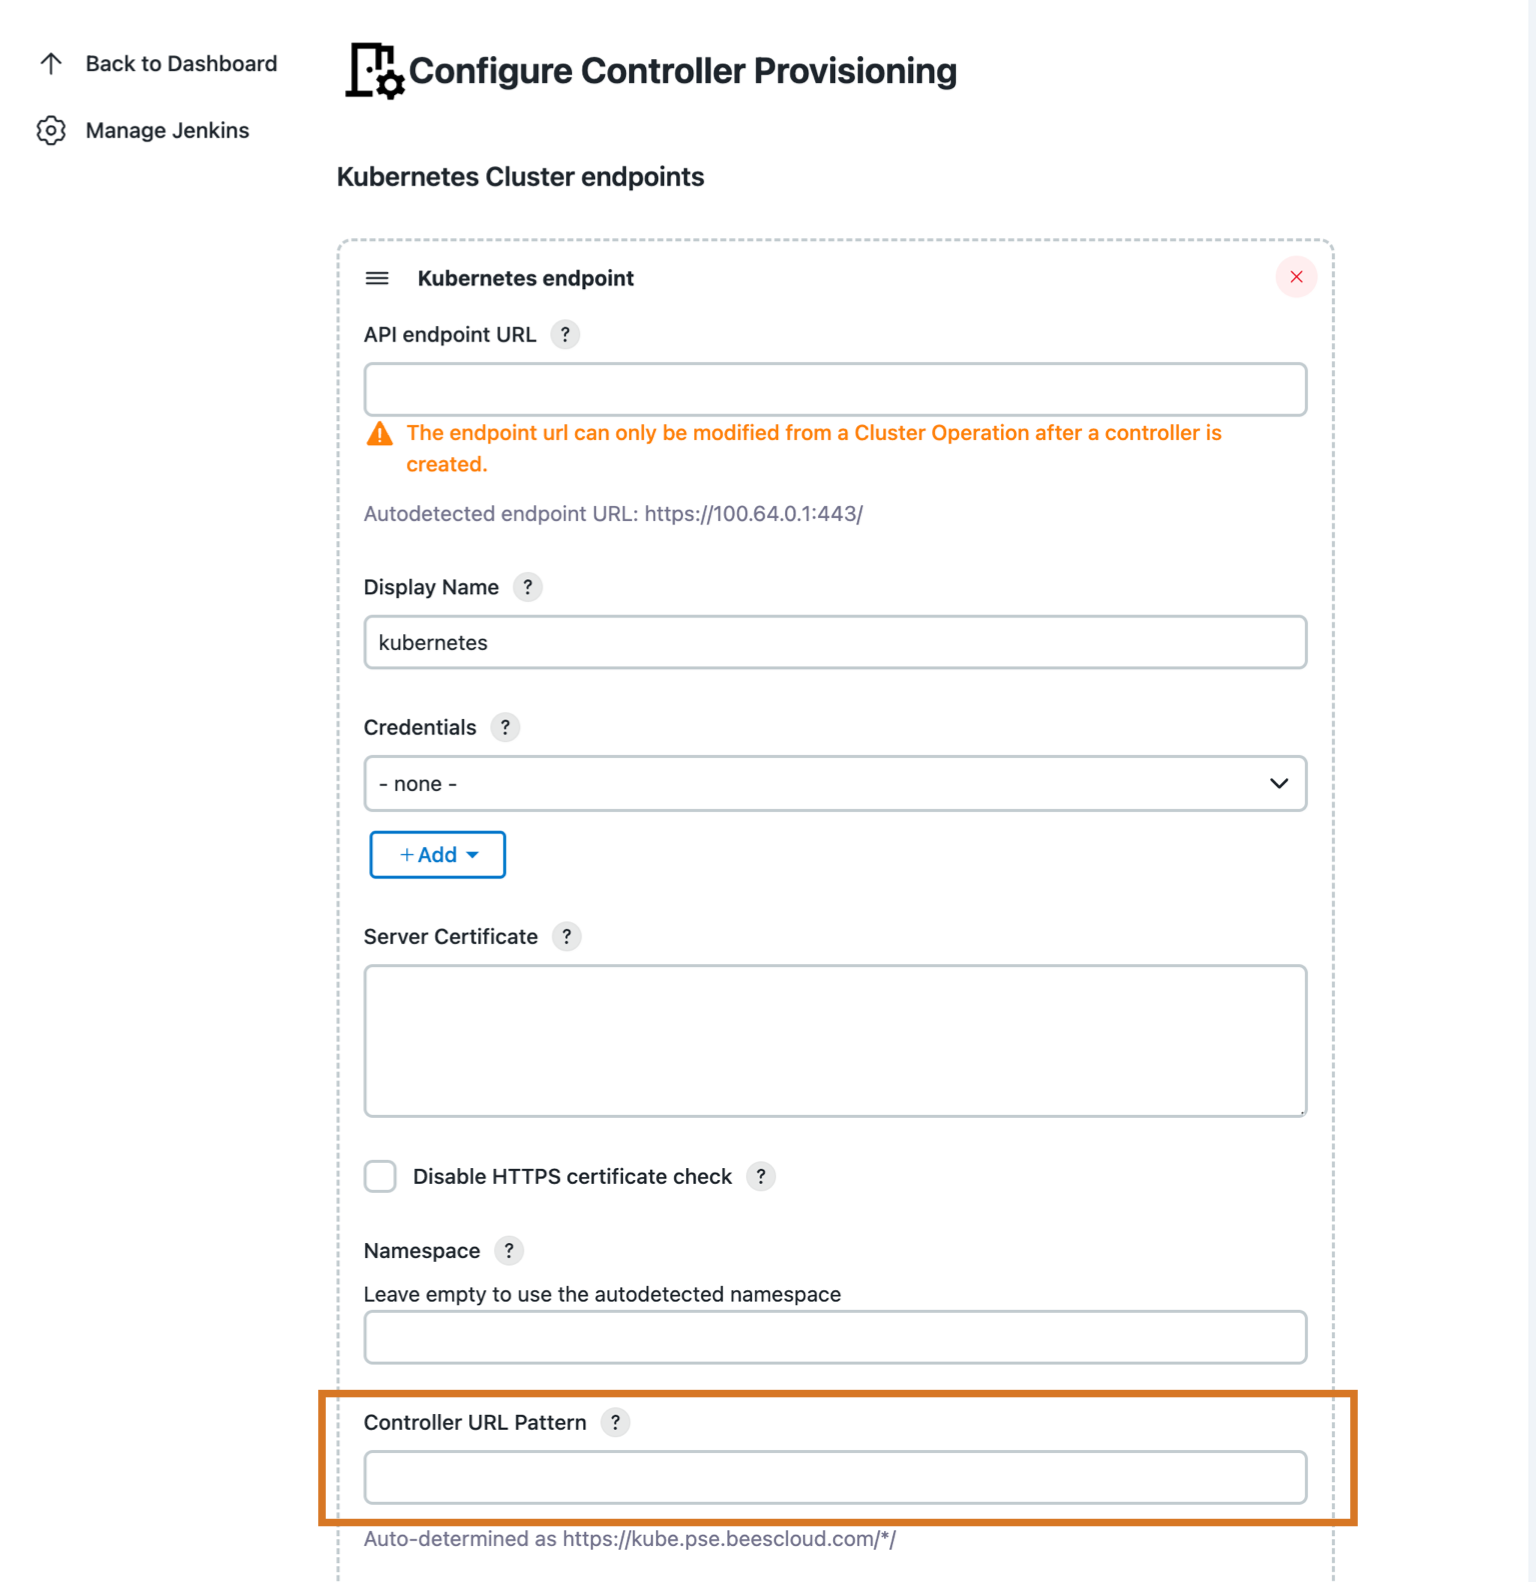
Under Kubernetes Cluster endpoints, set the Controller URL Pattern. For example, if the operations center domain is
ci.example.org, the Controller URL Pattern should behttps://*-ci.example.org/*/. Figure 4. Controller provisioning configuration
Provision controllers
The namespace for the controller resources can be configured as the default namespace for all managed controllers in the main operations center configuration screen with the namespace parameter.
The namespace can also specify a specific managed controller in the controller configuration screen with the namespace parameter.
| Leave the namespace value empty to use the value defined by the Kubernetes endpoint. |
TLS for remote controllers in a multicluster environment
The recommended approach to set up Ingress TLS for controllers in remote clusters is to add the secret to the namespace where the controller is deployed and then add the TLS to each remote controller’s Ingress (through the YAML field).
Remove managed controllers from a cluster
If you remove a controller from the operations center, the controller’s Persistent Volume Claim, which represents the JENKINS_HOME, is left behind.
To remove a controller from a cluster:
-
Type the following command:
kubectl delete pvc <pvc-name>The <pvc-name>is alwaysjenkins-home-<controller name>-0.
Troubleshoot multicluster and multi-cloud
- What should I do if my controller cannot connect back to the operations center?
-
Use kubectl to retrieve the controller. Then, inspect where it tries to connect and how it matches the configuration that is defined in operations center.
- My controller starts and shows as connected in operations center. Why isn’t my controller browsable?
-
This can be caused by either a DNS/Ingress misconfiguration or a URL misconfiguration.