The following permission examples are solutions to common Role-Based Access Control (RBAC) permission configuration requirements and include the following conditions:
-
There are multiple teams of users sharing access to operations center.
-
The CloudBees CI instance is using a Role-Based Access Control (RBAC) authorization strategy. Refer to Enable the authorization strategy for more information.
-
The CloudBees CI instance has the Overall/Manage permission enabled. Refer to Enable the new permissions for more information.
With the following roles:
-
Administrator: Member of a shared team, in charge of the security and the hosting of the solution. Has access to everything in the CloudBees CI instance.
-
Developer: Member of a team project, implementing features on a project.
-
Principal: Can also be called "tech lead" or "lead developer" in companies, is responsible for developers' code quality, and supports developers in their day-to-day work.
-
Tester: Member of a shared team, validates acceptance criteria in all projects across the company.
If you only need three groups, for instance an admin, developer, and read (browser) group, initialize RBAC with the Typical initial setup option in .
 Figure 1. Select Typical initial setup
-
Roles and permissions setup using RBAC
The RBAC setup for the following permission examples includes two controllers:
-
Controller-A: Contains CI/CD jobs for the projects of team A.
-
Controller-B: Contains CI/CD jobs for the projects of team B.
And the following project team-oriented groups:
-
Developers team A and Developers team B: Will have read-only access to the operations center instance and will only be able to access its controller. We will name these groups developer-team-A-group and developer-team-B-group.
-
Principal team A and Principal team B: Will have read-only access to the operations center instance with additional access to the controller that has the team configuration. These teams are trusted to have management access to the controller as well as developer access. We will name these groups principal-team-A-group and principal-team-B-group.
And shared team groups:
-
Tester team: Will have read-only access to the operations center instance and access to both Controller-A and Controller-B. We will name this group tester-team-group.
-
Admin team: Will be able to administer the operations center and controllers systems. We will name this group admin-team-group.
Operations center configuration
Create roles
First, you need to create the roles on the operations center.
| Leave the authenticated role with the Overall/Administer permission to avoid being locked out of the instance. Once the admin_role is assigned to an internal group, customize the permission in the authenticated role as required. |
To add a new role:
-
From the operations center dashboard, select in the upper-right corner, and then select Roles to navigate to the Roles overview page.
-
Select Manage above the Permissions column.
-
Enter manager_role in Role to add and select Add.
-
Select the Overall/Manage and Overall/Read permissions.
The Overall/Manage permission will only appear if you have enabled it. Refer to Enable the new permissions for more information.
Role Permissions read_role
-
Overall/ Read
-
Job/Read
admin_role
Overall/Administer (not filterable)
manager_role
-
Overall/Read
-
Overall/ Manage
-
Client/managed controller/Configure
-
Client/managed controller/Lifecycle
developer_role
-
Job/Build
-
Whatever additional permissions you want to include
authenticated, anonymous
No permissions
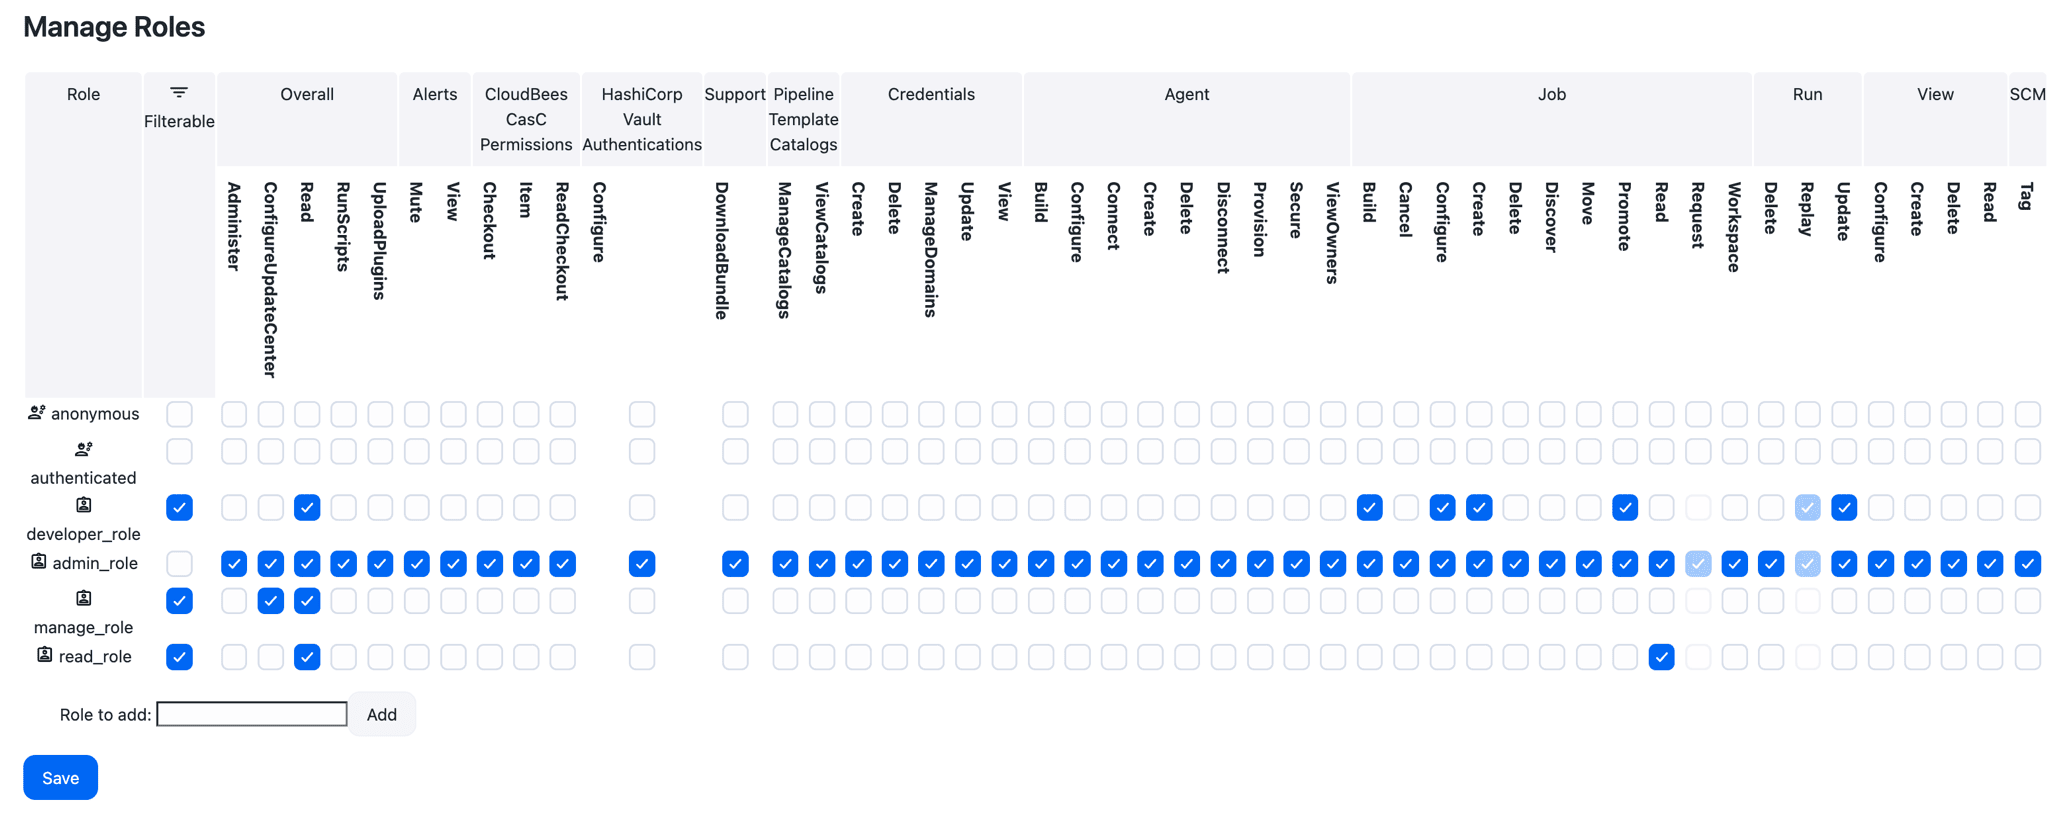 Figure 2. Example role set-up
 -
The admin_role role should NOT be filterable. Filterable means that the role can be removed on a sub-container (for example, a folder or a managed controller). We want an Administrator to be an Administrator anywhere on the cluster.
|
Create groups and assign roles
After you have created new roles, you must create the groups and assign the correct roles.
To create groups and assign roles:
-
From the operations center dashboard, select in the top-right corner, and then select Groups to navigate to the Groups overview page.
-
On the Groups page, select New Group in the top right corner.
-
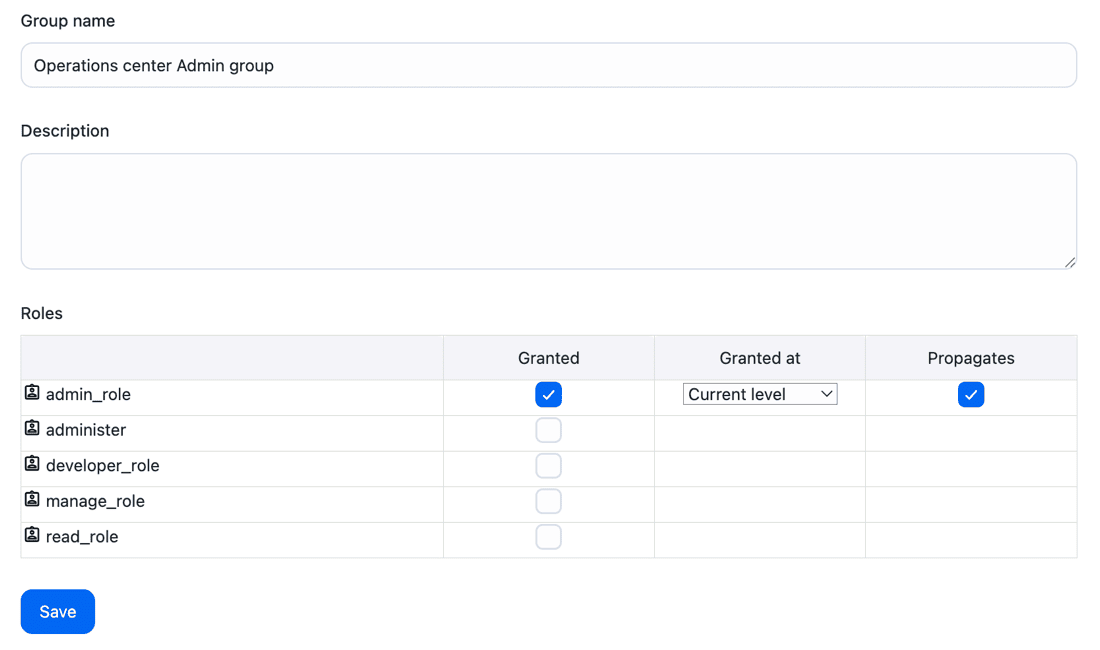
Create the following groups:
Context Group Role(s) Member(s) ROOT (operations center and controllers)
oc-admin-group
admin_role (current level/propagation)
All the administrator(s) of the operations center instance
ROOT (operations center and controllers)
oc-read-group
read_role (current level/no propagation)
-
Developers and principal of team A
-
Developers and principal of team B
ROOT (operations center and controllers)
oc-tester-group
read_role (current level/no propagation)
All testers
-
| Do not forget to remove permissions from the authenticated and anonymous roles for the configuration once all groups and roles are created. |
Controllers configuration
After you have configured the roles and groups for the operations center, you need to configure the roles and groups for the controllers.
-
From the Controller dashboard, select Groups in the left navigation pane.
-
On the Groups page select New Group in the top right corner.
-
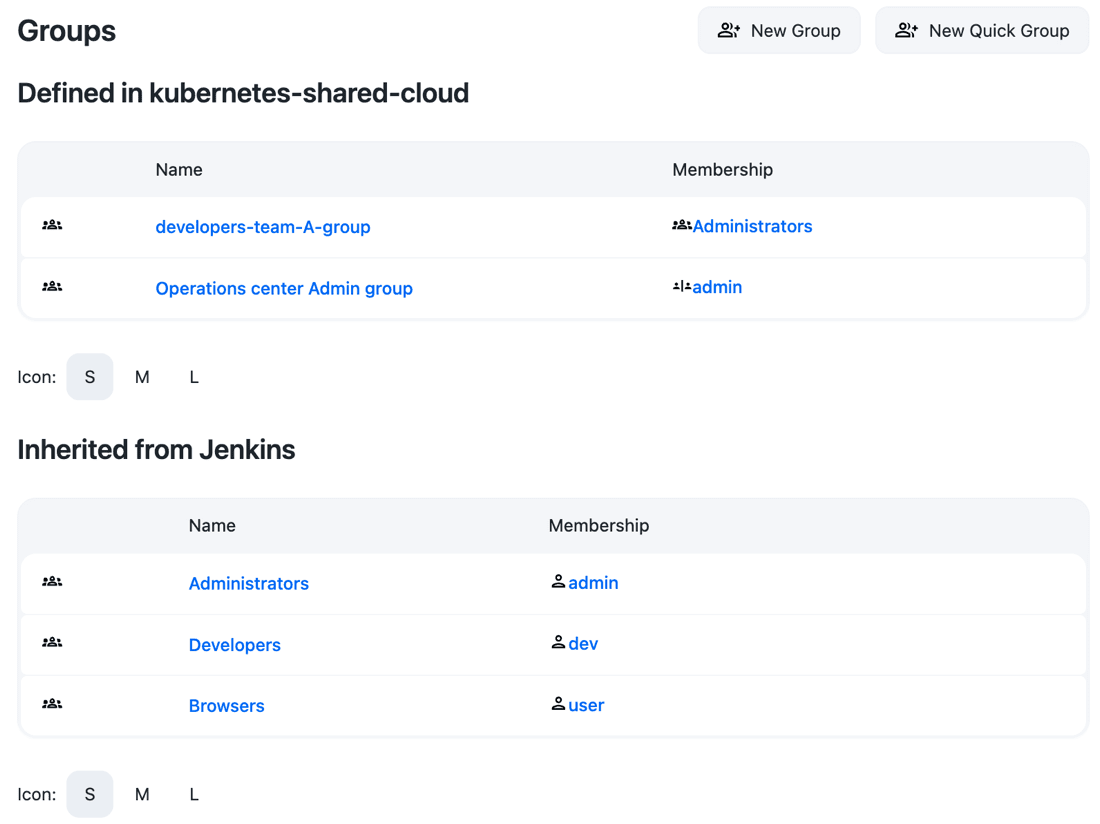
Create the following groups (for
Controller-Bdo the same, and replaceAwithB):Context Group Role(s) Member(s) Controller-A
developer-team-A
-
developer_role (current level/propagation)
-
read_role (current level/no propagation)
-
Developers and principal of team A
-
All testers (oc-tester-group)
Controller-A
principal-team-A
-
manager_role (current level/propagation)
-
Principal of team A
-
Isolate permissions into folders at the controller level
Some teams may want to have several levels of permissions inside one project team. For example, they may want developers to only have permission to create Pipeline jobs while the principals are able to create additional item types like Freestyle jobs.
This example uses the Roles and permissions setup using RBAC described above, adding the element of team folders. We concentrate on one controller, Controller-A, but similar or different configurations can be done in other controllers.
| Controllers included in the following example need to have the CloudBees Folders Plus plugin installed. |
Controller configuration
Create two folders on Controller-A:
-
Team A pipelines: For all development-related continuous integration(CI), developers can create Pipeline jobs inside this folder.
-
Tech lead maintenance CI: For the principal(s) only, all job types are allowed, hidden for developers.
To create a Folder:
-
From the controller dashboard, select New Item.
-
Select Folder from the list of options.
-
Enter a name.
-
Select OK.
Then you need to modify some group permission configurations. From the Controller dashboard, select Groups in the left navigation pane. Then, modify the following groups (developer has only read_role at the ROOT level):
| Context | Group | Role(s) | Member(s) |
|---|---|---|---|
Controller-A |
developer-team-A |
|
|
Controller-A |
principal-team-A |
|
|
Folder configuration
To configure the Team A pipelines folder:
-
Select the Team A pipelines folder.
-
At the bottom of the configuration, select the Restrict the kind of children in this folder checkbox.
-
Next to This folder can contain the following items, select the Pipeline checkbox.
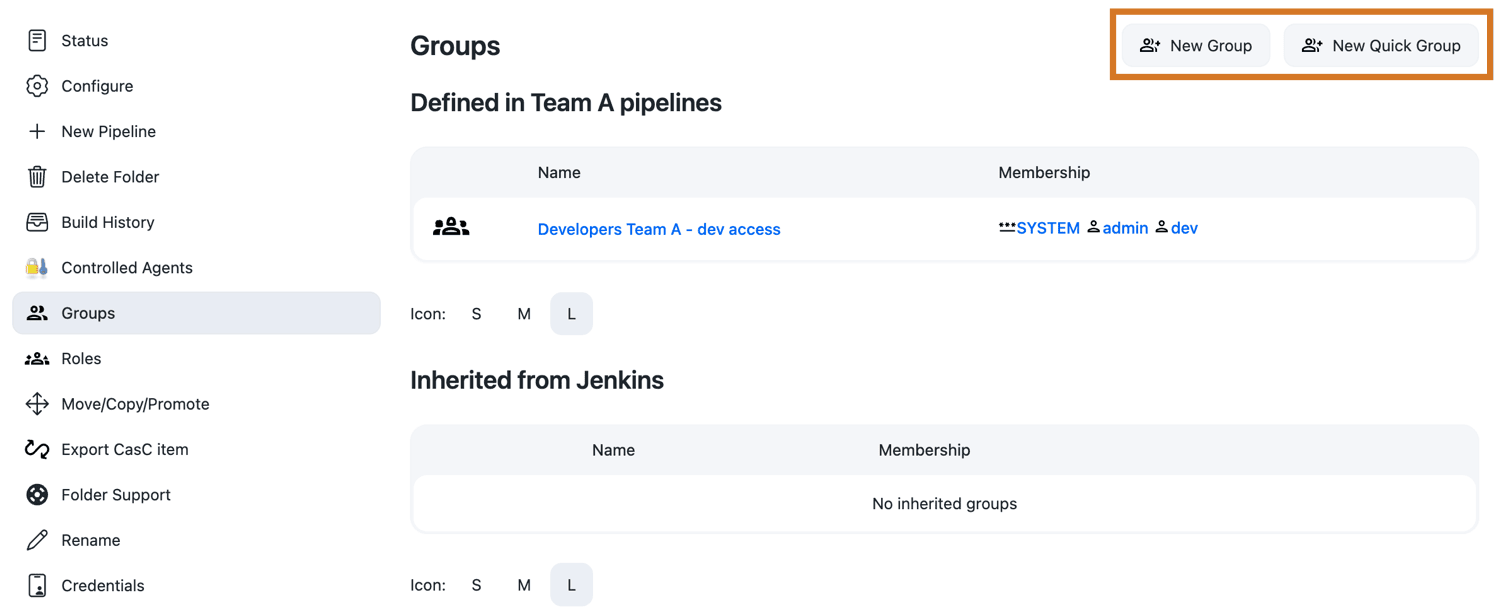
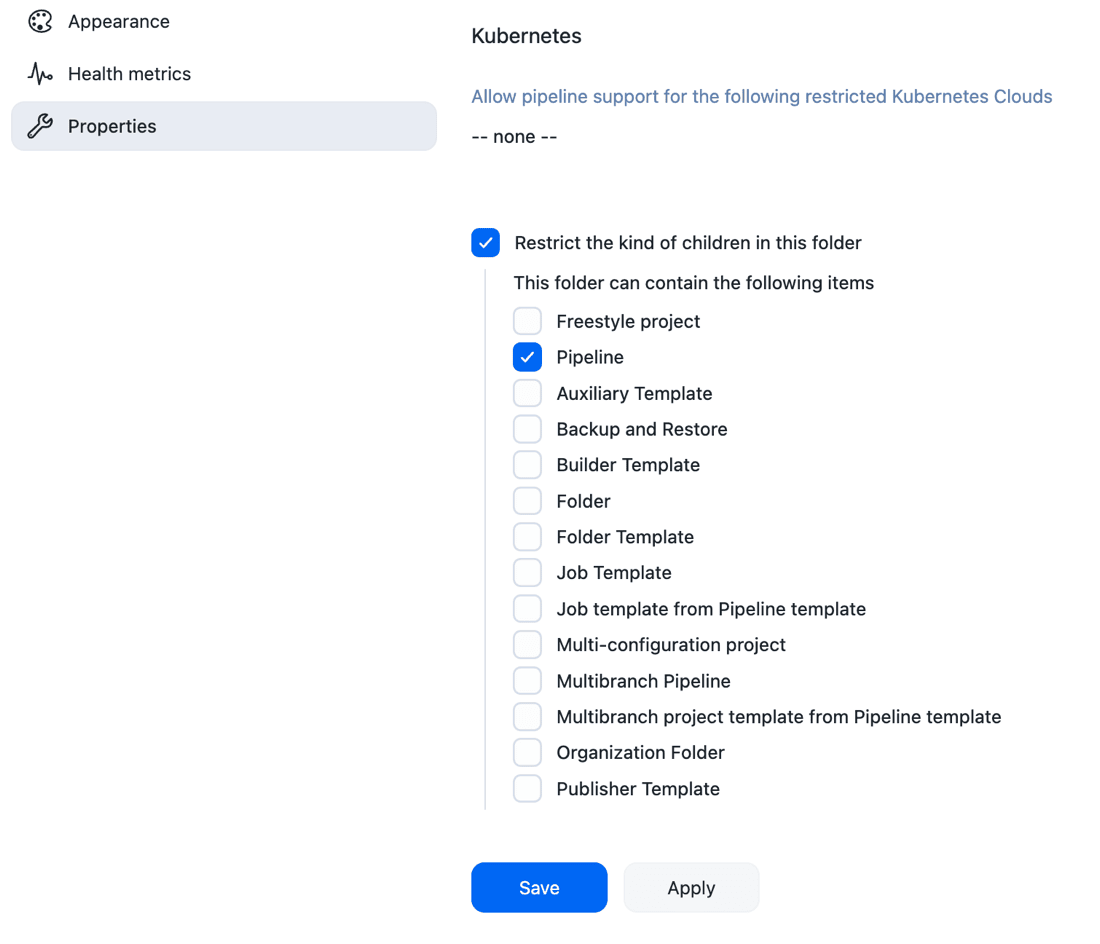 Figure 5. Restrict folder to Pipeline jobs
 -
Select Save.
-
Select Groups in the left navigation pane.
-
Select add some to add a group named Developers Team A - dev access.
-
Select OK.
-
Select the checkbox in the Granted column for the developer_role to assign the Developers Team A - dev access group the developer_role.
-
Select Save.
-
Select Add user/group.
-
Add all developers of the project team A, including the principal, to the Developers Team A - dev access group.
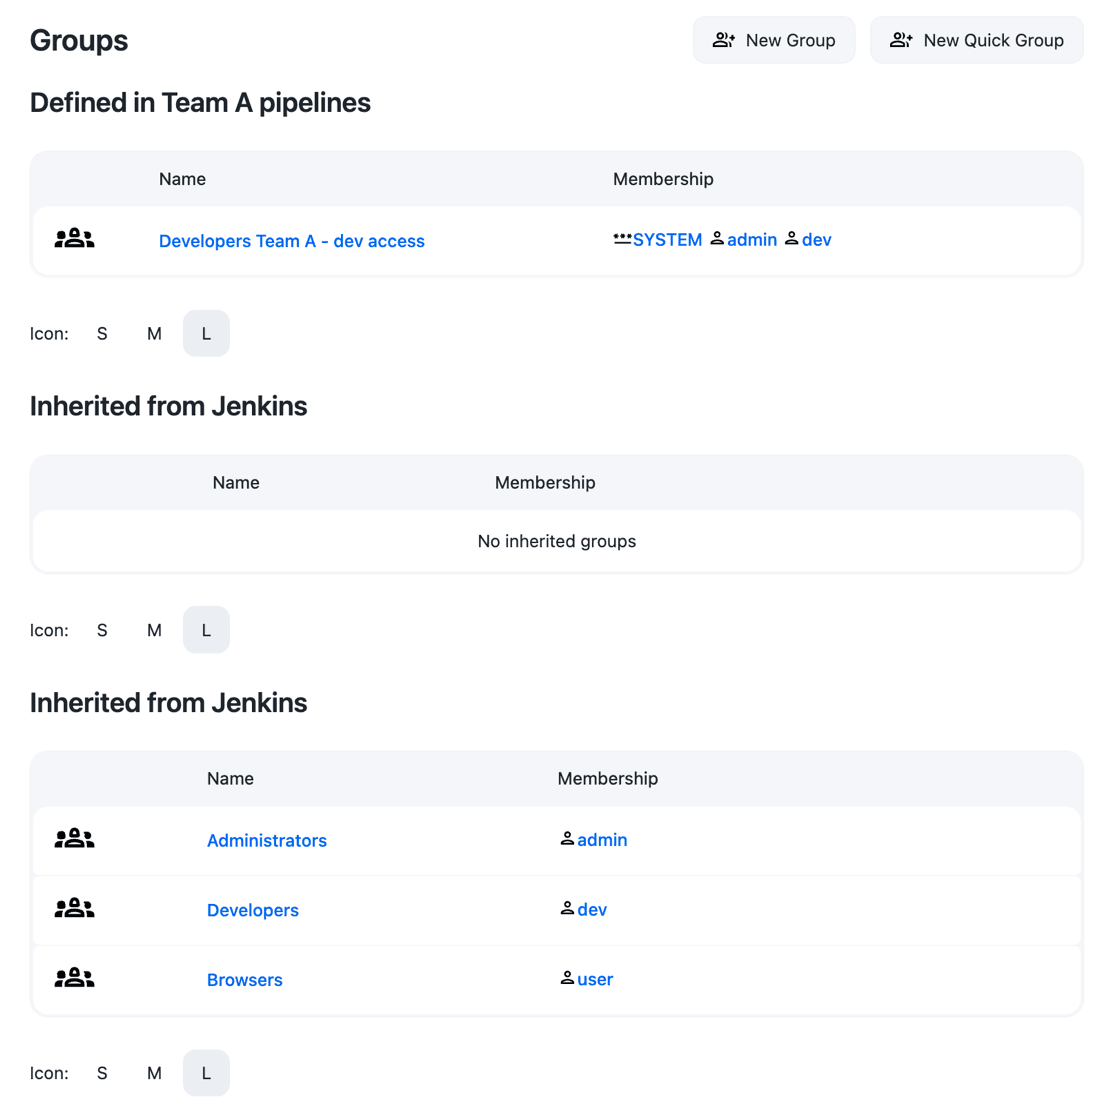 Figure 6. Group configurations for pipelines only folder
You do not need to configure the Tech lead maintenance CI folder, as principal roles are propagated.
Delegate the administration of groups at the controller level to principal
This example uses the Roles and permissions setup using RBAC described above adding group management permissions to principal users at the controller level.
Operations center configuration
To configure the operations center:
-
From the operations center dashboard, select in the upper-right corner, and then select Roles to navigate to the Roles overview page.
-
Select Manage above the Permissions column.
-
Add the following Group permissions to manager_role:
Role Permissions manager_role
-
Overall/Read
-
Overall/ Manage
-
Client/Managed Controller/Configure
-
Client/Managed Controller/Lifecycle
-
Group/Configure
-
Group/Create
-
Group/Delete
-
Group/Manage
-
Group/View
-
Sign in to the operations center as a principal user of team A on Controller A. The principal user now has access to Groups, and can manage groups at the controller level, but not at the operations center level.
