HashiCorp Vault is a secrets management system where users or vault clients can manage their sensitive details (for example, passwords, keys, certificates, and access tokens) via Secret Engines.
The CloudBees HashiCorp Vault plugin enables a credential store for CloudBees CI. Credentials are stored in a remote HashiCorp Vault instance and secrets are accessed on demand. With this plugin, you can manage credentials in a centralized location for all of your controllers.
The CloudBees Assurance Program (CAP) now includes the OpenID Connect (OIDC) Provider plugin (oidc-provider) for the HashiCorp Vault plugin. This plugin allows the operations center and the controllers to act as an OIDC provider, but it must only be used with CloudBees CI. Use of this plugin with other third-party tools is not supported.
|
Prerequisites
The CloudBees HashiCorp Vault plugin requires the following:
-
CloudBees CI on modern cloud platforms or CloudBees CI on traditional platforms 2.387.2.3 (or newer)
-
HashiCorp Vault v1.8.0 (or newer)
-
Controller access to the HashiCorp Vault instance
Credentials retrieval process
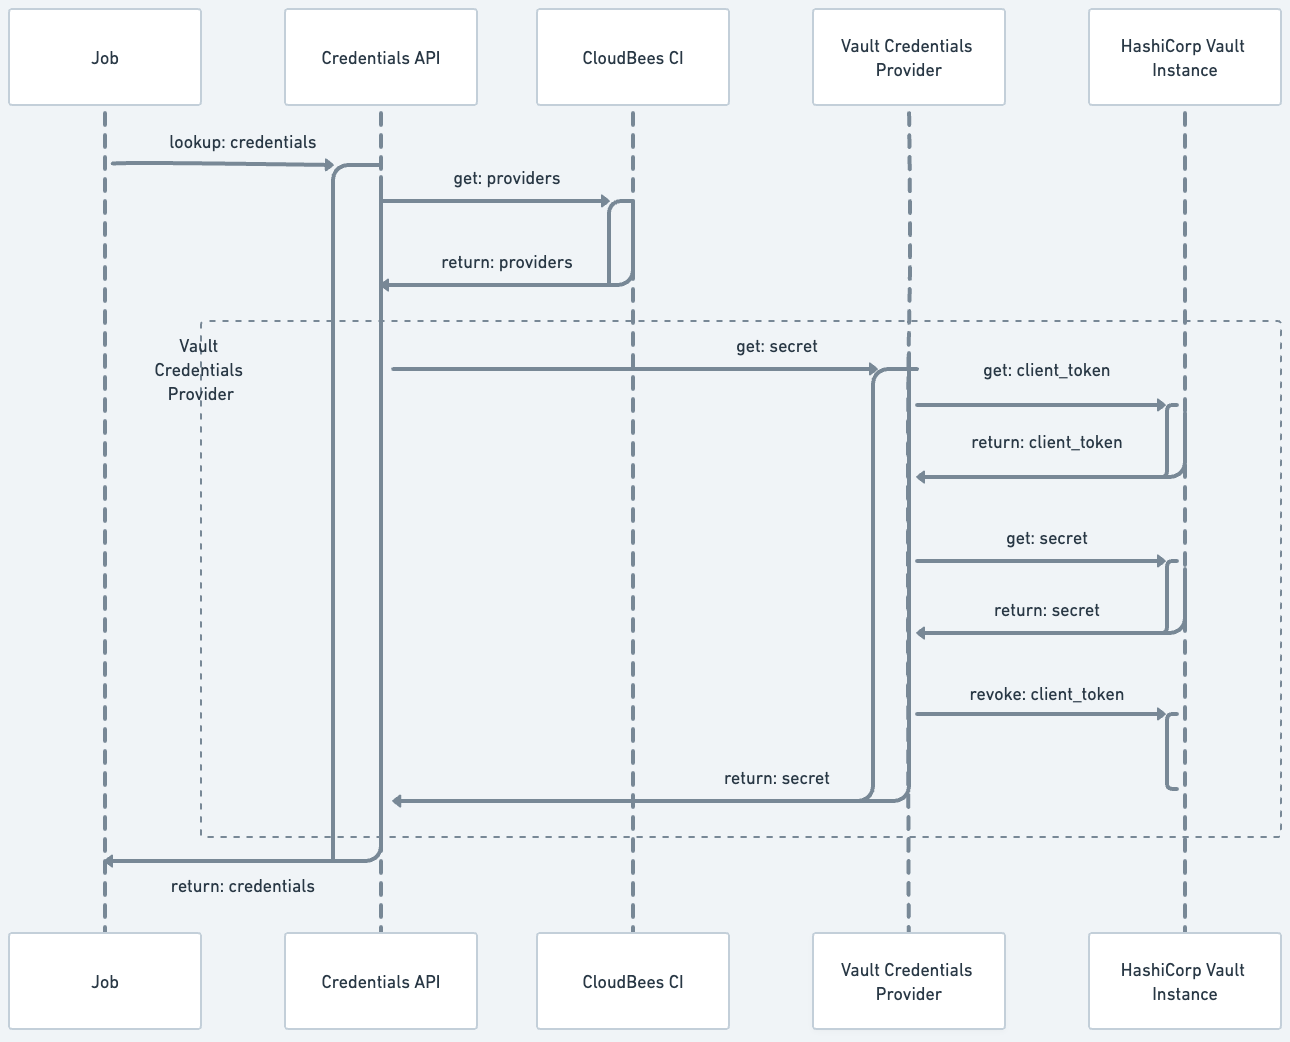
The following diagram illustrates the credential retrieval process.
Configure authentications for the HashiCorp Vault credential provider
The HashiCorp Vault credentials provider must be configured before using the HashiCorp Vault as a secret storage for your CloudBees CI instance. Once the provider is configured, it enables a new store (HashiCorp Vault) on the Credentials page. This new store is scoped to Jenkins. Configure authentications (HashiCorp Vault auth methods) at the global and folder level.
Configure HashiCorp Vault credential provider at the global level
Only administrators can configure authentications for the HashiCorp Vault credential provider at the global level.
To configure a global HashiCorp Vault Credentials provider:
-
Select in the upper-right corner to navigate to the Manage Jenkins page.
-
Under Security, select Credential Providers and navigate to HashiCorp Vault Credential Provider.
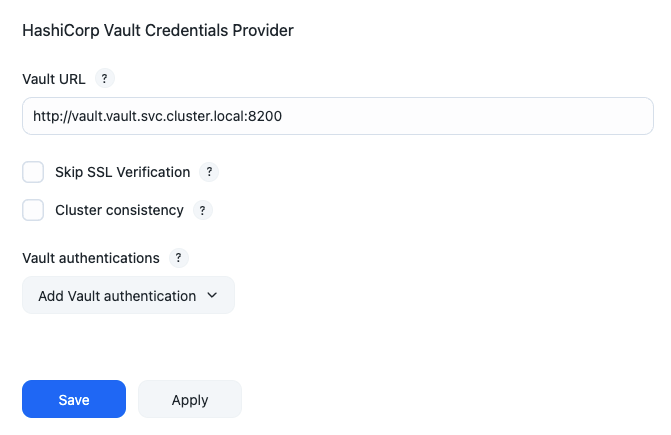 Figure 2. HashiCorp Vault Credential Provider
 -
In the Vault URL field, enter the URL of the HashiCorp Vault server. The URL can begin with
httporhttps. -
Select Skip SSL Verification to skip SSL certificate verification. This option is left blank by default.
CloudBees recommends leaving this option blank. Leaving this option blank ensures each SSL connection to the Vault instance is secure by verifying the server’s SSL certificate. -
Select the appropriate Cluster Consistency mode:
-
Unconditional forwarding: All requests are forwarded to the active node.
-
Conditional forwarding: The node handling the request looks at the state it has locally, and if it does not contain the state described by the X-Vault-Index header, the node forwards the request to the active node.
-
Retry stale requests: When the desired state is not present, Vault returns a failure response with HTTP status code 412. This code means to retry the request.
-
-
Select . Vault authentication is required to connect to the HashiCorp Vault server. The only supported authentication method is
AppRole. -
Under AppRole, configure multiple HashiCorp Vault namespaces. Complete the following fields:
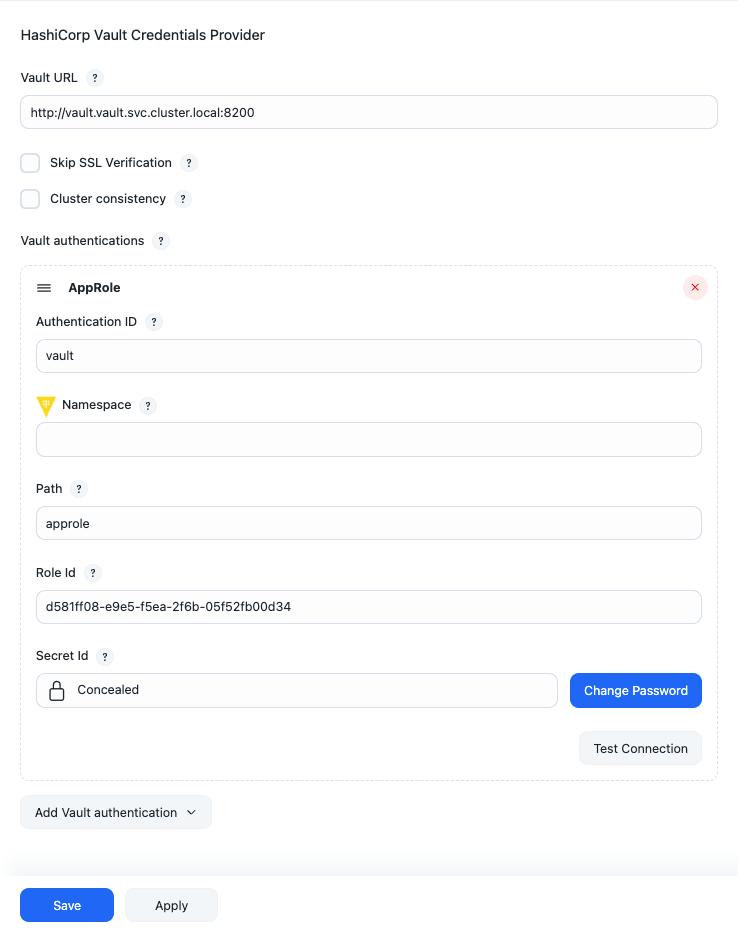 Figure 3. Add vault authentication
View HashiCorp Vault Credential Provider details
Label Description Authentication ID
The ID by which the authentication is identified from credentials.
Namespace
The HashiCorp Vault namespace where secrets are stored. Leave this field blank if namespaces are not enabled or the secret is part of the root namespace.
Role Id
A unique identifier associated with the AppRole. To get the RoleID, refer to Get RoleID.
Secret Id
A unique identifier that authenticates and access secrets within the Vault. To get the SecretID, refer to SecretID.
By default, the SecretID generated by the HashiCorp Vault instance has a TTL (time-to-live) attribute or a
num_usesattribute. Once those limitations are reached, the HashiCorp Vault credentials provider cannot retrieve secrets. CloudBees recommends configuring the AppRole withsecret_id_num_uses = 0andsecret_id_ttl = 0. -
Repeat steps 5-6 to create additional vault authentications and namespaces.
-
Select Test connection to validate the HashiCorp Vault connection details.
-
If CloudBees CI connects to the configured HashiCorp Vault instance, a
Connectedmessage displays. -
If the connection fails, troubleshoot the connection using the information contained in these error messages:
-
An error occurred while contacting Vault: invalid secret ID -
An error occurred while contacting Vault: invalid role ID -
An error occurred while contacting Vault: permission denied connect timed out -
{url} nodename nor servname provided, or not known
-
-
-
Select Save.
Creating vault authentications at the global level, makes the credential accessible to users with the Credentials permission. Those users can then add and edit the HashiCorp Vault credentials to their folders and jobs.
Configure HashiCorp Vault credential provider authentications at folder-level
Only users with the HashiCorp Vault Configuration permission can configure authentications for the HashiCorp Vault provider at the folder level.
To configure Authentications for the HashiCorp Vault credential provider at folder-level:
-
On the Dashboard, select the desired folder.
-
On the left navigation pane, select Vault Authentications. The HashiCorp Vault Authentications configuration page displays.
-
Select . Vault authentication is required to connect to the HashiCorp Vault server. The only supported authentication method is
AppRole.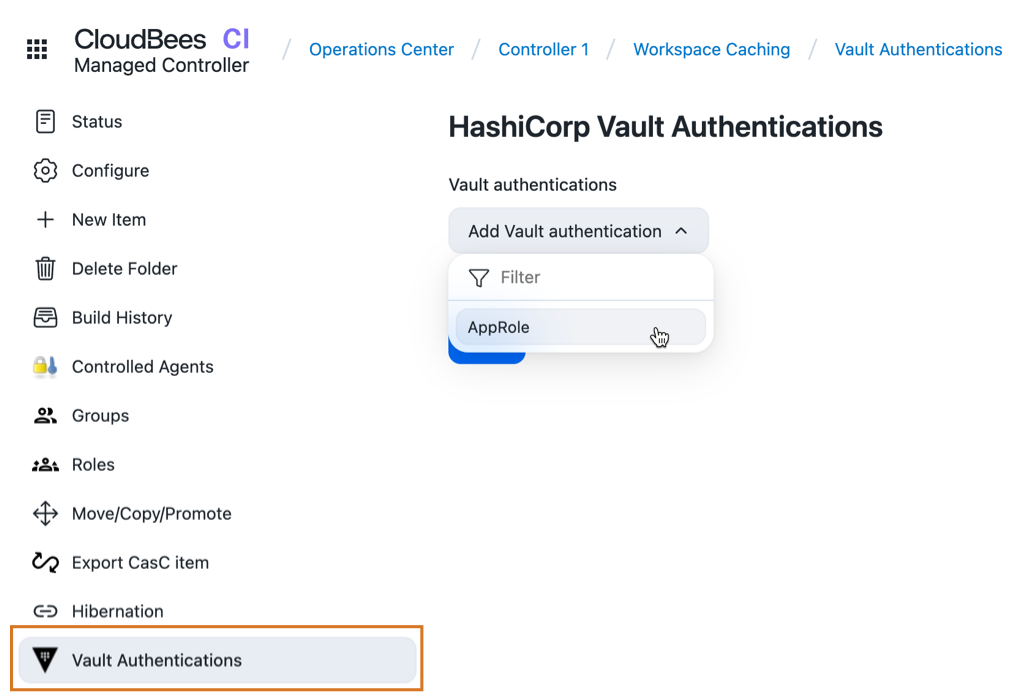 Figure 4. Vault Authentications Folder Property
 -
Under AppRole, configure multiple HashiCorp Vault namespaces. Complete the following fields:
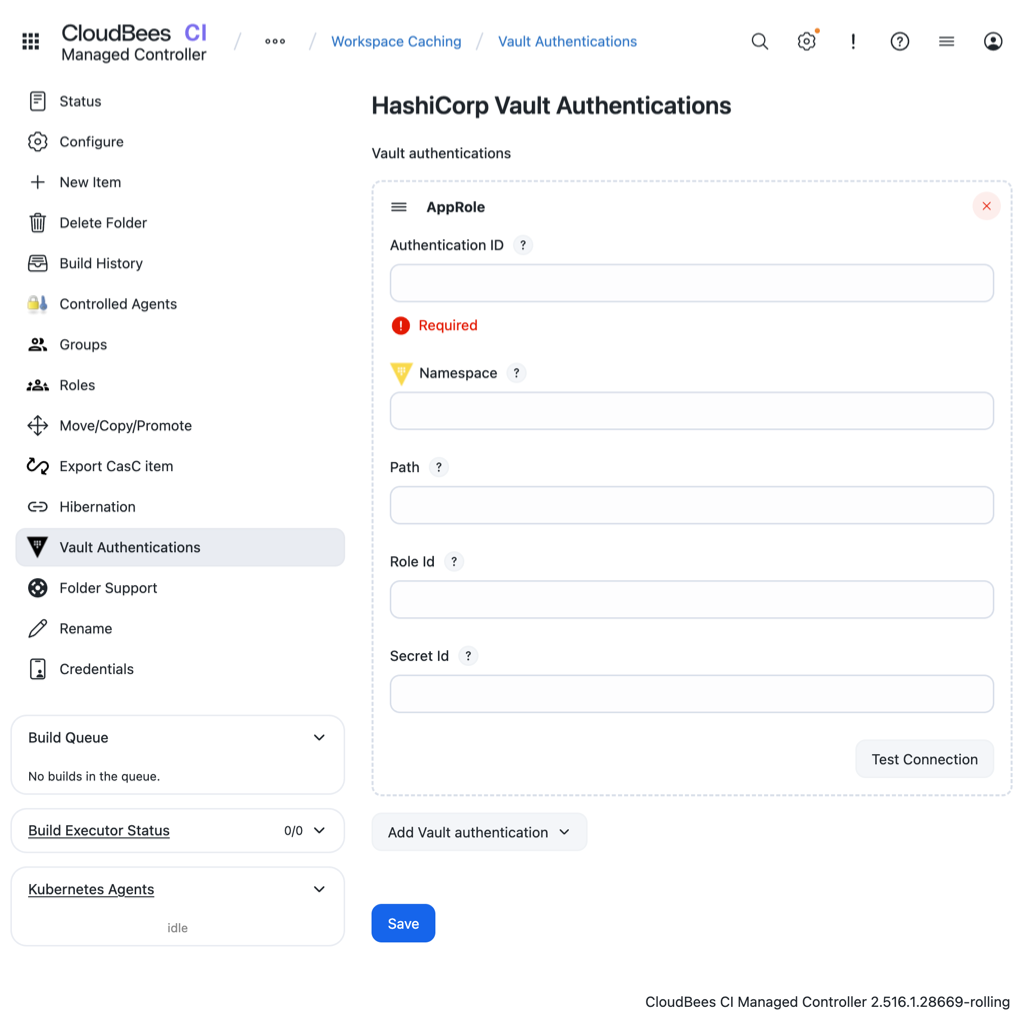 Figure 5. Add folder vault authentication
View HashiCorp Vault Credential Provider details
Label Description Authentication ID
The ID by which the authentication is identified from credentials.
Namespace
The HashiCorp Vault namespace where secrets are stored. Leave this field blank if namespaces are not enabled or the secret is part of the root namespace.
Role Id
A unique identifier associated with the AppRole. To get the RoleID, refer to Get RoleID.
Secret Id
A unique identifier that authenticates and access secrets within the Vault. To get the SecretID, refer to SecretID.
By default, the SecretID generated by the HashiCorp Vault instance has a TTL (time-to-live) attribute or a
num_usesattribute. Once those limitations are reached, the HashiCorp Vault credentials provider cannot retrieve secrets. CloudBees recommends configuring the AppRole withsecret_id_num_uses = 0andsecret_id_ttl = 0. -
Repeat steps 4-5 to create additional vault authentications and namespaces.
-
Select Test connection to validate the HashiCorp Vault connection details.
-
If CloudBees CI connects to the configured HashiCorp Vault instance, a
Connectedmessage displays. -
If the connection fails, troubleshoot the connection using the information contained in these error messages:
-
An error occurred while contacting Vault: invalid secret ID -
An error occurred while contacting Vault: invalid role ID -
An error occurred while contacting Vault: permission denied connect timed out -
{url} nodename nor servname provided, or not known
-
-
-
Select Save.
Configure HashiCorp Vault credentials
Once the HashiCorp Vault credential provider is created at either the global or folder level, a new Vault credential store is visible on the Credentials page.
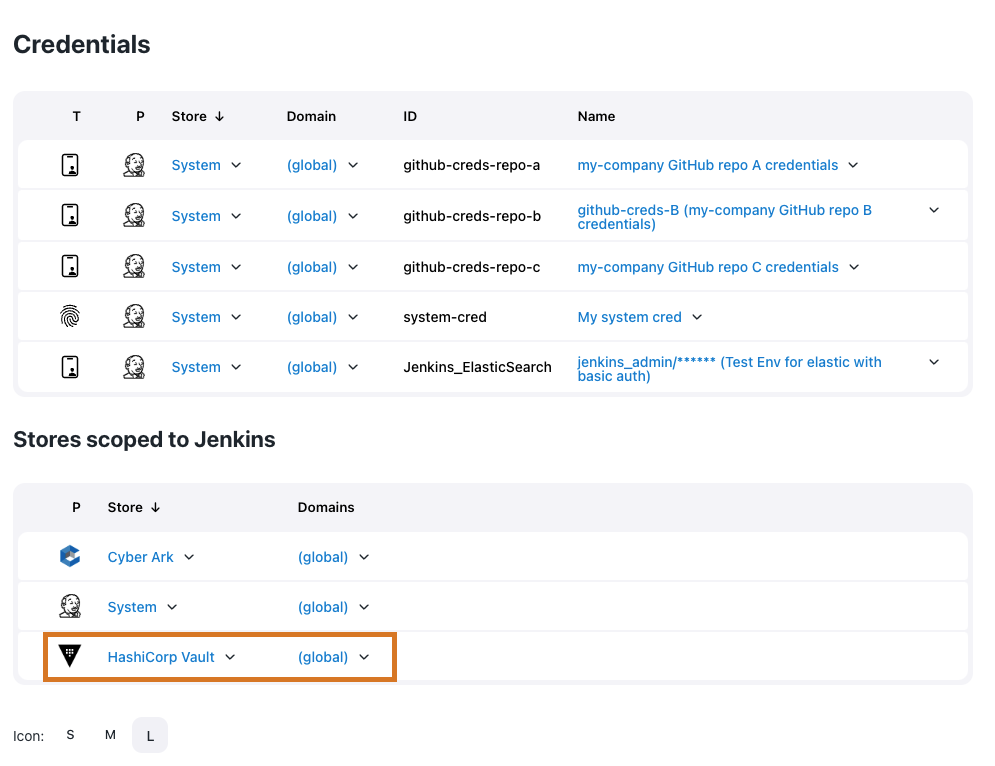
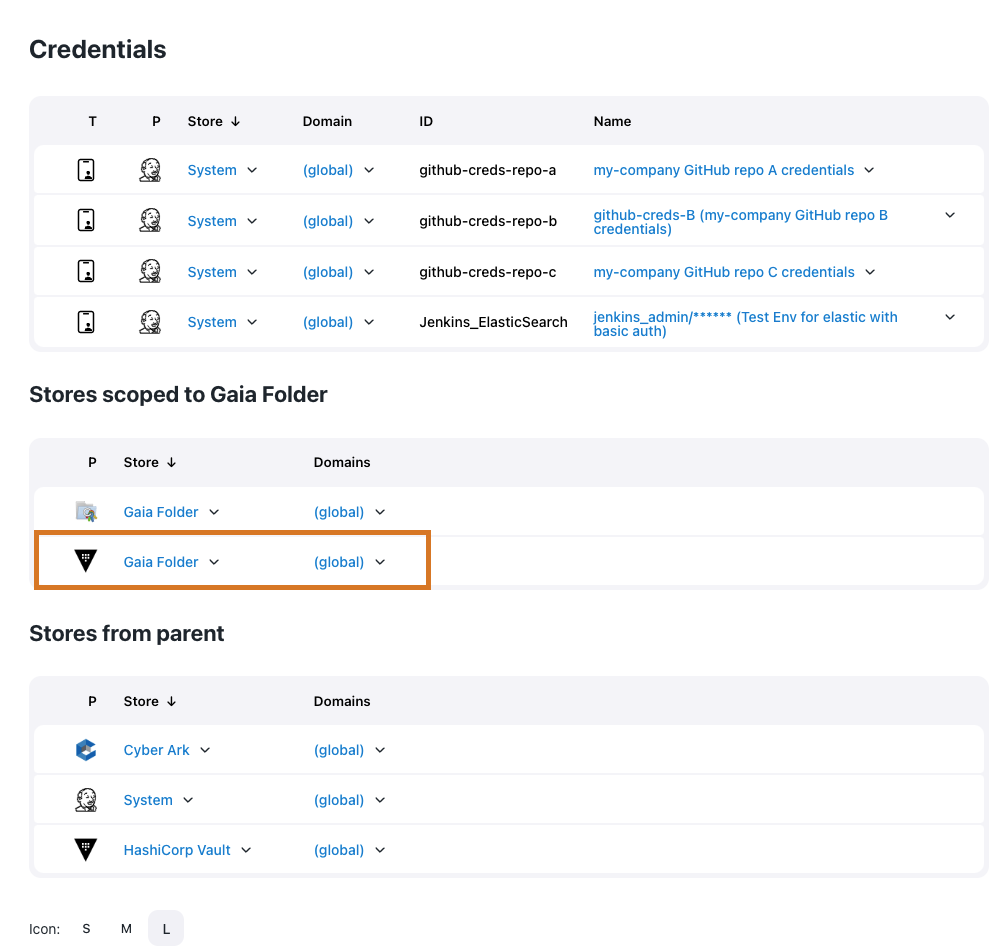
After configuring the HashiCorp Vault provider, create two new types of credentials: Vault Username Password and Vault Secret Text. HashiCorp Vault credentials only read actual secrets from the HashiCorp Vault instance and are not used to delete, update, or create secrets.
| If the HashiCorp Vault credentials need to be restricted, install the Restricted Credentials plugin. |
To configure a HashiCorp Vault credential:
-
Open the Credentials page.
-
For the global-level credential: Select in the upper-right corner to navigate to the Manage Jenkins page, adn then select Credentials.
-
For the folder-level credential: From the dashboard, locate a folder and select .
-
-
Open the New Credentials screen to add new credentials.
-
For the global-level credential provider, navigate to Stores scoped to Jenkins and hover your cursor over the
(global)domain and select Add credentials. -
For the folder-level credential, navigate to Stores scoped to [Folder Name] and hover your cursor over the
(global)domain and select Add credentials. Figure 8. Add credentials
-
-
Select the type of credential in the Kind field and configure the Vault Secret Engine settings.
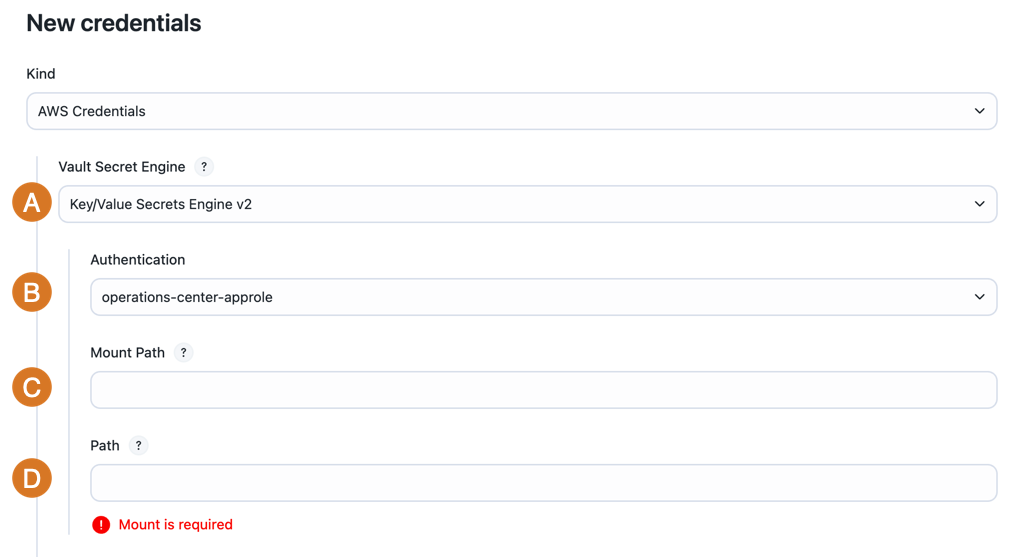 Figure 9. New credentials page
-
Vault Secret Engine: Select the appropriate type of Vault Secret Engine where secrets are stored.
-
Key/Value Secret Engine v2 is a Versioned Key/Value secret engine.
-
Key/Value Secret Engine v1 is a Static Secrets: Key/Value secret engine.
-
-
Authentication: Select the HashiCorp Vault authentication defined in Configure authentications for the HashiCorp Vault credential provider.
-
Mount Path: Enter the mount path where the Vault secret is stored. Type the mount path as
{mount}/path/to/secret. This is a required field. -
Path: Enter the path where the HashiCorp Vault secret is stored. Type the path as
mount/{path/to/secret}. This is a required field.The Vault Secret Engine validates whether the path for the HashiCorp Vault secret is correct. If the path is correct, a
Path was foundmessage displays. If CloudBees CI cannot retrieve secrets from the provided path, you may receive one of the following error messages:-
An error occurred while contacting Vault: the requested Vault resource was not found: This message displays if the Path or Mount Path is incorrect. -
An error occurred while contacting Vault: 1 error occurred: *permission denied. This message displays if theAppRoledoes not have permissions (via HashiCorp Vault) to access the path.
-
-
-
Based on the credential selected in the Kind field, complete the following fields:
View AWS Credentials details
Label Description ID
Enter the credential ID. If this field is left blank, the ID is automatically generated.
Description
Enter a description of the credential. This is an optional field.
Access Key ID Vault key
Enter the key to look up in HashiCorp Vault that is also used to retrieve the access key ID. It may be left blank in case you are selecting an IAM role.
Secret Access Key Vault key
Enter the key to look up in the HashiCorp Vault that is also used to retrieve the secret access key. It can be left blank if you select an IAM role.
IAM Role Support » Role ARN Vault Key
Enter the key to look up in the HashiCorp Vault that is also used to retrieve the role’s ARN.
IAM Role Support » External Id Vault Key
Enter the key to look up in the HashiCorp Vault that is also used to retrieve the external ID.
IAM Role Support » MFA Serial Number Vault Key
Enter the key to look up in the HashiCorp Vault that is also used to retrieve the MFA serial number.
IAM Role Support » STS Token Duration
Enter the duration of time (in seconds), for which the obtained session token will be valid.
View Vault GitHub App
Label Description Vault GitHub App ID key
Enter a key to look up in the HashiCorp Vault that is also used to retrieve the GitHub App ID value. This is a required field.
Vault GitHub App private key
Enter the key to look up in the HashiCorp Vault that is also used to retrieve the GitHub App ID SSH private key. This is a required field.
Description
Enter a description of the credential. This is an optional field.
ID
Enter a unique internal ID that identifies the Vault GitHub App credential from jobs and other configurations. If this field is left blank, the ID is automatically generated.
View Vault SSH Private Key
Label Description Vault username key
Enter the key to look up in the HashiCorp Vault that is also used to retrieve the username. This is a required field.
Vault private key
Enter the key to look up in the HashiCorp Vault Key that is also used to retrieve the SSH private key. This is a required field.
Vault passphrase key
Enter the key to look up in the HashiCorp Vault that is also used to retrieve the SSH passphrase.
Description
Enter a description of the credential. This is an optional field.
ID
Enter a unique internal ID that identifies the Vault SSH Private Key credential from jobs and other configurations. If this field is left blank, the ID is automatically generated.
View Vault Secret File
Label Description Vault key
Enter the key to look up in the HashiCorp Vault that is also used to retrieve the secret file content. This is a required field.
Description
Enter a description of the credential. This is an optional field.
ID
Enter the credential ID. If this field is left blank, the ID is automatically generated.
View Secret text
Label Description Value key
Enter the key to look up in the HashiCorp Vault that is also used to retrieve the secret text. This is a required field.
Description
Enter a description of the credential. This is an optional field.
ID
Enter the credential ID. If this field is left blank, the ID is automatically generated.
View Username Password
Label Description Vault username key
Enter the key to look up in the HashiCorp Vault that is also used to retrieve the username. This is a required field.
Vault password key
Enter the key to look up in the HashiCorp Vault that is also used to retrieve the password value. This is a required field.
Description
Enter a description of the credential. This is an optional field.
ID
Enter the credential ID. If this field is left blank, the ID is automatically generated.
-
Select Create.
Add a credential within a job
Follow the steps below to add HashiCorp Vault credentials from the configuration page of a specific job.
To create a HashiCorp Vault credential within a job:
-
From the Dashboard, select a controller.
-
Navigate to a specific job and select Configure from the dropdown list.
-
Navigate to the Environment section and select Use secret text(s) or files(s).
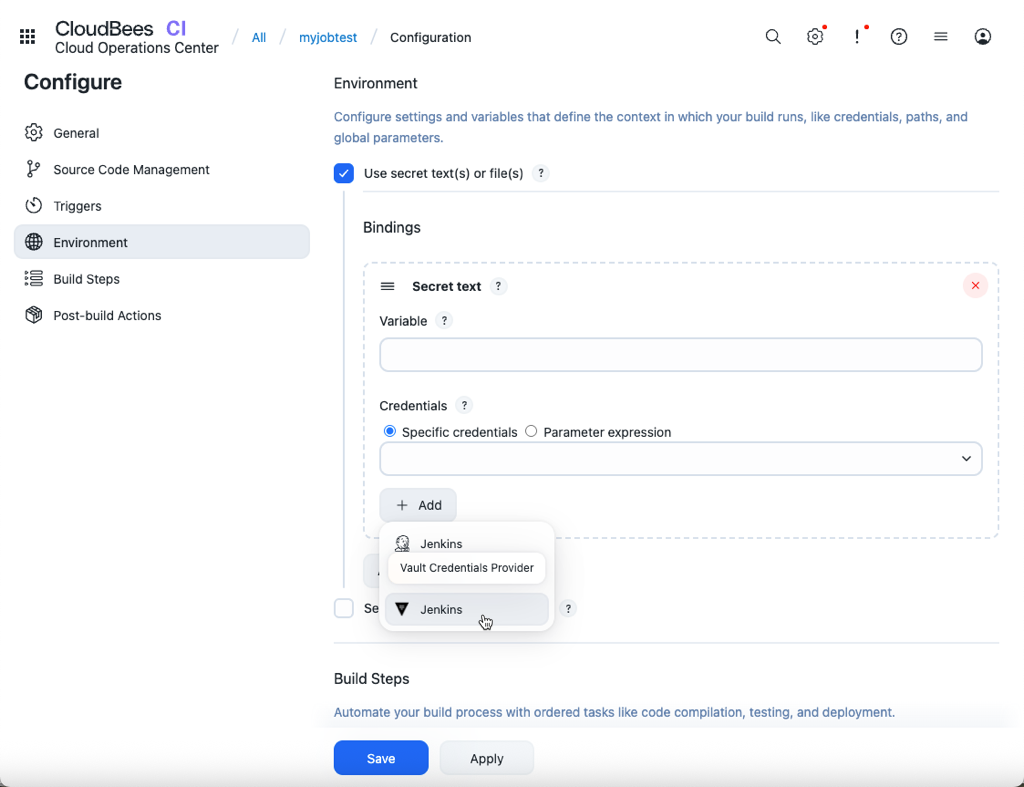 Figure 10. Add HashiCorp Vault credential to a job
 -
Under Bindings, select .
-
Enter details about the Secret text.
-
Variable: Enter the name of an environment variable to be set during the build.
-
Credentials: Select Specific credentials to set a specific credential type for the variable.
-
Select Add and then select a Vault Credential Provider.
-
Add credentials to pipelines
Run the following commands to add a HashiCorp Vault credential to a pipeline.
-
Vault Username Password
withCredentials([usernamePassword(credentialsId: 'vault-creds', passwordVariable: 'PASS', usernameVariable: 'USER')]) { sh 'echo USER=$USER' sh 'echo PASS=$PASS' } -
Vault Secret Text
withCredentials([string(credentialsId: 'vault-creds', variable: 'TOKEN')]) { sh 'echo TOKEN=$TOKEN' }
Use the HashiCorp Vault credential in CasC .yaml files
Use Configuration as Code to configure the HashiCorp Vault plugin on your CloudBees CI instance. On your controller bundle, add the following code to the jenkins.yaml and items.yaml files:
jenkins.yaml
globalCredentialsConfiguration: vaultGlobalConfiguration: url: "https://vault-cluster-public-vault-****.z1.hashicorp.cloud:8200" skipSslVerification: false authentications: - appRoleAuthentication: id: "global-admin-approle" namespace: "admin" roleId: "****" secretId: "****" - appRoleAuthentication: id: "ci-approle" namespace: "ci" roleId: "****" secretId: "****" credentials: cloudbeesHashicorpVault: domainCredentials: - credentials: - vaultUsernamePassword: scope: GLOBAL id: "test-username-password-id" description: "test vault username password" usernameKey: "user" passwordKey: "password" vaultSecretEngine: genericKV1SecretEngine: authenticationId: "ci-approle" path: "jenkins/secrets" - vaultSecretText: scope: GLOBAL id: "test-secret-text-id" description: "test vault secret text" secretKey: "password" vaultSecretEngine: genericKV2SecretEngine: authenticationId: "global-admin-approle" path: "jenkins/pldi"
items.yaml
removeStrategy: rbac: SYNC items: NONE items: - kind: folder name: Performance Team description: '' displayName: Ops Team properties: - envVars: {} - itemRestrictions: filter: false - kind: folder name: CI Team description: '' displayName: CI Team properties: - envVars: {} - itemRestrictions: filter: false - vaultAuthenticationsFolderProperty: authentications: - appRoleAuthentication: roleId: **** namespace: admin/demo/name secretId: **** id: developers-approle - appRoleAuthentication: roleId: **** namespace: ops-namespace secretId: **** id: ops-approle credentials: - vaultUsernamePassword: usernameKey: username vaultSecretEngine: genericKV2SecretEngine: path: jenkins-kv/user1 authenticationId: developers-approle scope: GLOBAL description: test vault username password with namespace admin/demo/dima id: folder-username-password-id passwordKey: password - vaultSecretText: secretKey: password vaultSecretEngine: genericKV2SecretEngine: path: jenkins/pldi authenticationId: global-admin-approle scope: GLOBAL description: test vault secret text with global namespace admin id: folder-secret-text-id
For information about the CloudBees HashiCorp Vault plugin requirements and releases, refer to CloudBees HashiCorp Vault plugin.