You can create custom labels that are displayed in the CloudBees CI header to easily identify the environment or instance.
The header label can be used to:
-
Indicate the team name or project for an individual controller.
-
Add a label to a set of controllers. For example, if some controllers within a cluster are Production controllers or require a special designation.
-
Indicate the type of environment for a complete cluster, such as Development, Staging, or Production.

Add a custom label to an individual controller or set of controllers
The controller administrator can add a label to a particular controller or set of controllers.
To add a label to a controller:
-
Ensure you are signed in to the controller as a user with the Administer permission.
-
Select in the upper-right corner to navigate to the Manage Jenkins page.
-
Select System, and then scroll down to Header label.
-
In the Text to display in header field, specify the controller label. The header label is limited to 40 characters.
-
Select Save. The header label is applied to the controller.
Add a custom label to an entire cluster
The operations center administrator can apply a label to an entire cluster.
To apply a header label to the entire cluster, you must:
Configure controller header label updates
Prior to applying the header label to the cluster, you must verify the controller is configured to receive header label updates from the operations center.
| When creating a new controller, it is configured to receive header label updates from the operations center by default. |
To configure the controller header label updates:
-
Ensure you are signed in to the operations center as a user with the Configure permission for the controller item.
-
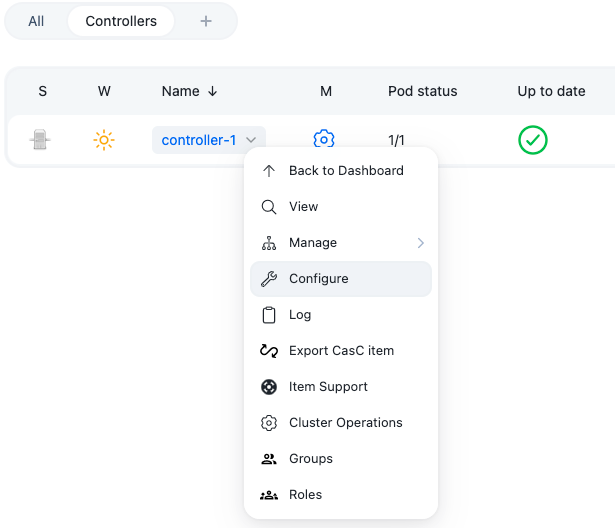
From the operations center dashboard, select the down arrow to the right of your controller’s name, and then select Configure.
 Figure 2. Controller dropdown menu
 -
Scroll down to Header label, and then select Receive header label updates from the operations center. In this configuration, the controller administrator can modify the header label, but the operations center administrator can override the controller label.
-
Select Save.
Add the operations center’s custom header label to controllers
Once you have configured the controller header label update settings, you can apply the operations center header label to the cluster.
To apply the operations center label to controllers:
-
Ensure you are signed in to the operations center as a user with the Administer permission.
-
Select in the upper-right corner to navigate to the Manage Jenkins page.
-
Select System, and then scroll down to Header label.
-
In the Text to display in header field, specify the operations center label. The header label is limited to 40 characters.
-
To apply the label to controllers that do not have a label defined, select Apply to controllers with no label.
-
To override the existing label on controllers, select Override on controllers with an existing label.
-
-
Select Save. The header label is applied to the operations center and all connected controllers.