This guide describes the bundle update process. If you do not have the latest version of the configuration bundle, an alert is displayed in the Manage Jenkins that states "A new version of the Configuration Bundle is available".
Check for bundle updates
You can also check for updates on the CloudBees Configuration as Code export and update screen on the Bundle update tab.
To check for bundle updates:
-
Ensure you are signed in as a user with the Overall/Manage permission.
This option is available to users with the Overall/Manage permission, and it lets users with the Administrator role delegate this task. For more information, refer to Delegate administration. -
Navigate to your CloudBees CI instance (operations center or controller).
-
Select in the upper-right corner to navigate to the Manage Jenkins page.
-
Select CloudBees Configuration as Code export and update.
-
Select the Bundle update tab. A blue bell appears next to the tab if an update is detected.
-
Select Check for Updates.
If a controller is configured with a bundle using the -Dcore.casc.config.bundle=/path/to/casc-bundleJava system property, a bundle update is detected only when theversionattribute in thebundle.yamlfile has been incremented. If theversionattribute is not incremented, the bundle update is not detected and cannot be applied. However, when the operations center generates an effective bundle (after calculating inheritance) for a controller, theversionattribute is the checksum of the entire bundle.In a operations center, a bundle update is detected only when the versionattribute in thebundle.yamlfile has been incremented. If theversionattribute is not incremented, the bundle update is not detected and cannot be applied. However, when using the CasC Bundle Retriever for the operations center, you can activate auto-versioning, which replaces theversionattribute with the commit hash obtained from your source control management (SCM) system.For operations centers in modern platforms, after you issue the kubectl applycommand and the updated CasC bundle is applied to the Kubernetes cluster, it may take approximately 60 seconds for the updated bundle to be detected by the operations center. Figure 1. Check for updates
 -
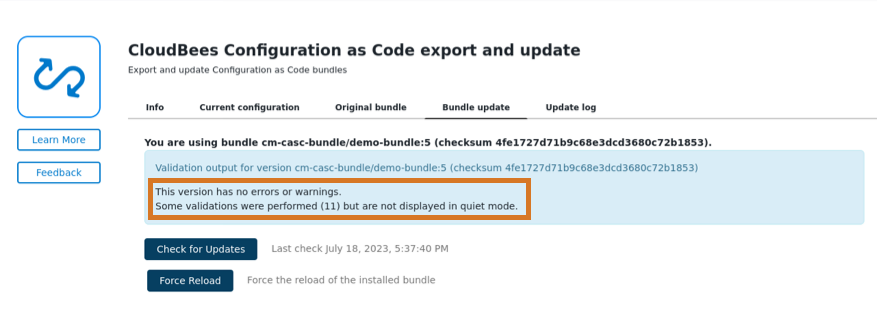
The Bundle update tab displays bundle validation messages. Each CasC bundle validation message includes the type of validation, the total number of validation messages, a general validation code, and a descriptive message.
View Bundle update tab with validation warning message

View Bundle update tab with no validation warning/error message
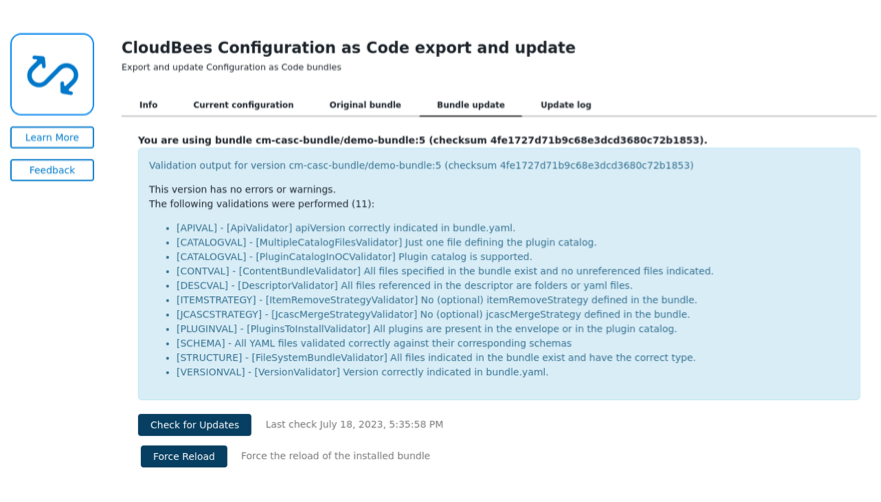
View Bundle update tab with validation messages in quiet mode
-
If bundle updates are available, you can select See the differences with the current version to view the differences between the current bundle and the new bundle.
 Figure 2. Bundle update file differences
 -
Select Back to Bundle update to return to the Bundle update tab.
-
Select one of the following options to apply the new bundle:
-
Safe Restart: Performs a restart and applies the new bundle. CloudBees recommends this option because you can determine an appropriate time to restart and apply the updated bundle.
-
Reload Configuration: Applies the new bundle without a restart. This only reloads the bundle sections with changes (with new, updated, or deleted files). If there are changes to the
variables.yamlfile, a full reload is performed.The Reload Configuration: option is called a "hot reload". For more information on when a hot reload is appropriate, refer to Use hot reload on a configuration bundle.
 Figure 3. New bundle version
You can optionally select Force Reload to reapply a bundle that is already installed. This option can be used to reset changes in the configurations managed by CasC. The new configuration is not going to be removed.
-
If you want to view the update log, refer to Review the CasC update log.
Update bundles with branch and tag support
CloudBees CasC Server plugin 2.0 introduces bundle branch and tag support. The plugin update changes the folder structure within JENKINS_HOME that stores CasC bundles. In older versions of the CloudBees CasC Server plugin, the folder structure within JENKINS_HOME was organized by bundle name with one folder per bundle. Now, the folder structure within JENKINS_HOME can store multiple versions of each bundle. This makes it easy to maintain bundles for different environments or releases.
Migrate bundles
Due to folder structure changes within JENKINS_HOME your existing bundles must be migrated. Bundle migration allows you to select bundles ready for update and assign them to the appropriate branch within a controller. During the migration process, the original bundle configuration remains until the migration is complete. This prevents the loss of data and misconfiguration of the controller. You can run the bundle migration process within the operations center or outside of the operations center.
If describing controllers as items, also specify the branch in the items.yaml file post migration as shown in the example below.
|
removeStrategy: items: "none" rbac: "sync" items: - kind: managedController name: payments-team configuration: kubernetes: memory: 4096 cpus: 2.0 disk: 2 properties: - configurationAsCode: bundle: main/payments-team
Before running the migration process, apply the defaultVersion configuration to bundles in a source control management (SCM) repository.
To configure defaultVersion value in jenkins.yaml:
unclassified: bundleStorageService: activated: true purgeOnDeactivation: true pollingPeriod: 12 activeBundle: name: "initial-remote" polling: false retriever: SCM: defaultVersion: "default-branch" (1) scmSource: git: id: "bf0d6af0-87a3-47bc-bd47-b3341d812cb9" remote: "https://github.com/cloudbees/pulsar-casc-bundles" traits: - "gitBranchDiscovery"
| 1 | Set the defaultVersion value. |
To configure defaultVersion in the operations center:
| These steps can only be performed if you have not upgraded to CloudBees CasC Server plugin 2.0. |
-
Select in the upper-right corner to navigate to the Manage Jenkins page.
-
Select System, and then navigate to Configuration as Code bundle location.
-
Select Load CasC bundles, and then select Configure.
-
Set the value for
defaultVersionfor each configured repository. This new value should be the branch your instance is currently using to check out the CasC bundles. -
Select Save.
For reporting purposes, generate a list of all repositories without the defaultVersion configuration:
-
Run the following Groovy script in the Script Console.
import com.cloudbees.opscenter.server.casc.config.remotes.RemoteBundles; import com.cloudbees.opscenter.server.casc.config.remotes.SCMBundleRetriever; def remotes = ExtensionList.lookupSingleton(RemoteBundles.class).getBundles(); def remotesWithoutDefVersion = [] as LinkedList remotes.each{ if (it.getRetriever() instanceof SCMBundleRetriever) { def defaultVersion = it.getRetriever().getDefaultVersion() if (!(defaultVersion?.trim())) { remotesWithoutDefVersion.add(it.getName()); } } } if (remotesWithoutDefVersion) { println "The following remote configurations read the bundles from SCM and they do not have a default version:" remotesWithoutDefVersion.each{ println "- " + it } println "You can fix this in Manage {JOSS} > System > Load CasC Bundles." } else { println "All your CasC Controller Bundle locations have configured the Default Version or are Local Folders" }
Bundle migration within the operations center
In the operations center the bundle migration process can be handled manually or automatically.
Manual bundle migration
When there are multiple versions of the bundle from different branches, an alert is displayed on the Manage Jenkins screen.

| You can proceed with the manual migration by selecting the link to the Manual Branch Migration screen or selecting Manual Branch Migration on the left side of the operations center dashboard. |
To migrate a bundle:
-
On the left side of the Dashboard, select Manual Branch Migration. The Manual Branch Migration screen displays.
-
Migrate bundles by doing one of the following:
-
Select Action needed. For each bundle listed, select the appropriate branch or tag to assign it to that bundle. Selecting the branch or tag updates all the controllers using the older version of the bundle.
 Figure 5. Bundles needing manual migration
 -
Select Advanced. Create and upload a YAML file to assign different branches or tags to a controller using the same bundle.
 Figure 6. Bundle migration - Advanced tab
Use the following format for the YAML input:
markAsComplete: true controllers: full-path-controller-1: branch1/bundle1 full-path-controller-2: branch2/bundle1 full-path-controller-3: another-branch/another-bundle
-
-
Select Save.
| Selecting Discard and complete will mark the migration process as complete and the discarded bundles will retain their legacy configuration. However, you can still migrate the discarded bundles. |

Bundle migration outside of the operations center
Without accessing the Manual branch migration page in the operations center, it is possible to migrate bundles.
| If using local folders, the migration process is automatic. Therefore, you only need to complete step 5. |
-
Make sure all bundle locations have a defaultVersion branch set in the operations center.
-
Upgrade to a product version that includes CloudBees CasC Server plugin 2.0 for operations center or newer (first released in 2.401.1.3).
-
Restart your operations center instance to enable branch and tag support.
-
Go to your
items.yamlexport file. It should display as follows:items: - kind: managedController name: basic-controller properties: - configurationAsCode: bundle: main/basic-controller -
Update the
items.yamlfile in the operations center with branch names.-
If you are using an SCM, use the Name in the
items.yamlexport file. -
If you are using a local folder, use the Name from either the
items.yamlexport file or thebundleStorageService.The name of the
bundleStorageServicecan be found in two places:-
The Name displayed in the setting.
-
The Name displayed in the
bundleStorageServiceconfiguration of thejenkins.yamlfile.
The following example shows the Name value in the
bundleStorageServiceconfiguration within ajenkins.yamlfile.unclassified: bundleStorageService: activated: true bundles: - name: "test" (1) polling: false retriever: localFolderRetriever: localFolder: /path/to/bundles1 The Name value in the bundleStorageServiceconfiguration -
-
-
Upgrade controllers to a product version that includes CloudBees CasC Client plugin 2.0 for controllers or newer (first released in 2.401.1.3).
-
Restart your instance to enable branch and tag support.
Migrate discarded bundles
Bundles discarded during the initial migration process can still be migrated.
To migrate a previously discarded bundle:
-
For each controller do the following:
-
Go to
JENKINS_URL/job/CONTROLLER/configureand select a bundle. -
Select Save.
-
-
Remove the temporary bundle source.
-
Select in the upper-right corner to navigate to the Manage Jenkins page.
-
Select System, and then select Configuration as Code bundle location.
-
Select Configure.
-
Remove the remote named as
legacyBundleConfiguration. -
Select Save.
-
-
Go to
JENKINS_HOME/legacyBundleConfigurationto remove the physical folder with the legacy configurations. -
(Optional) If the user has configured the default bundle:
-
Select in the upper-right corner to navigate to the Manage Jenkins page.
-
Select System, and then select Configuration as Code bundle location.
-
Select General settings.
-
Select the new default bundle.
-
Select Save.
-
-
From the
JENKINS_HOMEfolder, remove any existing files calledretriever-branch.*, except on.retriever-branch.migrated.-
JENKINS_HOME/retriever-branch.pendingRetriever -
JENKINS_HOME/retriever-branch.pendingMatch -
JENKINS_HOME/retriever-branch.pendingDefaultBundle
-
Revert bundle migration
Revert a bundle migration if the following occurs:
-
An error is detected during the migration process that prevents the migration from restarting.
-
Jenkins crashes and causes instability with
JENKINS_HOMEand no backup was performed.
To revert a bundle migration:
-
Run one of the following commands:
-
Delete
JENKINS_HOME/.retriever-branch.migrated -
Delete
JENKINS_HOME/.retriever-branch.pendingRetriever -
Delete
JENKINS_HOME/.retriever-branch.pendingDefaultBundle -
Delete
JENKINS_HOME/.retriever-branch.pendingMatch
-
-
Remove the physical folder with the legacy configurations from
JENKINS_HOME/legacyBundleConfiguration. -
Locate an entry for
legacyBundleConfigurationonJENKINS_HOME/com.cloudbees.opscenter.server.casc.config.remotes.RemoteBundles.xmland remove it from the file.
Validate bundles prior to update
Before updating bundles and adding them to the operations center, you can validate any changes made to them. Bundle prevalidation ensures that changes can be successfully applied to prevent controller outages. Some of the validations include:
-
There are no syntax errors.
-
Effective bundles can be calculated correctly.
-
Effective bundles are valid against available controllers.
For more information on validating bundles refer to Troubleshoot CasC for the operations center or Troubleshoot CasC for controllers.
|
When a bundle update adds a property to a YAML file, and a second bundle update removes the property from the YAML file, the property remains in the initial version of the bundle. To remove the property value from the instance, set the property value to its default value. For example:
The |
Validate bundles in your CLI
Run the following command to validate your bundle(s):
java -jar jenkins-cli.jar casc-pre-validate-bundle < bundle.zip (1)
| 1 | The bundle.zip contains the bundles you want to validate. |
Validate bundles using HTTP endpoint
Make a POST request using JENKINS_URL/casc-bundle/pre-validate-bundle uploads the provided bundles to the operations center without making them available, then applies the CasC bundle inheritance, and then validates the provided bundles. The output is the validation report without having to invoke any other endpoint.
The expected input is a .zip file that contains the bundles to validate (there is no need to include all bundles in the inheritance chain if they are available in the operations center). The output is not the effective bundle in .zip format, but the validation report.
An example of the Post request:
curl -s -H 'Accept: application/json' -H 'Content-Type: application/zip;charset=utf-8' --user [USER] --data-binary @[PATH_TO_ZIP] -XPOST $JENKINS_URL/casc-bundle/pre-validate-bundle
A report is generated once the bundles are validated. The following is an example of validated bundle report.
{"validations": [ { "bundle": "bundle-2",(1) "result": { "valid": true,(2) "structureValidations": [], "controllerValidations": [ { "controller": "landon-controller", "controllerStatus": "ONLINE", "validations": [] }, { "controller": "controller-2", "controllerStatus": "ONLINE", "validations": [] } ] } }, { "bundle": "bundle-1", "result": { "valid": false, "structureValidations": [ { "level": "ERROR",(3) "validationCode": "BUNDLE_CONTENT", "message": "[CONTVAL] - Missing {JOSS} Configuration as Code file specified in the bundle.yaml file."(4) }], "controllerValidations": [] } } ]}
| 1 | "bundle": Bundle name |
| 2 | "valid": 'true' indicates the bundle validation was a success. false indicates the validation failed. |
| 3 | "level": If the bundle validation fails, this field displays with an 'ERROR'. |
| 4 | "message": Failed bundle validation error message. |
Validate bundles with GitHub checks
Instead of using CLI or HTTP endpoints to validate bundles, you can also use GitHub Checks. When a pull request (PR) is generated against a specific bundle, prevalidation checks are run, and the results are displayed on the Checks tab of the PR.
| The GitHub App authentication for your GitHub Organization must be enabled to use the Checks feature. |

The Checks tab displays prevalidation details for each branch, including error messages.
Configure the bundle update recurrence period
After the initial configuration on startup, a background process automatically checks for bundle updates every twenty minutes.
Optionally, you can customize this by setting the Java system property com.cloudbees.opscenter.client.casc.ConfigurationUpdaterTask.recurrencePeriod to the desired interval, in minutes.
For example, to check for updates every five minutes, use the following startup command:
java -Dcore.casc.config.bundle=$JENKINS_HOME/casc-bundle-link.yml \ -Dcom.cloudbees.opscenter.client.casc.ConfigurationUpdaterTask.recurrencePeriod=5 \ -jar jenkins.war
Understand risks related to updating CasC files
Using CasC gives you great power and flexibility, which introduces the possibility for errors that could impact your installation. Please review the information below to help guide you as you evolve your CasC bundle.
Risks when updating the bundle.yaml file
Risks when updating the bundle.yaml file in controller bundles
If a controller is configured with a bundle using the -Dcore.casc.config.bundle=/path/to/casc-bundle Java system property, a bundle update is detected only when the version attribute in the bundle.yaml file has been incremented.
However, when the operations center generates an effective bundle (after calculating inheritance) for a controller, the version attribute is the checksum of the entire bundle.
Risks when updating the bundle.yaml file in operations center bundles
A bundle update is detected only when the version attribute in the bundle.yaml file has been incremented. However, when using the CasC Bundle Retriever for the operations center, you can activate auto-versioning, which replaces the version attribute with the commit hash obtained from your source control management (SCM) system.
If the version attribute is not incremented, the bundle update is not detected, and cannot be applied.
|
A CasC bundle can become invalid if you change the Different values for this property result in different behaviors for
Plugin management with CasC.
CasC bundles with |
Risks when updating the plugins.yaml file
You can install CloudBees Assurance Program (CAP) plugins by adding the plugins to the plugins.yaml file.
You can also install non-CAP plugins by adding the plugins to the plugins.yaml file or to the plugin-catalog.yaml file.
CAP plugins are supported by CloudBees; non-CAP plugins are not.
For more information, refer to CloudBees plugin support policies and Manage plugins with CasC.
CAP plugins
To get the list of CloudBees CAP plugins:
-
Navigate to CloudBees CI Plugins.
-
To verify that your plugin is a CAP plugin, search for the plugin and filter by Supported.
Uninstall a plugin
There are no "delete/uninstall" operations when using CasC, and you cannot uninstall plugins by removing the plugins from the plugins.yaml file.
To uninstall a plugin:
-
Uninstall the plugin in the UI.
-
Before restarting, remove the plugin IDs from the
plugins.yamlfile. Otherwise, the plugins will be reinstalled.
Risks when updating the plugin-catalog.yaml file
|
The |
You can install non-CAP plugins to your instance by adding the plugin to the plugins.yaml file or to the plugin-catalog.yaml file.
Refer to Manage plugins with CasC for more information.
The plugins in this file must be compatible with the set of CAP plugins in the plugins.yaml file. A validation of the plugin-catalog.yaml file runs at startup. If this validation fails, the plugin in the plugin-catalog.yaml file is not installed and the controller continues with its normal startup, which may lead to other problems. For example, specific configurations in the jenkins.yaml cannot be applied.
For more information on plugin catalogs, refer to Installing non-CAP plugins with plugin catalogs.
Risks when updating the jenkins.yaml file
This file can be edited to change or add Jenkins configurations. There are a wide variety of possible combinations, depending on the plugins that are configured as code. This file is managed by the Jenkins LTS - Configuration as Code (JCasC) plugin. Therefore, all Jenkins LTS documentation, reported bugs, community blogs, Gitter chats, etc., apply to this file.
The bulk of the content in this file is defined by the various plugins you have installed with only a small portion of it defined by the Jenkins core itself. However, there are a few general items to consider when editing the file:
-
Removing a configuration from this file does not remove the configuration from an existing controller or operations center instance.
-
Adding configurations requires the underlying plugin that the configuration references to be installed. Jenkins startup will fail otherwise.
-
Backward compatibility depends on the specific plugins that are being configured. If a plugin changes its configuration in an incompatible way, then the controller or the operations center will fail to start until the
jenkins.yamlfile is adapted, or the section in the file that is related to the plugin is removed. -
This file may contain data which is tied to a specific CloudBees instance, such as encoded secrets, the operations center connection details, and others, so a
jenkins.yamlis, in general, suitable for a single CloudBees controller instance. This might lead to indecipherable secrets, controller to operations center connection failing, and many more things depending on the specific configuration.
Use hot reload on a configuration bundle
CasC allows you to reload a configuration file without restarting the instance. Since the CasC API plugin manages plugin updates and the plugin catalog, validating a hot reload is a more complex process. A bundle reload is not always possible. In the UI, if the bundle hot reload is not possible, the Reload Configuration button does not appear on the Bundle update tab of the CloudBees Configuration as Code export and update screen.
| If plugin upgrades are in the updated bundle, Jenkins must be restarted. |
If a hot reload is possible, the following operations are automatically performed:
-
Install any new plugins.
-
Call the API on configuration as code to reload the Jenkins configuration.
-
Update the plugin catalog (Only for controller CasC bundles as plugin catalogs are not managed by operations center CasC bundle).
Configuration bundles that do not include plugin updates can be reloaded without an instance restart. This feature allows you to update Jenkins configurations, install new plugin catalogs, or install new plugins dynamically.