|
Starting with the July 2026 CloudBees CI release, Blue Ocean and team controllers will reach end-of-life (EOL) and will no longer be supported. After this date, Blue Ocean and team controllers will not receive updates, security patches, or technical support and will be removed from the CloudBees Assurance Program (CAP). What this means for you:
CloudBees strongly encourages all customers to complete their migration away from team controllers before the EOL date to ensure uninterrupted service. For detailed migration guidance, please refer to In-place conversion of team controllers to managed controllers. If you have questions or need assistance, please contact CloudBees Support. |
This content applies only to CloudBees CI on modern cloud platforms.
CloudBees CI on modern cloud platforms helps teams accelerate software delivery through seamless collaboration around the software delivery process.
As DevOps needs rapidly evolve, enterprises require confidence that they are equipping their teams with the most feature-rich, reliable and secure Jenkins-based continuous delivery platform possible. With CloudBees CI, enterprises can onboard new projects and new teams quickly, via pre-configured security and built-in integrations to code repositories. This fast set up enables organizations to accelerate their DevOps journey.
Install Teams
Getting Teams is as easy as installing a plugin in your operations center.
To download and install Teams:
-
Select in the upper-right corner to navigate to the Manage Jenkins page.
-
Select Plugins, and then select Available plugins.
-
Enter CloudBees CI Teams on operations center into the filter.
-
Select the checkbox to the right of CloudBees CI Teams on operations center.
-
Select Download now and install after restart.
The process will install some (not all) Pipeline and Blue Ocean components in operations center, but it will not add any new item to the New Item page (only tooling and API plugins are installed).
Once the installation is completed you should see a new link in the left menu bar, Teams:
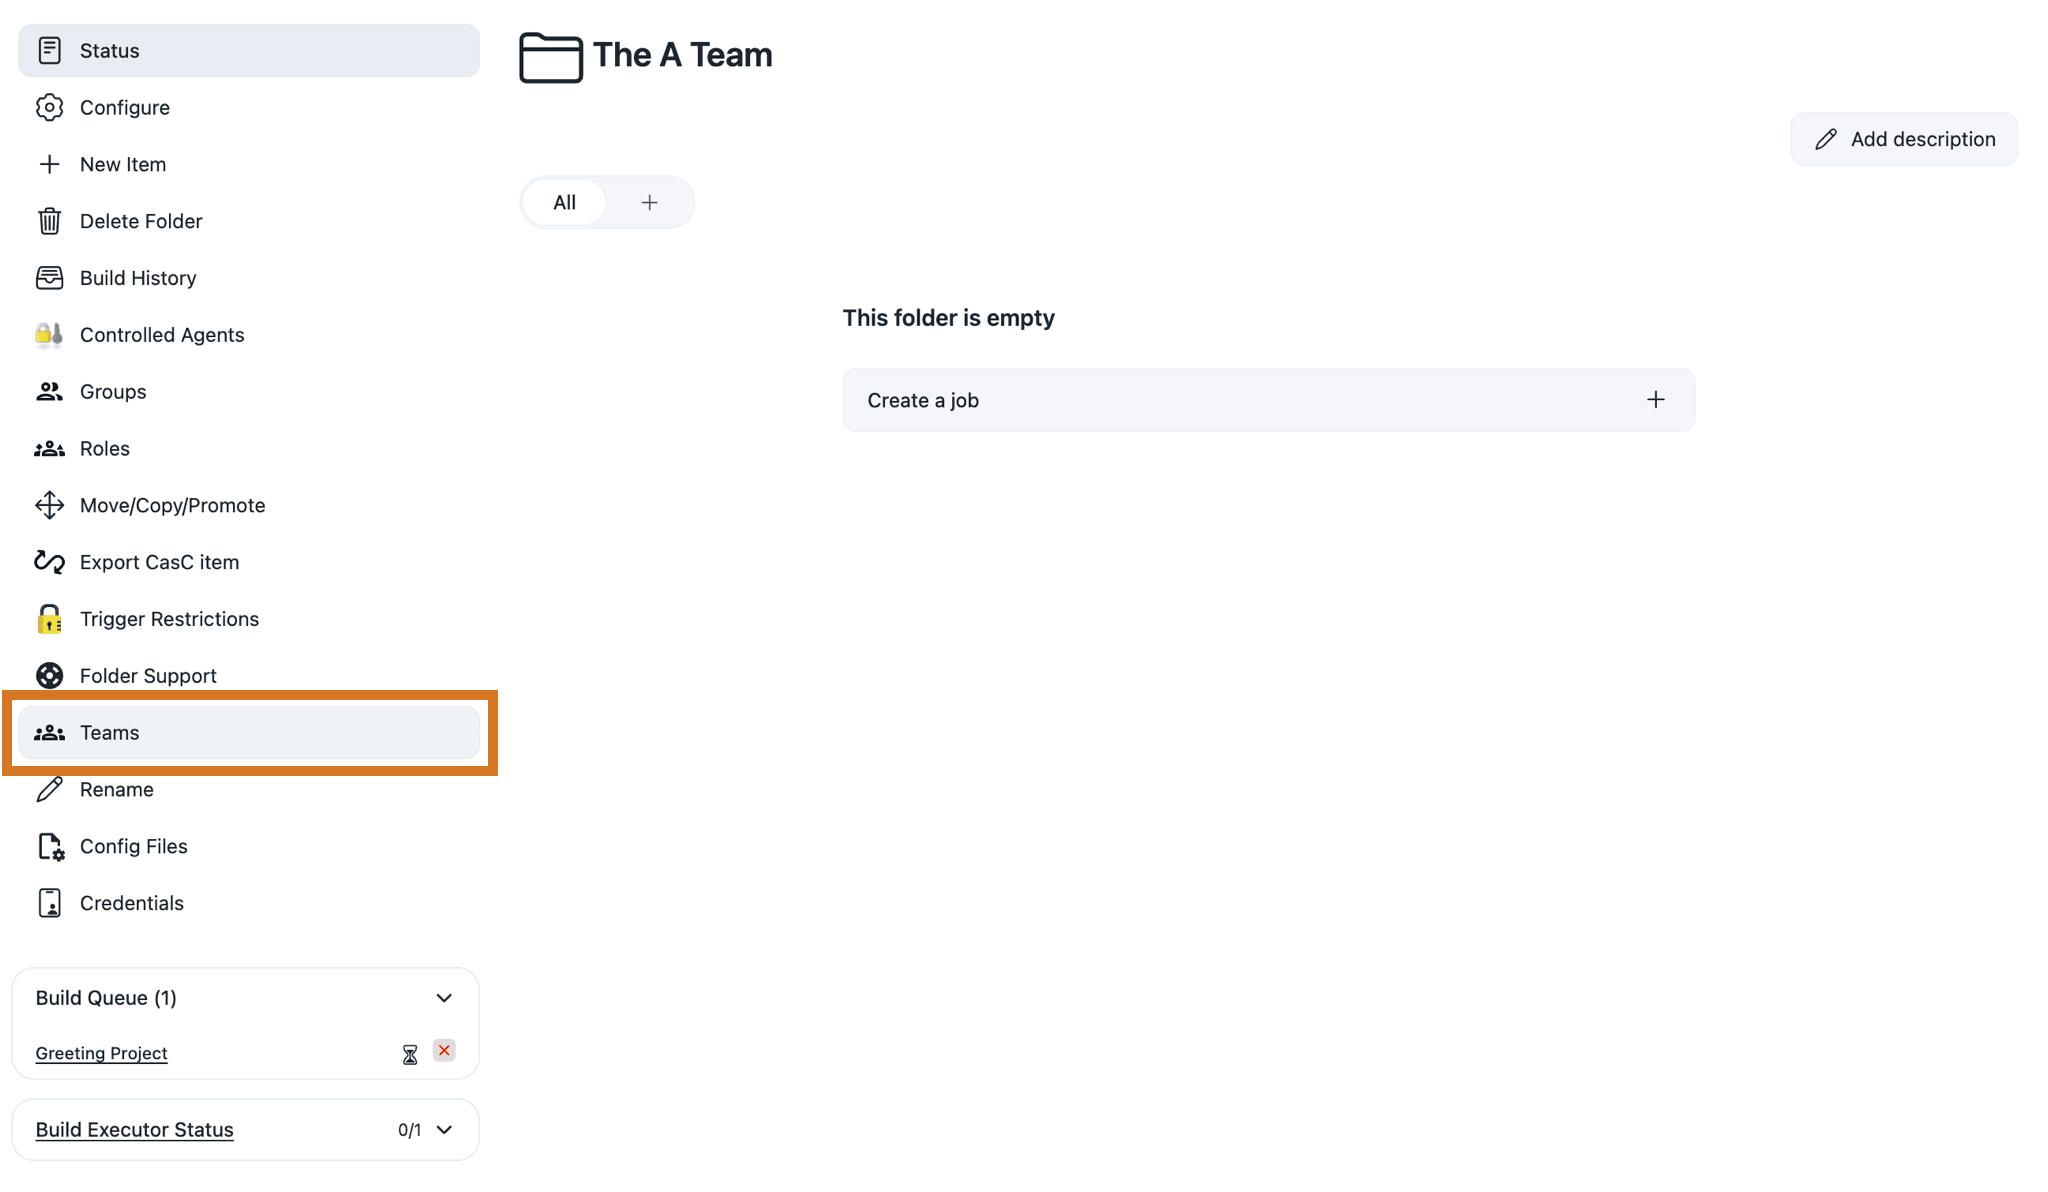
| Teams is not available on CloudBees CI on traditional platforms. |
How to create a new Team
Once you have installed the CloudBees CI Teams on operations center plugin, you can create a Team.
Administrators can grant the ManagedMaster.Create and Item.READ permissions in the Teams folder in order to limit Team creation permissions, granting only the ability to create teams, without granting the ability to manage the lifecycle of all teams. For more information about using the Role-Based Access Control plugin see Restrict access and delegate administration with Role-Based Access Control.
|
-
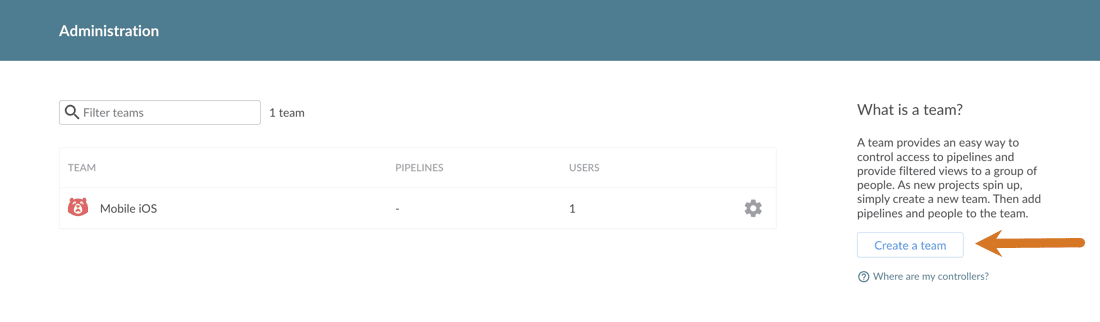
On the operations center main page, select Teams on the left menu.
-
Select Create a team
-
Complete Team creation with the following actions:
-
Name your Team.
-
Select an icon and a color.
-
Add new team members by entering their CloudBees CI on modern cloud platforms username or group id.
The CloudBees CI on modern cloud platforms username is the identifier you enter on the login page when you authenticate. The group id is the name of the external group as it is loaded by your authentication realm, if it supports external groups. -
Select a Kubernetes cluster endpoint to create a team controller. Cluster endpoints are created from the Jenkins classic UI. For more information, refer to Deploy CloudBees CI across multiple Kubernetes namespaces and clusters.
This field is disabled if you are not running CloudBees CI in Kubernetes. -
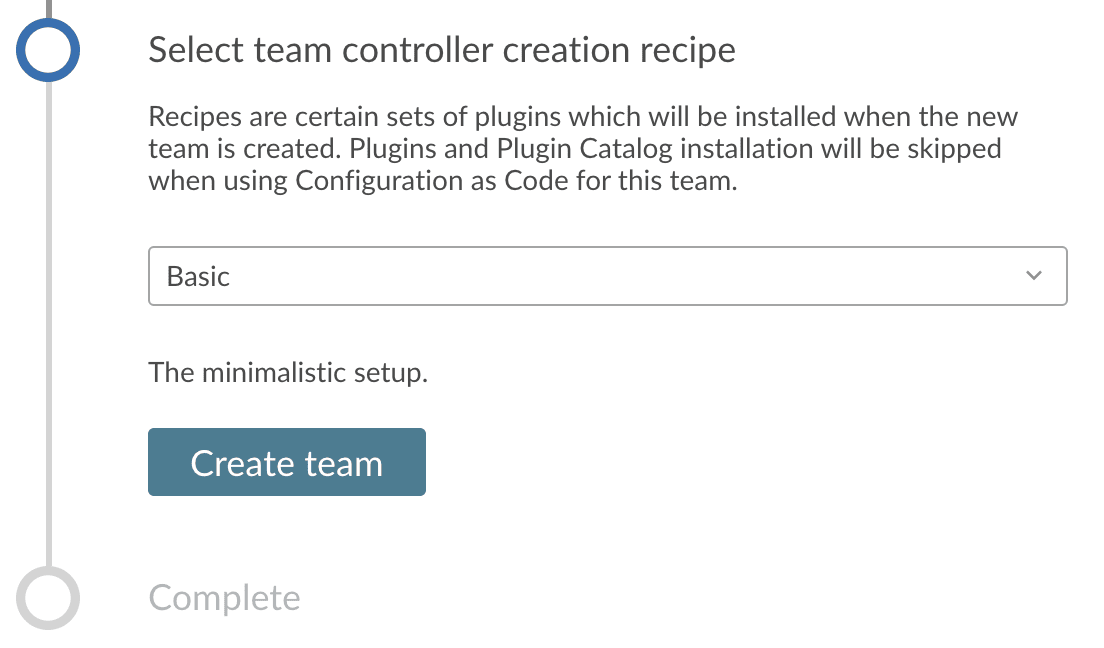
Select your Team controller creation recipe. Recipes define a kind of template (list of plugins to install, …) for creating your team controllers (Refer to Team controller creation recipes below for more details).
-
-
Select Create team.
The creation of the Jenkins team controller should take a few dozens of seconds [1]. Once the team controller is created, it is immediately accessible and usable by the team members.
Teams comes out of the box with a brand-new easy-to-use authorization model. This includes the following roles:
-
Team Admin: administrator of the team controller.
-
Team Member: read, write and execute permission on the pipelines.
-
Team Guest: read only.
| If additional customized roles are needed they can be added using the Command line interface. |
Access the Team settings
After you have created a Team, you can edit the Team settings by selecting Administration on the top right. It will take you to the Team list.
From there, select the team you wish to edit. You will be able to change the following: the Team display name, the icon and its color, and the members of that Team.
Team members management
Teams ships with a simple and easy to use new authorization model.
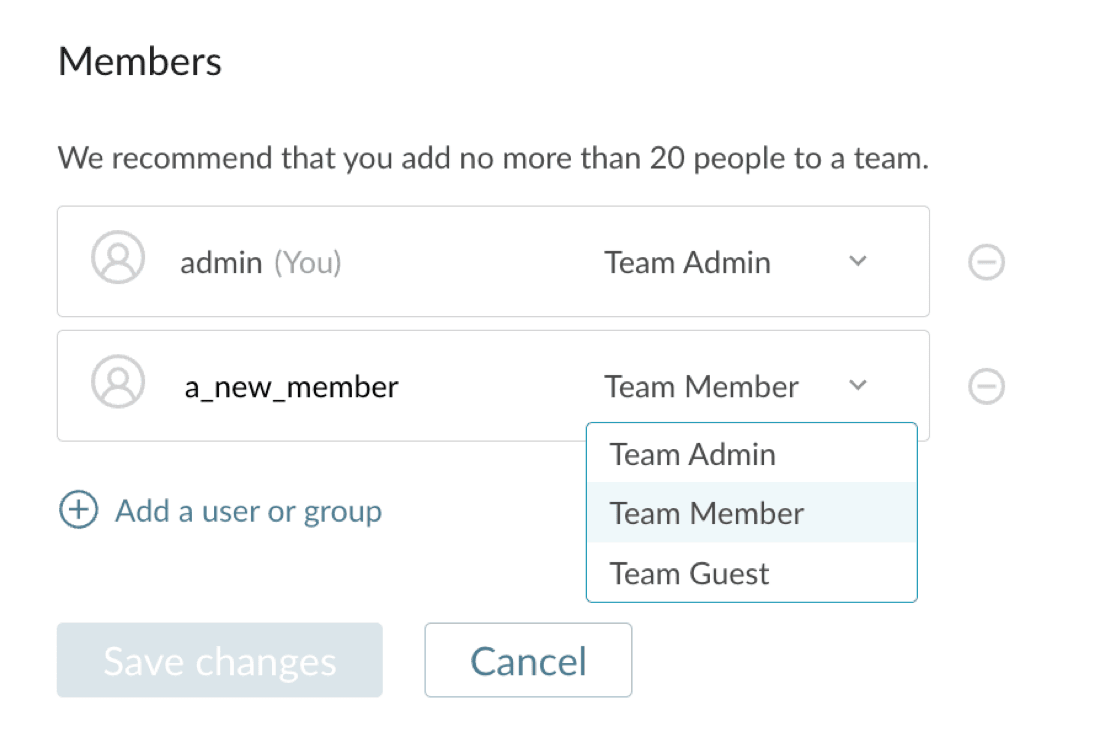
Adding user or group ID is straightforward.
-
Enter the ID.
-
Select the role you want in the combo-box next to the user.
-
Select Save changes.
The different roles
The authorization model offers the following roles:
- Team admin
-
Allows you to modify anything on the team.
This is not a global role - someone can be a Team admin on one Team, but not another. A Team admin only has permission to modify Teams on which they have the Team admin role. - Team member
-
Gives you read, write and execute permission on the pipelines of the team controller.
- Team guest
-
Gives you read access on the pipelines of the team controller.
Team controller creation recipes
By default, there are two predefined recipes:
- Basic (
basic) -
Includes a basic set of plugins designed to help get you started with CloudBees CI Teams.
- Java & Web Development (
java-web) -
Includes some plugins deemed useful for Java & Web development
Configurable parameters
In addition to a team controller creation recipe’s basic configurable parameters (for example, name, display name), a creation recipe has a few additional configurable parameters:
-
plugins- the list of plugins to automatically install in the controller. This is a list of plugin IDs where all of them must be available in the controller Update Center (either because the plugin comes from regular UC or it is provided by a plugin catalog) -
pluginCatalog( optional ) - a plugin catalog to apply to the controller (see Plugin Catalog for more information). The plugin catalog is applied before any plugin is installed, so plugins provided by the plugin catalog can be used in the list of plugins of the recipe. -
provisioning( optional ) - Refer to the help message of theteam-creation-recipesCLI command for an example of this parameter, which allows you to configure:-
diskSpaceGB- the disk capacity (in GB) to allocate for the controller. -
memoryMB- the amount of RAM that will be given to the container. -
cpu- the number of CPUs to allocate to the controller. This value can be a real number, for example,1.5is a valid value. -
jvmHeapMemoryRatio- the ratio of the memory set under "Jenkins Controller Memory" to use as heap for the Jenkins controller JVM. This must be a decimal between 0 and 1. Values over 0.7 are not recommended and can cause controller restarts when running out of memory.
-
Use the CLI
The Team creation CLI has been adapted to accept a new provisioningRecipe attribute.
From version 1.2.1, the CLI was extended to allow you to create your own recipes, and from version 2.138.1.3, the recipes allow to specify the installation of a plugin catalog. See the commands in more details below.
|
When the recipe specifies a plugin catalog, such a catalog is installed during the creation of the team controller. If the plugin catalog cannot be installed (for example, because it is not compatible with the team controller), then the team controller is still created but without the plugin catalog. |
Integrate with the CloudBees Role-Based Access Control plugin
CloudBees CI Teams ships with an integration with the CloudBees Role-Based Access Control plugin (exclusively when used on operations center).
Someone having the Jenkins.ADMINISTER permission on the underlying managed controller for that Team will have that permission propagated. This permission is the only permission that will propagate, all other permissions will be granted by the Team member configuration
For more information about using the CloudBees Role-Based Access Control plugin see Restrict access and delegate administration with Role-Based Access Control.
|
When operations center is configured to use an authorization strategy other than CloudBees Role-Based Access Control, ALL users (including admins) must be added to the Team’s membership list regardless of their permissions in the operations center. |
When to use a team controller, when to use a managed controller
CloudBees CI Teams introduces the new concept of team controller, however the existing managed controller functionalities will still be available to users who require the classic approach.
When a new Team in the organization is going to be on-boarded in CloudBees CI on modern cloud platforms the first question to answer is: should I use a team controller or a managed controller? The answer depends mainly on authorization needs.
As explained in Team members management, CloudBees CI Teams comes with a simplified and easy to use authorization model which offers 3 roles for team members: Team admin, Team member or Team guest.
If you need more fine-grained authorization settings then use a classic managed controller and CloudBees Role-Based Access Control.
Migrate a team from a managed controller to a team controller
Refer to Migrate team controllers to managed controllers using Move/Copy/Promote in the migration guides.
Command line interface
CloudBees CI Teams comes with an additional set of Command Line endpoints to manage Teams, Team Members, Team Roles and permissions. All commands can be used in two ways:
-
Human friendly: more fine-grained operations that operate on a single entity (i.e. change the role of a member)
-
Machine friendly: a JSON file is used as input and all changes are done in a single transaction (the
--putoption enables this mode)
Input and output messages are JSON, and usually the output of a read command can be used as input for a write.
These I/O messages follow the structure of a "data" element (containing the real content) and a "version" element which indicates the API version to use. Currently, there is only "version: 1" available. If a new feature is added to the API and it requires a backward-incompatible API change, then the "version" attribute must be adjusted properly to use the feature.
Messages staying in the same version (along different CloudBees CI versions) are granted to be always compatible.
In next examples, the cli script is a simplification for the whole Jenkins CLI command which is:
java -jar jenkins-cli.jar -noKeyAuth -auth $user:$token -s $url $* | python -m json.tool
Where $user is the Jenkins user to perform the operations, $token is the access token and $url is the Jenkins root URL.
jenkins-cli.jar must be downloaded from $url/jnlpJars/jenkins-cli.jar
All new commands provide in-line help with input examples. Help information can be accessed by cli help [command].
Teams
Use the teams command to:
-
Create or update a team (requires a JSON as input which contains the team definition, including Team Members).
-
Get the list of teams.
-
Get detailed information about a team.
Get Teams
Returns the list of Teams in CloudBees CI on modern cloud platforms.
$> cli teams { "data": [ { "displayName": "A Team", "name": "a-team", "provisioningRecipe": "basic", "status": { "team": "READY" } }, { "displayName": "B Team", "name": "b-team", "provisioningRecipe": "java-web", "status": { "team": "READY" } } ], "version": "1" }
Create or update a Team
Use a JSON file to define a team and create or update based on it.
$> cat a-team.json { "data": { "displayName": "A Team", "icon": { "color": "#7ac2d6", "name": "code" }, "members": [ { "id": "simon@acme.com", "roles": [ "TEAM_ADMIN" ] }, { "id": "all-developers-group", "roles": [ "TEAM_MEMBER" ] } ], "provisioningRecipe": "java-web", "name": "a-team" }, "version": "1" } $> cli teams a-team --put < a-team.json { "data": { "id": "a-team", "message": "Team [a-team] created successfully", "status": "success" }, "version": "1" }
| The Team ID passed as argument and the ID inside the JSON file must be the same. |
Get Team details
To get more detailed information about a Team, specify the team name as argument:
$> cli teams a-team { "data": { "displayName": "A Team", "icon": { "color": "#7ac2d6", "name": "code" }, "members": [ { "id": "simon@acme.com", "roles": [ "TEAM_ADMIN" ] }, { "id": "all-developers-group", "roles": [ "TEAM_GUEST" ] } ], "provisioningRecipe": "basic", "name": "a-team", "status": { "team": "READY" }, "url": "http://acme.com/a-team/" }, "version": "1" }
| The argument is a Team ID (as returned in the "name" attribute in the listing call). |
Team members
Get Team members
Retrieves the team members given a team name.
$> cli team-members a-team { "data": [ { "id": "simon@acme.com", "roles": [ "TEAM_ADMIN" ] }, { "id": "all-developers-group", "roles": [ "TEAM_GUEST" ] } ], "version": "1" }
Set team members
Use the --put option to set all members at once:
$> cat a-team-members.json { "data": [ { "id": "simon@acme.com", "roles": [ "TEAM_ADMIN" ] }, { "id": "all-developers-group", "roles": [ "TEAM_GUEST" ] }, { "id": "ada@acme.com", "roles": [ "TEAM_GUEST" ] } ], "version": "1" } $> cli team-members a-team --put < a-team-members.json
Or the more granular way to add/update/delete only one member:
$> cli team-members a-team --add ada@acme.com --roles TEAM_GUEST { "data": { "id": "a-team", "message": "Member [ada@acme.com] was added to the team", "status": "success" }, "version": "1" } $> cli team-members a-team --update ada@acme.com --roles TEAM_MEMBER { "data": { "id": "a-team", "message": "Member [ada@acme.com] was updated", "status": "success" }, "version": "1" } $> cli team-members a-team --delete ada@acme.com { "data": { "id": "a-team", "message": "Member [ada@acme.com] was removed from the team", "status": "success" }, "version": "1" }
Team roles
CloudBees CI Teams comes with a predefined set of roles which are automatically set for new Teams. However once the Team is created it is possible to customize the roles available for the Team.
Get Team roles
Get available roles for a Team:
$> cli team-roles a-team { "data": [ { "defaultRole": false, "id": "TEAM_ADMIN", "name": "Team Admin" }, { "defaultRole": true, "id": "TEAM_MEMBER", "name": "Team Member" }, { "defaultRole": false, "id": "TEAM_GUEST", "name": "Team Guest" } ], "version": "1" }
Set Team Roles
To set all Team roles (and the permissions for each of them) at once use the --put option:
$> cat a-team-roles.json { "version": "1", "data": [{ "name": "A new Role", "id": "NEW_ROLE", "defaultRole": true, "jenkinsInstancePermissions": [ "hudson.model.Hudson.Read" ], "teamPermissions": [ "hudson.model.Hudson.Read" ] }, { "name": "Team Admin", "id": "TEAM_ADMIN", "defaultRole": false, "jenkinsInstancePermissions": [ "hudson.model.Hudson.Administer" ], "teamPermissions": [ ] }] } $> cli team-roles a-team --put < a-team-roles.json { "data": { "id": "a-team", "message": "Team [a-team] was updated with the given list of roles", "status": "success" }, "version": "1" }
The command will fail when using --put if the resulting roles set is breaking the team security, for example if there is a member assigned to a role that is not present in the new set of roles.
|
As noted in the examples, the team-roles command also allows to set role permissions when using --put, even when there is a specific command to manage permissions (team-permissions).
This is done that way because it is a common use case to set roles and permissions at the same time in the same call, so there is no need to make two consecutive calls to two different endpoints.
To manage the permissions set of a given role (instead of all roles at once) use the team-permissions command (described in the next section).
As usual, the team-roles command also provides a more granular interface to operate on a single role.
To add a new role use:
$> cli team-roles a-team --add MY_NEW_ROLE --display 'My New Role' { "data": { "id": "a-team", "message": "Role [MY_NEW_ROLE] was added to the team", "status": "success" }, "version": "1" }
Then permissions can be set on that role using the team-permissions command.
Team permissions
This endpoint manages the set of permissions that a role grants. There are two types of permissions, depending on the item they are set in the underlying team controller:
-
Jenkins instance permissions: these permissions are granted at top level in the team controller (they are usually global permissions, like Jenkins Admin or Nodes Admin). They are mapped in the
jenkinsInstancePermissionsattribute in JSON messages. -
Team permissions: granted at Team Folder level, so they apply to team controller items (Pipelines and possibly other item types under the Team Folder, like Agent Templates). They are mapped in the
teamPermissionsattribute in JSON messages.
Get available permissions
To get all the permissions available to be set on a role for a given Team. They can all be set at Jenkins instance or Team level:
$> cli team-permissions a-team { "data": [ "com.cloudbees.jenkins.plugin.metrics.views.Alerter.Mute", "com.cloudbees.jenkins.plugin.metrics.views.Alerter.View", "com.cloudbees.jenkins.support.SupportPlugin.DownloadBundle", "com.cloudbees.plugins.credentials.CredentialsProvider.Create", "com.cloudbees.plugins.credentials.CredentialsProvider.Delete", "com.cloudbees.plugins.credentials.CredentialsProvider.ManageDomains", "com.cloudbees.plugins.credentials.CredentialsProvider.Update", "com.cloudbees.plugins.credentials.CredentialsProvider.UseItem", "com.cloudbees.plugins.credentials.CredentialsProvider.UseOwn", "com.cloudbees.plugins.credentials.CredentialsProvider.View", "hudson.model.Computer.Build", "hudson.model.Computer.Configure", "hudson.model.Computer.Connect", "hudson.model.Computer.Create", [.. removed for docs clarity ..] "nectar.plugins.rbac.groups.Group.Configure", "nectar.plugins.rbac.groups.Group.Create", "nectar.plugins.rbac.groups.Group.Delete", "nectar.plugins.rbac.groups.Group.Manage", "nectar.plugins.rbac.groups.Group.View", "nectar.plugins.rbac.roles.Role.Filter", "nectar.plugins.rbac.roles.Role.View" ], "version": "1" }
Get permissions of a role
To get detailed information about permissions on a given role:
$> cli team-permissions a-team TEAM_GUEST { "data": { "jenkinsInstancePermissions": [ "hudson.model.Hudson.Read" ], "role": "TEAM_GUEST", "teamPermissions": [ "hudson.model.Item.Discover", "hudson.model.Item.Read", "hudson.model.Run.Artifacts", "hudson.model.View.Read" ] }, "version": "1" }
Set permissions for a role
To set all the permissions for a role at once:
$> cat a-team-guest-permissions.json { "data": { "jenkinsInstancePermissions": [ "hudson.model.Hudson.Read" ], "role": "TEAM_GUEST", "teamPermissions": [ "hudson.model.Item.Discover", "hudson.model.Item.Read", "hudson.model.Run.Artifacts", "hudson.model.View.Read", "hudson.model.Item.Build" ] }, "version": "1" } $> cli team-permissions a-team TEAM_GUEST --put < a-team-guest-permissions.json { "data": { "id": "TEAM_GUEST", "message": "Permissions set correctly", "status": "success" }, "version": "1" }
And also the more granular arguments can be used:
$> cli team-permissions a-team TEAM_GUEST --add hudson.model.Item.Build --type team { "data": { "id": "TEAM_GUEST", "message": "Permission added correctly", "status": "success" }, "version": "1" } $> cli team-permissions a-team TEAM_GUEST --delete hudson.model.Item.Build --type team { "data": { "id": "TEAM_GUEST", "message": "Permission deleted correctly", "status": "success" }, "version": "1" }
The type option values are "team" or "jenkins" to add the permission at Team or Jenkins level respectively.
|
Team creation recipes
You will be able to use the output of the listing, to update them using --put.
You are allowed to override or delete any recipe, including the predefined ones.
The only exception is that you cannot delete the last recipe (because this would then prevent the creation of a Team, as the recipe is a required parameter).
Use the default attribute to mark a recipe as the first and default option in the UI.
Only one default is expected (though it is not enforced: if you make many recipes default, the first one found will be set as default).
|
List all recipes
$> cli team-creation-recipes { "version": "1", "data": [ { "name": "basic", "displayName": "Basic", "description": "The minimalistic setup.", "plugins": [ ... "workflow-aggregator", "workflow-cps-checkpoint" ], "default": true }, { "name": "java-web", "displayName": "Java & Web Development + Big memory", "description": "The essential tools to build, release and deploy Java Web applications including integration with Maven, Gradle and Node JS.", "provisioning": { "memoryMB": 10240 } "plugins": [ ... "pipeline-maven", "tasks", "warnings" ], "default": false }, { "name": "with-catalog", "displayName": "With a plugin catalog and big disk", "description": "Setup integrating a plugin catalog and big disk", "pluginCatalog": "one-plugin-catalog", "provisioning": { "diskSpaceGB": 100, "memoryMB": 2048, "cpu": 1.5, "jvmHeapMemoryRatio": 0.7 }, "plugins": [ ... "pipeline-maven", "tasks", "warnings" ], "default": false } ] }
Add, update or remove recipes
The simplest way to do this is to redirect the output of the recipes listing to a file, edit it, then pass it as input to this command.
$> cli team-creation-recipes --put < all-recipes.json { "version": "1", "data": { "id": null, "message": "Recipes list updated successfully", "status": "success" } }