The CloudBees Role-Based Access Control plugin allows a CloudBees CI administrator to define various security roles within the system they administer. Once the roles are defined, the administrator can assign those roles to groups of users. The assignment of roles can take place at the global level or be limited to specific objects within the system. The administrator can also delegate the management of groups for specific objects to specific users.
The Role-Based Access Control plugin combined with the Folders plugin provides a powerful solution for managing CloudBees CI shared by multiple teams of users. The administrator can create folders for each team and then create groups within those folders for each of the roles that team members have. Delegating the management of the group membership (but not the management of the roles assigned to groups) to the team leaders, the administrator can empower team leads to manage the permissions of their team. This reduces their own administrative overhead.
Concepts and definitions
The Role-Based Access Control plugin introduces a number of new concepts to Jenkins when enabled. These concepts and terms are used in many different systems other than Jenkins, however, this section defines their meaning within the plugin.
- Permission
-
Permission is a basic capability, such as starting a job or configuring a build agent. There is a core set of permissions defined by Jenkins, but some plugins define further permissions. If an action within Jenkins requires a specific permission, then the user who wants to perform that action must have the required permission.
- Role
-
A Role is a set of permissions grouped into some meaningful category. For example, a "developer" role might include viewing jobs, browsing workspaces, starting (or canceling) builds, and creating version control tags; but not configuring (or deleting) those jobs, managing the build agents they run on, or other permissions. The Role Based Access Control plugin allows the administrator to define as many roles as are needed. These definitions are made available throughout the system.
- Security Realm
-
The Security Realm is responsible for establishing the identity of users after sign in. Jenkins ships with a number of security realm implementations and plugins can define additional ones, typically connecting to external services such as LDAP. Only one security realm can be active at a time.
- External Group
-
An External Group is a group of users that are defined outside the control of Jenkins and reported by the security realm. For example, when the LDAP security realm is active, the LDAP groups that a user is a member of are considered external groups by Jenkins. The same is true of the Active Directory security realm. Some security realms, such as the built-in "Jenkins own user database", do not support external groups.
- Authorization Strategy
-
The Authorization Strategy picks up user definitions from the security realm and is responsible for determining what permissions users have on various objects within Jenkins. Jenkins ships with several authorization strategy implementations and plugins can define additional ones—including Role-Based Access Control. Only one authorization strategy can be active at a time; since Role-Based Access Control subsumes the functionality of most others this is unlikely to be a limitation.
- Group
-
A Group (sometimes, referred to as a Local Group) is a set of external groups, individual users, service accounts, and even other local groups, defined within Jenkins by the Role-Based Access Control plugin. In addition to membership, a group can be assigned to roles that are defined separately in Jenkins. Groups can be defined either at the root level of Jenkins or within specific objects such as folders or individual jobs. When you define a group within a specific object, this group becomes local to that object and its children (such as nested jobs and subfolders). A user’s effective permissions are the aggregate of all the roles assigned to the groups they belong to within the scope of the object they have access to.
- Role Filter
-
A Role Filter may be defined on an object within Jenkins. It allows roles to be restricted from propagating through from the parents of the object. For example, if a specific job is to be hidden from all but a small team of users, a group is created in that job with the required roles assigned to that group. A role filter is then applied to the job to suppress other roles from propagating through from the parent. However, administrators can specify that certain roles are never filtered out.
Set up the Role-Based Access Control plugin
Before configuring the Role-Based Access Control plugin, it is helpful to review the checklist in Pre-configuration checklist.
| Check | Done |
|---|---|
Do you have a list of roles do you want to define? It is usually best to start small, you can always add more later. If you are unsure, a reasonable minimal set could be: Read-only; Developer; Manager; and Administrator. Additionally, it is helpful to think about what you want those roles to be able to do. |
Yes / No |
Do you have a list of groups you want to define? You will typically require at least one local group for each role you define. If some roles are only being assigned to specific users or groups of users on specific objects, then each of those assignments will require a group local to that object. |
Yes / No |
Have you configured and tested your security realm? The first time you enable the Role-Based Access Control plugin, it defaults to a configuration where logged-in users can do anything and users cannot access the system anonymously. If you have not tested logging in to the system with the security realm you are using, enabling the Role-Based Access Control plugin may lock everyone out of the system. Refer to Recover from a lock-out for details on how to restore access to the system in the event of a lock-out. |
Yes / No |
Does your security realm provide details of external groups? If the security realm does not provide details of external groups, then you (or someone you delegate permissions to) may have to manually maintain synchronization between the external group membership and any corresponding shadow local groups that you may define within Jenkins. |
Yes / No |
Is this the first time the Role-Based Access Control plugin will be enabled? The Role-Based Access Control plugin remembers its configuration even when a different authorization strategy is configured, this allows easier experimentation with the plugin. However, a side effect is that you may have to remove the existing configuration if you want to start from a clean slate. Refer to Completely reset the configuration for details on how to remove any existing configuration. |
Yes / No |
Are there specific objects which require different permissions? If most of your jobs will have a permissive set of permissions, but a few jobs will have permissions restricted to specific users, then the typical design is to grant the permissive permissions at the root level, filter those permissions out on the few jobs that have restricted permissions, and define groups for the users who require permissions on the restricted jobs. |
Yes / No |
|
If you are still prototyping how the Role-Based Access Control plugin can help you, it can be useful to delay setting up a proper security realm while you are testing the Jenkins configuration. The Mock Security Realm plugin allows you to simulate having multiple users, as well as various external groups that can be bound to local groups. It provides no actual security (everyone has a dummy password), so replace it with another security realm before going into production. |
Enable the authorization strategy
Enable the Role-Based Access Control authorization strategy from the global security configuration screen (). Navigate to the Authorization list and select Role-based matrix authorization strategy.

|
The first time you enable the Role-Based Access Control plugin, it defaults to a configuration where signed-in users have no restrictions and users cannot access the system anonymously. If you have not tested logging into the system with the security realm you are using, enabling the Role-Based Access Control plugin may lock everyone out of the system. Refer to Recover from a lock-out for details on how to restore access to the system in the event of a lock-out. When enabling this strategy, you can also select Typical initial setup from the Import strategy list. This option is only available when you are logged in, because it creates a group of "administrators" (with full
permissions) of whom you are initially the sole member. For convenience, it also creates empty groups for "developers" and "browsers" with useful permission sets. However, you may want to add some existing users to developers, or add the special labels |
When the Role-Based Access Control authorization strategy is enabled, the following changes are made to the Jenkins interface:
-
Additional icons for Groups and Roles at the root of Jenkins as well as on any objects which support the definition of local groups. Refer to The main Jenkins screen with the additional icons for Groups and Roles.
-
An additional Manage Roles icon on the Manage Jenkins screen. Refer to The Manage Roles action from the main Manage Jenkins screen.
Configure and manage roles
Roles are configured and managed from the
![]() Manage Roles screen accessed via the
Manage Jenkins screen (refer to The Manage Roles action from the main Manage Jenkins screen). The first time the Role-Based Access
Control authorization strategy plugins RBAC Authorization Strategy is
enabled the Manage Roles screen should look something like The Manage Roles screen after the Role-Based Access Control authorization strategy plugins RBAC Authorization Strategy has been initially enabled. The
screen consists of a table of check boxes with each row of the table
corresponds to a role, and each column corresponding to a permission. By
checking the boxes you can assign permissions to roles.
Manage Roles screen accessed via the
Manage Jenkins screen (refer to The Manage Roles action from the main Manage Jenkins screen). The first time the Role-Based Access
Control authorization strategy plugins RBAC Authorization Strategy is
enabled the Manage Roles screen should look something like The Manage Roles screen after the Role-Based Access Control authorization strategy plugins RBAC Authorization Strategy has been initially enabled. The
screen consists of a table of check boxes with each row of the table
corresponds to a role, and each column corresponding to a permission. By
checking the boxes you can assign permissions to roles.

There are two types of roles:
-
 system role
 -
 user defined role
System roles cannot be removed. There are two system roles:
-
anonymous
This role is automatically assigned to any user that is not logged in. If you do not want anonymous users to be able to access the system then do not assign any permissions to the anonymous role.
-
authenticated
This role is automatically assigned to any user that is logged in. If you want very fine-grained control over user permissions you may end up removing all permissions from this role.
To define a new role you type the name of the role you want to define
into the Role to add text box (Add a role called Administrator).

AdministratorOnce you have typed the name in, select Add. This will add a new row to the bottom of the table.
Once you have created the row for the new role, you can assign permissions for that role by selecting the appropriate checkboxes.
|
If you want to assign all permissions there is a
|
|
If you install the Extended Read Permission plugin you will see another permission: to be able to view, but not change, configuration of objects such as jobs. This can be useful for certain roles; for example, a developer role might be granted this permission so that developers can more easily debug build failures while still requiring a project administrator to make changes to the job setup. |
|
Sometimes one permission will automatically imply other permissions. For example, Overall/Administer usually implies every other permission (running Groovy scripts may be excluded). When you have checked the overarching permission but not other permissions it implies, these other permission checkboxes will be shown with a colored background to remind you that they are also implicitly part of the role. |
|
Starting in version 5.25, Overall/Administrator no longer implies the permissions Overall/RunScripts, Overall/Uploadplugins, and Overall/ConfigureUpdateCenter. Roles configured prior to this update that contain the Overall/Administer permission automatically include these previously implicit permissions. New roles with Overall/Administer must explicitly select those three additional permissions when desired. |


Check all icon for the Administrator roleIf you need to delete a role, there is a
![]() remove button at the far right of the
row for all the user-defined roles.
remove button at the far right of the
row for all the user-defined roles.
Normally roles are filterable: anyone with the Role/Filter permission on an object such as a folder is allowed to block that role from propagating into the object from its parent (such as Jenkins overall), possibly while allowing another group defined on the object to explicitly grant it. (See Configure and manage role filters.) For some roles it is undesirable to permit this: a Jenkins administrative role ought to be valid anywhere in the system, so that a project manager cannot accidentally block even site administrators from seeing an otherwise private project. (That situation could be considered a kind of lockout.) For such roles you should uncheck the Filterable checkbox to make sure the role applies globally.
Once you have defined all the roles you require, you can save that configuration by selecting Save.
|
Care should be taken when removing the |
Configure and manage groups
Groups can be defined at any point in Jenkins where the
![]() groups action is available. The
following classes of objects support group definitions out of the box:
groups action is available. The
following classes of objects support group definitions out of the box:
-
Jenkins itself
-
Jobs
-
Agents
-
Views
-
Folders
|
Other objects added by plugins can support group definitions if the required support is built into the plugin itself, or is added by an additional plugin. However, in general, the objects need to have been designed to allow other plugins to contribute actions in order for the group definition support to be possible. Where an object does not support group definitions, the groups are inherited from the object’s parent. |
|
As of November 2020, RBAC groups and role filters can no longer be configured on views, and those previously configured are not loaded. This change only affects the views themselves, not the items within them. Previous permissions applied to the items are still enforced. You can enable the ability to configure RBAC groups and role filters at the views level by setting the system property |
Selecting the ![]() groups action will
bring you to a screen similar to that shown in the image below.
groups action will
bring you to a screen similar to that shown in the image below.

Create a group using the ![]() New
Group action which prompts for the Group Name as
shown in the image below. Groups can
be renamed after they are created. Group names are case-sensitive and
whitespace is allowed (although it can be confusing). When a group is
created with the same name as a group from the parent context, it will
hide the group from the parent context, however the permissions granted
to members of the group will not be removed.
New
Group action which prompts for the Group Name as
shown in the image below. Groups can
be renamed after they are created. Group names are case-sensitive and
whitespace is allowed (although it can be confusing). When a group is
created with the same name as a group from the parent context, it will
hide the group from the parent context, however the permissions granted
to members of the group will not be removed.

After the group has been created, depending on the effective permissions
of the user creating the group, one of two screens will be displayed.
Users with the Group Configure permission will be shown the
Configuration screen,
otherwise the user will be taken straight
to the group details screen (Manage a group). This differentiation is key to
effectively allowing administrators to delegate some of the
administrative responsibility.

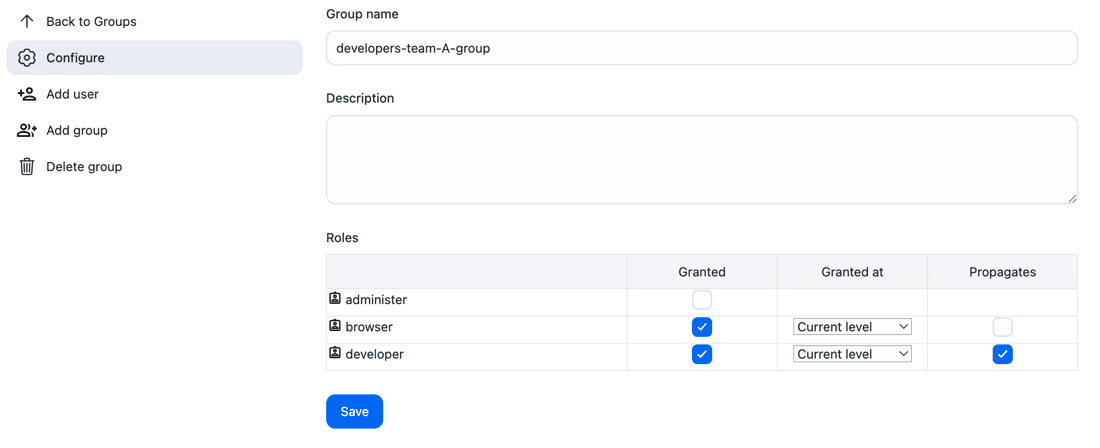
The Configuration screen is the screen where roles are assigned to a
group. By restricting access to this screen, an administrator can ensure
that groups cannot be created with permissions greater than those
intended by the administrator. The Group Manage permission can then be
assigned to specific users in order to allow them to manage the
membership of groups without risking them escalating their own
permissions by the addition of extra roles to groups they belong to.
Where a role is granted to a group, the role can be granted in one of
two modes. Be default the role is granted in the Propagates mode. This
means that the role will be available in child contexts. By clearing the
Propagates checkbox, you can create a pinned role (
![]() ) that is only available on the
specific object that the group is created on. Some examples where a
pinned role can be useful would be:
) that is only available on the
specific object that the group is created on. Some examples where a
pinned role can be useful would be:
-
A pinned group creation role at the root allows creating groups at the root while preventing creating groups on jobs.
-
When using the Folders plugin, a pinned group creation role on a folder allows creating groups at the in the folder while preventing creating groups on sub-folders.
After the configuration has been saved, the user will be taken to the group details screen as shown in the image below.

The ![]() Add user action
adds a member to the group. After selecting the action you are
prompted to enter the id of the user/group to add.
Add user action
adds a member to the group. After selecting the action you are
prompted to enter the id of the user/group to add.

The ID that you enter can be:
-
A user id
-
A group name from the current context
-
A group name from any of the parent contexts
-
An external group id from the security realm
When adding a new user to a group, the username cannot contain the backslash character (\). Usernames with a backslash triggers an HTTP ERROR 400 Suspicious Path Character error and prevents access to the user page.
|
You can add as many members as you like. The image below shows a group containing
three members, one of each type. Circular membership is permitted, for example,
a group can have as a member a group that it is a member of. When adding
external groups the http:// Jenkins-URL /whoAmI page can be useful
to figure out what the external group IDs actually are.

Members of a group can be removed by selecting the member’s
![]() remove icon. There is a two-step confirmation for removing a member, and you must confirm the removal
by selecting the
remove icon. There is a two-step confirmation for removing a member, and you must confirm the removal
by selecting the ![]() confirmation icon.
confirmation icon.

| For information on how to troubleshoot a specific issue, refer to Authenticated and Anonymous users are not added on RBAC. If you need more information or assistance, search the Knowledge Base or open a CloudBees Support ticket. |
Configure and manage role filters
Role filters can be defined at any point in Jenkins where group definitions are supported and roles are inherited from a parent of that object. By default, the following objects will support role filtering:
-
Jobs
-
Agents
-
Views
-
Folders
Selecting the ![]() roles action will
bring you to the Roles screen, where you can see the roles, permissions, and groups that are assigned to each of the roles for an object and its children.
roles action will
bring you to the Roles screen, where you can see the roles, permissions, and groups that are assigned to each of the roles for an object and its children.
If the object supports role filters then the
![]() Filter action will be available from
that screen. Selecting the
Filter action will be available from
that screen. Selecting the ![]() Filter
icon will bring you to a screen similar to that shown in The role filter screen for a job within a Jenkins instance where two roles are being filtered out.
Filter
icon will bring you to a screen similar to that shown in The role filter screen for a job within a Jenkins instance where two roles are being filtered out.

To filter a role, you just check the corresponding check-box. When a role is filtered, then the role is not available on that object to users unless there is a group defined within that object which the user is a member of and which has been assigned that role.
As mentioned in Configure and manage roles, administrators can mark certain important roles as being non-filterable. In such a case, they will not appear in the Filter Roles page at all.
For more information or troubleshooting specific issues, refer to the following articles:
If more information or assistance is necessary, search the Knowledge Base or open a CloudBees Support ticket.
Example Configurations
This section details some solutions to common configuration requirements. There are other ways to solve these configuration requirements, and there is no one "correct" solution for any of these, so it is better to think of these as examples of what can be done.
Instance owned by one cross-functional team
Background.
This example considers the case where there is one team of users owning the single instance. The team consists of multiple people with different roles. The most common roles in this case are:
-
Developer: Kick off builds and modify job configuration
-
Tester: Kick off builds, access build artifacts, and create SCM tags
-
Manager: Manage user roles in the team and create projects
-
Admin: Administer the system
-
Read only: Requires read access to the system but cannot download build artifacts
Sample solution.
Create one role for each role of user: developer_role, tester_role, manager_role, admin_role, and reader_role. Additionally, create one group at the root level for each role of user, assigning the corresponding role to each group: developers, testers, managers, admins and readers. Finally, add the members to each group as necessary.
| Role | Permissions |
|---|---|
developer_role |
|
tester_role |
|
manager_role |
|
admin_role |
|
reader_role |
|
| Context | Group | Role(s) | Member(s) |
|---|---|---|---|
ROOT |
developers |
|
All the developers |
ROOT |
testers |
|
All the testers |
ROOT |
managers |
|
All the manager(s) |
ROOT |
admins |
|
All the administrator(s) of the instance |
ROOT |
readers |
|
|
Instance shared by multiple cross-functional teams
This example considers the case where there are multiple teams of users sharing a single instance. Each team consists of multiple people with different roles. The most common roles in this case are:
-
Build Manager: Create, modify, and delete job configurations
-
Developer: Kick off their builds
-
Tester: Kick off their builds, access build artifacts, and create SCM tags
-
Manager: Manage user roles in their teams
-
Admin: Administer the system
-
Read only: Authenticated user that requires read access to the system but is not able to download build artifacts
Sample solution
Create one role for each role of user: builder_role, developer_role, tester_role, manager_role, admin_role, and reader_role. Additionally, create two groups at the root level for the administrators and readers, assigning the corresponding role to each group: admins and readers respectively. Use the folders plugin to create folders for the two teams, and in each folder create groups for the builders, developers, testers and managers of the respective teams. Finally, add the members to each group as necessary.
| Role | Permissions |
|---|---|
builder_role |
|
developer_role |
|
tester_role |
|
manager_role |
|
admin_role |
|
reader_role |
|
| Context | Group | Role(s) | Member(s) |
|---|---|---|---|
ROOT |
admins |
|
All the administrator(s) of the instance |
ROOT |
readers |
|
|
Team 1 Folder |
builders |
|
All the build managers in team 1 |
Team 1 Folder |
developers |
|
All the developers in team 1 |
Team 1 Folder |
testers |
|
All the testers in team 1 |
Team 1 Folder |
managers |
|
All the manager(s) of team 1 |
Team 2 Folder |
builders |
|
All the build managers in team 2 |
Team 2 Folder |
developers |
|
All the developers in team 2 |
Team 2 Folder |
testers |
|
All the testers in team 2 |
Team 2 Folder |
managers |
|
All the manager(s) of team 2 |
Instance shared by multiple single-function teams
Background.
This example considers the case where there are multiple teams of users sharing the single instance. Each team consists of multiple people with the same role. The most common teams in this case are:
-
Development - responsible for developing a single product
-
SQA - responsible for testing many products
-
DevOps - responsible for deploying many products into production
Sample solution.
Create one role for each role of user: developer_role, sqa_role, devops_role. Then create groups for the sqa and devops teams at the root level assigning the corresponding role to each group: sqa, devops. Use the folders plugin to create folders for each product and within each folder create a developers group assigned the developer_role. Complete the configuration by adding the members of each team as members of the corresponding groups.
teams
| Role | Permissions |
|---|---|
developer_role |
|
tester_role |
|
devops_role |
|
teams
| Context | Group | Role(s) | Member(s) |
|---|---|---|---|
ROOT |
sqa |
|
All the people in the SQA team |
ROOT |
devops |
|
All the people in the DevOps team |
Product 1 Folder |
developers |
|
All the developers of product 1 |
Product 2 Folder |
developers |
|
All the developers of product 2 |
Secret projects on a shared instance
Background.
This example considers the case where you want to have a secret project on a shared instance. The project will be worked on by a small team who should be able to see the project, but everyone outside of that team will be unable to see the project.
|
If somebody has access to the For most use cases, however, the project is being kept secret from
people who both do not have direct access to the |
Sample solution.
Create a group in the project (or folder) for the team of people who will be working on the secret project. Add all the roles that the team will require. Add all the members of the team. Modify the role filters for the project (or folder) filtering out every role (or all but the administrator role if administrators are to be allowed to view the project).
|
If you are configuring a secret project to which you will not have access, once you apply the role filters you will be locked out from the project, and it will appear as if there is no such project. See Find hidden projects for details on how to recover from accidental lock-outs of this type. It may also be advisable to create a group for admins of the secret project before configuring the role filters if only a subset of those with the overall administrator role are to be able to see the secret project. |
RBAC scripting with CLI commands
Sometimes it is useful to perform large-scale operations on a CloudBees CI server using scripts. The RBAC plugin provides CLI commands for managing the security setup. It also provides REST API, which is described in REST API in RBAC plugin.
| For automated scripts and CI/CD pipelines, consider using service accounts instead of personal user credentials for authentication. |
group-membership
Having defined some roles and groups, a common requirement is to change
the list of users authorized in a given group. To support this operation
from scripts, the group-membership CLI command is available in plugin
versions 4.1 and later. The first argument identifies the group
container:
-
rootfor the root of Jenkins -
jobnameorfoldernameorfoldername/jobnamefor a job, a folder, or any other item in the Jenkins folder hierarchy that can hold groups -
viewnameorfoldername/viewnamefor a view -
agentnamefor an agent node
The second argument is the name of an existing group. With no additional
arguments, all the members of the group are printed, one per line.
(These "members" can include user IDs, service account names, or Jenkins or external group names.)
If additional arguments are given, the group membership is set to the
listed members (replacing any current members). If a listed member is
ambiguous (there are both a user and group with the same name) then
CloudBees recommends prefixing the name with user:, group:, or serviceAccount:
to ensure the correct object is added to the membership list.
When adding service accounts to groups, prefix the name with serviceAccount: to distinguish them from users or groups. For more information about managing service accounts with CLI commands, refer to Service accounts CLI.
|
create-group
Creating a group can be performed via the create-group CLI command,
which is available in plugin versions 4.9 and later. The first argument
identifies the group container:
-
rootfor the root of Jenkins -
jobnameorfoldernameorfoldername/jobnamefor a job, a folder, or any other item in the Jenkins folder hierarchy that can hold groups -
viewnameorfoldername/viewnamefor a view -
agentnamefor an agent node
The second argument is the name of the group to create.
delete-group
Deleting a group can be performed via the delete-group CLI command,
which is available in plugin versions 4.9 and later. The first argument
identifies the group container:
-
rootfor the root of Jenkins -
jobnameorfoldernameorfoldername/jobnamefor a job, a folder, or any other item in the Jenkins folder hierarchy that can hold groups -
viewnameorfoldername/viewnamefor a view -
agentnamefor an agent node
The second argument is the name of the group to delete.
group-role-assignments
Assigning or listing group roles can be performed via the
group-role-assignments CLI command, which is available in plugin
versions 4.9 and later. The first argument identifies the group
container:
-
rootfor the root of Jenkins -
jobnameorfoldernameorfoldername/jobnamefor a job, a folder, or any other item in the Jenkins folder hierarchy that can hold groups -
viewnameorfoldername/viewnamefor a view -
agentnamefor an agent node
The second argument is the name of the group.
With no additional arguments, the current group roles will be printed.
By default, the roles are printed one by line in the format used to
assign them. To print them in a more readable format, use the
-e (--expanded-display) command line option.
If additional arguments are given, the group roles are set to the listed roles (replacing any current roles).
Each role follows the format:
ROLE[,GRANTED_AT[,PROPAGATES]] GRANTED_AT=0|1|2 (0:current level, 1: Child level, 2: Grand child level), PROPAGATES=true|false.
For example: developer,0,true will assign the "developer" role at the
current level and the role will be available in child contexts.
list-groups
Listing existing groups can be performed via the list-groups CLI
command, which is available in plugin versions 4.11 and later. The
argument identifies the group container:
-
rootfor the root of Jenkins -
jobnameorfoldernameorfoldername/jobnamefor a job, a folder, or any other item in the Jenkins folder hierarchy that can hold groups -
viewnameorfoldername/viewnamefor a view -
agentnamefor an agent node
REST API in RBAC plugin
The REST API in RBAC plugin documentation has been moved. See API Reference - RBAC for more information.
Troubleshooting
Recover from a lock-out
There are two ways to recover from a lock-out. Both require that the Jenkins instance be stopped and then restarted after completion of the steps.
The first way will remove all the roles that are defined in the system but does not require any manual editing of XML files
-
Ensure that the Jenkins instance is stopped.
-
Open a shell
-
Change into the
JENKINS_HOMEdirectory$ cd $JENKINS_HOME -
Remove/rename the
nectar-rbac.xmlconfiguration file$ mv nectar-rbac.xml nectar-rbac.xml.old -
Start the Jenkins instance.
-
Ensure that the Jenkins instance is stopped.
-
Open a command prompt
-
Change into the
JENKINS_HOMEdirectoryC:\> cd %JENKINS_HOME% -
Remove/rename the
nectar-rbac.xmlconfiguration fileC:\...\Jenkins> ren nectar-rbac.xml nectar-rbac.xml.old -
Start the Jenkins instance.
The second way will not remove any of the roles that are defined in the system but requires manual editing of an XML file.
JENKINS_HOME/nectar-rbac.xml-
Ensure that the Jenkins instance is stopped.
-
Open the
JENKINS_HOME/nectar-rbac.xmlin a text editor that can edit XML filesIt is a good idea to make a backup copy of the file before changing it.
The file should look something like General structure of the
nectar-rbac.xmlfile -
Add the following line(s) into the role that you want to have the overall Administrator permission along with related administrative permissions
<permission id="hudson.model.Hudson.Administer"/> <!-- below permissions are no longer implied by Administer since v5.25 --> <permission id="hudson.model.Hudson.RunScripts"/> <permission id="hudson.model.Hudson.Uploadplugins"/> <permission id="hudson.model.Hudson.ConfigureUpdateCenter"/> -
Save the file
-
Start the Jenkins instance.
nectar-rbac.xml file<?xml version='1.0' encoding='UTF-8'?> <nectar.plugins.rbac.strategy.RoleMatrixAuthorizationplugin> <configuration class="..."> ... <role name="..."> <permission id="..."/> ... </role> ... <role name="anonymous"> ... </role> <role name="authenticated"> ... </role> ... </configuration> </nectar.plugins.rbac.strategy.RoleMatrixAuthorizationplugin>
Completely reset the configuration
If you want to completely reset all the Role-Based Access Control plugin’s configuration, an irreversible action, you can use the script console to remove all the user-defined roles, local groups and role filters on all the objects within your Jenkins instance.
|
There is no way to recover the user-defined roles, local groups and role filters after you have reset the configuration other than by restoring a backup of the complete system, and this may have the side effect of removing any changes that occur within the system after the configuration has been reset. Only follow this procedure if you are absolutely sure that you want to wipe all the Role-Based Access Control plugin’s configuration |
If you have been locked out of the system, you will need to follow one of the procedures in Recover from a lock-out to recover administrative access.
-
Sign in to Jenkins using a web browser and open the
Script Consolefrom theManage Jenkinsscreen. -
Type the following into the script text box:
RoleMatrixAuthorizationPlugin rbacPlugin = RoleMatrixAuthorizationPlugin.getInstance() if (rbacPlugin != null) { rbacPlugin.reset() } else { println 'RBAC is not configured as Security Realm' } -
You should have a screen that looks like Use the script console to completely reset the Role-Based Access Control plugin’s configuration
-
Select Run. The screen should now look like After successfully resetting the Role-Based Access Control plugin’s configuration via the script console


Find hidden projects
You can remove permissions for a project by filtering out roles on that project using a role filter. In general, it is best to add groups and roles to a project before applying the role filter, as if you filter all roles, you will be locked out from accessing the project completely. The strategy of filtering out all roles can be used to create secret projects, but there are times when it is necessary to recover or discover the projects that are hidden.
While there are various workarounds for this situation, best is to make sure that there is at least one administrative role with all permissions which is not filterable (see Configure and manage roles). The Jenkins administrator should grant this role to a group containing themselves, and the secret project will be visible again.
Configure a bypass of the recursive permissions check
An authorization issue with the Role-Based Access Control plugin previously made it possible for users to view nested resources, even if they did not have permission to view the parent resources. This issue has been resolved with version 5.54 of the Role-Based Access Control plugin, and permissions are checked on the parent container, in addition to the target container. Additionally, a new caching mechanism improves performance while browsing system resources.
If you observe performance issues after upgrading to CloudBees CI version 2.277.1.2.2, you can disable the permissions enforcement by setting the following system property:
nectar.plugins.rbac.strategy.RoleMatrixAuthorizationPlugin.checkParentPermissions=false
If you observe inconsistencies in how permissions are applied after updating them, you can also disable the caching mechanism using the following system property:
nectar.plugins.rbac.strategy.RoleMatrixAuthorizationPlugin.cacheSize=0
Make sure that the Item.READ permissions are properly configured before disabling the caching mechanism.
Please note that CloudBees recommends that you do not disable the permissions enforcement or the caching mechanism.
Example
Administrators with a CloudBees CI cluster supporting multiple teams of users can delegate some management powers to team leads and limit the permissions that unauthenticated and other users have to make changes and view items in the cluster. Delegating the assignment of such permissions to project administrators allows teams to define more granular permissions for specific projects and objects within their controller, enabling them to do things like hiding a "secret" project from other teams.
These fine-grained permissions are enabled through the Role-Based Access Control (RBAC) Authorization Strategy defined by an administrator in the operations center Global Security Configuration.
Administrators define various security roles for use in their cluster and assign those roles to groups of users, including groups and users imported from an authentication server like LDAP.
To illustrate this use case, consider the following scenario where an administrator has two configured client controllers with some Folders configured for projects:
-
Controller-1
-
developers-team-A-folder (Working folder for developers-team-A-group)
-
another-folder (accessible by everyone)
-
-
Controller-2
The administrator in this scenario will support four different teams with their CloudBees CI cluster. Each team will only need access and permissions over a very limited set of items within the context of the CloudBees CI cluster, specifically:
-
Developers team A - Within CloudBees CI, this group will be called internal-developers-team-A-group. They should only have read access to the operations center instance and only be able to access to Controller-1. In Controller-1, these users should only see the folder developers-team-A-folder.
-
Developers team B - Within CloudBees CI, this group will be called internal-developers-team-B-group. They should only have read access to the operations center instance and should only be able to access to Controller-2.
-
Tester team - Within CloudBees CI, this group will be called internal-tester-team-group. They should only have read access to the operations center instance and should be able to access to Controller-1 and Controller-2.
-
Admin team - Within CloudBees CI, this group will be called internal-admin-team-group. They should be able to administer the operations center and client controllers systems.
There are at least two levels of permissions for an administrator to consider when configuring permissions - permissions over the cluster itself (operations center-level) and permissions over particular controllers, the administrator will first need to sign in to the operations center and creates roles and groups.
Roles are sets of configured permissions that can be assigned to groups, and they are configured from the configuration page.
Out of the box, operations center offers two options - anonymous and authenticated. For this scenario, administrators want to create 3 new roles in operations center with the following permissions:
| Role | Permissions |
|---|---|
read_role |
|
admin_role |
|
developer_role |
|
Set up operations center-level access controls
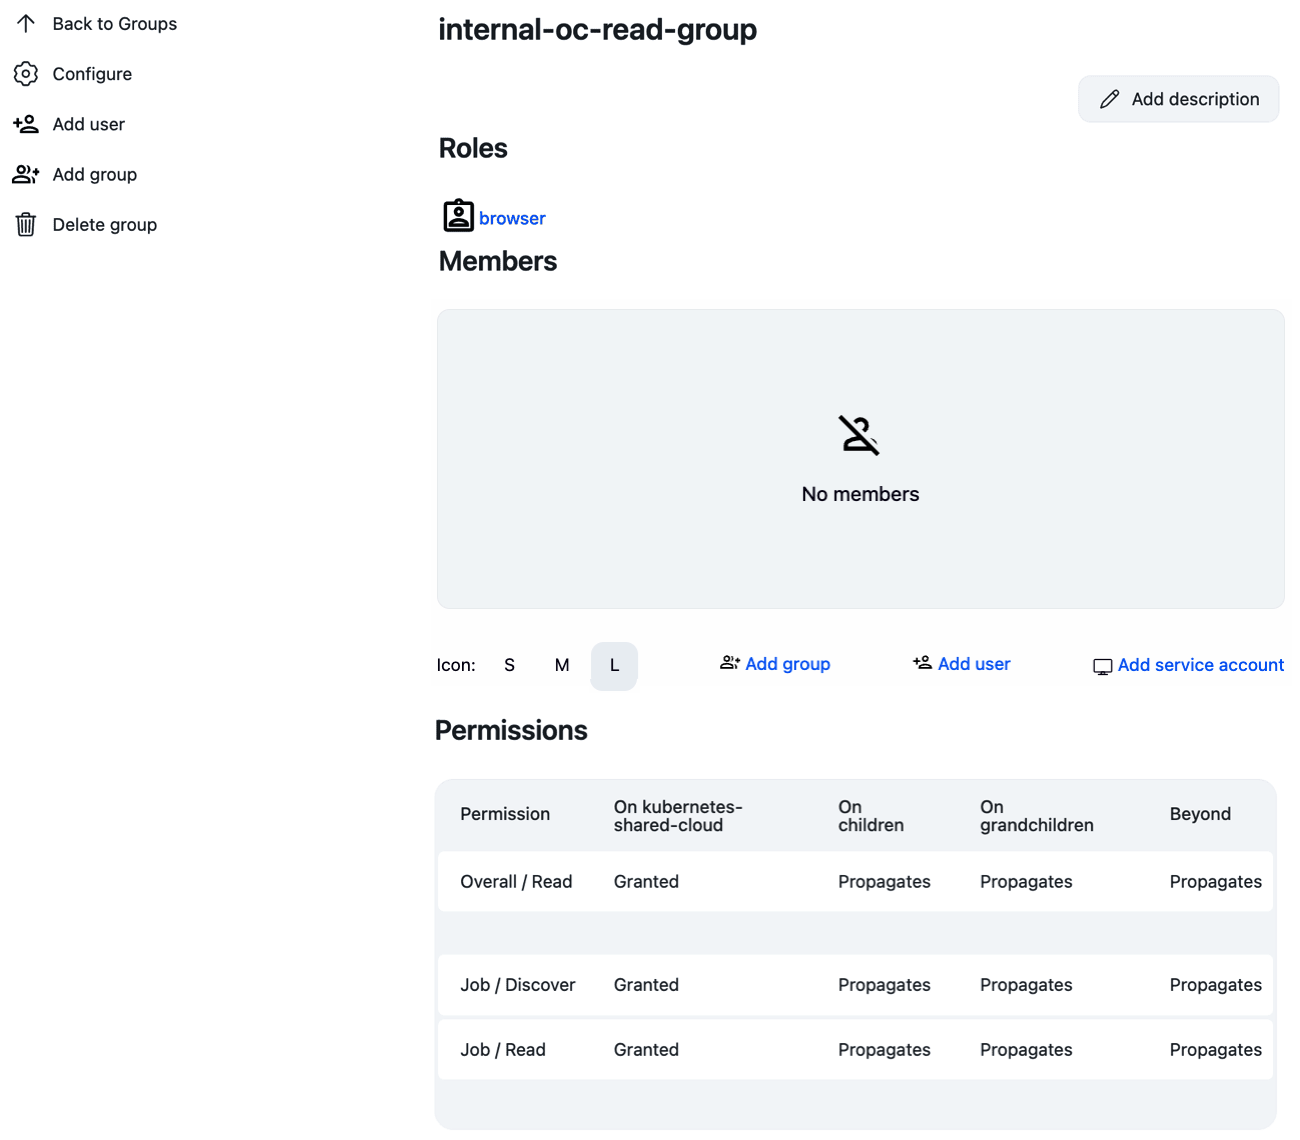
In this scenario, the administrator wants to delegate administer permissions, so the internal-oc-admin-group will be assigned the default pre-configured admin_role. All users in that group will be able to perform cluster management functions in operations center, so membership for this group should be limited to only the Admin team in this example organization. This configuration is propagated to all connected controllers, so operations center-level admins will also have Administer permissions over those controllers.
For non-admin teams, the administrator will want to prevent them from changing any configurations to the cluster in operations center, and so the administrator will need to create another group - internal-oc-read-group - and assign to that group the pre-configured read_role. Developer teams and Tester team belong in this group, as they will have limited interactions with operations center and therefore do not need any permissions above read access at the operations center-level.
To create a group from the operations center dashboard:
-
Select in the upper-right corner, and then select Groups.
-
Select New Group, and then enter the name of the group.
 Figure 18. New group
Once a group is created, administrators can assign roles, users, and service accounts to the group.
| Context | Group | Role(s) | Member(s) |
|---|---|---|---|
ROOT |
internal-oc-admin-group |
|
All the administrator(s) of the operations center instance |
ROOT |
internal-oc-read-group |
|
|
Once the administrator has added themselves to a group with the admin_role, the administrator should disable the default roles of authenticated and anonymous. The *authenticated permission includes overall administration permissions and is no longer necessary once a formal admin role exists and is assigned to an administration group.
Set up access controls on connected controllers
In this scenario, the administrator wants to limit the Developer teams’ access to only their team’s controller while giving the Tester team access to both. This configuration protects teams from unauthorized users accessing their credentials and artifacts while still empowering a trusted team to access only the resources they need. Within the controller itself, administrators can also set up specific permissions to restrict access on certain objects, such as a folder containing a "secret" internal project.
In this scenario, the administrator will configure permissions on two folders that exist on Controller-1 - the developers-team-A-folder, which will be restricted to only the developers-team-A-group as a "secret project", and another-folder, which will be accessible by everyone logged into the instance.
To achieve this, the administrator will configure the following groups and roles on the following controllers:
| Context | Group | Role(s) | Member(s) |
|---|---|---|---|
ROOT |
internal-oc-read-group |
|
|
Controller-1 |
|
|
|
Controller-1 |
|
|
|
Controller-1/developers-team-A-folder |
|
|
|
Controller-2 |
|
|
|
Once these settings are configured any member of the internal-developer-team-A-group who logs into operations center will only be able to access to the Controller-1/developers-team-A-folder.
Migrate from versions prior to 5.65
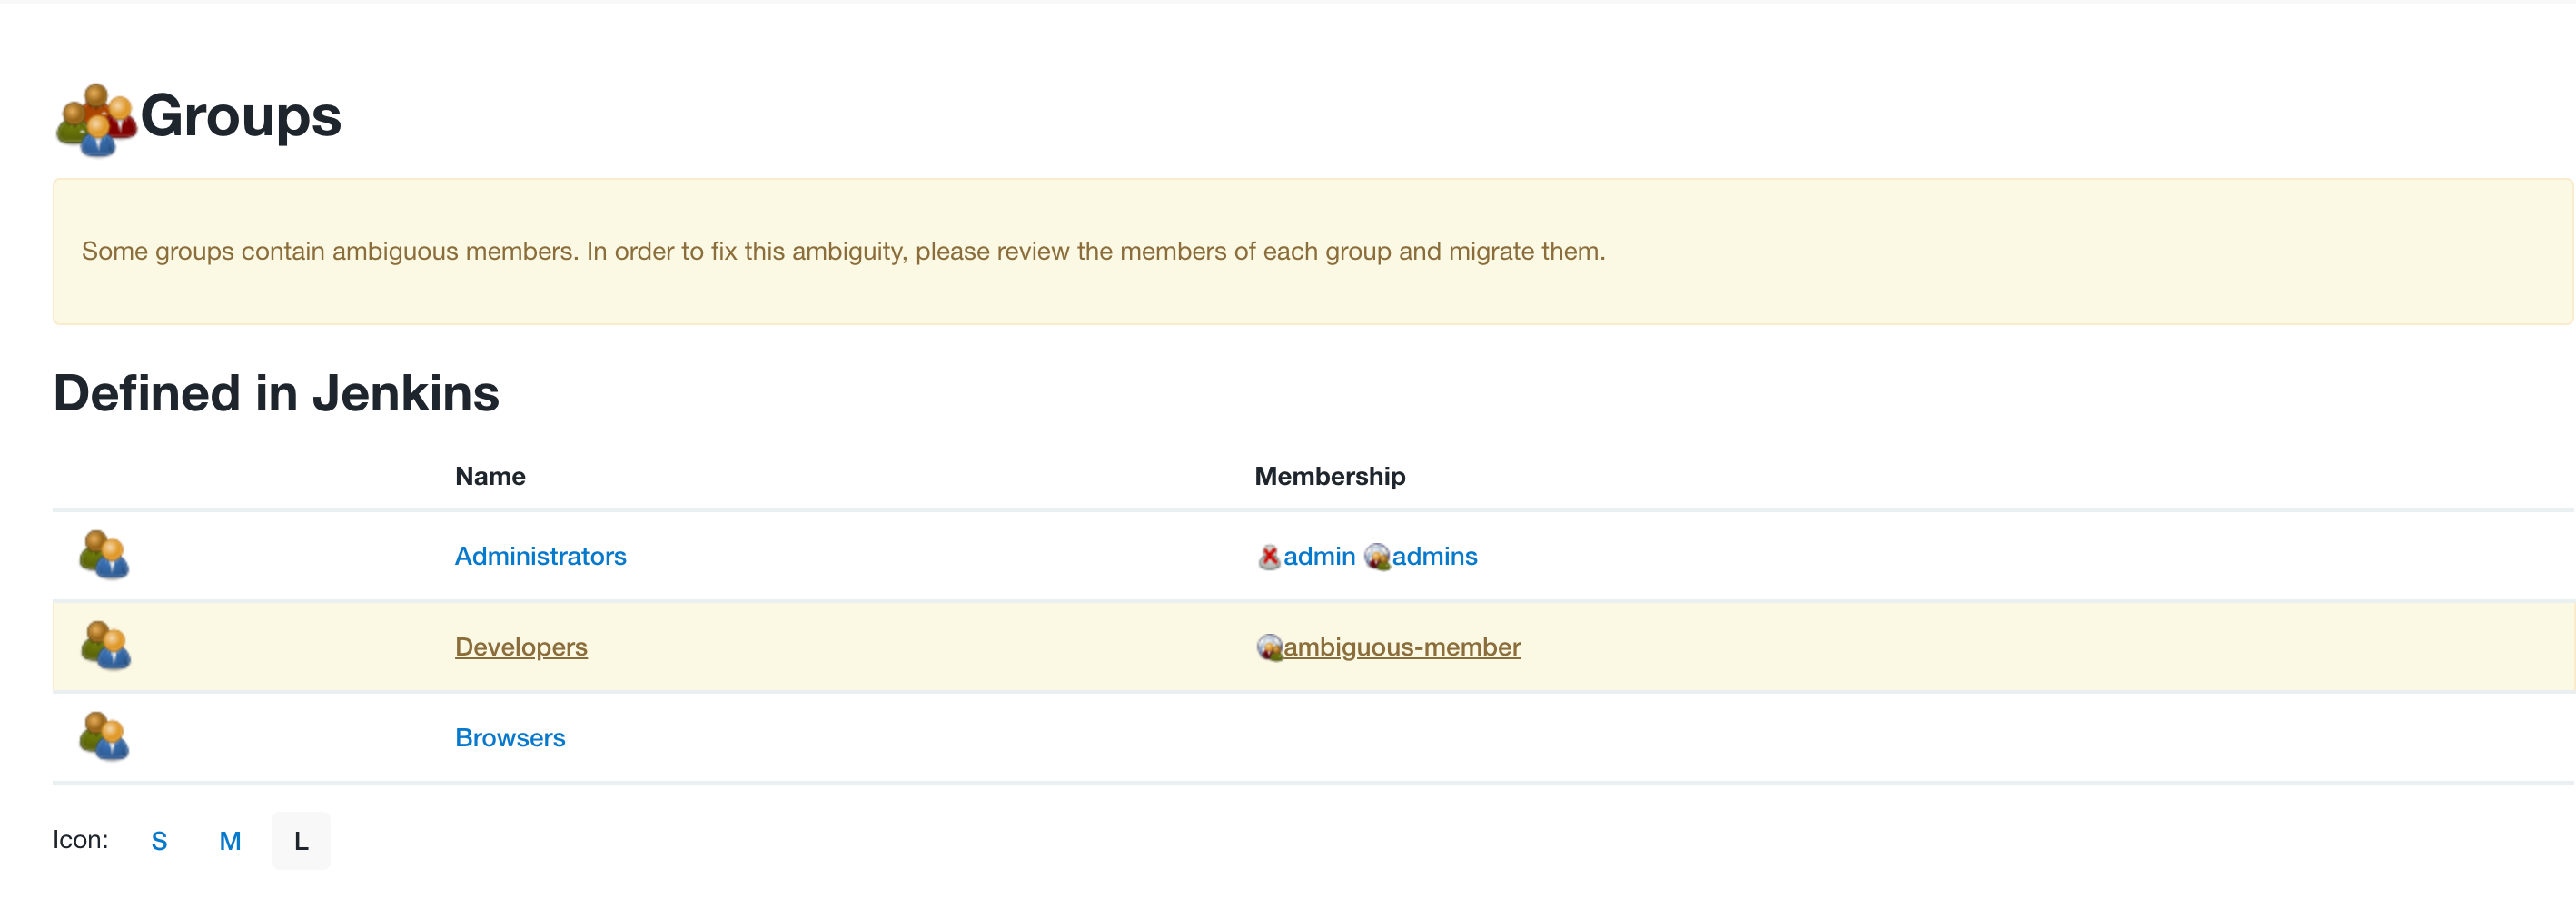
Prior to version 5.65 of the Role-Based Access Control Plugin, users were not distinguished from groups in the RBAC configuration. While it is unlikely that a user and group would be configured with the same name, there were some reported scenarios where this limitation caused misconfigurations. In version 5.65 of the Role-Based Access Control Plugin, an update was made to ensure that users and groups are now properly distinguished and validated when added.
When upgrading to CloudBees CI version 2.319.2.5 or later, any group member who could not be automatically identified as a unique user or group is highlighted as ambiguous on the Groups page.
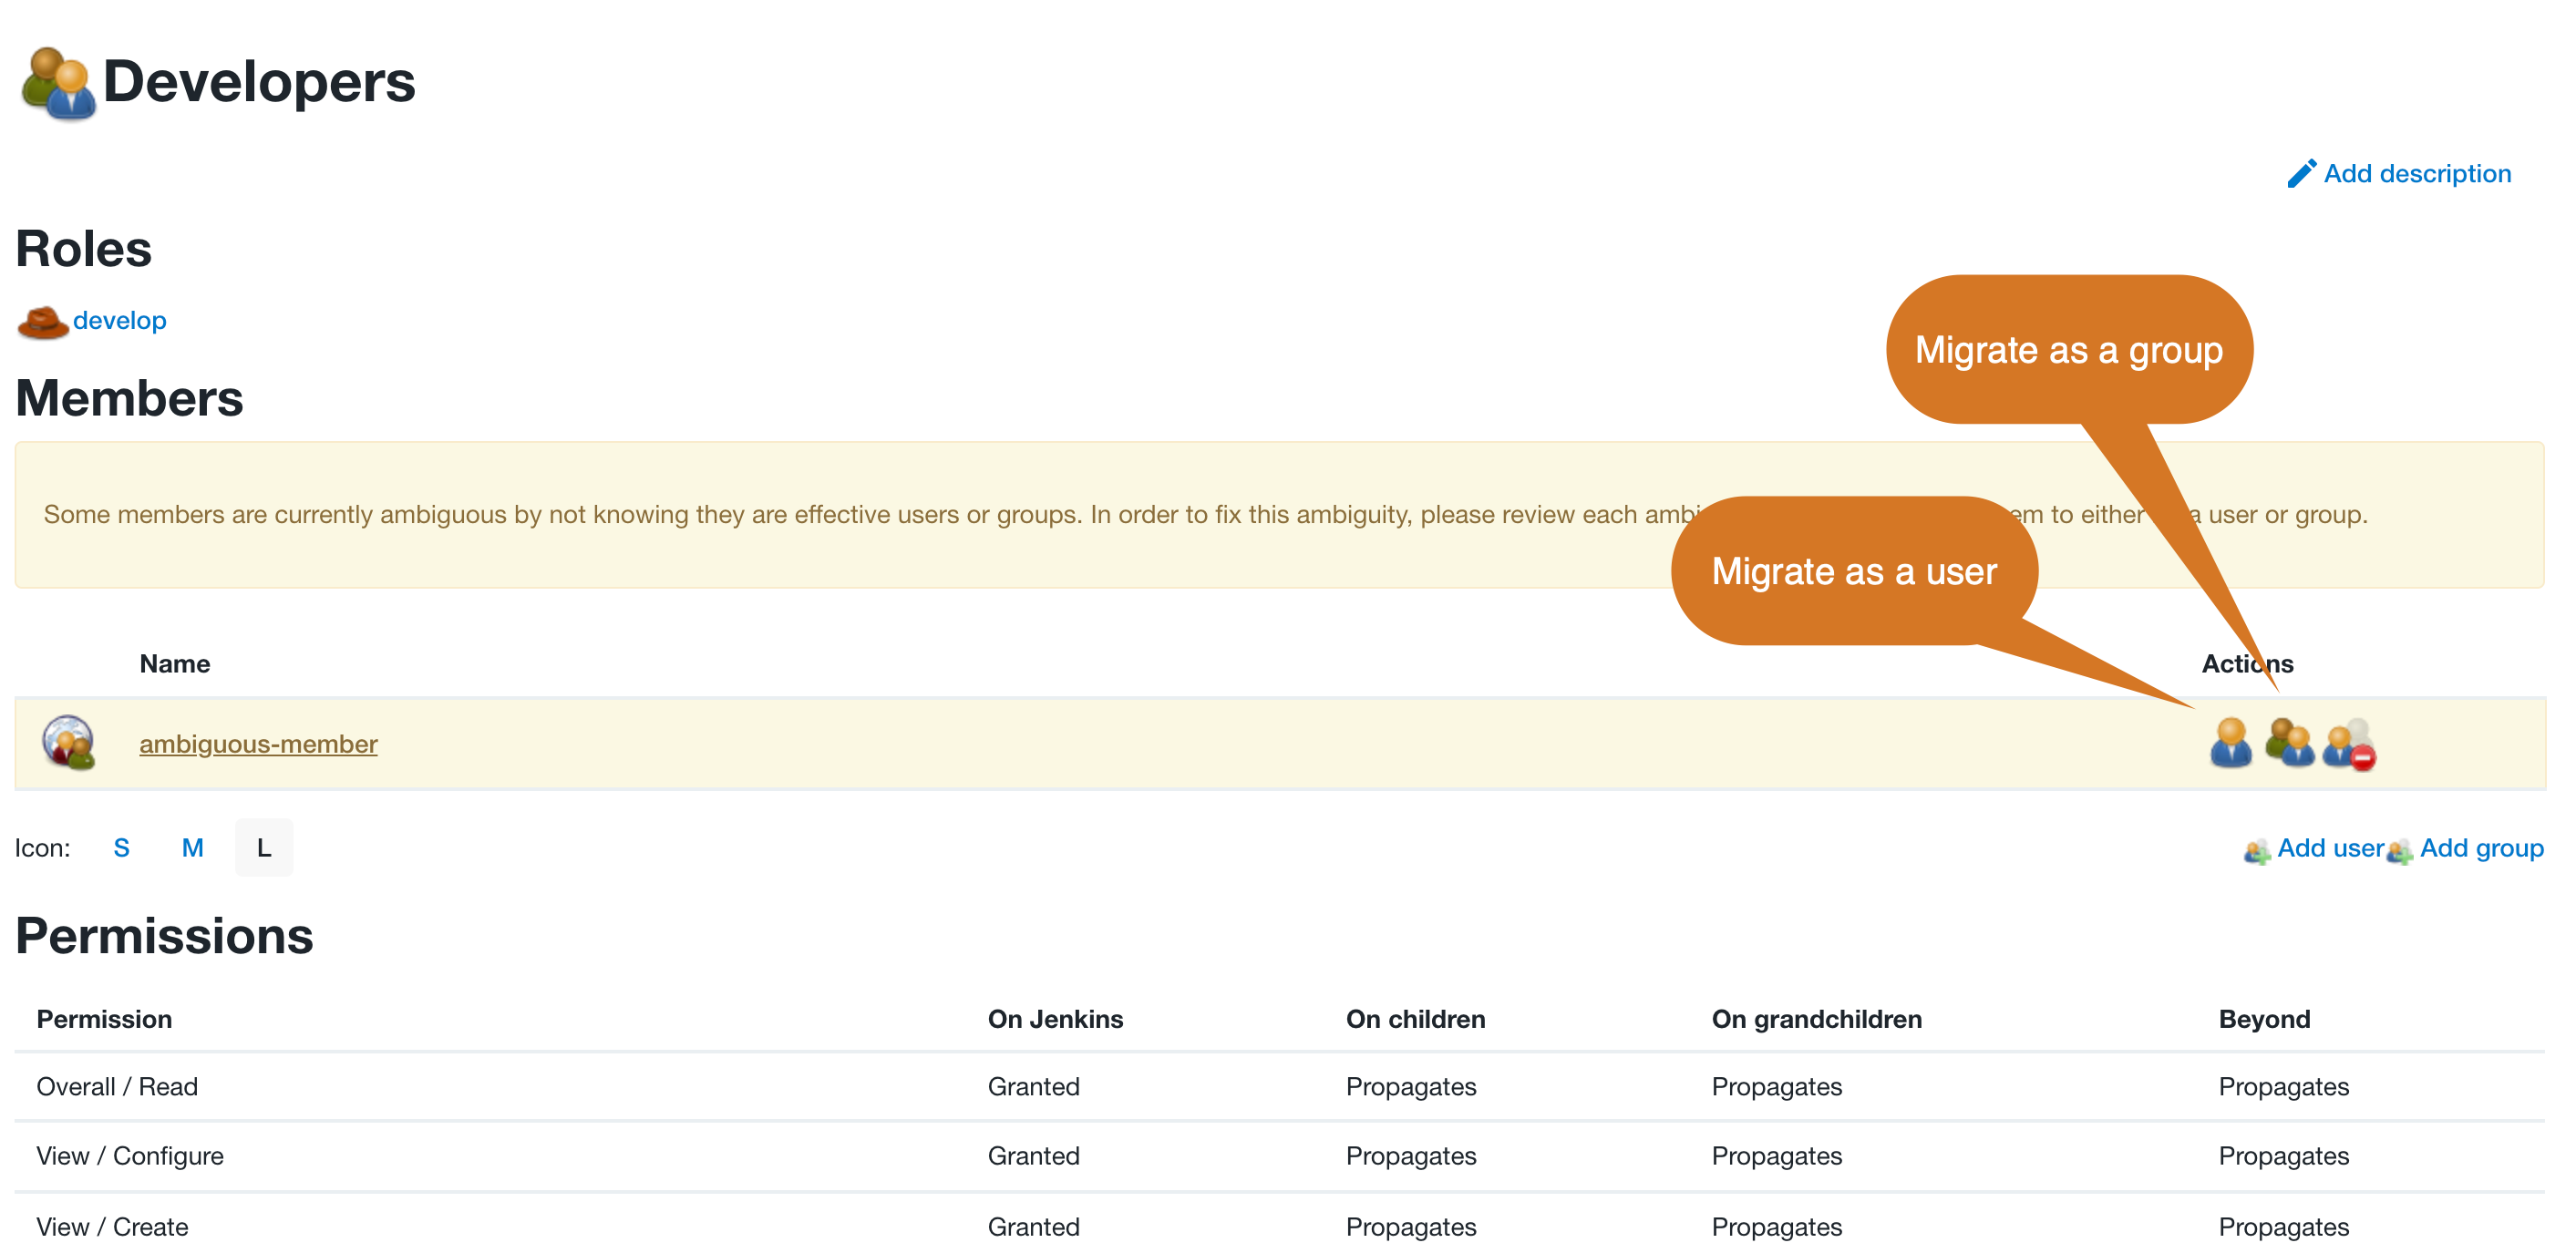
To resolve the conflicts, select the ambiguous user or group and then select either the Migrate as a user icon or the Migrate as a group icon.
Migrate from versions prior to 5.42
In version 5.42 of the Role-Based Access Control Plugin, CloudBees moved RBAC configurations from the config.xml file to a new file named nectar-rbac.xml.
Migration data is now spread across multiple plugins, and if all the plugins are not upgraded at the same time as the RBAC plugin, the RBAC migration may not be completed successfully.
If you upgrade plugins using the Beekeeper Upgrade Assistant, and you selected Allow automatic upgrades of plugins on restart, all the plugins are upgraded at the same time and the migration to version 5.42 is successful.
However, if you manually upgraded the RBAC plugin to version 5.42 without upgrading the following plugins, the upgrade may not be complete:
-
Operations center server Role-Based Access Control
-
CloudBees Update Center
-
CloudBees Template
If one or more of the plugins above was not upgraded at the same time as the RBAC version 5.42 plugin, the migration did not complete successfully. Complete the following steps to fix the migration:
-
Remove the marker file at
JENKINS_HOME/.nectar-rbac-separated-group-containers-migrated-v2. -
Install or upgrade the following plugins to the version numbers specified below:
-
Operations center Server Role-Based Access Control 2.249.0.5+
-
CloudBees Update Center 4.50+
-
CloudBees Template 4.49+
-
-
Restart CloudBees CI.
For more information or troubleshooting a specific issue, refer to RBAC migration keeps running every restart but fails to complete.
| If still having issues, refer to Required Data: RBAC issues for more information on the required data needed to open a CloudBees Support ticket. |